
Hello World,
Ubuntu 14.04 has been released on April 17th 2014 and we already released the traditional post about how to perform a fresh install. We didn’t covered the upgrade process because it’s quite easy nowadays. Basically, you will be notified that a new version is available and you will be asked if you want to upgrade to the latest version.
Some readers and some of my colleagues have been asking for a post about XRDP functionality in Ubuntu 14.04. If you follow me, you know that we have been using xrdp package in order to connect to linux machines using the built-in remote desktop client available within Windows Operating System.
You probably also know that since the introduction of Unity Desktop Interface in Ubuntu you need to tweak the configuration in order to have it working. The most annoying part while using xrdp (with Ubuntu) is the fact that you have to install an alternate desktop environment.
So, in this post, we will describe the steps needed in order to install xrdp and the xfce alternate desktop that will be used while remoting into your Ubuntu 14.04 machine.
Let’s Go !
Install XRDP Package from Ubuntu Repository
In this post, we will be installing the standard xrdp package from the Ubuntu Repository. In order to perform the installation of the xrdp package, you will login into your ubuntu 14.04 machine.
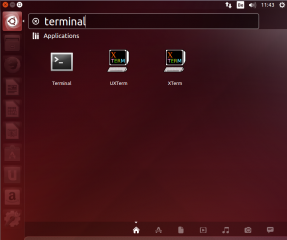
Using the Dash button, in the search box, type Terminal
Click on Picture for Better Resolution
Click on the terminal icon and the Terminal console will open
In the Terminal, type the following command
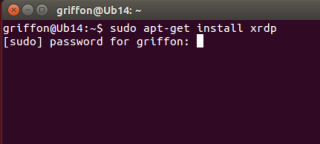
sudo apt-get install xrdp
You will be prompted for your password
Click on Picture for Better Resolution
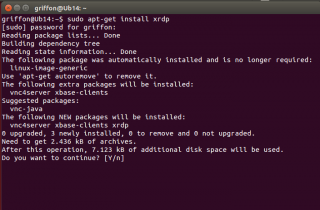
You will be then informed about the package size. To proceed with the installation, press Y
Click on Picture for Better Resolution
Wait for the completion
When done, you need to install an alternate desktop environment. In our scenario, we are using xfce4
Installing the xfce4 Desktop environment
In the Terminal console; type the following command
sudo apt-get update
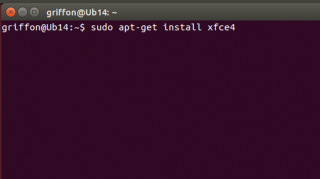
sudo apt-get install xfce4
Click on Picture for Better Resolution
You might be prompted for a password.Enter the password and press enter
You will be then informed about the package size. To proceed with the installation, press Y
Wait for the completion
Configure xrdp to use xfce desktop environment
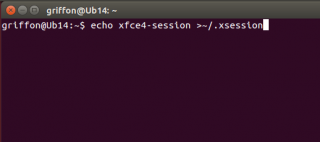
At this stage, you have to configure your Ubuntu machine in order for xrdp to know that the xfce desktop will be used instead of the Unity or Gnome (which are not working anymore in Ubuntu). To configure this, from the terminal console, you will issue the following command
echo xfce4-session >~/.xsession
Click on Picture for Better Resolution
Restart the xrdp service by issuing the following command
sudo service xrdp restart
Test your xrdp connection
At this stage, you should have a basic xrdp working solution. When I say basic, I mean that you can indeed connect to your remote Ubuntu machine but if you disconnect your session and try to connect again, you will each time open a new session. (Read below section in this post to see how you can reconnect to the same session)
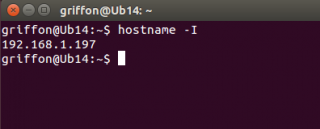
To test your xrdp solution, find the ip address of your linux machine (or use the name if you have DNS Infrastructure in place). To find the ip address, issue the command
hostname -I
Click on Picture for Better Resolution
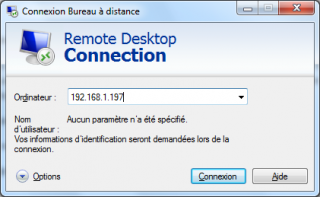
Now go to your windows machine, start remote Desktop client and enter the ip address/name of your ubuntu machine
Click on Picture for Better Resolution
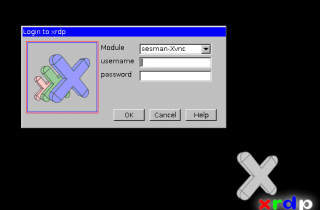
You should see then the login screen of xrdp presented to you. Note that, at this screen (and because we have not configured keyboard layout yet), the keyboard layout is set to English by default.
Click on Picture for Better Resolution
Enter your username and password and Press OK
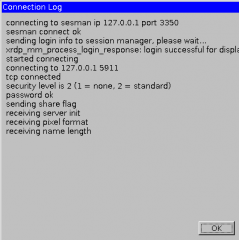
You will see a dialog box showing the login process
Click on Picture for Better Resolution
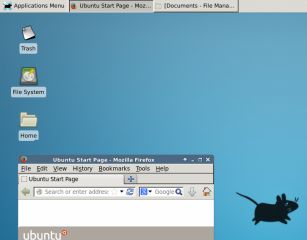
If everything is configured correctly,you should see your xfce desktop loading and you should be able to perform you work through this desktop environment.
Click on Picture for Better Resolution
To set Keyboard layout at the xrdp Login screen, perform the following steps
As explained above, with no special configuration, the xrdp login screen keyboard layout is set to english by default. if you need to change it to another keyboard layout, you should proceed with the following actions
This is the command you should issue in order to change the keyboard layout to be used during xrdp sessions…
Step 1 : You go to the /etc/xrdp directory
Step 2 : you issue the command setxkbmap -layout <%your layout%> to define which keyboard map/layout to use
Step 3 : create a copy of the km-0409.ini file into the same directory. It seems that this is the default file used by xrdp to define the keyboard layout. You will need to use sudo in order to be able to write into the directory
Step 4 : Check that you have a backup of your file by typing the dir or ls command
Step 5 : update the file by issuing the following command sudo xrdp-genkeymap km-0409.ini
Reconnect to the same session throug xrdp
You have mutliple ways to reconnect to the same session through xrdp. we have explained two of them. One method is based on performing a custom installation and use the X11VNC software. This is one is working well but requires a little bit more effort. (http://c-nergy.be/blog/?p=4168)
The other one is to use the xrdp package from ubuntu repository and tweak some configuration files whil connected to the session. This solution is really a workaround and it’s not our favourite one. (see http://c-nergy.be/blog/?p=4471)
Here, we will use a third method that can be used if you use the xrdp pakcage from the ubuntu repository. This method is much better than the one provided by us some time ago. In this method, we will tweak the xrdp login screen. We will add a field in the login box where the user can specify the port to be used when remoting to the ubuntu machine.
You will first need to edit xrdp.ini file located under the /etc/xrdp. To edit the file, issue the following command
sudo gedit /etc/xrdp/xrdp.ini
You might be prompted for a password. if this is the case, provide the password and Press enter
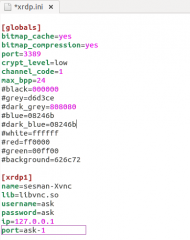
When the file is open, locate the section [xrdp1] and replace the following line
port=-1
with the line
port=ask-1
Save the file. The file should look like this
Click on Picture for Better Resolution
When done, restart the xrdp service by issuing the following command
sudo service xrdp restart.
You are done.
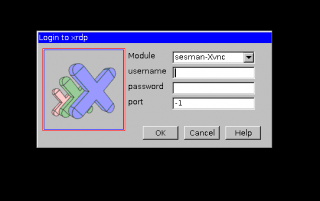
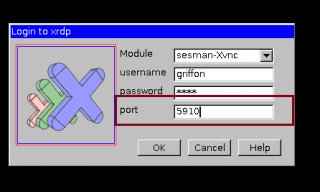
When trying to access your Ubuntu machine through via the remote desktop client, you will see that the xrdp login screen has indeed an additional field called port.
Click on Picture for Better Resolution
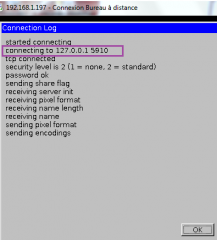
If this is your first connection, leave the default value in the port field (i.e. -1), you will be then connecting through xrdp to your ubuntu machine using a specified port that can be seen on the login process dialog box.
Click on Picture for Better Resolution
Take a note of this port.
When you need to reconnect, you will have to specify the same port as your first connection and you should see the same screen as you left it.
Click on Picture for Better Resolution
Note : This tip has been provided to us by one of our reader (Thank you Wei 🙂 )
This is it for this post. Using only the ubuntu xrdp package, we have been able to install and configure a remote access solution. By tweaking the xrdp.ini file, we even have been able to provide a simple and easy to use solution in order to reconnect to an existing session.
However, we still have a problem with xrdp used in conjunction with Ubuntu. In order to remote into your ubuntu machine, you have no other choice than using an alternate desktop environment (in our case its xfce). I find it quite irritating that we cannot have the xrdp package working with Unity or Gnome desktop environment.
We have installed fedora distribution and installed the xrdp package. And guess what ! I can connect through xrdp to fedora and have the gnome desktop environment working. Moreover, I can disconnect and when reconnecting I will be reconnecting to the existing session I just left. And all of this with no tweak in configuration files.
I would love to see the same functionality in Ubuntu. As one of our readers mentionned, it might be time for Ubuntu users to fill in a bug report about xrdp and try to have it fixed. If more and more users complains, maybe Ubuntu team will take the request into account.
Till next Time
See ya
Hello Brian,
Which operating system are you using ??? If it’s ubuntu, which Desktop environmnent are you using ?
In your xsession file, i see mention of cinnamon desktop….. are you trying to use this one as Default desktop in xrdp…
As far as I know, cinamon is not supported with XRDP because cinamon is uing 3D technology (not supported by XRDP).
waiting for your feedback
Till next time
See ya
Many many thanks. All worked as it should. Saved me half day’s work 🙂
Hey there,
always good to know that this post is working
thank you for the visit and the feedback provided
till next time
see ya
You have no idea (maybe you have) on how great this tutorial is. Unfortunately, I am unable to make it work with Windows 10 and Ubuntu 14.04. I have gone so far as to purge the installs of xrdp and xfce and reinstall everything. Still can’t get away from the grey screen. Admittedly I’m new at all this, but I CAN follow instructions. 🙂 Can you think of anything I may be missing?
Thanks.
Hello there,
I just validated the process install and it’s working for Ubuntu 14.x and 15.x and I can connect via Windows 10 rdp client.
You could have a look at this post about FAQ related to XRDP (check link http://c-nergy.be/blog/?p=5984)
What I would try……
check that I can connect from a non Windows 10 machine -> if this is not working, you have a misconfiguration issue on xrdp
have you installed alternate desktop ? (in your comment, I understood you did install xfce…)
have you populated the .xsession file with the correct infor (echo xfce4-session >~/.xsession). Note : I tend to use mate-desktop nowadays instead of the xfce desktop (have a look at http://c-nergy.be/blog/?p=7984 to see the command for mate-desktop)
restart your machine
try to connect at least two times via xrdp…
if this fails, check the xsession logs and see what’s the problem could be
You should look at the following files
~/.xsession-errors (this is the one which can give you some useful insight)
/var/log/xrdp.log
/var/log/xrdp-sesman.log
hope this help
Till next time
See ya
I’ve succeeded in getting xrdp to run – thanks as I’d been trying for quite a while and even changed distros to get it to run – but, when I attempt to login from my Windows machine the X Window starts to open and then closes.
The session logs only show that the session was terminated:
++ terminated session: username XXXXXX display :10.0, session_pid 24280, ip 192.168.X.X:56438 – socket: 7
Ubuntu 14.04 running as a VM on Hyper-V 2012 R2. I’m attempting to RDP from both Windows 7 and Windows Server 2012 R2 (the hyper-v host)
I’ve also tried to connect via TightVNC and get the message that the connection was actively refused.
Any suggestions?
Barry
Hello Barry,
Sorry for the late answer, I’m quite busy with work right now….
So you have installed ubuntu 14.04 and use the xrdp package to have remote desktop capability, right ?
have you installed the xfce desktop package or the MATE-Desktop environment (check this post to have mate installed instead of xfce if you want to – http://c-nergy.be/blog/?p=5874)
can you check your ~/.xsession-errors log files and see if you got useful error hints over there ?
when connecting through the xrdp login box, are you selecting the correct option in the dropdown box (Sesman-Xvnc)
I would try to re-install the xrdp package and instead of xfce4 try to install mate desktop and see if this can fix your issue
Hope this help
Till next time
See ya
I downloaded Ubuntu 14-04 from the CD as directd but I find no desktop. All I get is a black screen, a command screen.
Hello;
It seems that you have downloaded the UBuntu Server edition which come with a Terminal by default (and no desktop environement). Either you get the correct version of Ubuntu (Desktop) either you install a desktop environment on the machine you have installed
Hope this help
Till next time
See ya
Thanks a lot for the great tutorial! It worked for my on Win10 and Ubuntu 🙂
No Problem
Good to see that this is still working
Thank for the visit and the comments
Till next time
See ya
I follow your steps and RDP worked greatly. But when I tried to use CTRL-C and CTRL-V to copy and paste between windows and ubuntu. It did not work.
Do we have a way to do that?
Thanks so much!
Hua
Hi Griffon,
brilliant tutorial, indeed! It took me only minutes to set it up.
I just would like to add that you don’t have to enter the port each time to login to the last session. It is enough that you logout properly (not by closing the Remote Desktop Client window but from within the session manager) and the logout form allows you to choose this option by checking the “Save session for future logins” checkbox. (xfce4 version 4.10.1)
Cheers!
Good tutorial. Installed and works just fine (Win10, Ubuntu14.04). However, the at the bottom of the remote desktop page is a terminal icon (just to the right of the folder icon). When I load it, I do not get a prompt and it does not show any entered keystrokes. I can pull down the File/Edit/View/etc. menu items and they seem to work. Any ideas?
Allen
Hello Sahand,
Thank you for the feedback and the visit
Till next time
See ya
Hello There,
As far as I know the clipboard function is not working between windows and xrdp session. The clipboard function seems to work when having Linux to Linux session
We will need to check if new dev have been provided to support clipboard functionalities
Till next time
See ya
Hello Lena,
From Ubuntu 14.10, a new xrdp package is available and fix the port issue.. It will work out of the box
Please check http://c-nergy.be/blog/?p=5874
http://c-nergy.be/blog/?p=6063
http://c-nergy.be/blog/?p=6046
Thank you for the comments and the useful information
Thank for visiting our blog
Till next time
See ya
Hello Allen,
This is a known issue if you are using xfce desktop interface.. Please use a different xterm applications and you should be fine
One of our reader has suggested the following
For a not working Terminal (not XTerm), you can get it to work by: Settings -> Appearance -> Style, select style to, for example, Radiance.
The other workaround is to use the XTERM application instead of the Terminal
Till next time
See ya
Having issues with this… Can get logged in and see the desktop but whenever I go to utilize any of the applications or open a terminal, it closes out the session. Ideas?
Hello Greg,
We never encountered this kind of issue…. I’m assuming you are using xfce interface…
Can you check your xrdp logs and see if you find some errors over there (check this post to see where to find all appropriate log files http://c-nergy.be/blog/?p=5984
We would recommend you to move from xfce and install mate desktop instead and give it another try.
Let us know your findings and will try to help
Till next time
See ya
Hello!
How are you!
Problem connection
I am from Brazil (I think for this not connect, because I need change config…but where do I change?
I do it all steps. But, when I Try to connect, it give me this error:
Rdesktop Client LINUX:
connection to sesman ip 127.0.0.1 port 3350
sesman connect ok
sending login info to session manager, please wait…
xrdp_mm_process_login_response: login successful for display
startted connecting to 127.0.0.1 5910
error – problem connecting
I receive other window in linux from Error (grdesktop):
Autoselected keyboard map pt-br
X Error of failed request: BadAtom (invalid Atom Parameter)
Major opcode of failed request 23 (X_GetSelectionOwner)
Atom id in failed request: 0x0
Serial number of filed request: 12982
Current serial number in output stream: 12982
Please, Somebody can help me. I need solve this problem!
Thanks attention and help
Douglas
Hello There;
You should first have a look at the following post (http://c-nergy.be/blog/?p=5984) Check question 20 in order to locate log files that could help solving your issue.
You should also check that in the XRDP login box; you select the correct option which should be sesman-XVNC
Provide us the content of the logs and we might see what the problem is
Till next time
see ya
G’day Griffon,
Thanks for the info.
Works like a charm on ubuntu 12.
Cheers.
Joe
Hello Joe,
Thank you for the feedback
Sorry if it took us some time to answer but have been really busy for the end of this year
Till next time
See ya
Hello Griffon!
Happy new Year
Please, I want to share that I solved the keymap brazilian pt-br abnt2 on xrdp. I see that many brazillians read your site.
We use Linux Mint 17 64 bits. After install xrdp, open the file km-0409.ini (this file xrdp uses to keymap) inside of: /etc/xrdp/ After the file open, erase all keymap code from file and copy and paste the text below. Save file and restart xrdp. IT WORKS RIGHT.
Here is the site solution:
https://www.vivaolinux.com.br/topico/UbuntuBR/Problema-com-XRDP-no-Ubuntu-Teclado-ABNT2/?pagina=1
[noshift]
Key8=0:0
Key9=65307:27
Key10=49:49
Key11=50:50
Key12=51:51
Key13=52:52
Key14=53:53
Key15=54:54
Key16=55:55
Key17=56:56
Key18=57:57
Key19=48:48
Key20=45:45
Key21=61:61
Key22=65288:8
Key23=65289:9
Key24=113:113
Key25=119:119
Key26=101:101
Key27=114:114
Key28=116:116
Key29=121:121
Key30=117:117
Key31=105:105
Key32=111:111
Key33=112:112
Key34=65105:180
Key35=91:91
Key36=65293:13
Key37=65507:0
Key38=97:97
Key39=115:115
Key40=100:100
Key41=102:102
Key42=103:103
Key43=104:104
Key44=106:106
Key45=107:107
Key46=108:108
Key47=231:231
Key48=65107:126
Key49=39:39
Key50=65505:0
Key51=93:93
Key52=122:122
Key53=120:120
Key54=99:99
Key55=118:118
Key56=98:98
Key57=110:110
Key58=109:109
Key59=44:44
Key60=46:46
Key61=59:59
Key62=65506:0
Key63=65450:42
Key64=65513:0
Key65=32:32
Key66=65509:0
Key67=65470:0
Key68=65471:0
Key69=65472:0
Key70=65473:0
Key71=65474:0
Key72=65475:0
Key73=65476:0
Key74=65477:0
Key75=65478:0
Key76=65479:0
Key77=65407:0
Key78=65300:0
Key79=65429:0
Key80=65431:0
Key81=65434:0
Key82=65453:45
Key83=65430:0
Key84=65437:0
Key85=65432:0
Key86=65451:43
Key87=65436:0
Key88=65433:0
Key89=65435:0
Key90=65438:0
Key91=65439:0
Key92=0:0
Key93=65406:0
Key94=92:92
Key95=65480:0
Key96=65481:0
Key97=65360:0
Key98=65362:0
Key99=65365:0
Key100=65361:0
Key101=0:0
Key102=65363:0
Key103=65367:0
Key104=65364:0
Key105=65366:0
Key106=65379:0
Key107=65535:127
Key108=65421:13
Key109=65508:0
Key110=65299:0
Key111=65377:0
Key112=65455:47
Key113=65027:0
Key114=0:0
Key115=65515:0
Key116=65516:0
Key117=65383:0
Key118=0:0
Key119=0:0
Key120=0:0
Key121=0:0
Key122=0:0
Key123=47:47
Key124=65027:0
Key125=0:0
Key126=65469:61
Key127=0:0
Key128=0:0
Key129=0:0
Key130=0:0
Key131=0:0
Key132=0:0
Key133=0:0
Key134=65454:46
Key135=0:0
Key136=0:0
Key137=0:0
[shift]
Key8=0:0
Key9=65307:27
Key10=33:33
Key11=64:64
Key12=35:35
Key13=36:36
Key14=37:37
Key15=65111:168
Key16=38:38
Key17=42:42
Key18=40:40
Key19=41:41
Key20=95:95
Key21=43:43
Key22=65288:8
Key23=65056:0
Key24=81:81
Key25=87:87
Key26=69:69
Key27=82:82
Key28=84:84
Key29=89:89
Key30=85:85
Key31=73:73
Key32=79:79
Key33=80:80
Key34=65104:96
Key35=123:123
Key36=65293:13
Key37=65507:0
Key38=65:65
Key39=83:83
Key40=68:68
Key41=70:70
Key42=71:71
Key43=72:72
Key44=74:74
Key45=75:75
Key46=76:76
Key47=199:199
Key48=65106:94
Key49=34:34
Key50=65505:0
Key51=125:125
Key52=90:90
Key53=88:88
Key54=67:67
Key55=86:86
Key56=66:66
Key57=78:78
Key58=77:77
Key59=60:60
Key60=62:62
Key61=58:58
Key62=65506:0
Key63=65450:42
Key64=65511:0
Key65=32:32
Key66=65509:0
Key67=65470:0
Key68=65471:0
Key69=65472:0
Key70=65473:0
Key71=65474:0
Key72=65475:0
Key73=65476:0
Key74=65477:0
Key75=65478:0
Key76=65479:0
Key77=65273:0
Key78=65300:0
Key79=65463:55
Key80=65464:56
Key81=65465:57
Key82=65453:45
Key83=65460:52
Key84=65461:53
Key85=65462:54
Key86=65451:43
Key87=65457:49
Key88=65458:50
Key89=65459:51
Key90=65456:48
Key91=65452:44
Key92=0:0
Key93=65406:0
Key94=124:124
Key95=65480:0
Key96=65481:0
Key97=65360:0
Key98=65362:0
Key99=65365:0
Key100=65361:0
Key101=0:0
Key102=65363:0
Key103=65367:0
Key104=65364:0
Key105=65366:0
Key106=65379:0
Key107=65535:127
Key108=65421:13
Key109=65508:0
Key110=65299:0
Key111=65377:0
Key112=65455:47
Key113=65027:0
Key114=0:0
Key115=65515:0
Key116=65516:0
Key117=65383:0
Key118=0:0
Key119=0:0
Key120=0:0
Key121=0:0
Key122=0:0
Key123=63:63
Key124=65027:0
Key125=65513:0
Key126=65469:61
Key127=65515:0
Key128=65517:0
Key129=0:0
Key130=0:0
Key131=0:0
Key132=0:0
Key133=0:0
Key134=65454:46
Key135=0:0
Key136=0:0
Key137=0:0
[altgr]
Key8=0:0
Key9=65307:27
Key10=185:185
Key11=178:178
Key12=179:179
Key13=163:163
Key14=162:162
Key15=172:172
Key16=123:123
Key17=91:91
Key18=93:93
Key19=125:125
Key20=92:92
Key21=167:167
Key22=65288:8
Key23=65289:9
Key24=47:47
Key25=63:63
Key26=8364:8364
Key27=174:174
Key28=956:359
Key29=2299:8592
Key30=2302:8595
Key31=2301:8594
Key32=248:248
Key33=254:254
Key34=180:180
Key35=170:170
Key36=65293:13
Key37=65507:0
Key38=230:230
Key39=223:223
Key40=240:240
Key41=496:273
Key42=959:331
Key43=689:295
Key44=106:106
Key45=930:312
Key46=435:322
Key47=65105:180
Key48=126:126
Key49=172:172
Key50=65505:0
Key51=186:186
Key52=171:171
Key53=187:187
Key54=169:169
Key55=2770:8220
Key56=2771:8221
Key57=110:110
Key58=181:181
Key59=2211:0
Key60=183:183
Key61=65120:0
Key62=65506:0
Key63=65450:42
Key64=65513:0
Key65=32:32
Key66=65509:0
Key67=65470:0
Key68=65471:0
Key69=65472:0
Key70=65473:0
Key71=65474:0
Key72=65475:0
Key73=65476:0
Key74=65477:0
Key75=65478:0
Key76=65479:0
Key77=65407:0
Key78=65300:0
Key79=65429:0
Key80=65431:0
Key81=65434:0
Key82=65453:45
Key83=65430:0
Key84=65437:0
Key85=65432:0
Key86=65451:43
Key87=65436:0
Key88=65433:0
Key89=65435:0
Key90=65438:0
Key91=65439:0
Key92=0:0
Key93=65406:0
Key94=186:186
Key95=65480:0
Key96=65481:0
Key97=65360:0
Key98=65362:0
Key99=65365:0
Key100=65361:0
Key101=0:0
Key102=65363:0
Key103=65367:0
Key104=65364:0
Key105=65366:0
Key106=65379:0
Key107=65535:127
Key108=65421:13
Key109=65508:0
Key110=65299:0
Key111=0:0
Key112=65455:47
Key113=65027:0
Key114=0:0
Key115=65515:0
Key116=65516:0
Key117=65383:0
Key118=0:0
Key119=0:0
Key120=0:0
Key121=0:0
Key122=0:0
Key123=176:176
Key124=65027:0
Key125=0:0
Key126=65469:61
Key127=0:0
Key128=0:0
Key129=0:0
Key130=0:0
Key131=0:0
Key132=0:0
Key133=0:0
Key134=65454:46
Key135=0:0
Key136=0:0
Key137=0:0
[capslock]
Key8=0:0
Key9=65307:27
Key10=49:49
Key11=50:50
Key12=51:51
Key13=52:52
Key14=53:53
Key15=54:54
Key16=55:55
Key17=56:56
Key18=57:57
Key19=48:48
Key20=45:45
Key21=61:61
Key22=65288:8
Key23=65289:9
Key24=81:81
Key25=87:87
Key26=69:69
Key27=82:82
Key28=84:84
Key29=89:89
Key30=85:85
Key31=73:73
Key32=79:79
Key33=80:80
Key34=65105:180
Key35=91:91
Key36=65293:13
Key37=65507:0
Key38=65:65
Key39=83:83
Key40=68:68
Key41=70:70
Key42=71:71
Key43=72:72
Key44=74:74
Key45=75:75
Key46=76:76
Key47=199:199
Key48=65107:126
Key49=39:39
Key50=65505:0
Key51=93:93
Key52=90:90
Key53=88:88
Key54=67:67
Key55=86:86
Key56=66:66
Key57=78:78
Key58=77:77
Key59=44:44
Key60=46:46
Key61=59:59
Key62=65506:0
Key63=65450:42
Key64=65513:0
Key65=32:32
Key66=65509:0
Key67=65470:0
Key68=65471:0
Key69=65472:0
Key70=65473:0
Key71=65474:0
Key72=65475:0
Key73=65476:0
Key74=65477:0
Key75=65478:0
Key76=65479:0
Key77=65407:0
Key78=65300:0
Key79=65429:0
Key80=65431:0
Key81=65434:0
Key82=65453:45
Key83=65430:0
Key84=65437:0
Key85=65432:0
Key86=65451:43
Key87=65436:0
Key88=65433:0
Key89=65435:0
Key90=65438:0
Key91=65439:0
Key92=0:0
Key93=65406:0
Key94=92:92
Key95=65480:0
Key96=65481:0
Key97=65360:0
Key98=65362:0
Key99=65365:0
Key100=65361:0
Key101=0:0
Key102=65363:0
Key103=65367:0
Key104=65364:0
Key105=65366:0
Key106=65379:0
Key107=65535:127
Key108=65421:13
Key109=65508:0
Key110=65299:0
Key111=65377:0
Key112=65455:47
Key113=65027:0
Key114=0:0
Key115=65515:0
Key116=65516:0
Key117=65383:0
Key118=0:0
Key119=0:0
Key120=0:0
Key121=0:0
Key122=0:0
Key123=47:47
Key124=65027:0
Key125=0:0
Key126=65469:61
Key127=0:0
Key128=0:0
Key129=0:0
Key130=0:0
Key131=0:0
Key132=0:0
Key133=0:0
Key134=65454:46
Key135=0:0
Key136=0:0
Key137=0:0
[shiftcapslock]
Key8=0:0
Key9=65307:27
Key10=33:33
Key11=64:64
Key12=35:35
Key13=36:36
Key14=37:37
Key15=65111:168
Key16=38:38
Key17=42:42
Key18=40:40
Key19=41:41
Key20=95:95
Key21=43:43
Key22=65288:8
Key23=65056:0
Key24=113:113
Key25=119:119
Key26=101:101
Key27=114:114
Key28=116:116
Key29=121:121
Key30=117:117
Key31=105:105
Key32=111:111
Key33=112:112
Key34=65104:96
Key35=123:123
Key36=65293:13
Key37=65507:0
Key38=97:97
Key39=115:115
Key40=100:100
Key41=102:102
Key42=103:103
Key43=104:104
Key44=106:106
Key45=107:107
Key46=108:108
Key47=231:231
Key48=65106:94
Key49=34:34
Key50=65505:0
Key51=125:125
Key52=122:122
Key53=120:120
Key54=99:99
Key55=118:118
Key56=98:98
Key57=110:110
Key58=109:109
Key59=60:60
Key60=62:62
Key61=58:58
Key62=65506:0
Key63=65450:42
Key64=65511:0
Key65=32:32
Key66=65509:0
Key67=65470:0
Key68=65471:0
Key69=65472:0
Key70=65473:0
Key71=65474:0
Key72=65475:0
Key73=65476:0
Key74=65477:0
Key75=65478:0
Key76=65479:0
Key77=65273:0
Key78=65300:0
Key79=65463:55
Key80=65464:56
Key81=65465:57
Key82=65453:45
Key83=65460:52
Key84=65461:53
Key85=65462:54
Key86=65451:43
Key87=65457:49
Key88=65458:50
Key89=65459:51
Key90=65456:48
Key91=65452:44
Key92=0:0
Key93=65406:0
Key94=124:124
Key95=65480:0
Key96=65481:0
Key97=65360:0
Key98=65362:0
Key99=65365:0
Key100=65361:0
Key101=0:0
Key102=65363:0
Key103=65367:0
Key104=65364:0
Key105=65366:0
Key106=65379:0
Key107=65535:127
Key108=65421:13
Key109=65508:0
Key110=65299:0
Key111=65377:0
Key112=65455:47
Key113=65027:0
Key114=0:0
Key115=65515:0
Key116=65516:0
Key117=65383:0
Key118=0:0
Key119=0:0
Key120=0:0
Key121=0:0
Key122=0:0
Key123=63:63
Key124=65027:0
Key125=65513:0
Key126=65469:61
Key127=65515:0
Key128=65517:0
Key129=0:0
Key130=0:0
Key131=0:0
Key132=0:0
Key133=0:0
Key134=65454:46
Key135=0:0
Key136=0:0
Key137=0:0
Thank You
Douglas
Sorry My English!
But. I think that people can understand yeah 🙂
Thank You
Douglas
Hello, if I use this method, when I use the server locally. Do I have to stand with this ugly interface too? I.e Does this configuration totally suppress the unity/gnome session on the host computer?
Hello Ming,
No, If you login locally, you can use the Unity desktop. If you use xrdp to perform a remote desktop connection, you will need to use a different desktop environment. This post was refering to xfce desktop but you can install other desktop alternatives such as mate or kde. please check the xrdp section of the blog to find more recent articles or articles related to other desktop alternatives
Hope this help
till next time
See ya
Just wanted to say thanks for the guide.
Hello There,
Thank you for the feedback
Till next time
See ya
Hello,
I’m having a Problem with my Ubuntu xrdp connection.
I’m getting everytime after some connections to the same session this error:
“started connecting
connecting to 127.0.0.1 5911
tcp connected
security level is 0 (1 = none, 2 = standard)
error – problem connecting”
How can I fix this error?
I can login to a new session correctly but to a same session like after 24 hours I cant?
Screenshot: http://s17.postimg.org/6vwhlzxtb/rwzrtz55555.png
Hello there,
So, you can connect the first time no problem and if you try to reconnect to same session you have the issue, is this correct ?
You have to check which version of xrdp package you are using. if you have a recent one, the reconnect is available out of the box (check question 11 in this post – see http://c-nergy.be/blog/?p=5984
If this not help, we have to start looking into the log files, To find them, please have a look again in the post I mentioned above (http://c-nergy.be/blog/?p=5984).
Give it already a try and let see how far we can go…
Hope this help
Till next time
See ya
all is ok but the only problem is the firefox browser every time is crashed and i don’t find a solution to fix it??
Hello there,
I’m not sure that the xrdp installation would break your Firefox browser.
if you login locally on the machine (not using xrdp) are you having issues with Firefox or everything is ok
Do you have only the issue with Firefox Inside xrdp ?
Could you try to either update Firefox or install another browser and see if this fix the issue
Sorry for the short answer but I’m travelling a lot on heavy project..so not much time for the momennt for blogging
Hope this help
Till next time
I followed the guide and get this odd login screen with no selectable or typable text. Do you know whats going on?
here is a screenshot: https://drive.google.com/file/d/0B9BCv_-28ZfMTDV5Y1Z0TDQ4WGM/view?usp=sharing
Hello Justin,
Apparently, there is a problem with the xrdp package you are using… or you have deleted some important files related to xrdp (in /etc/xrdp/) and more specifically the /etc/xrdp/xrdp.ini file
As first step to try to fix this issue, would be to remove the xrdp package and reinstall it
sudo apt-get remove xrdp
sudo apt-get install xrdp
and see if this fix your issue
Hope this help
Till next time
Thank you!!!. I have been four hours trying to connect my mac with the raspberry Pi2 – Ubuntu Mate 15.10 and till I found your great post I was desperated.
It works perfectly.
hello,
i have an azure vm running linux and i used your tutorial to install and use the desktop environment.
i was working fine until today when i tried to login using RDC i got the error “xrdp_mm_process_login_response: login failed”
i can still access the server by SSH
i checked the logs i got ” X server — no display in range is available”
i followed a tutorial and allow max number connections from 10 to 100
however now the RDC isn’t even starting .. im getting remote access is turn off!
i used telnet on port 3389 to test and i got connection refused
the endpoints are allowed on the azure portal and ufw is innactive.
can you help?
Hi there, thanks for the nice article.
xrdp works nice on Ubuntu 14.04. I use it when loggin in from a Windows 7 Professional machine.
However, each time I log on and off, it leaves an idle process in Ubuntu.
You can check this with
ps -ef|grep vnc
After loggin in about ten times or so, the logon does not work anymore.
Killing the idle processes gets rid of the problem and logon works again.
This is not fun.
Do you have an alternative?
Thanks and best regards,
Martin
Hello Jose,
Thank you for the feedback and sharing your experience with raspberry pi2.
Till next time
See ya
Hello Martin,
which version of xrdp package are you using ? If you are using 0.6.0-1, you might indeed encounter this issue.. We have performed some tests with UBuntu 16.04 (beta) and xrdp. The xrdp package that is included with ubuntu 16.04 is the version 0.6.1-2. This version kill properly the process when you logout from your system. This version of the package also handle correctly the xrdp processese when we disconnect from the machine. If we reconnect, the same running process will be re-used.
Option 1 – I would say try to ugprade your xrdp package if you are using an older version
Option 2 – another workaround that some people have used consists of modifying the number of session in the file sesman.ini. If you look for the line MaxSessions, you see the default value is set to 10. If you increase that to 100, you can have a little bit more flexibility
Option 3 – Some user mentioned already the issue and provided a script solution to clean up the processes. Have a look at this post http://c-nergy.be/blog/?p=4242 in the comment section (look for episkopos)
Whatever the option you are choosing, please share with us so we can propagate information to others
Hope this help
Till next time
See ya
Hello There,
I have no idea so far.
If you cannot access port 3389 using telnet, it seems indeed that xrdp is either not running or a misconfiguratio happen…
Revert back your changes (from 100 to 10) and restart the service -> is this fixing your issue ?
Which version of ubuntu are you using ? Check that xrdp service is running first (sudo service xrdp status or sudo systemctl status xrdp) ?
Remove Re-install xrdp and check again ?
Check all the logs file related to xrdp and try to provide us a little bit more info
hope this help
till next time
See ya
Hi Griffon
I love your blog about xrdp! I tried to do this port thing now, but I get an error:
“Error – Problem connecting”. It ONLY appears if I set the port from -1 to something else, otherwise everything works flawlessly. I do it in my local network, so it’s not a port-forwarding problem.
I hope you have a tip for me, thanks for your work here! 🙂
Hello Raffi,
Thank you for the positive feedback 🙂
Before trying to figure out what could be your problem, you should review the following options when installing xrdp because newer packages makes things easier
Option 1 – perform a custom install of xrdp (and you be reconnecting automatically to the existing xrdp session). Using the script provided, this should be really easy. see http://c-nergy.be/blog/?p=5971http://c-nergy.be/blog/?p=5971
Option 2 – Upgrade your Ubuntu system from 14.04 to a higher version (because later version of Ubuntu includes a xrdp package that support reconnections of xrdp session out of the box). see http://c-nergy.be/blog/?p=6046
Option 3 – Try to install the xrdp package found in Ubuntu 14.10 and later (version 0.6.1-xx) and install it on your Ubuntu 14.04 and see if this could fix your issue
For your problem, are you using port range from 5910 and higher ?
till next time
See ya
If you set up xrdp to re-use sessions, then it appears you can’t log out, because the port will be tied to a screen with no xfce4 session. So the port stays in use. You then have to kill xvnc to get the session back. Is there a way to find the processes using a given display, short of looking in /proc/[pid]/environ and looking for the DISPLAY variable?
Hello John,
We would recommend you to either perform a custom installation (see Ubuntu 14.04 – Perform a custom XRDP Install (using X11VNC) so you do not have the issue about logout process.
You can also move to a newer Ubuntu version 14.10 and later which offer a new xrdp package that allow you to reconnect to existing session out-of-the-box (see XRDP – Reconnect to existing sessions made easier – New xrdp package on Ubuntu repository or try to obtain the new xrdp package and install it on your ubuntu 14.04 machine
Hope this help
Till next time
Good, nice tutorial. I follow your tutorial and now i succes acces my vps on desktop 🙂
Hello there,
Thank you for your visit and the positive feedback. Thank you for sharing your experience with our readers
Till next time
See ya
This is really simple and straight forward guide. I like this kind of fail-proof guides which anyone can follow.
@Ramesh
Thank you for the visit and the positive feedback
Till next time
See ya