
Hello World;
Today again, we will speak about xrdp on ubuntu.
Overview
In our blog, we have already discussed how you could reconnect to the same xrdp session. You can find detailed instructions on how to reconnect to the same xrdp session
Recently, one of our reader encountered an issue with the described procedure. Because of this error, the user rollback to the standard installation process of xrdp software. So, in its case; the user installed an alternative desktop to be used with Xrdp (gnome-fallback,xfce,lxde…) and simply install the xrdp package from the Ubuntu repositories.
Everything was working as expected. The main drawback with the standard package is that each time you perform a remote desktop to your xrdp server; a new session was created. We scratched our head a little bit and we actually found out that a simple configuration change could allow users to reconnect to the same session while still using the default xrdp package from ubuntu repository.
This approach is not as good as the one described in this post but provide a good workaround if you simply want to use the default xrdp package available in the official repository.
Step by Step Installation Process
For this post, we assume that you are using Ubuntu 13.10. A detailed description on how to install the xrdp package on ubuntu 13.10 has been described here. In this post, we will simply outline the necessary steps to be performed in order to be able to reconnect to same session while using the standard xrdp ubuntu package.
In this post, we will perform the installation process using command line (really fast)
Step 1 – Login into your Ubuntu machine
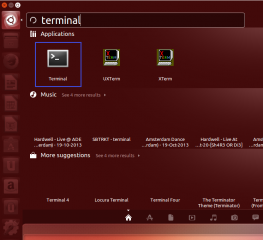
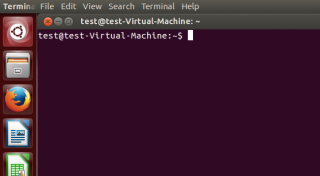
Step 2 – Using the Dash, search for Terminal. Click on the Terminal icon
Click on Picture for Better Resolution
Click on Picture for Better Resolution
Step 3 – In the terminal window, type the following command to install the xrdp package. You might get prompted for a password
sudo apt-get install xrdp
Step 4 – then in the terminal session; issue the following command to install the xfce interface
sudo apt-get update
sudo apt-get install xfce4
Step 5 – Wait for action to complete. When Done, you have to configure your xsession. In the terminal, type the following command
echo xfce4-session >~/.xsession
Step 6 – Restart the xrdp service by issuing the following command
sudo service xrdp restart
At this stage, you should be able to connect to your Ubuntu machine using remote desktop client. However; given that we have performed a standard configuration, if you disconnect from your session; the next time you will reconnect you create a new session. We need to perform an additional configuration change in order to reconnect to the existing session.
Implementing the workaround
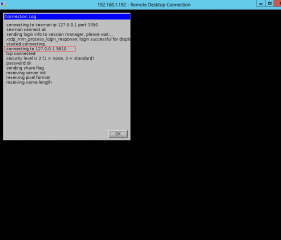
You will need to perform at least one remote desktop connection to your ubuntu machine. When you perform this connection, you will connect through a specific port. You can find the value of the part when your perform your first connection. (see screenshot below)
Click on Picture for Better Resolution
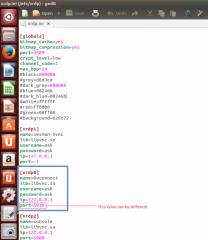
Because it’s the first time we perform a connection, we are connect to the default port 5910 used by the xrdp software (see screenshot above). If you have made multiple connections already, the value for this port will be different. In order to reconnect to the existing session, we will need to update the /etc/xrdp/xrdp.ini file. We have created a new section in the file (called [xrdp8]) which looklike :
[xrdp8] name=Reconnect lib=libvnc.so username=ask password=ask ip=127.0.0.1 port=5910So, our /etc/xrdp/xrdp.ini file looks like this now
Click on picture for Better resolution
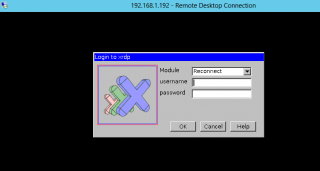
You normally does not need to restart the xrdp the service in order to have the configuration changes applied to your system. If you disconnect from your session and needs to reconnect to your existing session, you would select the option Reconnect in the xrdp dropdown menu.
Click on picture for Better Resolution
And voila, you should be able to reconnect to the session you were connected to and resume your work.
Final Notes
In this post, we have described how a user could reconnect to an existing session while using the standard xrdp package found in the ubuntu repository. This is not the best option to reconnect to your existing session. We have basically implemented a small workaround to achieve our goal. You will need to perform an initial remote desktop connection. You will then need to identify the port used by the session. Finally, you need to modify your xrdp.ini file in order to reconnect to your session. The good thing is yes, you can reconnect to your existing session. The drawback of this approach is that you can use it for a limited set of users… You wouldn’t populate your xrdp.ini file with hundreds of entries for each users that connects to your xrdp server.
Till next time
See ya
Hi!
Thanks for your great instructins! But, I’m using Ubuntu 13.10 and I did exactly as you said, but still I cannot connect to the same desktop. I thought that this way I could see exactly the same screen with same applications open that I see in my Ubuntu’s own screen, but when I use this method to connect it thru Windows Remote Desktop, I always get an empty Ubuntu desktop. What could cause this problem..?
With best regards,
Jari
Hello Jari,
First issue I see is that you have an empty desktop while connecting to your desktop via Remote desktop. So, Xrdp does not support unity and you have to define a alternate desktop solution (xfce is the best one for Ubuntu 13.10) – Please be sure to review this post http://c-nergy.be/blog/?p=4448
Second point – xrdp will not connect to the “console” you see on your desktop while logged on ubuntu. When using xrdp software, you are creating
a new session. The point of this post is that you can reconnect to the same session and not on the console access you have on your ubuntu machine.
There might be a way to connect to the console via xrdp but so far I didn’t find one.
Hope this help
Till next time
See ya
Hi,
Thanks for your tip. It really helps me solve the problem.
Based on your tip, I use a simper solution by changing the port of [xrdp1] to
port=ask-1
Then the port field will appear on the login window. If user remembered the port number of his last session, he can change -1 to that number, then connect to last session.
Regards,
Wei
hey Wei,
thank you for the tip..We will try this out
till next time
see ya
It doesn’t work for Ubuntu 14.04 in VM. I have one in VirtualBox and one in Hyper-V and both gives blank screen with gray lines. .xsession-errors give (sorry for the verbose output):
Xsession: X session started for at Mon May 12 22:24:55 2014
X Error of failed request: BadValue (integer parameter out of range for operation)
Major opcode of failed request: 109 (X_ChangeHosts)
Value in failed request: 0x5
Serial number of failed request: 6
Current serial number in output stream: 8
localuser:user1 being added to access control list
X Error of failed request: BadValue (integer parameter out of range for operation)
Major opcode of failed request: 109 (X_ChangeHosts)
Value in failed request: 0x5
Serial number of failed request: 6
Current serial number in output stream: 8
Script for ibus started at run_im.
Script for auto started at run_im.
Script for default started at run_im.
Script for ibus started at run_im.
Script for auto started at run_im.
Script for default started at run_im.
xfce4-session-Message: ssh-agent is already running
(xfwm4:712): xfwm4-WARNING **: The display does not support the XRender extension.
(xfwm4:712): xfwm4-WARNING **: The display does not support the XComposite extension.
(xfwm4:712): xfwm4-WARNING **: The display does not support the XDamage extension.
(xfwm4:712): xfwm4-WARNING **: The display does not support the XFixes extension.
(xfwm4:712): xfwm4-WARNING **: Compositing manager disabled.
** (polkit-gnome-authentication-agent-1:728): WARNING **: Unable to register authentication agent: GDBus.Error:org.freedesktop.PolicyKit1.Error.Failed: An authentication agent already exists for the given subject
Cannot register authentication agent: GDBus.Error:org.freedesktop.PolicyKit1.Error.Failed: An authentication agent already exists for the given subject
No window manager registered on screen 0. To start the xfdesktop without this check, run with –disable-wm-check.
** (xfce4-volumed:789): WARNING **: Binding ‘XF86AudioRaiseVolume’ failed!
** (xfce4-volumed:789): WARNING **: Binding ‘XF86AudioRaiseVolume’ failed!
** (xfce4-volumed:789): WARNING **: Binding ‘XF86AudioRaiseVolume’ failed!
** (xfce4-volumed:789): WARNING **: Failed to map virtual modifiers
** (xfce4-volumed:789): WARNING **: Binding ‘XF86AudioRaiseVolume’ failed!
** (xfce4-volumed:789): WARNING **: Binding ‘XF86AudioRaiseVolume’ failed!
** (xfce4-volumed:789): WARNING **: Binding ‘XF86AudioRaiseVolume’ failed!
** (xfce4-volumed:789): WARNING **: Failed to map virtual modifiers
** (xfce4-volumed:789): WARNING **: Binding ‘XF86AudioRaiseVolume’ failed!
** (xfce4-volumed:789): WARNING **: Failed to map virtual modifiers
** (xfce4-volumed:789): WARNING **: Failed to map virtual modifiers
** (xfce4-volumed:789): WARNING **: Failed to map virtual modifiers
** (xfce4-volumed:789): WARNING **: Binding ‘XF86AudioRaiseVolume’ failed!
** (xfce4-volumed:789): WARNING **: Failed to map virtual modifiers
** (xfce4-volumed:789): WARNING **: Failed to map virtual modifiers
** (xfce4-volumed:789): WARNING **: Failed to map virtual modifiers
** (xfce4-volumed:789): WARNING **: Binding ‘XF86AudioLowerVolume’ failed!
** (xfce4-volumed:789): WARNING **: Binding ‘XF86AudioLowerVolume’ failed!
** (xfce4-volumed:789): WARNING **: Binding ‘XF86AudioLowerVolume’ failed!
** (xfce4-volumed:789): WARNING **: Failed to map virtual modifiers
** (xfce4-volumed:789): WARNING **: Binding ‘XF86AudioLowerVolume’ failed!
** (xfce4-volumed:789): WARNING **: Binding ‘XF86AudioLowerVolume’ failed!
** (xfce4-volumed:789): WARNING **: Binding ‘XF86AudioLowerVolume’ failed!
** (xfce4-volumed:789): WARNING **: Failed to map virtual modifiers
** (xfce4-volumed:789): WARNING **: Binding ‘XF86AudioLowerVolume’ failed!
** (xfce4-volumed:789): WARNING **: Failed to map virtual modifiers
** (xfce4-volumed:789): WARNING **: Failed to map virtual modifiers
** (xfce4-volumed:789): WARNING **: Failed to map virtual modifiers
** (xfce4-volumed:789): WARNING **: Binding ‘XF86AudioLowerVolume’ failed!
** (xfce4-volumed:789): WARNING **: Failed to map virtual modifiers
** (xfce4-volumed:789): WARNING **: Failed to map virtual modifiers
** (xfce4-volumed:789): WARNING **: Failed to map virtual modifiers
** (xfce4-volumed:789): WARNING **: Binding ‘XF86AudioMute’ failed!
** (xfce4-volumed:789): WARNING **: Binding ‘XF86AudioMute’ failed!
** (xfce4-volumed:789): WARNING **: Binding ‘XF86AudioMute’ failed!
** (xfce4-volumed:789): WARNING **: Failed to map virtual modifiers
** (xfce4-volumed:789): WARNING **: Binding ‘XF86AudioMute’ failed!
** (xfce4-volumed:789): WARNING **: Binding ‘XF86AudioMute’ failed!
** (xfce4-volumed:789): WARNING **: Binding ‘XF86AudioMute’ failed!
** (xfce4-volumed:789): WARNING **: Failed to map virtual modifiers
** (xfce4-volumed:789): WARNING **: Binding ‘XF86AudioMute’ failed!
** (xfce4-volumed:789): WARNING **: Failed to map virtual modifiers
** (xfce4-volumed:789): WARNING **: Failed to map virtual modifiers
** (xfce4-volumed:789): WARNING **: Failed to map virtual modifiers
** (xfce4-volumed:789): WARNING **: Binding ‘XF86AudioMute’ failed!
** (xfce4-volumed:789): WARNING **: Failed to map virtual modifiers
** (xfce4-volumed:789): WARNING **: Failed to map virtual modifiers
** (xfce4-volumed:789): WARNING **: Failed to map virtual modifiers
(process:779): Indicator-Power-WARNING **: Fail to query backlight devices.
(xfsettingsd:795): xfsettingsd-CRITICAL **: RANDR extension is too old, version 1.1. Display settings won’t be applied.
Xlib: extension “XInputExtension” missing on display “:12.0”.
(xfsettingsd:795): xfsettingsd-CRITICAL **: XI is not present.
(xfsettingsd:795): xfsettingsd-CRITICAL **: Failed to initialize the Xkb extension.
(xfsettingsd:795): xfsettingsd-CRITICAL **: Failed to initialize the Accessibility extension.
(xfsettingsd:795): GLib-CRITICAL **: g_str_has_prefix: assertion ‘prefix != NULL’ failed
** (process:785): CRITICAL **: bluez.vala:104: GDBus.Error:org.bluez.Error.NoSuchAdapter: No such adapter
** (process:750): CRITICAL **: volume_control_set_volume_internal: assertion ‘_tmp1_ == PA_CONTEXT_READY’ failed
(zeitgeist-datahub:769): GLib-GObject-WARNING **: invalid (NULL) pointer instance
(zeitgeist-datahub:769): GLib-GObject-CRITICAL **: g_signal_connect_data: assertion ‘G_TYPE_CHECK_INSTANCE (instance)’ failed
Failure: Module initialization failed
** (process:750): CRITICAL **: file /build/buildd/indicator-sound-12.10.2+14.04.20140401/obj-i686-linux-gnu/src/volume-control.c: line 1775: uncaught error: GDBus.Error:org.freedesktop.DBus.Error.InvalidArgs: No such interface (g-dbus-error-quark, 16)
(xfwm4:712): GLib-CRITICAL **: g_str_has_prefix: assertion ‘prefix != NULL’ failed
(xfwm4:712): xfwm4-WARNING **: The property ‘/general/double_click_distance’ of type int is not supported
Error creating proxy: Error calling StartServiceByName for org.gtk.vfs.Daemon: Timeout was reached (g-io-error-quark, 24)
(xfsettingsd:795): GVFS-CRITICAL **: fill_mountable_info: assertion ‘proxy != NULL’ failed
hello there,
we didn’t encouter the issue but we will have a look in ubuntu 14.04. In the mean time, can you try the tip described in the following post http://c-nergy.be/blog/?p=5305 in the section reconnecting to the same session.
If this is still not working, you might have an issue with your xfce package
Hope this help
Till next time
problem
okay,
so what’s the problem ?
You are the best! Thank you very much!
It worked perfect!
hello there,
Thank you for the feedback and your visit. We are glad to see that this is still providing good support to our readers
Till next time
See ya
I have Ubuntu 14.04 installed and have managed to setup XRDP so I can remote desktop to it from Windows, everything works except that I cannot logout of a remote session, when I choose logout from the icon in the top right corner the desktop clears with just the XCFE4 rodent wallpaper displayed but the session remains.
Hello Amid,
First comment
If you are using Ubuntu 14.04, you should have looked for posts related to Ubuntu 14.04 and xrdp….
check http://c-nergy.be/blog/?p=5382 to use mate-desktop or http://c-nergy.be/blog/?p=5305 if you want to use xfce
If you upgrade to 14.10, you will have even a better experience as the xrdp package has been updated (http://c-nergy.be/blog/?p=6046)
Second comment about your problem
If the xrdp package is “old”, yes, you might have this kind of side effects. The logout button is not working or shutdown is not working. To workaround this, we use the Terminal session
in the Terminal type xfce4-session-logout or xfce4-session-logout –logout and you will be able to logout. Similar problems were already reported in Ubuntu 12.10 (http://c-nergy.be/blog/?p=3518)
Hope this help
Till next time
See ya
The solutions works great!! You saved me!!! Thanks a lot!!!!!!
Hello there,
Thank you for visiting our blog and sharing your feedback
We are always happy when a post can be really useful to the community
Till next time
See ya
Hi,
I had connected to the 14.04 LTE desktop from Win7 successfully by following your guide. But I don’t know why it failed suddenly . It can not initialize the remote connection.
Any idea?
Thanks in advance
Hello Mai,
I have no clue at the moment. We might need to find a little bit more info through the logs files
You should look at the following files
~/.xsession-errors
/var/log/xrdp.log
/var/log/xrdp-sesman.log
and see if there is any useful information that could help in debugging/investigating the issue you are experiencing
Hope this help
Till next time
See ya
Hi nice how to works well but am using xubuntu 14.04 and when i try to edit xrdp.ini am getting permission denied am not to good with linux os can anyone help me out how would i edit the xrdp.ini for the reconnect to your existing session
@Jesus,
if you are trying to open the file using the Graphical interface, you will indeed have a permission issue.
To keep it simple, open a Terminal console and type sudo gedit
You will be prompted for a password.
Provide your password and the text editor will open (with admin rights). click on open and go to the /etc/xrdp location and edit the file you need to modify
Save it
and you should be good to go
Till next time
See ya
Thanks! Worked great on my Debian 7 system and using KRDC as the client.
Worked great… This was such a pain as I kept losing my previous sessions. You saved me from losing progress in the future. Thank you, great write up by the way. I love the format of your documentation.
@Niko P,
Thank you for your visit and your positive feedback… We probably do not publish a lot of posts but as you have noticed we are trying to provide good quality documentation….:-)
Thank you for the positive feedback
Till next time
See ya