
Hello World,
This post will be quite short also. Since Ubuntu 14.10 is on its way, we need to update our posts about custom installation of xrdp on Ubuntu 14.10 in order to validate that the process still works. If you are a regular reader of this blog, you know that our xrdp posts are quite popular and that we have already provided information about how to perform a custom installation. If you have a different Ubuntu version, you can have a look at the following posts :
- Ubuntu 14.04 – Perform a custom XRDP Install (using X11VNC)
- Xrdp Tip – How to reconnect to the “same” remote session
- How to customize xrdp install & login screen on Ubuntu 12.10 – Part I
In this post, we will check that the process is still valid for Ubuntu 14.10 in order to ensure that the new release of the Operating System do not break anything in the described process.
So, Let’s go !
Why a custom installation ?
Now, you should know why we are performing a custom installation. If you are using the default xRDP package available from Ubuntu repository, you will not be able out of the box to reconnect to the same session. You will need to tweak some configuration files to enable this. Moreover, the user experience is not that good (see our posts : http://c-nergy.be/blog/?p=4471, http://c-nergy.be/blog/?p=5382 – Check the section reconnecting to the same session/see http://c-nergy.be/blog/?p=4168 / http://c-nergy.be/blog/?p=4242).
We perform a custom installation because this allow us to reconnect to the same session without modifying any configuration file. Once the installation is completed, by default a user will always reconnect to the same session. This is a more suitable situation for our users. The custom installation might seems difficult but in fact it’s not that difficult.
We are providing a installation script to perform the installation. Because we have already explained, the different steps in our previous post (check this one –Ubuntu 14.04 – Perform a custom XRDP Install (using X11VNC)), in this post, we will simply run the xrdp-install.sh script and see if the process is still valid.
Important Update
With the release of Ubuntu 14.10, the xrdp package has been updated and you can now reconnect to an existing session with no additional configurations or tweaks. You can however still perform a custom xrdp installation if you want to test the latest version of the xrdp pacakge.
Performing the custom installation
Get the Script
To perform the custom installation, we will use the script we have provided in a previous post. This is the content of the script
########################################################################################
# Script_Name : xrdp-install.sh
# Description : Perform an automated custom installat of xrdp
# on ubuntu 14.10
# Date : October 2014
# written by : Griffon - http://www.c-nergy.be - http://www.c-nergy.be/blog
# Version : 1.2
# Disclaimer : Script provided AS IS. Use it at your own risk....
#
########################################################################################
#-Go to your Download folder
echo "Moving to the ~/Download folders..."
echo "-----------------------------------"
cd ~/Downloads
#Download the xrdp latest files
echo "Ready to start the download of xrdp package"
echo "-------------------------------------------"
wget https://github.com/neutrinolabs/xrdp/archive/master.zip
#Unzip xrdp package
echo "Extracting content of xrdp package..."
echo "-----------------------------------"
unzip master.zip
#Install prereqs for compilation
echo "Installing prereqs for compiling xrdp..."
echo "----------------------------------------"
sudo apt-get -y install autoconf libtool libpam0g-dev libx11-dev libxfixes-dev libssl-dev libxrandr-dev
#Install the desktop of you choice - I'm Using Mate Desktop
echo "Installing alternate desktop to be used with xrdp..."
echo "----------------------------------------------------"
sudo add-apt-repository "deb http://repo.mate-desktop.org/archive/1.8/ubuntu $(lsb_release -cs) main"
wget -q http://mirror1.mate-desktop.org/debian/mate-archive-keyring.gpg -O- | sudo apt-key add -
sudo apt-get -y update
sudo apt-get -y install mate-core mate-desktop-environment mate-notification-daemon --force-yes
echo "DoNE ??"
#Configure the Xsession file
echo mate-session> ~/.xsession
#Install the X11VNC
echo "Installing X11VNC..."
echo "----------------------------------------"
sudo apt-get -y install x11vnc
#Add/Remove Ubuntu xrdp packages
echo "Add/Remove xrdp packages..."
echo "---------------------------"
sudo apt-get -y install xrdp
sudo apt-get -y remove xrdp
#Compile and make xrdp
echo "Installing and compiling xrdp..."
echo "--------------------------------"
cd xrdp-master
sudo ./bootstrap
sudo ./configure
sudo make
sudo make install
#Final Post Setup configuration
echo "Post Setup Configuration..."
echo "---------------------------"
sudo mv /etc/xrdp/startwm.sh /etc/xrdp/startwm.sh.backup
sudo ln -s /etc/X11/Xsession /etc/xrdp/startwm.sh
sudo mkdir /usr/share/doc/xrdp
sudo cp /etc/xrdp/rsakeys.ini /usr/share/doc/xrdp/rsakeys.ini
echo "Restart the Computer"
echo "----------------------------"
sudo shutdown -r now
Set Execute rights on the script
You can copy/paste the script into a text file in your home directory and save it as xrdp-install.sh. In order to be able to run this script, you will need to make the script executable. Right-click on the file, go to properties, then select permissions and tick the box allow executable….

Click on Picture for better resolution
Execute the script
You are now ready to execute the script. we assume that you have internet connection available. The script needs to download the xrdp package (the latest version from the xrdp community) from internet. When you are ready, you can execute the script by issuing the following command in the command prompt.

Click on Picture for better resolution
We assume that you have downloaded or created the file in the your home folder under the Download folders. if this is not the case, browse to the location and execute the script from there.
Wait for completion of the script. The machine will reboot automatically when done.
Configure your Keyboard layout at the xrdp Login screen
By default, the xrdp login screen keyboard layout is set to english. If your keyboard layout is set to something else than english, when entering your credentials in the xrdp login box, you should either
- remember that you have an english keyboard and you have to be sure that what you type is the correct password value (use the username textbox to check what’s your are typing…)
- change the keyboard layout to the one you are using
If you need to change it to another xrdp keyboard layout, you should proceed with the following actions while login into the ubuntu system directly (not via the xrdp session)
Step 1 : You go to the /etc/xrdp directory
Step 2 : you issue the command setxkbmap -layout <%your layout%> to define which keyboard map/layout to use (ex. setxkbmap -layout be – for Belgian keyboard)
Step 3 : create a copy of the km-0409.ini file into the same directory. It seems that this is the default file used by xrdp to define the keyboard layout. You will need to use sudo in order to be able to write into the directory
Step 4 : Check that you have a backup of your file by typing the dir or ls command
Step 5 : update the file by issuing the following command sudo xrdp-genkeymap km-0409.ini
Test your custom xRDP installation
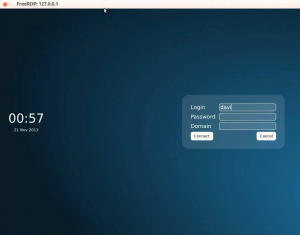
Here, what you want to test is that you can effectively reconnect to the same session. To test that, you will connect a first time to your remote Ubuntu machine, open some applications and then disconnect. If the xrdp installation completed successfully, you should see the xRDP login screen (see screenshot)

Click on Picture for better resolution
Important Note :
Note 1 : The first time connection might fail. We have seen multiple users having this issue. Successive login are successful.
Note 2 : Please be sure to select the option Sesman-xVNC in the dropdown box in order to connect to your xRDP server. (We will try to update the script to make the sesman-xVNC the default option but can take some time before we do…)
Note 3 : Please note that the keyboard layout in the xRDP login screen is by default en-us. Ensure that you have changed the keyboard layout (see above) or keep in mind you have an english keyboard when typing your password.
You will then connect again using the xRDP software and if the configuration and process are still working, you should be automatically reconnected to your session where you left it.

Click on Picture for better resolution
And Voila ! We did it again….. We have a working xRDP installation where users can reconnect automatically to their sessions.
Final Notes
As you can see, the process did not change much in Ubuntu 14.10. We can still use our xrp-install.sh script to perform a custom installation and have users reconnecting automatically to their existing session. If you need to connect to the console or if you need to have access to the Unity Desktop; you can also configure your machine to have a VNC access directly to the console. To perform such configuration, you can follow the steps provided in the following post :
- XRDP – How to connect to console or how to connect to Unity Desktop (not yet available but on its way…)
Hope you still enjoy these posts about xRDP
In this post, we have just touched the custom installation. As soon as we have time, we will provide an complementary post about xrdp configuration (such as keyboard layout and xsession file) in order to have a really smooth user experience.
Now, what I would like to see it’s a cool and sexy xrdp login page. We know that we can customize the existing login box (post is coming) but we are still limited. We would like to see someting like the freerds login interface (see screenshot below) . Do you think that we can add this to their whishlist ?
Till next time
See ya