Hello World,
We have received positive feedback on our posts related to XRDP installation on Ubuntu and how to perform remote desktop connection from windows computers. However, we are still receiving questions related to xrdp and how to reconnect to a existing remote session.
We have already described the installation procedure to perform just that but in a discrete way. This time we will expose the problem and the solution for such situation in more visible way.
Let’s go !
The Problem
In our previous post, we have described the easy way to install xrdp in Ubuntu and we have explained the needed configuration to have a working keyboard and a workable desktop interface. Using this installation procedure; you will end up with a quite common problem : you will not be able to reconnect to an existing remote session.
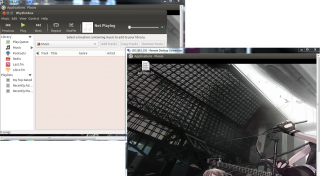
Click on picture for better resolution
To illustrate the problem, let’s imagine the following situation. You have performed the installation of xrdp as described in our previous post, you have made a remote desktop connection and everything works as expected. You are currently working on your spreadsheet and your are inserting data to it. If you decide to disconnect from the remote desktop session in Ubuntu (or if you have been disconnected (time out) and try to remote desktop back to your Ubuntu system, you will notice that a brand new desktop is displayed. You have lost your spreadsheet and the work you were doing.
This is the standard behaviour when working with xRdp and underlying VNC Server component. Each time you connect to your Ubuntu machine, you will be creating a new remote session on the server (even if you are using the same user account).
Note : There might be ways to change this behavior when xrdp is configured to use VNC Server but we didn’t check for it. We have used another approach…
The Solution
To overcome this situation, we have described in this post how to perform a custom installation of xRDP. Custom installation because you will compile yourself the xrdp source and replace the default VNC Server component found in the Ubuntu package with the X11VNC software solution.
By replacing the default VNC Server with the X11VNC component, you should be able to reconnect to your existing remote session. You will be able to disconnect from your session and reconnect and find the same desktop session as before. If you were working on a spreadsheet, you will be able to resume your work on it. Cool, isn’t it
For this post, we will be using the latest version of XRDP Sources available (which is 0.7.0). This post provides detailed information about how to perform the installation. In this post, we will summarize these steps and outline the deviation in the installation process.
Prepare Ubuntu machine for manual installation of xRDP
At this stage, we are simply installing software needed in order to compile xrdp sources on your Ubuntu machine. During this phase, we will also install the alternative desktop to be used (in my case gnome) and create the necessary configuration file to have it working. Finally, we will be installing the X11VNC package which will replace the VNC4Server package
From a command line, you should type the following commands
sudo apt-get install autoconf libtool libpam0g-dev libx11-dev libxfixes-dev libssl-dev
 sudo apt-get install gnome-session-fallback
 echo  ”gnome-session --session=gnome-fallback” > ~/.xsession
 sudo apt-get install x11vnc
For more information, have a look at this location
Download and Install Xrdp packages from sources
The xrdp project has been joining the FreeRDP community. You will find the latest version of the package sources at this location : https://github.com/FreeRDP/xrdp. The current version of xRDP is version 0.7.0
You can then go to the location where the package has been downloaded (in my case /home/griffon/Downloads) and extract the content of the archive by right-clicking the package and selecting extract here. We are ready to perform the installation of the xrdp package.
sudo ./bootstrap
sudo ./configure
sudo make
sudo make install
Post Setup Configuration
At this stage, we have installed the xrdp software but we still need to configure our system in order to have xrdp using X11Vnc package and have the xrdp service started automatically when the Ubuntu computer is restarted. To have this done, you will again open your terminal box and issue the following commands
sudo apt-get install xrdp
sudo apt-get remove xrdp

sudo mv startwm.sh startwm.sh.backup
sudo ln -s /etc/X11/Xsession /etc/xrdp/startwm.sh
sudo mkdir /usr/share/doc/xrdp
sudo cp /etc/xrdp/rsakeys.ini /usr/share/doc/xrdp/rsakeys.ini
As a final step, you will need to update the /etc/init.d/xrdp configuration file because we have made a custom installation of xrdp software. Simply copy the content of the modified xrdp script file into your /etc/init.d/xrdp file and you should be good to go.
<------- Begin of the Script -------->
#!/bin/sh -e
#
# start/stop xrdp and sesman daemons
#
### BEGIN INIT INFO
# Provides:          xrdp
# Required-Start:    $network $remote_fs
# Required-Stop:     $network $remote_fs
# Default-Start:     2 3 4 5
# Default-Stop:      0 1 6
# Short-Description: Start xrdp and sesman daemons
# Description:       XRDP uses the Remote Desktop Protocol to present a
#                    graphical login to a remote client allowing connection
#                    to a VNC server or another RDP server.
### END INIT INFO

PATH=/usr/local/sbin:/usr/local/bin:/sbin:/bin:/usr/sbin:/usr/bin
DAEMON=/usr/local/sbin/xrdp
PIDDIR=/var/run
SESMAN_START=yes
USERID=xrdp
RSAKEYS=/etc/xrdp/rsakeys.ini
NAME=xrdp
DESC="Remote Desktop Protocol server"

test -x $DAEMON || exit 0

. /lib/lsb/init-functions

check_root()  {
    if [ "$(id -u)" != "0" ]; then
        log_failure_msg "You must be root to start, stop or restart $NAME."
        exit 4
    fi
}

if [ -r /etc/default/$NAME ]; then
   . /etc/default/$NAME
fi

# Tasks that can only be run as root
if [ "$(id -u)" = "0" ]; then
    # Check for pid dir
    if [ ! -d $PIDDIR ] ; then
        mkdir $PIDDIR
    fi
    chown $USERID:$USERID $PIDDIR

    # Check for rsa key
    if [ ! -f $RSAKEYS ] || cmp $RSAKEYS /usr/share/doc/xrdp/rsakeys.ini > /dev/null; then
        log_action_begin_msg "Generating xrdp RSA keys..."
        (umask 077 ; xrdp-keygen xrdp $RSAKEYS)
        chown $USERID:$USERID $RSAKEYS
        if [ ! -f $RSAKEYS ] ; then
            log_action_end_msg 1 "could not create $RSAKEYS"
            exit 1
        fi
        log_action_end_msg 0 "done"
    fi
fi

case "$1" in
  start)
        check_root
        exitval=0
        log_daemon_msg "Starting $DESC "
        if pidofproc -p $PIDDIR/$NAME.pid $DAEMON > /dev/null; then
            log_progress_msg "$NAME apparently already running"
            log_end_msg 0
            exit 0
        fi
        log_progress_msg $NAME
        start-stop-daemon --start --quiet --oknodo  --pidfile $PIDDIR/$NAME.pid \
	    --chuid $USERID:$USERID --exec $DAEMON
        exitval=$?
	if [ "$SESMAN_START" = "yes" ] ; then
            log_progress_msg "sesman"
            start-stop-daemon --start --quiet --oknodo --pidfile $PIDDIR/xrdp-sesman.pid \
	       --exec /usr/local/sbin/xrdp-sesman
            value=$?
            [ $value -gt 0 ] && exitval=$value
        fi
        # Make pidfile readables for all users (for status to work)
        [ -e $PIDDIR/xrdp-sesman.pid ] && chmod 0644 $PIDDIR/xrdp-sesman.pid
        [ -e $PIDDIR/$NAME.pid ] && chmod 0644 $PIDDIR/$NAME.pid
        # Note: Unfortunately, xrdp currently takes too long to create
        # the pidffile unless properly patched
        log_end_msg $exitval
	;;
  stop)
        check_root
	[ -n "$XRDP_UPGRADE" -a "$RESTART_ON_UPGRADE" = "no" ] && {
	    echo "Upgrade in progress, no restart of xrdp."
	    exit 0
	}
        exitval=0
        log_daemon_msg "Stopping RDP Session manager "
        log_progress_msg "sesman"
        if pidofproc -p  $PIDDIR/xrdp-sesman.pid /usr/local/sbin/xrdp-sesman  > /dev/null; then
            start-stop-daemon --stop --quiet --oknodo --pidfile $PIDDIR/xrdp-sesman.pid \
                --chuid $USERID:$USERID --exec /usr/local/sbin/xrdp-sesman
            exitval=$?
        else
            log_progress_msg "apparently not running"
        fi
        log_progress_msg $NAME
        if pidofproc -p  $PIDDIR/$NAME.pid $DAEMON  > /dev/null; then
            start-stop-daemon --stop --quiet --oknodo --pidfile $PIDDIR/$NAME.pid \
	    --exec $DAEMON
            value=$?
            [ $value -gt 0 ] && exitval=$value
        else
            log_progress_msg "apparently not running"
        fi
        log_end_msg $exitval
	;;
  restart|force-reload)
        check_root
	$0 stop
        # Wait for things to settle down
        sleep 1
	$0 start
	;;
  reload)
        log_warning_msg "Reloading $NAME daemon: not implemented, as the daemon"
        log_warning_msg "cannot re-read the config file (use restart)."
        ;;
  status)
        exitval=0
        log_daemon_msg "Checking status of $DESC" "$NAME"
        if pidofproc -p  $PIDDIR/$NAME.pid $DAEMON  > /dev/null; then
            log_progress_msg "running"
            log_end_msg 0
        else
            log_progress_msg "apparently not running"
            log_end_msg 1 || true
            exitval=1
        fi
	if [ "$SESMAN_START" = "yes" ] ; then
            log_daemon_msg "Checking status of RDP Session Manager" "sesman"
            if pidofproc -p  $PIDDIR/xrdp-sesman.pid /usr/local/sbin/xrdp-sesman  > /dev/null; then
                log_progress_msg "running"
                log_end_msg 0
            else
                log_progress_msg "apparently not running"
                log_end_msg 1 || true
                exitval=1
            fi
        fi
        exit $exitval
        ;;
  *)
	N=/etc/init.d/$NAME
	echo "Usage: $N {start|stop|restart|force-reload|status}" >&2
	exit 1
	;;
esac

exit 0
Minor Configuration changes since version 0.6.0
After you have updated the /etc/init.d/script, you should normally restart the service by issuing the command
sudo service xrdp restart
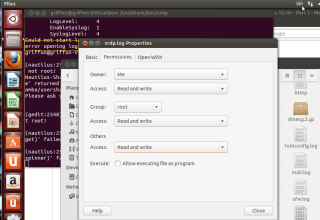
With version 0.7.0, you will get an error when you will perform this operation. You will be notified that the log file cannot be opened. The problem here is just a permission issue. You will have to navigate to the location /var/log and change the permissions in a way that the service script can open the file and write on it.
Click on Picture for better resolution
After making this change, you should be good to go and you should be able to remote desktop to your Ubuntu machine or to reconnect to a previous remote session you had to leave. To show you that this is a working configuration, we have made a small video as well about it. Have a look at it !
Choosing the correct sesman module when prompted for the XRDP connection
We had to update this post because a lot of people were encountering a small issue while trying to perform the xrdp remote connection. A connection error message was displayed when trying to perform the connection. You have to select the sesman-Xvnc module in the xrdp login box in order to be able to connect to your desktop while using this custom setup.
We have write a small post explaining the problem and the solution and how to fix it permanently. Please have a look at this location http://c-nergy.be/blog/?p=4242 before trying your first remote desktop connection.
Customization your XRDP login interface
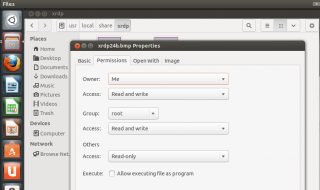
In the video above, you have probaly noticed that we have customize the login interface when connecting to the xrdp interface. We have explain the process in this post. You can follow exactly the same instruction in order to change background image and customize your login box. However, there is again here a small change related to the permissions. If you simply replace the file and do not change the permissions, the background image you have selected will not be displayed
Click on picutre for better resolution
Final Notes
And voila ! We are done with this post. As mentioned earlier, we already talked about this topic but we kept receiving questions about how to reconnect to existing remote desktop session using xrdp. We hope that this post will be more visible and will provide the answer to the question.
Till next time
See ya


@Ron,
The post you are referring is quite old and using the package xrdp 0.7.x. If you are using a recent ubuntu version (or a recent xrdp package 0.9.x), you can reconnect to the same session with no modification (out of the box)
The only drawback with xrdp so far is that you can either perform a connection locally on the system or a remote session on the system (but not both at same time)…
So, yes, it’s possible to reconnect automatically to your remote session (if the session has been started remotely!!!!)
Hope this help
till next time
See ya
Here’s what I did. Make sure tigervnc-server is installed so we can use Xvnc. Launch a VNC session with the default configuration (I actually followed the Arch Linux setup guide for TigerVNC). Then configure your Xrdp to use that VNC session every time. Also set TigerVNC to startup on boot. This is the only VNC section in my xrdp.ini file:
[vnc-any]
name=vnc-any
lib=libvnc.so
ip=localhost
port=5901
username=na
password=YOURPASSWORD
#pamusername=asksame
#pampassword=asksame
#pamsessionmng=127.0.0.1
#delay_ms=2000
If you want to connect to the existing running desktop, TigerVNC can help you there too. See the Arch Linux docs