Hello World,
In our previous post, we have seen how you could install and configure xrdp package. xrdp package make it possible to perform a remote desktop connection against an Ubuntu machine. However, since the release of ubuntu 12.10, when performing the remote desktop connection, you will not be able to use the Unity Desktop environment. Indeed, xrdp does not work with this desktop solution. In Ubuntu 12.04, it was possible to fallback to Unity 2D but this desktop interface has been removed from the lastest ubuntu release.
You can still perform a remote desktop connection using the xrpd package. However, you will need to configure an alternate desktop in order to have a useable remote session. This can be seen as an important limitation as your users will have to use different desktop interfaces based on the way to connect to the ubuntu computer (locally or remotely)
The topic of this post is to show you how you can customize a little bit the xrdp experience…. I really think that the look’n feel of a product helps user adopting a solution or not. While xrdp is providing effective rdp connections, the fact that you see the black screen when performing the connection is not really appealing…
In this post, we will show you how you can perform a basic customization of the xrdp login “interface”. In order to to customize the look’n feel of xrdp, you will need to install xrdp packages from sources. The current ubuntu packages does not offer you this capability. In part I, we will describe how to perform a manual installation of the xrdp packages (using the xrdp source pacakges). In part II, we will show how you can automate the installation. Finally, part III will show you what you can customize (not much but still better than nothing : – ) )
Installing xrdp from source (and not ubuntu packages)
Let’s try to perform a manual installation by using the xrdp source packages
Preparing your manual installation
In order to be able to compile the xrdp package from source, you will need to download some additional packages that will be used by the compilation script.
Step 1 – Install additional packages (needed in order to install xrdp from the source packages). From a command prompt, type the following command
- sudo apt-get install autoconf libtool libpam0g-dev libx11-dev libxfixes-dev libssl-dev
Click on picture for better resolution
Step 2 – Install the gnome-fallback desktop interface by typing the following command at the terminal window
- sudo apt-get install gnome-session-fallback
Click on picture for better resolution
Step 3 – configure the xrdp in order to use the gnome-session-fallback as default desktop environment when performing a remote desktop connection. To do this, you will simply create a file called .xsession in your home folder. We will again use a command line in order to perform this operation
- echo “gnome-session – -session=gnome-fallback” > ~/.xsession
Step 4– Instead of using vnc4server packages, we will be replacing this one with the X11vnc server package. apparently, this package provides a little better performance when dealing with remote desktop connection. To install the x11VNC server, you can use the command line or the ubuntu software center. We will use the command line
- sudo apt-get install x11vnc
Note : at time of writing, this was version 0.6
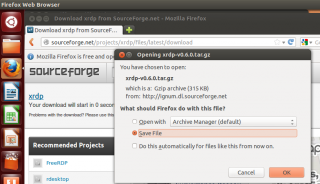
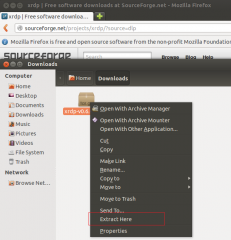
Step 7 – Go to the location where the package has been downloaded (in my case /home/griffon/Downloads) and extract the content of the archive by right-clicking the package and selecting extract here
Click on picture for better resolution
At this stage, we have prepared all the necessary steps in order to perform a succesful installation of xrdp source packages… So, let’s proceed….
Installing the xrpd package on your system.
It’s time to install the xrdp from the source package. If you browse to the location where you have extracted the xrdp package, you will see that the instructions to install xrdp package are described in the file called readme.txt. (Do not take into account the instructions found in the file install.txt). To build and configure your custom xrdp installation, perform the following tasks :
Step 1 – From a command line, browse to the location where the xrdp package has been extracted (in my case /home/griffon/Downloads)
Click on picture for better resolution
Step 2 – Run the following command and wait for completion
- sudo ./bootstrap
- sudo ./configure
Step 4 – Run the following command and wait for completion
- sudo make
Click on picture for better resolution
Step 5 – Run the following command and wait for completion
- sudo make install
Now, it’s time to configure our ubuntu machine to use xrdp in the most appropriate way….
Configure xrdp & set the service to start automatically
We have installed the xrdp package from souce. However, we still need to configure the service to start automatically when the computer boots or reboots. Because we want to reuse the startup scripts created by Ubuntu team, we will install/remove the official xrdp software package that you will find in the ubuntu repository (the current version is 0.5). This will pre-configure our computer to use xrdp software package.
- sudo apt-get install xrdp
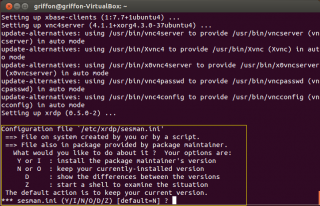
You will see some warnings (see screenshot below). Accept defaults each time you see this message.
Click on picture for better resolution
- sudo apt-get remove xrdp
- sudo mv startwm.sh startwm.sh.backup
- sudo ln -s /etc/X11/Xsession /etc/xrdp/startwm.sh
- sudo mkdir /usr/share/doc/xrdp
- sudo cp /etc/xrdp/rsakeys.ini /usr/share/doc/xrdp/rsakeys.ini
Click on picture for better resolution
Step 5 – As a final step, you will need to update the /etc/init.d/xrdp configuration file. Indeed, we have performed a default installation of xrdp source packages which store files in some other locations than the one used by the xrpd Ubuntu package. Hereafter, you can see the content of my “custom” /etc/init.d/xrdp file. Simply copy the conten of the modified xrdp script file into your /etc/init.d/xrdp file and you should be good to go .
<------- Begin of the Script -------->
#!/bin/sh -e
#
# start/stop xrdp and sesman daemons
#
### BEGIN INIT INFO
# Provides:          xrdp
# Required-Start:    $network $remote_fs
# Required-Stop:     $network $remote_fs
# Default-Start:     2 3 4 5
# Default-Stop:      0 1 6
# Short-Description: Start xrdp and sesman daemons
# Description:       XRDP uses the Remote Desktop Protocol to present a
#                    graphical login to a remote client allowing connection
#                    to a VNC server or another RDP server.
### END INIT INFO

PATH=/usr/local/sbin:/usr/local/bin:/sbin:/bin:/usr/sbin:/usr/bin
DAEMON=/usr/local/sbin/xrdp
PIDDIR=/var/run
SESMAN_START=yes
USERID=xrdp
RSAKEYS=/etc/xrdp/rsakeys.ini
NAME=xrdp
DESC="Remote Desktop Protocol server"

test -x $DAEMON || exit 0

. /lib/lsb/init-functions

check_root()  {
    if [ "$(id -u)" != "0" ]; then
        log_failure_msg "You must be root to start, stop or restart $NAME."
        exit 4
    fi
}

if [ -r /etc/default/$NAME ]; then
   . /etc/default/$NAME
fi

# Tasks that can only be run as root
if [ "$(id -u)" = "0" ]; then
    # Check for pid dir
    if [ ! -d $PIDDIR ] ; then
        mkdir $PIDDIR
    fi
    chown $USERID:$USERID $PIDDIR

    # Check for rsa key
    if [ ! -f $RSAKEYS ] || cmp $RSAKEYS /usr/share/doc/xrdp/rsakeys.ini > /dev/null; then
        log_action_begin_msg "Generating xrdp RSA keys..."
        (umask 077 ; xrdp-keygen xrdp $RSAKEYS)
        chown $USERID:$USERID $RSAKEYS
        if [ ! -f $RSAKEYS ] ; then
            log_action_end_msg 1 "could not create $RSAKEYS"
            exit 1
        fi
        log_action_end_msg 0 "done"
    fi
fi

case "$1" in
  start)
        check_root
        exitval=0
        log_daemon_msg "Starting $DESC "
        if pidofproc -p $PIDDIR/$NAME.pid $DAEMON > /dev/null; then
            log_progress_msg "$NAME apparently already running"
            log_end_msg 0
            exit 0
        fi
        log_progress_msg $NAME
        start-stop-daemon --start --quiet --oknodo  --pidfile $PIDDIR/$NAME.pid \
	    --chuid $USERID:$USERID --exec $DAEMON
        exitval=$?
	if [ "$SESMAN_START" = "yes" ] ; then
            log_progress_msg "sesman"
            start-stop-daemon --start --quiet --oknodo --pidfile $PIDDIR/xrdp-sesman.pid \
	       --exec /usr/local/sbin/xrdp-sesman
            value=$?
            [ $value -gt 0 ] && exitval=$value
        fi
        # Make pidfile readables for all users (for status to work)
        [ -e $PIDDIR/xrdp-sesman.pid ] && chmod 0644 $PIDDIR/xrdp-sesman.pid
        [ -e $PIDDIR/$NAME.pid ] && chmod 0644 $PIDDIR/$NAME.pid
        # Note: Unfortunately, xrdp currently takes too long to create
        # the pidffile unless properly patched
        log_end_msg $exitval
	;;
  stop)
        check_root
	[ -n "$XRDP_UPGRADE" -a "$RESTART_ON_UPGRADE" = "no" ] && {
	    echo "Upgrade in progress, no restart of xrdp."
	    exit 0
	}
        exitval=0
        log_daemon_msg "Stopping RDP Session manager "
        log_progress_msg "sesman"
        if pidofproc -p  $PIDDIR/xrdp-sesman.pid /usr/local/sbin/xrdp-sesman  > /dev/null; then
            start-stop-daemon --stop --quiet --oknodo --pidfile $PIDDIR/xrdp-sesman.pid \
                --chuid $USERID:$USERID --exec /usr/local/sbin/xrdp-sesman
            exitval=$?
        else
            log_progress_msg "apparently not running"
        fi
        log_progress_msg $NAME
        if pidofproc -p  $PIDDIR/$NAME.pid $DAEMON  > /dev/null; then
            start-stop-daemon --stop --quiet --oknodo --pidfile $PIDDIR/$NAME.pid \
	    --exec $DAEMON
            value=$?
            [ $value -gt 0 ] && exitval=$value
        else
            log_progress_msg "apparently not running"
        fi
        log_end_msg $exitval
	;;
  restart|force-reload)
        check_root
	$0 stop
        # Wait for things to settle down
        sleep 1
	$0 start
	;;
  reload)
        log_warning_msg "Reloading $NAME daemon: not implemented, as the daemon"
        log_warning_msg "cannot re-read the config file (use restart)."
        ;;
  status)
        exitval=0
        log_daemon_msg "Checking status of $DESC" "$NAME"
        if pidofproc -p  $PIDDIR/$NAME.pid $DAEMON  > /dev/null; then
            log_progress_msg "running"
            log_end_msg 0
        else
            log_progress_msg "apparently not running"
            log_end_msg 1 || true
            exitval=1
        fi
	if [ "$SESMAN_START" = "yes" ] ; then
            log_daemon_msg "Checking status of RDP Session Manager" "sesman"
            if pidofproc -p  $PIDDIR/xrdp-sesman.pid /usr/local/sbin/xrdp-sesman  > /dev/null; then
                log_progress_msg "running"
                log_end_msg 0
            else
                log_progress_msg "apparently not running"
                log_end_msg 1 || true
                exitval=1
            fi
        fi
        exit $exitval
        ;;
  *)
	N=/etc/init.d/$NAME
	echo "Usage: $N {start|stop|restart|force-reload|status}" >&2
	exit 1
	;;
esac

exit 0
<------- End of the Script -------->
Step 6 – you will need to restart the xrdp service in order to apply all the changes you have made. To restart the service, you can simply type the following command
- sudo service xrdp restart
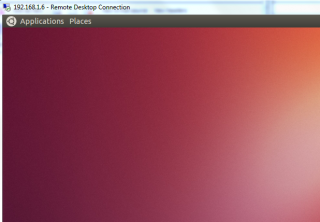
Step 7 – From now on, you should be able to perform a remote desktop connection to your ubuntu machine. You can restart the ubuntu machine and try your remote desktop connection again. If everything is configured correctly, you will have access to your desktop interface via the remote desktop.
Click on picture for better resolution
Final notes
And voila ! We did it !
In this post, I focused mainly on the installation of the xrdp package using the source files and not the package provided by Ubuntu. You have noticed also that I’ve preferred to use command line instead of the ubuntu software center. You could gather all the commands into one file and have a basic installation script. There are probably other ways (even better way) to perform manual installation of xrdp than the one I’ve described. In order to be able to customize the xrdp login screen, I need to have the files from the xrdp source packages…
I’ll be working in part II of this serie. The part II will show you how to use a nice little script to fully automate the installation of xrdp. So, you would be able to choose which method better suit your needs. Finally, the part III will simply show the little customization thing that you can do….
Till next time
See ya
References:
- http://scarygliders.net/2011/11/17/x11rdp-ubuntu-11-10-gnome-3-xrdp-customization-new-hotness/ provided me the necessary information in order to have xrdp interacting with X11VNC….
Note : If you would like to read part I from III of this post series, have a look at
- How to customize xrdp install & login screen on Ubuntu 12.10 – Part I
- How to customize xrdp install & login screen on Ubuntu 12.10 – Part II
- How to customize xrdp install & login screen on Ubuntu 12.10 – Part III


How do we get Audio and printer redirect to work from the client machine?
Hello Kumar,
To be honest, I have no clue…I never needed to redirect audio nor printers from xrdp…
For the sound redirection, If you google a bit, you will find some entries/posts explaining how this could be achieved. For the printer, I d0 not know if xrdp is supporting this…
As soon as I have some time, I’ll start installing xrdp package 0.7 and check if redirection would be an option ….
Till then
See ya
Hi Griffon,
I’m running under ubuntu 12.04 in french with belgian keyboard.
XRDP is installed (0.5.0-2). I changed the keyboard layout into belgian but I got a lot of problems with altgr keys.
So I want to upgrade to xrdp 0.6.
I followed your procedure :
Preparing your manual installation – all except steps 2 and 3.
Installing the xrpd package on your system – all steps.
Configure xrdp & set the service to start automatically – all except step 1 (already installed).
And it’s working. I can open a remote session uisng windows remote desktop connection.
But … ubuntu is now in english and the keyboard returned to us layout.
What’s going wrong ?
Hello There,
Have you looked at the instructions found in http://c-nergy.be/blog/?p=2879 -> Check the section Solving the keyboard Layouts problem in the xRDP session
We explain how you could set the keyboard layout when using xrdp
Give it a try
Hope this help
See ya
Yes, I did it when I installed xrdp 0.5.
But I dit not retried with 0.6 …
I will test it …
But do you think it have any influence on the language of ubuntu ?
It is in french and thru the remote connection it’s in english (and a dialog box tell me something like : “you have opened a
ooops
“you have opened a session with a different language” and asking me if i want to rename Bureau into Desktop and on on
Hello,
Okay, this is a different issue… You would need to update the startwm.sh file
just after the comment lines (#), you can add the following code
if [ -r /etc/default/locale ]; then
. /etc/default/locale
export LANG LANGUAGE
fi
We assume that you have a locale file configured and listing the languages you want to use
restart the xrdp service and give it a try
Let me know if this fix you problem, I might want to write a post about it
Hope this help
See ya
Hello Griffon,
Good and bad news.
Good :
I just added your code in my startwm.sh and now my environment remains in french.
Bad :
I tried that :
cd /etc/xrdp
setxkbmap -layout be
sudo cp km-0409.ini km-0409.ini.bak
sudo xrdp-genkeymap km-0409.ini
but the keyboard remains without altgr keys, without arrows, home, end, …
So no changes with xrdp 0.5
ps : in step 3 configuring xrdp, for the command sudo mv startwm.sh startwm.sh.backup, there is a little mistake : missing /etc/xrdp like in the picture below.
Hello Tweety,
I had some time to check for your keyboard issue….
I’ll send you a working keyboard file for the belgian layout…. It’s working for me, you will have to test it for yourself
I’ll be write a small post also about this topic in the near future…. (I hope)
sorry for the long delay but I’m really overloaded by work…..
Thank you for visting us again
Hi Griffon,
thanks you for your tutorial.
I have a problem. I am on ubuntu 12.04. I follow your tuto but i have a grey screen. i search on google to resolve this problem but it doesn’t work…
Do you have an idea ?? thanks
Hello There,
you might want to check this post (http://c-nergy.be/blog/?p=2879) where I described how to use the ubuntu 2d desktop interface. You might need to change the desktop interface to be used in the xsession file….
Give it a try and let us know if it’s working
Till Next Time
See you
I get error when execute make command
root@:~/xrdp-v0.6.1# ls
aclocal.m4 config.guess docs install-sh mc tests
AUTHORS config.log faq-compile.txt install.txt missing vnc
autom4te.cache config.sub faq-general.txt instfiles NEWS xrdp
bootstrap configure file-loc.txt keygen prog_std.txt xup
ChangeLog configure.ac fontdump libxrdp rdp
common COPYING freerdp ltmain.sh README
compile depcomp freerdp1 Makefile.am readme.txt
config_ac-h.in design.txt genkeymap Makefile.in sesman
root@:~/xrdp-v0.6.1# make
make: *** No targets specified and no makefile found. Stop.
Hello There
or you have a disk space issue or you are missing the makefile
the makefile should be located in the same directory
or use -f to specify the path
Can you try on a plain virtual machine running ubuntu and try again to see if the problem still exists
Hope this help
See ya
Hello Griffon.
thanks for the writeup. Please where do i see the custom /etc/init.d/xrdp you specified in step 5?
hello Griffon
Rather i have followed the steps you stated up to step 5. I seriously do not understand the step 5. Where do i get the custom config from? is it the one on the screen, bacause i copied it to /etc/init.d/xrdp and my xrdp couldnt start.
Hello Kalito,
in the step 5, you copy the content of the custom script for xrdp in your /etc/init.d/xrdp file (I assume you have made a backup of the file beforehand). The “custom” xrdp file simply update some file locations that are not the same if you perform a standard installation or a custom installation. We have write a small script that can be used to automate the custom xrdp installation (see http://c-nergy.be/blog/?p=5439)
What’s your issue ? If you do not use my custom xrdp script, is the service xrdp starting ? If not, what’s the message error ? can you check the xrdp log files.
Provide more information…?
Hope this help
Till next time
Hello Griffion,
I have a problem after removing the xrdp ubuntu package. Till here everthing works fine, but after step the 3 of “Configure xrdp & set the service to start automatically” i get an “error – problem connectiong” after the “sending encodings” – point. How can i set it back to the point before i do the confugrations after point 3?
THANK YOU
Hello,
I do not get your question. If you have followed the instructions, you should be able to login using xrdp…..
In the xrdp login box, are you sure you are selecting the correct option
sesman-Xvnc and bot sesman-x11rdp
What do you see in your logs -> Check this post to see which logs and where they are located (http://c-nergy.be/blog/?p=5984)
Hope this help
Till next time
See ya