Hello World,
As you can see, I’m posting quite some information about MDT 2012 lately. This is due to the fact that I was working on a project where MDT 2012 was one of the deployment solution. Even if SCCM 2012 is already implemented within the organization, there was a need to have this stand-alone and portable Deployment Solution present on the network. Today, we will speak about the applications and applications Bundle and how you can use them in order to better organize your deployment approach.
To read about our MDT 2012 posts, have a look at
- Part I : Installing MDT
- Part II : MDT Deployment Share
- Part III : Deploying OS with MDT
- Part IV : Adding PXE Capabilities to MDT
- Part V : Perform a Basic MDT Deployment
- Part VI: Branding your MDT Infrastructure
- Set Screen Resolution automatically with MDT
Overview
The purpose of this post is not to explain how you can import applications within your MDT infrastructure. This post will look how you can better organize your work when creating and building you the master image you want to use. The process of building up the master image and automate its deployment is generally based and trial and error. This means that the operator will need to execute the same task multiple times.
So, an operator will have to go through the MDT Wizard (see this post for a standard deployment with MDT) in order to select the settings and options to be applied to the target workstation. The most annoying page in this wizard is the applications page. Based on the way the operator has configured and organize the packages, you can have a really messy page where the operator will have to select each packages needed for the installation to be performed. This can be a boring and repetitive task that can be alleviated.
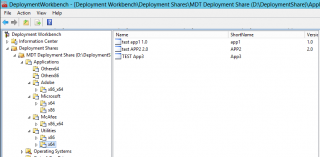
The following screenshot illustrates the situation we have found at many customer locations. They are trying to create a folder structure to group their application together based on criteria such as publisher or version (32-bit/64-bit).
Click on Picture for Better resolution
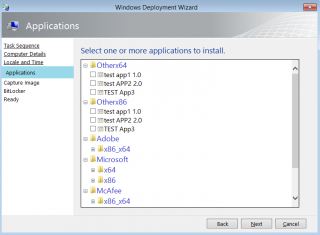
The application wizard page then look like this one where you have to expand a lot of folder and select the applications to be installed. (a little bit messy)
Click on Picture for Better resolution
Improving your Building process when working with Applications
Again, this post does not discuss the way you have to import applications within your MDT, we assume that you have already imported your applications. This post will show options you can use in order to better organize your time and have a better build process. After you have created your master image, you can reuse these options described hereafter in order to automate as much as possible your deployment process.
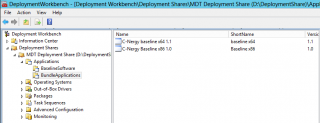
In order to improve the way to you can control your applications folder structure and make the deployment easier, we usually create a minimum set of folders. The screenshot below show the structure we use most of the time. One folder will contain all the software that could be installed on a workstation during the deployment (Baseline Software) and another folder called bundle Applications. This folder will contains combination of software that needs to be installed on target machine based on the customer criteria (ex. 64-bit vs 32-bit software)
Click on Picture for Better resolution
Now that we have defined and streamline the folder structure we want to use. It’s time to decide how to automate the applications selection process. In general, you can use 3 different approaches. Let’s have a look at them !
Option 1 – Using the CustomSettings.ini file
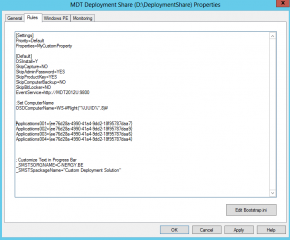
Instead of ticking the applications you need to have installed during the deployment process, you could automate the selection of the packages you want to install by editing the CustomSettings.ini file (or via the GUI by right-clicking the deployment share and select properties, and then the Rules tab). You would append to the file the applications that have to be installed by default when performing the deployment. You add entry like
- applications001={GUID1}
- applications002={GUID2}
- ….
The screenshot below shows you an example of such customization
Click on Picture for Better resolution
Using this approach, you can install in a sequential order your applications (applications001 will be installed first,then applications002,and so on).
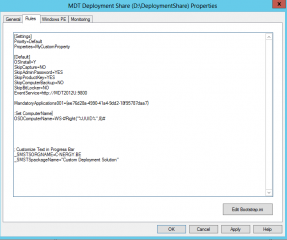
Using the applications variable in the customsettings.ini file will not give you a visual hint on which applications will be deployed in the Applications Wizard page. If you need to have a visual hint, you should then use the MandatoryApplications001 variable in the customsettings.ini file.
Click on Picture for Better resolution
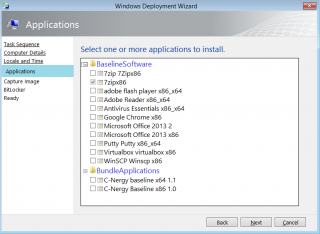
Because its a mandatory application you will see that the application is checked in the Wizard Page but you will not be able to unchecked it.
Click on Picture for Better resolution
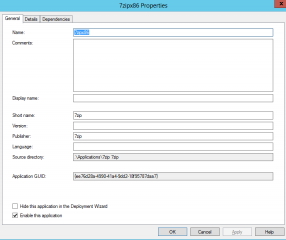
If you are wondering where you can find the GUID for the application you want to include in the CustomSettings.ini file, you will simply need to right-click the application you want insert, select the properties options. In the general page, at the bottom, you will see the GUID number to be used .
Click on Picture for Better resolution
This approach works well as long as you have to deploy a single image through your organization. Indeed, the settings you define in this file are used by default during the deployment process. If you still display the Applications wizard page, you can probably mix and match your situation. You can use the customSettings.ini file to list the default applications that all users will get (ex. Office Suite) and then via the application wizard page, select the additional packages that are needed for a specific deployment situation.
Option 2 – Using Task Sequences
This approach might be more flexible but this assumes that you have already defined the image type that will be deployed within your organization. In this option, the application wizard page could be hidden. The operator will be able to deploy different images to different workstations (based on the requirements) by selecting the appropriate task sequences. You could create two or more task sequences that would contains the applications that need to be deployed given the situation (i.e Standard Users vs Advanced Users).
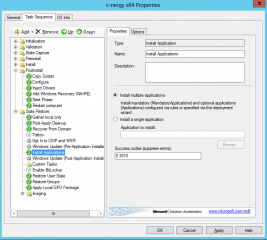
The Screenshot below illustrate the default task sequence created. If you navigate to the Install Applications node, you will see that you have 2 options : you can select multiple applications (using the CustomSettings.ini file or using the Wizard Page) or you can decide to install single applications
Click on Picture for Better Resolution
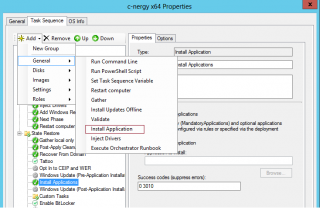
We have seen in some locations people inserting additional step in the task sequence in order to install multiple applications. To illustrate the process, open your task sequence, navigate to the install applications node. Then Click on the Add Button > General > install Application
Click on Picture for Better Resolution
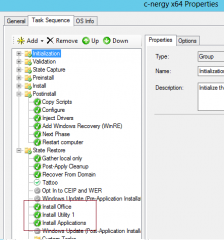
In the task sequence, you will then select the install single application and select the package to be installed. To illustrate the final results, you would end up with a task sequence similar to the screenshot below
Click on Picture for Better Resolution
As you can see this is feasible but again if you have a lot of applications to be installed, this can be quite time consuming. You have to edit the task, you have to add the step, you have to select the application package… and this for each applications to be installed. We are not really fan of this approach and we would prefer the option 1 approach over this one. There is a third option where you can use application bundles.
Keep reading
Option 3 – using application bundles
We can achieve quite some flexibility in managing and maintaining your applications repository and the way you deploy them. I haven’t seen a lot of people using the MDT feature which can be quite handy while automating your deployment process. Application bundles is basically a logical container where you can combine multiple applications and have only one application package to be deployed. This approach offers much flexibility. If you need to modify or update a package, you will not need to update the task sequence. You will simply update the Application Bundle. This is a cool feature (I think) which can help you streamline your installation and deployment process.
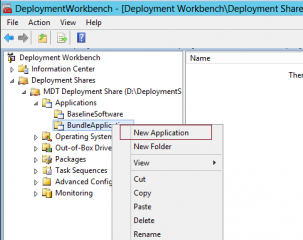
How do you create Applications bundles ? this is quite easy. In our example, we go to the Bundle Application Node, right-click on it and select New Application
Click on Picture for Better Resolution
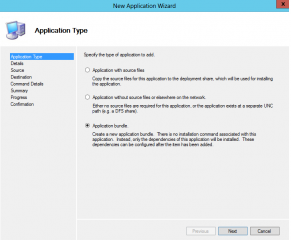
The wizard will start. In the Application type page, you select Application Bundle. Press Next
Click on Picture for Better Resolution
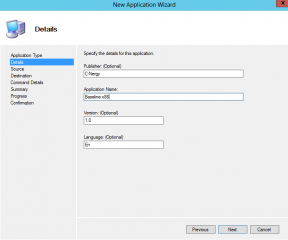
Provide the details information and Press Next
Click on Picture for Better Resolution
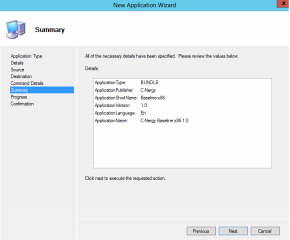
In the Summary page, review you settings and Press Next
Click on Picture for Better Resolution
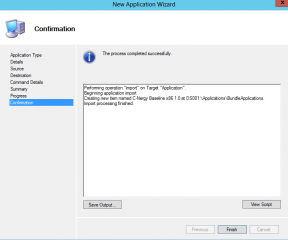
In the confirmation page, check for the results and press Finish
Click on Picture for Better Resolution
In our example, we have created 2 applications Bundle based on the architecture of the target machines.
Click on Picture for Better Resolution
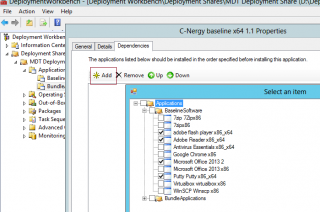
We haven’t finished yet. We need to specify which applications will be part of the bundle. To perform this, simply right-click the application bundle to modify, select properties. In the properties page, go to the dependencies tab.
Press the Add button, expand the folder tree and select the applications to be part of the bundle
Click on Picture for Better Resolution
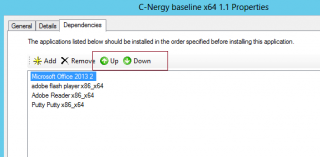
Before closing the page, check the order in which the applications will be installed. The application on the top would be the first one to be installed. If you need to change the order, use the arrow buttons.
Click on Picture for Better Resolution
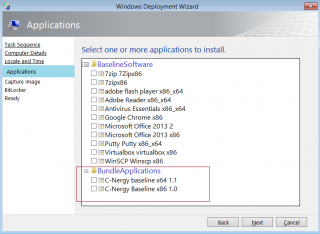
If you do not hide the application Wizard page, while performing your deployment, instead of selecting all the packages you need to include in your image, you will simply need to select which bundle you want to use. (You have to admit it… this is a cool feature)
Click on Picture for Better Resolution
Note : the screenshot above show a cleaner view of the Application wizard page. As you can see, if you keep a simple and clean folder structure for the applications, the operator will have a cleaner view on the available packages
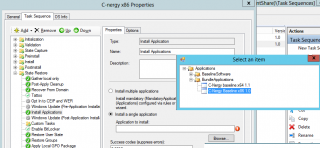
If you hide the application wizard page during your deployment, you can then configure a task sequence to install the appropriate bundle. Open the task sequence, go to the Installation applications node, select Install a Single Application. Click on the Browse Button and select the application bundle you need. Press OK. Press OK again to save the task sequence. You are done !
Click on picture for better resolution
Final Notes
In this post, we have tried to explain different approaches that can be used in order to deploy applications packages during the deployment process. Generally speaking, we recommend to keep a simple folder structure under the Application Node within your MDT server. You have to correctly name the application and provide enough information so the operator can easily choose between them. In order to ease the deployment process, we have seen a lot of people using the task sequence approach (option 2). This is a valid option but as you have seen can be time consuming. You have to modify your task sequence and you will have to add additional steps for each application package you want to use. It does not seems to be the most easy to work with.
We have being using the applications Bundle for some time now and I have to say that this approach fits the needs of the customer most of the time. It easy to use and maintain. When you have created you bundle, you can then decide to automate the application part by using the customSettings.ini or even better (because offers more flexiblity) using a task sequence.
If you have other ideas/ways to streamline the build process and thus the deployment process, please let us know. More I use MDT 2012, more I think that this is a really good tool when it come to deploy Windows Operating systems. It’s a free tool and offers quite some flexibility. You can really automate (and have a full unattended installation procedure) using only this piece of software. In a coming post ,we will describe how you can achieve this zero touch installation.
That’s it for this post ! I hope you enjoyed it
Till next time
See ya
I never new about app bundles! I have been listing them as individual steps in the task sequence.
How do app bundles affect troubleshooting. Does MDT still manage to tell you what install crashed (e.g. Office) or will it just report the whole bundle failed?
I never knew about app bundles! I have been listing them as individual steps in the task sequence.
How do app bundles affect troubleshooting. Does MDT still manage to tell you what install crashed (e.g. Office) or will it just report the whole bundle failed?
Hello Thom,
Cool, I’m happy to ear that you never heard about App Bundles (this means this blog/post is somewhat useful)
As far as I know, App Bundle is just the logical container. This means that you will get output info about failed applications but not for the bundle…. You will also be able to check log files generated during the deployment which will show you the apps that have been installed and not only the bundle.
But I’ll double check to confirm this
Till next time
See ya
All your posts Griffon are a life saver. You rock
I loved all the posts and it made learning the 2012 version very easy.
God bless and you rock…
Keep writing more cool stuff…
Regards,
Manoj
Hello Manoj,
Thank you very much for the positive comments.
I’m glad to hear that this blog can be really useful
I’ll try to keep posting some useful tips and hints but it might be at a slower piece for the moment…really busy
See you around
Till next time
Hi Manoj,
Very good article. I have one question though. I need to install certain applications ONLY when the PC is joined to my domain.. How can i do this. I have tried the below but they are not working;
Select * from Win32_NTDomain WHERE (DomainName = “MyDName” and ClientSiteName = “MyDName”)
Select * from Win32_NTDomain WHERE (DomainName = “MyDName” or ClientSiteName = “MyDName”)
Select * from Win32_NTDomain WHERE (DomainName = “MyDName”)
SELECT * FROM Win32_ComputerSystem WHERE PartOfDomain = False
Hello there,
What’s you are doing should be working…i’m currently abroad and cannot test this…
Are you placing the install step after the joining domain section ?
As a workaround, I would create a script that would run at the end of the task and install the applications…or i would create a variable that would capture the domain name…..
If you can wait a little bit; I will see if I have time to work on this and come back with a solution (No guarantee)
Hope this help
Till next time
See ya
ok, thanks. I am adding the above queries to some appications which is in the ‘State Restore’ category. ‘Recover From Domain’ is also in the ‘State Restore’ category but before applications.
Also, which exact step does the PC join the Domain?
Thanks for helping.
David
Hello David,
I have checked the process and it seems to work just fine. My Procedure in two words
1. Create a standard Task sequence
2. Add information in the Customsettings.ini to join the domain (see the posthttp://c-nergy.be/blog/?p=4009 – choose your method)
3. In the task sequence, after the recover from Domain, in add a step that restart the computer
4. in the task sequence,after the restart tasks, we add the install applications step(s) with the wmi query SELECT * FROM Win32_ComputerSystem WHERE PartOfDomain = False
5. And you should be done
We have tested this 2/3 times and each time we had the expected results….
I’m guessing that you were joining the domain but you didn’t reboot the machine so the wmi query was returning not part of domain…
The post http://c-nergy.be/blog/?p=4009 should explain how the join domain happens
Hope this help
Till next time
See ya
Excellent! that worked, issue was that I was missing a ‘Restart Computer’ after ‘Recover From Domain’ step in my TS under State Restore.
Thanks for all your help.
HI,
I set following in CS.ini and set the Application in TS and enabled. But Windows 7 deployed without applying the Application. This application is command line to move profile path from C: to D:User
Also noticed that MININT and _Tasksequence folders in D drive.
CS.ini
SkipApplications=YES
SkipAppsOnUpgrade=YES
Applications001={1bb80667-aeee-409c-a8ad-707b253ee273}
Select Sta
Create the Application to change the Profile Path
reg add “HKLM\SOFTWARE\Microsoft\Windows NT\CurrentVersion\ProfileList” /v ProfilesDirectory /t REG_EXPAND_SZ /d “D:\Users” /f
Error in BDD.log
(Err): 70: CreateObject(Microsoft.BDD.Utility) – Permission denied]
the message is quite clear, you do not have the right to change registry entry or maybe you cannot write on d drive ? is the folder D:\users existing on the system ?
if you try to run the command manually- is this working or failing ? which error are you getting ???
try to run it manually just after end of mdt task and provide us the error
hope this help
till next ime
see a
HI
Thanks for your quick reply. No D:\Users. and i just tried login to the PC with Domain Admin account and run the command got the access denied. Then open CMD run as Administrator and command complete successfully. i can see the D:\Users after restart. But my profile adadmin still in the c drive.
Microsoft Windows [Version 6.1.7601]
Copyright (c) 2009 Microsoft Corporation. All rights reserved.
C:\Users\adadmin>reg add “HKLM\SOFTWARE\Microsoft\Windows NT\CurrentVersion\Pro
fileList” /v ProfilesDirectory /t REG_EXPAND_SZ /d “D:\Users” /f
ERROR: Access is denied.
C:\Users\adadmin>
Hello Asela,
Try to use sysprep file instead of using the registry approach…
I can provide you some pointers where to look. check this link https://technet.microsoft.com/en-us/library/ff715936.aspx
In MDT, you can update the sysrep unattend.xml file and add the info for the proile info..
Hope this help
Till next time
Well, I tried using the packages like this and got an error every time.
No matter which Task I used it against, it error-red out. Any suggestions?
Also, do you have any suggestions regarding hiding certain start menu folders. Like I want to hide the VNC folder from the All Programs line up but cannot find anything about it.
Hello Tony,
Please reformulate question. I do not get it. So you are trying to use bundles and it fails. is it correct ? What’s the error you are getting . Some applications are installed or they all fail immediately ? Have you tried to install the application manually in silent mode and it works…
For your start menu, you could create a script to remove the vnc folder from all programs….
Hope this help
till next time
See ya
Hi,
thanks for this useful blog and work. i have problem with computer naming. i would like to name my computer base on mac address. i looked a lot but i didnt find something helpful. do you have any idea how can we do it with MDT.
Ahmad
Hello There,
You can have a look at this post which provide different ways to set computer name using task sequence/ custom rules or even Powershell Script
Hope this help
Till next time
see ya
Excellent Post!! helped me with TS
I am stuck at a last automation process. After capturing the Wim file to (captures folder) I want to mount Image and insert a customized answer file and unmounts/commit using task sequence.
Hello AMK,
What are you trying to achieve ? Why would you add a custom answer file while you can use MDT To deploy your image and thus using a customized answer file ? if you really want to mount image, insert custom answer file, I would guess that you would need to create a script that would perform the operations you want to do.
something like Dism /Mount-Image …..
Then copy answerfile.wim d:\Windows\….
…
Hope this help
Till next time
See ya
Hello Griffon,
Thanks for the quick reply, In my environment we don’t use MDT to deploy but and offline image on a USB. At the moment, I mount the captured wim and insert the answer file and commit – move it to usb which already has an automated winPE to format and install from WIM file. – hence I am wondering if there is away to mount in the TS, I tried script but can’t get to work 🙂
Hello AMK,
Do you know that you can create an offline installation media from MDT. HAve you looked at the following post (http://c-nergy.be/blog/?p=3968. I think it’s exactly what you are looking for.
Hope this help
Till next time
See ya
Great article – however, unfortunately none of these solutions work for me 🙁
Here is why – and i’m curious on your thoughts
Right now I have 5 task sequences, each task sequences currently call a large script to install the programs, which are all different for each task sequence (think desktop apps, compared to laptop apps, compared to thin pc apps)
I can turn these all into app bundles – no problem, however, then it forces the technician to have to manually click their app bundle (they are going to whine, because right now, they just click the task sequence and it gets their apps). Can I auto mate this? sure I can set their app bundle as a single app install per task sequence(but then this bypasses the app screen) – but with no app screen,there goes the flexibility of changing or adjusting apps (such as office 32bit to 64bit)
am I missing something here? I cannot find a way to auto deliever the app bundles to my specific tasksequnces (w/o having the tech check them, and what if he forgets to check or checks wrong box) AND give the flexibility of choosing apps
🙁
Oooooh
maybe I can pull this off
I think maybe I can hide them, but its going to be complex where I have two app line installs
One multiple (brings up screen)
One single (installs base package for the image, and then those are hidden)
got it!!!!!
my last 3 comments can be merged if you’d like
end result:
All of my task sequences will now call a app install (single) which is an app bundle that is a bundle of a ton of apps that are for that specific task sequence(desktop, laptop, work from home, etc)
This is automated and linked to each specific task sequence, and so all those apps don’t show in the catalog, I have then hidden
Next I run another app install line, but set to multiple, this will prompt the app selection screen.
The app selection screen has everything hidden but specialized apps, one off apps, or apps that only apply to like 10% of the company
Techs can then easily select those to add on top.
good solution, can you tell me more?
I keep on being enthusiastic in writing. I like this article, it’s good to add knowledge that I didn’t know before. thank you very much for writing enthusiasm
@Annisa,
Thanks for your visit and positive feedback… Browse through our blog to see if you can find more useful info. we are trying to write interesting articles but we have some time constraints as well so we trying to focus on subjects that people are really interested in… We are planning since a long time to go back to MDT and deployment solution, we just need time
Till next time
See ya