Hello World,
In part I of this post series, we’ve started at looking how to build up a “standalone (meaning not relying on Active Directory infrastructure) deployment solution. Compared to solution such as SCCM or WDS (Windows Deployment Services), MDT can be installed on a standalone box. However, MDT is missing the most important component for deployment : PXE capabilities.
If you are using SCCM or WDS, PXE capabilites will be present by default. With MDT 2012, you have multiple choices. You can decide to integrate your MDT infrastructure with WDS or SCCM but then you would need to rely on an Active Directory (We don’t want that ! ). The other option is to add the PXE capability to MDT “StandAlone” box.
This post is all about that ! So, get ready
Configuring a PXE Capable MDT Server
Note : In this post, we were already demonstrating how to create a custom PXE server. In this article, we are describing the pxe customization process specifically for situation where you have MDT software deployed. This post will be specifically discussing the PXE capabilities added to an MDT Server.
Adding TFTP Capabilities
In order to deploy OS through network, we will need to have an TFTP server/Service running on our MDT Box. By default, MS does not provide built-in tftp feature. We will need to use a third party tool solution. For our Deployable “Deployment Server”, we have been using the TFTP solution from Solarwinds. We have decided to use this one because it’s small,easy to configure and provide adequate information through logs enabling fast debugging process.
Note: You can use alternative Tftp server solution by downloading and installing the TFTPD32.exe
Step 1 – Downloading the software
So to install your tftp server, you have first to download it. You will need to provide an email address and after then the download will start.
Step 2 – Installing the software
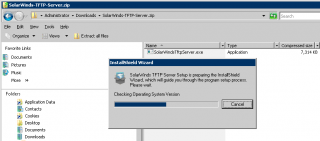
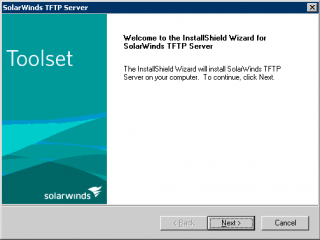
When the download has completed, you can extract the content of the zip file and then you will click on the exe file. The setup wizard will start. Simply accept defaults.
Click on image for better Resolution
Click on image for better Resolution
Step 3 – Configure the software
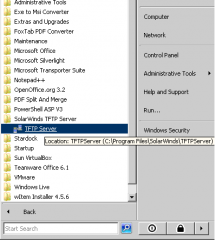
Now that the software is installed, we might need to perform some changes. click on the start button and locate the SolarWinds TFTP folder
Click on image for better Resolution
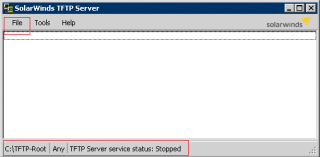
When you click on the “TFTP Server” link, a small dialog box will be displayed. This dialog box will display logs information when there is an interaction with your TFTP Server.
Click on image for better Resolution
In this dialog box, click on the file menu. The server configuration dialog box will be displayed
Click on image for better Resolution
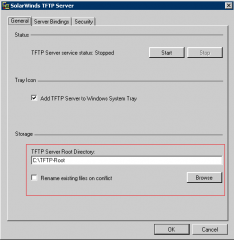
In the General tab, you will see that at the bottom of the dialog box, you can specify the tftp root folder location. The default location when installing the TFTP software is set to c:\TFTP-ROOT. We will need to change that because we want the TFTP server to use the folder structure created by MDT 2012. Click on the Browse button, go to your deployment share(in my example E:\DeploymentShare\Boot) and then select the Boot Folder. Click OK to Close the Dialog box.
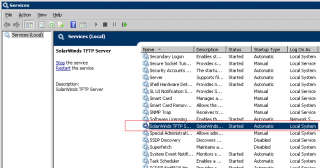
The SolarWinds TFTP Service startup type is set to manual. Because our MDT server is dedicated to perform deployment we want to have the TFTP service set to run automatically (see screenshot below). You simply open your Management console (services.msc), locate the tftp service, change the startup type and start the service – Not started by default –
Click on image for better Resolution
Step 4 – Configure the firewall
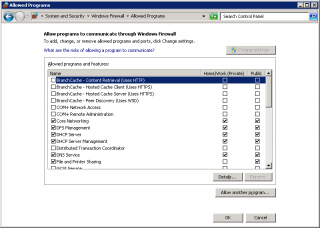
On Windows 2008 R2, you will need to open the firewall for the TFTP server. If you don’t, you won’t be able to download your boot.wim image on the client. To open the firewall, you click on Control Panel > locate the Security Settings > Click on Check Firewall Status. In the new Windows displayed, on the left side, Click on Allow a program through firewall… The following windows will open.
Click on Allow Another Program button
Click on image for better Resolution
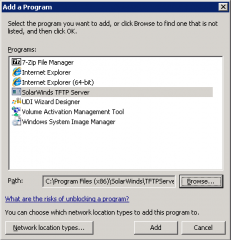
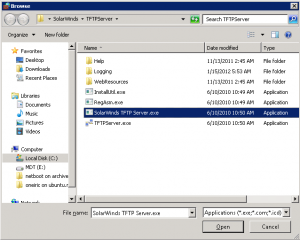
In the new Window, Click on Browse and navigate to the SolarWinds TFTP folder and be sure to select the SolarWinds TFTP.exe file
Click on image for better Resolution
Click on image for better Resolution
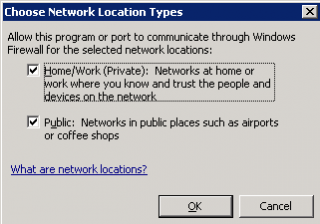
In the Add a program Dialog box, you have a button called Network location. If you click on it, you can specify which network type will be allowed.
Click on image for better Resolution
Press OK, Close your control panel. At this stage, you should have a running TFTP Service that will be able to serve request to your MDT 2012 server. However, we havn’t finished yet. We need to install and configure the DHCP server and optionally a DNS server.
Let’s do this !
Install and Configure your DNS (Optional)
We assume that you are running a Windows 2008 R2 server. To install the DNS Server Role, we will use the powershell command line. In a Powershell Prompt, you would type the following similar to
- Import-module ServerManager
- Add-WindowsFeature DNS,RSAT-DNS
This is an optional component depending if you need or not name resolution on your network.
Install and Configure your DHCP
We assume that you are running a Windows 2008 R2 server. To install the DHCP Server Role, we will use the powershell command line. In a Powershell Prompt, you would type the following similar to
- Import-module ServerManager
- Add-WindowsFeature DHCP,RSAT-DHCP
When the DHCP Role is installed, you will need to configure it. Open your Dhcp console and configure the following options :
- Scope options : 066 Boot server value :host name or IP Address of the Tftp/DHCP server
- Scope options : 067 boot file name value:<%your pxeboot file%>)
- Restart the DHCP
- Scope option: 043 Vendor specific info Value : 01 04 00 00 00 00 ff.
You will then need to configure additional settings through netsh. From a command prompt, type the following commands
C:\WINDOWS\system32>netsh
netsh>dhcp
netsh dhcp>server \\<server name> *OR* <server IP address>
netsh dhcp server>add optiondef 60 PXEClient String 0 comment=PXE support
netsh dhcp server>set optionvalue 60 STRING PXEClient
To verify that the Option 060 was added successfully enter the command:
netsh dhcp server>show optionvalue
Exit issuing command exit and restart your DHCP server.
Configure your PXE Server
We are almost done. We need to tweak a little bit the TFTP Root folder in order to have the Tftp client downloading the LiteTouchXXX.wim images from which they will boot and then start the MDT Deployment Wizard.
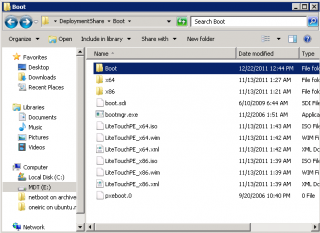
In the <DriverLetter>\DeploymentShare\Boot Folder, we have created a new folder called Boot plus we have copied a some additional files inside the <DriverLetter>\DeploymentShare\Boot. The files are
- bootmgr.exe
- Boot.sdi
- pxeboot.com
The following screenshot shows the content of my tftp root folder
Click on image for better Resolution
Where do you get this files ? Easy ! On a Windows7/windows 2008 R2 media.
If you navigate to <DriveLetter>\boot folder (where drive letter is the drive of the DVD for installation media), you can copy the files into your deployment share
- Boot.sdi (this has to be copied at <driveLetter>\DeploymentShare\Boot)
- fonts folder (this has to be copied at <driveLetter>\DeploymentShare\Boot\Boot\)
In the Source folder of your DVD, you have a boot.wim file as well. You will need to mount this image (using imagex.exe utility) and extract the following file
- pxeboot.com (located in windows\boot\PXE inside the boot.wim )
- Bootmgr.exe (located in windows\boot\PXE inside the boot.wim)
You need to copy these files at <driveLetter>\DeploymentShare\Boot)
Are you still with me ? If yes, we still need to create a custom BCD file in order to reflect our Tftp folder structure. If you have read this post, you know that you can create a batch file that can help you in creating this BCD file. The following screenshot is the batch file I’ve used to create the bcd file. Replace the variable as needed for your environment !!
Click on image for better Resolution
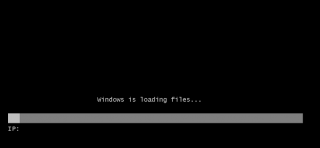
After running the batch, the BCD File is created and placed to the correct location on the Deployment share. And voila, we are done. Our “Standalone” MDT infrastructure is ready. If you pxeboot one of the workstation where your MDT image has to be deployed, you should see the famous screen Windows downloading files…
Click on image for better Resolution
Final Notes
This article was quite long but It was need in order to explain how to have PXE capabilities on a standalone MDT 2012 Server. We have reached our goal i.e. having a standalone deployment server based on MDT 2012 and not relying on Active Directory for the PXE/TFTP part.
This setup can be used in multiple situations and on different network. I’ve setup my All-in-One MDT as a virtual machine and I can easily have this MDT deployed at customer location in order to quickly have the deployment infrastructure ready. This is really cool and a real time saver
In the next part, we will have a quick look at the MDT deployment wizard and see how it works and maybe how to customize and automate it a bit.
Till then
See ya
References :
To customize the PXE folder structure, we have used the information found at http://msdn.microsoft.com/en-us/library/cc722358%28v=ws.10%29.aspx
Related Links

Hello,
I seem to be incapable of tracking down the pxeboot.0 file. Bootmgr.exe is right there in the wim image but there is no trace of the other file. Any other way for me to get my hands on it?
Hello there,
if you have mounted your boot.wim image (using imagex or dsim.exe), you should find in the folder\Windows\Boot\PXE a file called pxeboot.com (and probably a file pxeboot.n12)
This is the file you need. You can rename it to pxeboot.0 (if you want to)
Try Serva as PXE Server and see how fast the new LiteTouchXXX.wim are transfered.
Hello There;
I know the software. However, I wanted to present this solution as well because, in some environments, the customer will never allow the use of third party tools
See ya
Hi,
Well, Serva as PXE server is as third party tool as SolarWinds or Tftpd32.
Plus if you decide to use Serva’s deploying capabilities it’ll save a lot of effort taking virtually no time learning how to use it…
Hello there,
Disregard my last comment.It was not intended to you (sorry, got confused with another comment)
YEs you are right – Tftp32,Serva or solarwinds are to be considered as third party tools
See ya
interesting alternative for adding PXE capabilities to WDS, MDT, SCCM, etc etc etc… with just a single PXE app —REMOVED BY THE MODERATOR—
Griffon, hahah you edited my posting … I was talking about —REMOVED BY MODERATOR—- not about your article…
you are one of a kind ;-)) keep the good work…
Hello nb,
We do not support nor use the product you are mentioning and not willing to promote it. Under normal conditions, all the posts are left untouched. However, we have been the target of “spam” campaign (some people might call this promotion campaign) related to this product. We have been flooded by spam and undesirable comments. This is why the product name has been removed.
Till next time
See ya
spam?? Then for you if I mention some free software that does something probably better than your article I’m a “spammer”?? you call my first post here “advertising campaign”?? that’s just not fair…
I think you should take criticism not personally.
1. I do not see any criticism in your comments -> thus, I cannot take it personally 🙂
2. Feel free to use any software you think is better for your needs. We are just sharing our experience/workaround/solutions.
3. Yes, we have faced spam related to the product you wanted to mention. people have used this blog to promote the product by placing links in the comment section. As you probably know, this is a known Technic to improve visibility on internet. This is clearly SPAM. Sorry, you are paying for these people
4. Our previous comment was not targeted to you personally. We tried to explain why the product name has been removed. We never said that you were at the origin of the spam or promotion campaign. Please see Point 3.
I hope this clarify the situation. We hope we can close this Topic.
Till next time
See ya
I really cannot see how this post could be the target of a marketing campaign? how many readers do you have a day? 20? 30?… anyway…
Let’s go back to the technical stuff;
I have tried the WDS method, I have tried your method (using Solarwinds and also Tftpd32), and then I have tried the application I cannot mention (let’s call it SSSSS); could you please explain me why when I use your method (no matter what TTFTP server I use) the transfer of the LiteTouchXXX.wim is much (way much) slower than using WDS or SSSSS?? I have tried all possible BCD tweaks but I’m always getting the same results…? I’m puzzled on this.
Any help, appreciated.
See http://technet.microsoft.com/en-us/library/cc732649(v=ws.10).aspx#TFTP
Improvement due to Windows size “feature” which is implemented in WDS but not in solarwind.
Till next time
See ya
I see, well I do not want to use WDS because it forces me to use MS Server, and Solarwinds and TFTPD are really slow; I think I’m going to stick to SSSSS that is as fast as WDS but runs on non-Server platforms. Thanks a lot.
Hello Griffon,
i tried to build standalone deployment server and can make it work. few question would like to clarify
1. Scope options : 067 boot file name value:) (is this litetouchPE_64x.wim?
2. where i can find this file pxeboot.0? cant find in the media.
3. if i add opton 060 i always hit with error pxe-e55 proxydhcp service did not reply on port 4011 and if i remove i will receive error PXE-E79 nbp is too big
I appreciate your help on this. Thank you.
Hello Jiro,
To answer your question
1. option 067 in DHCP is pxeboot.com (or pxeboot.0 or pxelinux.0 depending of the pxe boot file you are using)
2. In the source folder of your DVD, you have a boot.wim file as well. You will need to mount this image (using imagex.exe utility) and extract the following file pxeboot.com (located
in windows\boot\PXE inside the boot.wim ) Bootmgr.exe (located in windows\boot\PXE inside the boot.wim). I tend to rename this file…sorry
3. this error appears when the dhcp server and pxe server are located on different servers. Can you tell me if you are running everything (dhcp,tftp server on the same server or did you split the roles…) Configure already the dhcp option 067 and see if the problem still appears (pxe-e55)
Hope this help
Hi Griffon,
Thanks for the reply.
1. I will try to add pxboot.com as the value
2. i use 7 zip to extract the bootmgr.exe and pxeboot.com but unable to find pxeboot.0
3 DHCP and tftp server role are in the same server.
Hey Reccawa,
Just to be clear and repeat what I’ve said in the previous comment
There is no pxeboot.0 when you extract data from the boot.Wim file. the pxeboot.0 is in fact the file called pxeboot.com that has been renamed as pxeboot.0
I hope this clarifies the topic…
I think I’ll change the post to mention to use the pxeboot.com file. It might be confusing for people 🙂
Till Next Time
See ya
Hi Griffon,
Thank you very much for this. i would try it out and let you know the result 😉
if you could help uploading the video via youtube or any other site on the standalone server setup that would be great. i appreciate your time on this.
Thanks again.
Hello Griffon,
i still encounter the same error “pxe-e55 proxydhcp service did not reply on port 4011”. not sure where goes wrong.
below is my BCD file
Rem Creates BCD (boot configuration data) for Windows PE 3.0
set BCD-File=c:\DeploymentShare\Boot\BCD
del %BCD-File%
Bcdedit /createstore %BCD-File%
Bcdedit /store %BCD-File% /create {ramdiskoptions} /d “Ramdisk options”
Bcdedit /store %BCD-File% /set {ramdiskoptions} ramdisksdidevice boot
Bcdedit /store %BCD-File% /set {ramdiskoptions} ramdisksdipath \boot\boot.sdi
for /f “tokens=1-3” %%a in (‘Bcdedit /store %BCD-File% /create /d “WinPE x86” /application osloader’) do set guid1=%%c
Bcdedit /store %BCD-File% /set %guid1% systemroot \Windows
Bcdedit /store %BCD-File% /set %guid1% detecthal Yes
Bcdedit /store %BCD-File% /set %guid1% winpe Yes
Bcdedit /store %BCD-File% /set %guid1% osdevice ramdisk=[boot]\boot\LiteTouchPE_x64.wim,{ramdiskoptions}
Bcdedit /store %BCD-File% /set %guid1% device ramdisk=[boot]\boot\LiteTouchPE_x64.wim,{ramdiskoptions}
Bcdedit /store %BCD-File% /create {bootmgr} /d “Windows Vista BootManager”
Bcdedit /store %BCD-File% /set {bootmgr} timeout 30
Bcdedit /store %BCD-File% /set {bootmgr} displayorder %guid1%
Bcdedit /store %BCD-File% /enum all
Please help me on this.
Hello,
look like you dhcp is not configured correctly….
are you sure you have open the firewall for the TFTP service (whatever tftp server you are using)
Have you configured your DHCP Correctly, can you confirm that the option 060 is set correctly and at the good level…
Can you provide input about your dhcp configuration (screenshots possibly)
Hello Griffon,
Thanks for you reply. how do i send the screen capture to you? can i have your email?
at the moment i provider the information for option 60 and the new error that i get.
1. i follow your script to add option 60 on the DHCP. under the server options “060 PXEClient option checked and the String Value : PXEClient
2. error message when i pxe boot as below
Windows bootmanager (server ip:192.168.002.002)
Windows failed to start. A recent hardware or software change might be the cause to fix the problem
1. Insert your windows installation disc and restart your computer
2. Choose your language setting, and click “next”
3. Click “repair your computer”
If you do not have this disc, contact your system administrator or computer manufacturer for assistance.
File: \Boot\BCD
Status : 0x000000f
Info : An error occurred while attempting to read the boot configuration data.
Thank you and sorry for asking too many question.
hello there,
you have specified the wrong boot root path folder. you should have checked the screenshot in the post…..
instead of typing [boot]\boot\litetouchpe_x64.wim, you should use [boot]\litetouchPE_x64.wim.
this is the corrcted version of the script that you need to use
Rem Creates BCD (boot configuration data) for Windows PE 3.0
set BCD-File=c:\DeploymentShare\Boot\BCD
del %BCD-File%
Bcdedit /createstore %BCD-File%
Bcdedit /store %BCD-File% /create {ramdiskoptions} /d “Ramdisk options”
Bcdedit /store %BCD-File% /set {ramdiskoptions} ramdisksdidevice boot
Bcdedit /store %BCD-File% /set {ramdiskoptions} ramdisksdipath \boot.sdi
for /f “tokens=1-3″ %%a in (‘Bcdedit /store %BCD-File% /create /d “WinPE x86″ /application osloader’) do set guid1=%%c
Bcdedit /store %BCD-File% /set %guid1% systemroot \Windows
Bcdedit /store %BCD-File% /set %guid1% detecthal Yes
Bcdedit /store %BCD-File% /set %guid1% winpe Yes
Bcdedit /store %BCD-File% /set %guid1% osdevice ramdisk=[boot]\LiteTouchPE_x64.wim,{ramdiskoptions}
Bcdedit /store %BCD-File% /set %guid1% device ramdisk=[boot]\LiteTouchPE_x64.wim,{ramdiskoptions}
Bcdedit /store %BCD-File% /create {bootmgr} /d “Windows BootManager”
Bcdedit /store %BCD-File% /set {bootmgr} timeout 30
Bcdedit /store %BCD-File% /set {bootmgr} displayorder %guid1%
Bcdedit /store %BCD-File% /enum all
hope this help
till next time
See ya
Hello Griffon,
i use the BCD script given by you above however still getting the same error 🙁
People usually get confused by the role of PXE and DHCP server.
When you have a real PXE server (such as WDS/SCCM/MDT), you should NEVER set DHCP option 66 and 67, since this is exactly the role of the PXE server to send these details to the requesting PXE clients.
If PXE servcie and DHCP sends the same options 66 and 67, no problem. Now if you change PXE server’s settings in such a way that option 66 and 67 will be modified but forget to propagate that change to DHCP server (manually), the DHCP server options will usually have a higher priority and will “win”
More details in my article here (and its comments).
http://www.experts-exchange.com/Networking/Misc/A_2978-PXEClient-what-is-it-for-Can-I-use-PXE-without-it.html
Furthermore, DHCP option 43 should also never be set in the DHCP server option itself. This is the role of the PXE server to set it.
PXE specs are not clear but as a PXE expert, I am 150% sure of what I say.
Hi Griffon
I have a problem with the pxeboot.
I have build a virtual server (vmware 10)
server 2012 r2
MDT 2013
WDS
It’s all on the same server
Virtual Clients also vmware 10
It’s all on the same physical computer.
when I pxeboot within my virtual invironment it woks perfect.!!
But when i try to pxeboot from a physical client to my virtual wds server I get this errors
TFTP.
PXE-t04: Access violation
DASH-E36: Error received from TFTP server
DASH-M0F: Exiting option ROM
My DHCP server is not on the same network, BUT is configured to see my WDS.
Personally I have no access to the DHCP server, only the network administrator has, but he assured me that it is set up correct.
We can’t figure out way we get this errors.?
I’m not on a domain or have AD
The physical client get’s correct IP from the DHCP server.
I’m temptet to try your TFTP, but can it work when the DHCP is on a different network.?
Hello there,
First guess based on your description is a network/dhcp config issue….
You might be missing an ip helper or dhcp relay….
Hope this help
Till next time
See ya
According to the network administrator IP helper is already running.
Thx for helping. 🙂
keep up the good work.
Hello Den,
I’m currently abroad so I cannot test fully your situation….
I see that you are running WDS/Windows 2012 R2… are you using a custom tftp solution (like tftp32.exe) or the build capability of the WDS in 2012 R2. you might wanna check this post first (http://c-nergy.be/blog/?p=4557).
Now concerning your issue….
1. Can you check that you have provided the correct value for DHCP for option 066 and 067 -> I’m assuming yes given that you can boot from PXE with your Virtual Infrastructure….
2. Can you try to manually download a file from the tftp server (which would be the WDS server) by installing the tftp client on computer on the remote network and issue a command similar to tftp -i GET \boot\x64\pxeboot.n12 (Adapt this command based on your netzork infra). Do the same test on physical computer located on the same network as the WDS ?
Do you see a difference. if remote download fails, this might mean that network is not configured accordingly
3. Can you check the WDS log files to get more information about the issue or the event viewer (WDS log files)
4. do you have firewall between you segments, can you check that the UDP port used by WDS are open on the switch/firewall
5. You could check this MS KB (http://support.microsoft.com/kb/977512) and see if this might be your issue (but It’s specific to 2008/R2). I do not know if this might affect Win 2012 R2
Check already this and see if you can get more information about the issue and try to isolate the issue…..
Is this a network problem or a VMWARE Problem 🙂
Till next time
See ya
Hello Griffon,
I am confused how the network will handle both (?) dhcp server. Because, the novice home company, uses dhcp server on the adsl router itself right ? So what happens if we create a Windows Server DHCP server role ? How should I manage that ?
Hello Mikoyan,
Good question. In theory, you cannot have two dhcp on the same subnet….DHCP is using broadcast. So this means that the client asking for an ip address will make a request and the first server to answer will provide the ip offering…. If your adsl router support pxe options, you could use this dhcp with no problem. It’s not mandatory to have TFTP and DHCP server on the same server… If this is not an option, you could use mac filtering (if supported by the adsl router), so the pxe client will never get ip from adsl router but from the other dhcp server….
There might be plenty of other options (such as segmenting your network or using virtual technology to create a dedicated network and still have access to internet….
That’s up to you
Hope this help
Till next time
See ya
So can I have two DHCP servers running in two different subnets, same network? This will result in what you said about “first DHCP server to answer will provide the IP offering”. Isn’t results in conflict?
Hello,
Sorry for delay in answer but busy with a lot of stuff lately….
If you have two different subnets, you can have two dhcp server located in the different subnet. The DHCP is using broadcast technology and does not cross routers…
The client located in the same subnet as the DHCP server will always connect to the dhcp server located on the subnet….
I hope that i understood your question correctly and that I provided the expected answer as well
Till next time
See ya
Don’t need to sorry, you’re helping me a lot, learning great time here. In my case, DHCP server (2) from windows server role would be phisically ‘wired’ “inside” DHCP” server (1) from adsl router. Structure is like: adslswitchclients (including one of W2k8 servers).
Griffon, First off thank you so much for the walk-through’s. I’m a newb to MDT/WDS.. I have a question though. I’m getting an error during PXE boot related to the BCD file. A generic MSFT error 0xc0000034. I ran your batch script, modified for my paths obviously, but this error persists.
My BCD.bat:
Bcdedit /createstore %BCD-File%
Bcdedit /store %BCD-File% /create {ramdiskoptions} /d “Ramdisk Options”
Bcdedit /store %BCD-File% /set {ramdiskoptions} ramdisksdidevice boot
Bcdedit /store %BCD-File% /set {ramdiskoptions} ramdisksdipath \boot\boot.sdi
for /f “tokens=1-3” %%a in (‘Bcdedit /store %BCD-File% /create /d “WinPE x64” /application osloader’) do set guid1=%%c
Bcdedit /store %BCD-File% /set %guid1% systemroot \Windows
Bcdedit /store %BCD-File% /set %guid1% detecthal Yes
Bcdedit /store %BCD-File% /set %guid1% winpe Yes
Bcdedit /store %BCD-File% /set %guid1% osdevice ramdisk=[boot]\boot\LiteTouchPE_x64.wim,{ramdiskoptions}
Bcdedit /store %BCD-File% /set %guid1% device ramdisk=[boot]\boot\LiteTouchPE_x64.wim,{ramdiskoptions}
Bcdedit /store %BCD-File% /create {bootmgr} /d “Windows COCO BootManager”
Bcdedit /store %BCD-File% /set {bootmgr} timeout 30
Bcdedit /store %BCD-File% /set {bootmgr} displayorder %guid1%
Bcdedit /store %BCD-File% /enum all
Also of note, I’ve ran the script as Admin on both a Server 2012, Win8.1 and Win7 hosts with no help.
Thanks
Hello there,
message error means your are missing boot configuration
what the root folder of your tftp server ? is it \ or is it \boot ?
try to create a new bcd file….instead of using \boot\boot use only \boot
hope this help
till next time
see ya
I’m running that SolarWinds tftp server so my tftp path is c:\tftp-root
The folder structure is c:\tftp-root\boot. The boot subfolder is where bcd, boot.sdi, lighttouchpe_x64.wim and the Fonts folder lives.
I revamped the BCD file using these changes to the script:
bcdedit /store %BCD-File% /set %guid1% osdevice ramdisk=[boot]\LightTouchPE_x64.wim,{ramdiskoptions}
bcdedit /store %BCD-File% /set %guid1% device ramdisk=[boot]\LightTouchPE_x64.wim,{ramdiskoptions}
Still get the same 34 error.
Oh wait.. I found this: http://c-nergy.be/blog/?p=458 below you commented about how copy/paste the script text off your page will bring over invalid quote characters. Replacing them made my script work correctly! However even though a full BCD is being created now I’m getting a different error. A required device isn’t connected.
hello Ben,
it s seems that you didn t copy the files to the correct location based on your bcd extract.
either you move the files from tftp-root\boot to tftp-root or you change the bcd file to
bcdedit /store %BCD-File% /set %guid1% osdevice ramdisk=[boot]\boo\LightTouchPE_x64.wim,{ramdiskoptions}
bcdedit /store %BCD-File% /set %guid1% device ramdisk=[boot]\boot\LightTouchPE_x64.wim,{ramdiskoptions}
hope this help
till next time
see ya
Thanks Griffon.. That’s my original path was tftp-root\boot. Funny though because when I put the \boot back in there, regenerate my BCD it friggin works! The Generic wim booted successfully.. not to go back to the lite touch.
Thanks G
Hello Ben,
No problem… we are happy that we could help
till next time
See ya
Hi,
Do you still support this? I am trying this out but I am stuck at the Create BCD part.
@Sam,
This procedure should be still working indeed.. Even do windows 2012 R2 make it easier to implement pxe solution, we are still keen on using a custom pxe solution for more flexibility
Till next time
See ya