Hello World,
Today, we will continue our journey through MDT 2012 Update 1 product. In our previous posts about MDT, we have seen already a lot of things. You can have a look at our previous posts
- Part I : Installing MDT
- Part II : MDT Deployment Share
- Part III : Deploying OS with MDT
- Part IV : Adding PXE Capabilities to MDT
- Part V : Perform a Basic MDT Deployment
- Part VI: Branding your MDT Infrastructure
- Set Screen Resolution automatically with MDT
This post will focus a little bit on a new feature : Powershell Scripting.
Overview
MDT 2012 and previous versions have been using vbscript extensively in order to automate and hide complexity of the deployment. With MDT 2012 update1, you can now use Powershell script in order to automate a series of tasks. If you are using MDT 2012 Update 1, you will be able to use transparently your powershell script within your task sequence. In fact, when you add a step in your task sequence, you will see that you can simply specify powershell script option. I’ve seen in numerous blogs (may be a little bit outdated) that some people where trying to execute complex command line in order to have the Powershell scripts running. The major blocking point was the Powershell Execution Policy. In MDT 2012 Update1, if you add a powershell script in your task sequence, you will not need to perform any of these workarounds.
Configuring MDT for Powershell
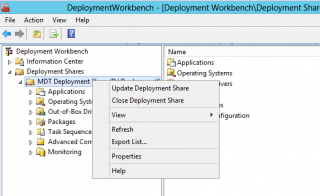
By default, Powershell components are not included in the winpe boot images. You will need to include these packages into your images in order to be able to use them. The process is quite easy. Open your Deployment Workbench console, right-click on your Deployment Share and Select Properties.
Click on Picture for better Resolution
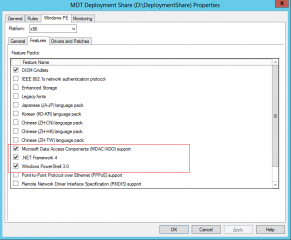
In the Properties page, you will go to the WINPE Tab and you will then select the Features tab. You will need to tick the following options in order to be able to use the Powershell scripting capabilities in the pre-installation environment :
- PowerShell 3.0
- Net Framework 4.0
- MDAC/ADO can be included as well
You will have to perform this action for both x86 and x64 WINPE architecture.
Click on Picture for better Resolution
Click on Picture for better Resolution
Click on Apply
Click on OK to close the Properties page
Right-click again on the Deployment Share and select Update Deployment Share.
And Voila ! You’ve just added Powershell capabilities to your WINPE environment.
Using Powershell script in your Task sequence
Overview
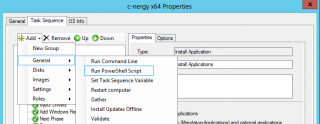
As mentioned above, MDT 2012 Update 1 make it really easy to integrate PowerShell scripts within your task sequence. You do not need to run your script as command line. MDT 2012 Update 1 includes a proper Run a PowerShell Script as show below
Click on Picture for better Resoluion
When this step type is added, MDT will automatically load the necessary module(s) prior running the script. The Microsoft.BDD.TaskSequenceModule module will create TSENV: and TSENVLIST: Windows Powershell drives. These PowerShell drives can be used to retrieve/modify the task sequences variables defined by MDT (such as OSDComputerName, Architecture,…) but there is a catch !
These PowerShell Drives are only available while the task sequence is running. In other words, if you press F8 to open a command prompt in your WINPE environment, type powershell.exe to access the powershell engine and you try to do get-childitem TsEnv:, you will get nothing. You will not be able to access the PS Drives in real time by default.
If you really need to have access to these additional PSDrives, you will need to perform a specific procedure. In summary, you will need to
- load the ZTIUtility.psm1 module (which is located under <%\\MDT SERVER%>\DeploymentShare$\Tools\Modules\ZTIUtility folder) and can be found under C:\MININT\Modules\ZTIUtility folder in the WINPE Pre-installation environment. . To load this module, you will simply type Import-module <%_path_to_foler%>\ZTIUtility.psm1.
- You will then need to set the Powershell Execution Policy to unrestricted. When this is done, you will be able to access the Powershell PS Drives that can be used with PowerShell. If you follow this process, you will be able to test your Powershell Scripts and see what they would effectively do during the task sequence.
Usually, you will not need to access these PSDrive in real time. You should use the procedure described above only if you need to debug some of your PowerShell Scripts
Configure a task sequence to run PowerShell Script
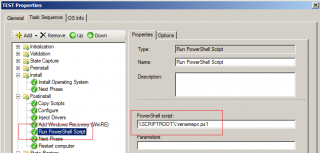
We are almost done ! As you can see, using PowerShell script is quite straightforward. In this previous post, we’ve briefly spoken about a Powershell script that could be used to rename computer using a task sequence instead of using the CustomSettings.ini file. We will briefly demonstrate how to use this script which is called RenameConputer.ps1. You will need to copy the script in your MDT Script folder (which is located <%\\MDT SERVER%>\DeploymentShare$\Scripts). You can now create your Task sequence and add the PowerShell Script Step.
Click on Picture for better Resoluion
In the PowerShell Script node, you will have a screen similar to the following. In the screenshot, you can see how we have specified the Powershell Script path.
Click on Picture for better Resoluion
Again, in this example, we assume that you have saved you PowerShell script in the Script Folder under the Deployment Share. That’s it ! This is all you need to do in order to have your PowerShell Script running. You will not have to care about the Execution Policy. It will run automagically !
Configure a task sequence to run PowerShell Script during PreInstallation Stage
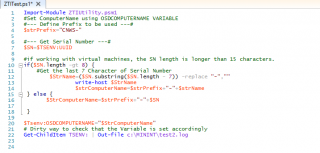
If you want to set the computername during the Preinstall operation, you could also use a PowerShell Script and set the value for the variable OSDComputerName. You will first need to create the PowerShell Script you wanna use to set the value for the OSDComputername. I will be using the following script below in order to illustrate the situation. As you can see, the script is quite basic. I’ll retrieve the UUID variable value, make some text manipulations and concatenate the obtained value with the prefix we wanna use. This value will be the one that will be used to set the value for the OSDComputerName variable.
Click on Picture for better Resolution
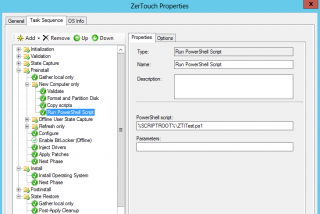
You will then need to add a step in your Task Sequence in order to run the PowerShell Script we want to use to set the value for the OSDComputername.
Click on Picture for better Resolution
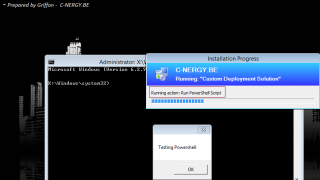
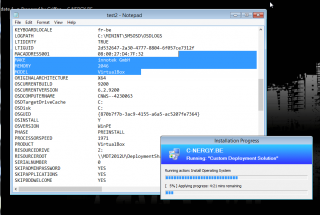
During the Preinstall steps, by monitoring the Progress bar, you should see when the Powershell Script is running
Click on Picture for better Resolution
You can then check that the OSDComputer has been set to the correct value by quickly checking the log file generated by the PowerShell Script.
Click on Picture for better Resolution
Finally, when the deployment has been completed, you can check that the hostname of the machine is effectively set to the value generated by the script
Click on Picture for better Resolution
Final Notes
In this post, we have quickly demonstrate how to use PowerShell Script within your MDT deployment. Nowadays, PowerShell is used extensively and you can perform quite a lot of tasks and automation with a minimum amount of efforts. This addition to MDT is really a great feature. In a future post, we will describe how we have achieved Zero Touch automation by combining the different features of MDT and especially how we have used some PowerShell script to rename and to join the machines into an Active Directory Domain.
But this will be for later
Till Then
See ya

Griffon, question for you. I receive a message after the OS deployment “successfully” completes:
The term ‘Remove-AppPackage’ is not recognized as the name of a cmdlet, function, script file, or operable program. Check the spelling of the name, or if a path was included, verify that the path is correct and try again.
At \\10.10.10.10\SHB-DEP$\Scripts\RemoveApps.ps1:8 char:1
+ Remove-AppPackage Microsoft BingNews_4.6.169.0_x86_….
Every line of the PowerShell script produces a similar message. Any ideas what might be going on? I followed all your steps to a t. Any help would be much appreciated.
Thanks,
Bob
@Bob Mowchan,
The error seems to say it all. The remove-AppPackage is not a known Cmdlet. Maybe, you have to use Remove-AppXPackage and see if this is working
The error does not seems to be related to either MDT nor the powershell process capability of MDT. It seems to be an error in the script
Maybe share the code of your script, so we can have a look
hope this help
Till next time
See ya
This is a simple script that I want to run at the end of the installation to put a static ip on the computer.
But it doesn’t run, the restriction policy is correctly activated to be able to run powershell scripts.
I suspect that the interactive instruction to request the IP number does not work.
Any idea what could happen.
I suppose it is possible to run an interactive script.
Any ideas?
$ip=Read-Host “Enter IP : ”
New-NetIPAddress –InterfaceAlias “Ethernet” -IPAddress $ip –PrefixLength 23 -DefaultGateway 10.52.178.1
Set-DnsClientServerAddress -InterfaceAlias “Ethernet” -ServerAddresses 10.42.68.254, 10.42.68.253
@Fernando;
Thank you for visiting our blog and providing some feedback and sharing your experience. At the moment, I do not have MDT up and running… So I cannot test your code right now… We are quite busy with some projects and it might take some time before we can answer your question. Maybe you can you use the build feature of MDT where you normally get the option to specify if you want to use a static ip
As soon as we have some time, we will try to provide some feedback on your question
Till next time
See ya