
IMPORTANT NOTE
Since Ubuntu 15.04, Upstart component has been replaced by systemd process. This change can have an impact on how the xrdp functionality is working. If you want to perform a custom installation on Ubuntu 15.04, please use the updated version of the script which can be found at (XRDP- Perform a Custom installation on Ubuntu 15.04 (with Systemd))
if you have performed the custom installation on ubuntu 15.04 using the script in this post, xrdp service will not start. To fix this issue, please refer to the following article http://c-nergy.be/blog/?p=8316.
Hello World,
As a follow up of the previous post, we will quickly describe how to perform a custom xrdp installation on Ubuntu 15.04. Since the previous release, the process is still the same. Nothing has changed. However, in order to bring something new, we have slightly modified the install-xrdp.sh script we have written to make life even easier for the users.
If you are a regular reader of this blog, you know that our xrdp posts are quite popular and that we have already provided information about how to perform a custom installation. This time we will simply check that the updated script is working as expected. If this is the case, the only thing you need to do in order to perform a custom installation is to run the script provided hereafter…
Sweet 🙂
Why a custom installation ?
We are performing and testing custom installation because we can use the bleeding edge version of xrdp. Ubuntu is using package 0.6.xx which is fully supported by the team behind xrdp. With the custom installation, we will be using the package 0.9.xx. We wanna see the progress made by the team and see how the solution is evolving.
The custom installation will also configure the system to always reconnect to the same session. This element is of less importance since Ubuntu has updated the xrdp package and since you can reconnect to the same session with no additional configuration.
The Process
As mentioned above, in order to perform the custom installation, we have written a small script that perform all the necessary actions for you. We are providing a installation script to perform the installation. Because we have already explained, the different steps in our previous post (check this one –Ubuntu 14.04 – Perform a custom XRDP Install (using X11VNC)), in this post, we will simply run the xrdp-install.sh script and see if the process is still valid.
Note, however, that we have updated the script in order to set the Xvnc-sesman option in the xrdp login screen as the default option. We have noticed that a lot of people didn’t pay attention to that and people were thinking that the solution was not working.
The Updated Script
In this script, we are installing the MATE-Desktop which is our favourite desktop environment. If you want to use another, you will have to update the script provided hereafter
Disclaimer : As usual, use this at your own risk !!
The script
################################################################
# Script_Name : xrdp-install.sh
# Description : Perform an automated custom installat of xrdp
# on ubuntu 15.04
# Date : February 2014
# written by : Griffon
# Web Site :http://www.c-nergy.be - http://www.c-nergy.be/blog
# Version : 1.3
#
# Disclaimer : Script provided AS IS. Use it at your own risk....
#
##################################################################

#-Go to your Download folder

echo "Moving to the ~/Download folders..."
echo "-----------------------------------"
cd ~/Downloads

#Download the xrdp latest files
echo "Ready to start the download of xrdp package"
echo "-------------------------------------------"

wget https://github.com/neutrinolabs/xrdp/archive/master.zip

#Unzip xrdp package

echo "Extracting content of xrdp package..."
echo "-----------------------------------"
unzip master.zip

#Install prereqs for compilation

echo "Installing prereqs for compiling xrdp..."
echo "----------------------------------------"
sudo apt-get -y install autoconf libtool libpam0g-dev libx11-dev libxfixes-dev libssl-dev libxrandr-dev

#Install the desktop of you choice - I'm Using Mate Desktop

echo "Installing alternate desktop to be used with xrdp..."
echo "----------------------------------------------------"
sudo apt-get -y update
sudo apt-get -y install mate-core mate-desktop-environment mate-notification-daemon --force-yes
echo "Desktop Install Done"


#Configure the Xsession file
echo mate-session> ~/.xsession

#Install the X11VNC
echo "Installing X11VNC..."
echo "----------------------------------------"

sudo apt-get -y install x11vnc

#Add/Remove Ubuntu xrdp packages (used to create startup service)

echo "Add/Remove xrdp packages..."
echo "---------------------------"

sudo apt-get -y install xrdp
sudo apt-get -y remove xrdp

#Compile and make xrdp

echo "Installing and compiling xrdp..."
echo "--------------------------------"

cd xrdp-master
# needed because libtool not found in Ubuntu 15.04
# Need to use libtoolize

sudo sed -i.bak 's/which libtool/which libtoolize/g' bootstrap

sudo ./bootstrap
sudo ./configure
sudo make
sudo make install


#Final Post Setup configuration
echo "---------------------------"
echo "Post Setup Configuration..."
echo "---------------------------"

echo "Set Default xVnc-Sesman"
echo "-----------------------"

sudo sed -i.bak '/\[xrdp1\]/i [xrdp0] \nname=Xvnc-Sesman-Griffon \nlib=libvnc.so \nusername=ask \npassword=ask \nip=127.0.0.1 \nport=-1 \ndelay_ms=2000' /etc/xrdp/xrdp.ini

echo "Symbolic links for xrdp"
echo "-----------------------"

sudo mv /etc/xrdp/startwm.sh /etc/xrdp/startwm.sh.backup
sudo ln -s /etc/X11/Xsession /etc/xrdp/startwm.sh
sudo mkdir /usr/share/doc/xrdp
sudo cp /etc/xrdp/rsakeys.ini /usr/share/doc/xrdp/rsakeys.ini

echo "Restart the Computer"
echo "----------------------------"
sudo shutdown -r now
Set Execute rights on the script
You can copy/paste the script into a text file in your home directory and save it as xrdp-install.sh. In order to be able to run this script, you will need to make the script executable. Right-click on the file, go to properties, then select permissions and tick the box allow executable….

Click on Picture for better resolution
or you can use the command line to perform the same action. Open your Terminal console and issue the following command
chmod +x ~/Downloads/install-xrdp.sh
(if the file is located in your home directory in the Download Directory. Adapt the path accordingly…)

Click on Picture for better resolution

Execute the script
You are now ready to execute the script. we assume that you have internet connection available. The script needs to download the xrdp package (the latest version from the xrdp community) from internet. When you are ready, you can execute the script by issuing the following command in the command prompt.

Click on Picture for better resolution
We assume that you have downloaded or created the file in the your home folder under the Download folders. If this is not the case, browse to the location and execute the script from there.
Wait for completion of the script. The machine will reboot automatically when done.
Configuring your xRDP keyboard layout
Manual Configuration
As in the past, the xRDP login screen will use by default an en-us keyboard layout. You remote session will also be using the en-us keyboard layout. This can be changed. In my case, I’m using a Belgian French keyboard, so I had to tell xrdp to use the belgian french keyboard as well. To do that, you need to perform the following actions :
Step 1 : You go to the /etc/xrdp directory
Step 2 : you issue the command setxkbmap -layout <%your layout%> to define which keyboard map/layout to use

Click on Picutre for better Resolution
Step 3 : create a copy of the km-0409.ini file into the same directory. It seems that this is the default file used by xrdp to define the keyboard layout. You will need to use sudo in order to be able to write into the directory
Step 4 : Check that you have a backup of your file by typing the dir or ls command
Step 5 : update the file by issuing the following command sudo xrdp-genkeymap km-0409.ini

Click on Picutre for better Resolution
Test your xRDP Connection
Here, what you want to test is that you can effectively reconnect to the same session. To test that, you will connect a first time to your remote Ubuntu machine, open some applications and then disconnect. If the xrdp installation completed successfully, you should see the xRDP login screen (see screenshot)

Click on Picture for better resolution
Check also your keyboard layout in the xRDP login and check that the layout has been set correctly. Remember that by default, xRDP login screen will use EN-US keyboard layout if you do not have configured any other additonal keyboard layout (see section above).
Final Notes
As you can see, we have provided some small improvement to our installation script. All in all the process remains the same as in the past. I like the xRDP solution even if incomplete. The only thing I do not like is the login screen which is really not appealing and sexy.
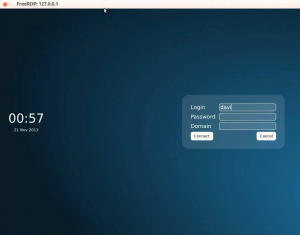
As mentioned already in a previous post, we would like to see a cool and sexy xrdp login page. Something similar to the one provided by the FreeRDS project. (see screenshot below). It’s may be time to post a request feature for this sexy login page on the xrdp github web site.
In the coming post, we will see how can perform a basic customization of the xrdp login when using the latest version from the github repository.
Hope you still enjoy these posts about xRDP
Till next time
See ya
HI Griffon,
I’ve used you’re guide to set-up xrdp on Ubuntu 15.04 (http://c-nergy.be/blog/?p=7984).
this worked perfectly, after using this i found out that clipboard sharing wasn’t working. It should work from version 0.7.
So I decided to use this guide to install the latest version. After running your script successfully the xrdp daemon won’t start any more.
I get the following message:
journalctl -xe
— Defined-By: systemd
— Support: http://lists.freedesktop.org/mailman/listinfo/systemd-devel
—
— Unit xrdp-sesman.service has begun starting up.
Mai 13 11:50:22 TEST-UBUNTU sudo[2405]: pam_unix(sudo:session): session closed for user root
Mai 13 11:50:22 TEST-UBUNTU polkitd(authority=local)[831]: Unregistered Authentication Agent for unix-proc
Mai 13 11:50:33 TEST-UBUNTU sudo[2434]: me : TTY=pts/5 ; PWD=/home/me ; USER=root ; COMMAND=/usr/bin/apt-g
Mai 13 11:50:33 TEST-UBUNTU sudo[2434]: pam_unix(sudo:session): session opened for user root by me(uid=0)
Mai 13 11:50:34 TEST-UBUNTU sudo[2434]: pam_unix(sudo:session): session closed for user root
Mai 13 11:51:15 TEST-UBUNTU sudo[2450]: me : TTY=pts/5 ; PWD=/home/me ; USER=root ; COMMAND=/usr/sbin/serv
Mai 13 11:51:15 TEST-UBUNTU sudo[2450]: pam_unix(sudo:session): session opened for user root by me(uid=0)
Mai 13 11:51:15 TEST-UBUNTU polkitd(authority=local)[831]: Registered Authentication Agent for unix-proces
Mai 13 11:51:15 TEST-UBUNTU systemd[1]: Failed to load environment files: No such file or directory
Mai 13 11:51:15 TEST-UBUNTU systemd[1]: xrdp-sesman.service failed to run ‘start’ task: No such file or di
Mai 13 11:51:15 TEST-UBUNTU systemd[1]: Failed to start xrdp session manager.
— Subject: Unit xrdp-sesman.service has failed
— Defined-By: systemd
— Support: http://lists.freedesktop.org/mailman/listinfo/systemd-devel
—
— Unit xrdp-sesman.service has failed.
—
— The result is failed.
Mai 13 11:51:15 TEST-UBUNTU systemd[1]: Dependency failed for xrdp daemon.
— Subject: Unit xrdp.service has failed
— Defined-By: systemd
— Support: http://lists.freedesktop.org/mailman/listinfo/systemd-devel
—
— Unit xrdp.service has failed.
All the dependencies should be installed.
sudo apt-get install autoconf libtool libpam0g-dev libx11-dev libxfixes-dev libssl-dev libxrandr-dev
Reading package lists… Done
Building dependency tree
Reading state information… Done
autoconf is already the newest version.
libpam0g-dev is already the newest version.
libssl-dev is already the newest version.
libtool is already the newest version.
libx11-dev is already the newest version.
libxfixes-dev is already the newest version.
libxrandr-dev is already the newest version.
0 upgraded, 0 newly installed, 0 to remove and 7 not upgraded.
sudo apt-get install vnc4server
Reading package lists… Done
Building dependency tree
Reading state information… Done
vnc4server is already the newest version.
vnc4server set to manually installed.
0 upgraded, 0 newly installed, 0 to remove and 7 not upgraded.
Any idea what I’m missing?
Hello There,
You should first check this post (http://c-nergy.be/blog/?p=8069). Try this first…
However, note that Ubuntu has moved away from Upstart to systemd system to manage services… This might explain why this is not working anymore…
I will need to check/test/validate or re-write the setup for systems using systemd
Hope this help
Till next time
See ya
Hello Simon,
I will update the post as soon as possible with a proper solution. in the mean time, we have quickly checked what the problem could be and we have come up with a quick fix….
Have a look at http://c-nergy.be/blog/?p=8316 Which describe the problem and a quick fix
Hope this help
Feedback would be appreciate so we can further investigate and provide a working solution in the coming days
Till next time
see ya