Hello World,
Today, I’ll provide you some information about building up a custom PXE Server. Microsoft offers deployment tools such as Windows Deployment Server or even Microsoft deployment Toolkit 2010 or even more advanced product such as SMS or SCCM.
They are all great tools but they have “heavy” dependencies mainly on Active Directory. You need to have a working Active Directory in order to take full advantages of all these products. In some scenarios, it’s not possible to use these technologies. But don’t panic ! You can create your own PXE Server/TFTP Server. Usin a PXE server, you can easily deploy through your network OS images to capable pxe workstations and improve the overall process.
SETUP YOUR INFRASTRUCTURE
I’m assuming that you have no Active Directory available or reacheable. Imagine a situation where you have to setup a staging area in a room with no network connection to the rest of your network. You will need a switch and at least one computer (stand-alone) to host the PXE/TFTP services.
You have 2 options in order to create your PXE/TFTP infrastructure :
- You can use ready to use tools such as TFTPD32.exe or TFTP Server from SolarWinds
- You can try to tweak your windows system and get a TFTP server up an running in Minutes (more fun but more challenging may be !). I’ll provide some scripts and utilities to smooth your installation.
Option 1 : Using TFTP Server From Solarwinds
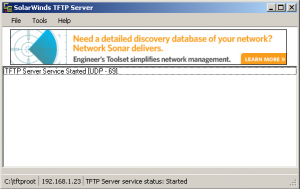
If you want to configure a TFTP server only and you are about to use DHCP,DNS services from Windows Operating System, the TFTP server from SolarWinds might fit yours needs. With this free utility, you will be able to configure quickly your TFTP server. You simply download the free tool from their site (you need to register to have access to the download ). On your future TFTP Server, you perform the Setup installation routine. At the end of the procedure, you have shortcut on your desktop. Double-click on the shortcut and you will see the following window.
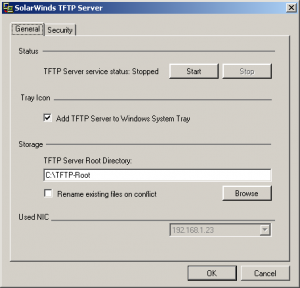
On the menu, click on File and select Configure. the following windows will be displayed. As you can see, you cannot configure much. You can simply start the TFTP server and specify where to store your TFTP/PXE Boot files.
In order to have a fully working PXE infrastructure, you will need to install DHCP server and configure it to support PXE technology. You will also need to populate the tftp root directory with your pxe files and bootable images. We will provide some explanation later in this post but first let’s check which other options do we have
Option 2 : Using TFTPD32.exe
You can download the tool from here. The tool includes DHCP,TFTP,DNS services. The tool can also be installed as a windows service if you need to. You have some advanced settings that can be configured but for this post we are just interested in the DHCP-TFTP Functionality.
Note: if you want to make TFTP32.exe a windows service, you need to download the correct package from their web site. You have 2 options: TFTP32.ex as stand alone and TFTP32.exe as service
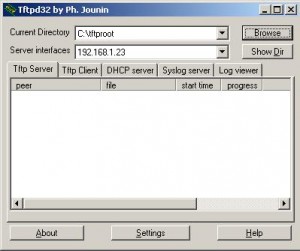
Logon into your future TFTP Windows server and install the Tftpd32.exe software. Based on your configuration, you will need to configure the DHCP settings and the basic TFTP Server Settings.To ease the setup, I’m assuming that you will be using the DHCP feature of the TFTPD32.exe utilty. After the installation, you can click on the shortcut created on the desktop and you will see a screen similar to the following :
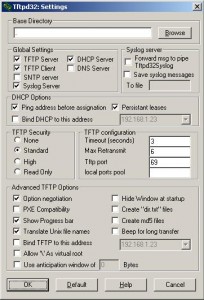
If you click on settings button, you will be redirected to the following dialog box. I have changed the Base TFTP Directory to c:\tftproot. You can accept default or point to another folder if you prefer to. Press OK when done
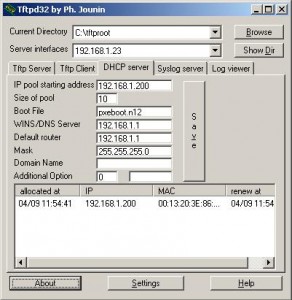
Finally, go to the DCHP server tab and fill in the requested information (if you intend to use the DHCP feature of TFTD32.exe)
As you can see, this is quite straightforward ! Using TFTPD32 can be useful, if you do not have the DHCP Service already installed on your Windows box. Like the previous option, we are not able to boot in PXE mode at this stage, we will need to populate the tftp root directory with the correct files. Note that in the DHCP configuration, you will need to provide the path of the boot file for the pxe server. Again no panic, we will explain that in the next lines.
Option 3 : Build up your “Custom” TFTP Server
With this option, we will try to use only windows components in order to build up your TFTP/PXE server. We will use a “old” recipe in order to have a working TFTP Server running on a Windows 2003 server. You can configure a TFTP Server by using the following procedure
Step 1 : installing and Configuring the TFTP service
- Copy the file tftpd.exe from %root%\system32\dllCache to %root%\system32 ( This is only possible for Windows 2003 Operating Systems. If you have Windows 2008 OS or later, you will need to copy the file from a Windows 2003 box.)
- using the resource kit instsrv.exe, create a service using the following command
intsrv tftpd c:\winnt\system32\tftpd. ( or you can use SC.exe)
- Start the service using the command net start tftpd
- Normally, after the service starts, it creates a folder in %root%\tftpdroot
- To start the service automatically at boot time, in services.msc change to start automatically option
Additional information : if the tftpdroot is not automatically created, you need to created it manually. You need to check that a registry key has been created as well. If not, you need to created it manually. Navigate to HKLM\system\CurrentControlSet\Services\tftpd\Parameters. Create (if not existing) the key directory and in the value specify the location of the tftpdroot folder
Step 2 : installing and Configuring the DHCP service
You install the DHCP service via the Add/remove program applet. You need to configure additional settings within the DHCP in order to have a working PXE server. The following options should be configured :
- Scope options : 066 Boot server value :host name or IP Address of the Tftp/DHCP server
- Scope options : 067 boot file name value:<%your pxeboot file%>)
- Restart the DHCP
- Scope option: 043 Vendor specific info Value : 01 04 00 00 00 00 ff.
- add additional option via Netsh
C:\WINDOWS\system32>netsh
netsh>dhcp
netsh dhcp>server \\<server name> *OR* <server IP address>
netsh dhcp server>add optiondef 60 PXEClient String 0 comment=PXE support
netsh dhcp server>set optionvalue 60 STRING PXEClient
To verify that the Option 060 was added successfully enter the command:
netsh dhcp server>show optionvalue
Exit issuing command exit and restart your DHCP server. You have a TFTP Server up and running with no third-party tools. That’s cool ! Again, in order to have a working PXE Server, you will need to populate the TFTP ROOT Directory and ensure that the bootfile name option in your DHCP is set correctly.
BONUS
I have explained the manual process. You will get a small bonus ! You can find a batch file sample here that will help you in automating the setup of your TFTPD and DHCP Server. The Batch file is valid on Windows 2003 at the moment. I’ll publish a little bit later a GUI that will be working with Windows XP or Windows 2003 and later (including Windows 2008)
Tftp directory content
Time to populate our tftp Directory. We will upload all the necessary files into the TFTP directory in order for our pxe clients to boot into WINPE 2.0 or 3.0 enviromnent. You can customize your WinPE boot image in order to add some additional tools and utilities and automate for example capture or dump of an image on a target PXE machine. This is out of scope of this post. but we will come back to that in some future posts.
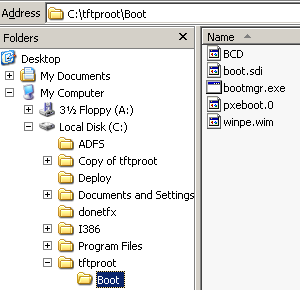
So, what do you need to upload in this directory. I have tried to keep to a minimum the number of files to be uploaded. This is the content of my basic tftproot directory
As you can see, I’ve created a sub folder called Boot and copied there 5 files. Where do you find these files ? If you have a Windows VISTA/7 or windows 2008/R2 installation media, you can extract the following files from the boot folder at the root of the DVD media
- Boot.sdi
In the Source folder of your DVD, you have a boot.wim file as well. You will need to mount this image (using imagex.exe utility) and extract the following file
- pxeboot.0 (located in windows\boot\PXE inside the boot.wim )
- Bootmgr.exe (located in windows\boot\PXE inside the boot.wim)
Finally, you will need to create your own BCD file. You can copy the following text into a batch file and run it on a Windows VISTA/7 or windows 2008 R2. You will need then to upload a wim file into your directory. You can use the boot.wim file from the DVD media and rename it in order to reflect the name you want to use in your BCD File (in my case, I’ve renamed the boot.wim file in winpe.wim)
Rem Creates BCD (boot configuration data) for Windows PE 3.0
set BCD-File=c:\tftproot\boot\BCD
del %BCD-File%
Bcdedit /createstore %BCD-File%
Bcdedit /store %BCD-File% /create {ramdiskoptions} /d “Ramdisk options”
Bcdedit /store %BCD-File% /set {ramdiskoptions} ramdisksdidevice boot
Bcdedit /store %BCD-File% /set {ramdiskoptions} ramdisksdipath \boot\boot.sdi
for /f “tokens=1-3” %%a in (‘Bcdedit /store %BCD-File% /create /d “WinPE x86” /application osloader’) do set guid1=%%c
Bcdedit /store %BCD-File% /set %guid1% systemroot \Windows
Bcdedit /store %BCD-File% /set %guid1% detecthal Yes
Bcdedit /store %BCD-File% /set %guid1% winpe Yes
Bcdedit /store %BCD-File% /set %guid1% osdevice ramdisk=[boot]\boot\winpe.wim,{ramdiskoptions}
Bcdedit /store %BCD-File% /set %guid1% device ramdisk=[boot]\boot\winpe.wim,{ramdiskoptions}
Bcdedit /store %BCD-File% /create {bootmgr} /d “Windows Vista BootManager”
Bcdedit /store %BCD-File% /set {bootmgr} timeout 30
Bcdedit /store %BCD-File% /set {bootmgr} displayorder %guid1%
Bcdedit /store %BCD-File% /enum all
Download the CreateBCD.zip File
Final note: because I’ve created a boot sub folder, I had to change the boot file name value in the DHCP Server from pxeboot.0 to \boot\pxeboot.0
That’s it for this post ! This is a first step into deployment tasks. This infrastructure will be useful in many many scenarios
Till next time see ya

I read your blog frequently and I just thought I’d say keep up the amazing work!
Dear
What value shoud i put on {randiskoptions}?
how to find it?
When i copy the code , the code is not valid…
Please help…
Bcdedit /store %BCD-File% /create {ramdiskoptions} /d “Ramdisk options”
Regards
Hello there,
Check that you have changed the %BCD-FILE% to reflect your file.
The code should be correct as is you do not need to change stuff
However, if you copy paste from the site, you might have improper character copied over…
If you can wait, I’ll send you the batch file to your mail (this evening or tomorrow)
see ya
Hello there,
for all the people out there, if you copy/paste the code from the blog, you might copy invalid character and the script will not run properly…… If you need to perform a copy/paste operation, you have the replace the quotes with valid character in your text editor or copy/past the following code
Rem Creates BCD (boot configuration data) for Windows PE 3.0
set BCD-File=c:\testbcd
del %BCD-File%
Bcdedit /createstore %BCD-File%
Bcdedit /store %BCD-File% /create {ramdiskoptions} /d “Ramdisk options”
Bcdedit /store %BCD-File% /set {ramdiskoptions} ramdisksdidevice boot
Bcdedit /store %BCD-File% /set {ramdiskoptions} ramdisksdipath \boot\boot.sdi
for /f “tokens=1-3? %%a in (‘Bcdedit /store %BCD-File% /create /d “WinPE x86? /application osloader’) do set guid1=%%c
Bcdedit /store %BCD-File% /set %guid1% systemroot \Windows
Bcdedit /store %BCD-File% /set %guid1% detecthal Yes
Bcdedit /store %BCD-File% /set %guid1% winpe Yes
Bcdedit /store %BCD-File% /set %guid1% osdevice ramdisk=[boot]\boot\winpe.wim,{ramdiskoptions}
Bcdedit /store %BCD-File% /set %guid1% device ramdisk=[boot]\boot\winpe.wim,{ramdiskoptions}
Bcdedit /store %BCD-File% /create {bootmgr} /d “Windows Vista BootManager”
Bcdedit /store %BCD-File% /set {bootmgr} timeout 30
Bcdedit /store %BCD-File% /set {bootmgr} displayorder %guid1%
Bcdedit /store %BCD-File% /enum all
Sorry for the annoyance
See ya
Hello guys,
This is a great guide however I have a question, I have no firewall and when I start up the Admin UI …. I get a message saying “Cannot connect to service Error 10061 (No Connection could be because the target machine active refused it).
Can anyone help with this please?
Thanks,
Hello Michael…
I would need a little bit more information
What’s your OS and which Admin UI are you talking about (TFTP solarWind or TFTPD.EXE)
Are you sure that the firewall is not blocking the tftp process
are you sure that the service is started
Waiting for the info… I hope I’ll be able to help you
See ya
Griffon
Griffon,
Sorry the OS was Windows 2008 Server R2 – 64 bit.
Hello I figured it out sorry, What I found out was tfpd32 service was not on, so after turning it on, It worked fine apparently after install it does not urn the service on. I set it to automatic and walla it is all good. Now i do have a question and I don;t see iti n your documentation do I just drop the image in tftp-root and can these images be isos to push out to a client?
Thanks,
Hello Michael,
This post was specifically written for windows administrators who would use WIM images (instead of ISO images). If you are using WIM images, yes, you can simply
drop them in the tftp-root folder or any subfolder below. If you deploy wim images, do not forget to adapt the script to create the BCD file based on you folder structure
If you want to perform more exotic stuff with PXE, I would highly recommend you to use syslinux instead of the windows pxe image.
from the syslinux web site, you can also find a tool called memdisk that allow you to boot from iso directly
See ya
Thank you Griffon,
Well here is my plight, I work for a company who buys a third party product, which is installed on devices at a customer site. These devices allow us to monitor our batteries on site so they gather info and send it back to us. However the OS on those devices are a derivative of CentOS and I want to deliver these by way of PXE Boot. I do have a PXE Linux server built and it is actually working up to the Menu, However it is not delivering the image to the device. I am not sure why. I am very new to this so I was practicing with Windows before I move back to the Linux PXE to try and get it working properly.
Thank you for the info though
Hello Michael
By modifying a little bit the Windows PXE server (as described in the post), you could be able to boot up from iso images…
You will be configuring the TFTP/PXE by uploading pxelinux/syslinux/memdisk files on the Windows Server in the tftp folder. Copy your iso images in the tftp folder also….Update your settings as required (in DHCP name of the boot file,…)
Get a look at to see how to build up a PXELINUX MENU. Basically, you use the memdisk command and specify the location/name of your iso image.
If you are lucky, your system might be able to use memdisk and boot from iso…
Read further the wiki to see how to use memdisk
Note : you can use the syslinux/pxelinux/memdisk on a Linux PXE server… Configuration is really similar
Hope this help…
Let me know your progress…
See ya
Well now that’s another story that’s the part I am having trouble with lol, But Iwill get it I already have the iso in the tftproot directory. Now I gotta get the rest going.
Hi I think you guys should take a look at Serva; it’s a tiny portable app that automates the whole net install process.
Hello Pat,
We know the software but we like to try different solutions…We usually use only built-in functionalities of the operating system. Time tot time you try other software such as tftpd32, solarwinds, or any other alternative…..
See ya
Hi Griffon,
Well, the OS built-in alternatives are called RIS and WDS and (as you said) they are very heavy.
Tftpd32/Solarwinds really do not provide a lean simpler alternative plus they both requiere the bloated 1GB WAIK in order to produce a really complicated environment, and do not even mention booting more than one OS with the same environment.
On the other hand Serva does it all in a very easy way just downloading a 2 Mb file 😉
Hello there,
In this post, I’m not using tftpd32 or solarwinds software but the tftp.exe file provided by microsoft (within Windows 2003 OS file)
1. Tftpd32/solarwinds have small footprint (as application)
2. You do not need a Bloated 1 GB WAIK but you need a boot image that can be between 150 and 250 MB)
3. Using the boot.wim boots the client in a winpe mode that offers you on the fly customization, drivers injections and scripting…
4. Using MDT, you can streamline your deployment in an easy way (You can customize the OS, you can inject drivers and packages, create task sequences….
5. Using a single OS Wim image, you can cover different scenarios by simply creating task sequences
Serva might be easy to install, fast and easy to use but I’m not sure that it offers the flexibility that MDT would provide me. But that just me :-))
See ya
Hi,
2)> but you use Bcedit.exe and that requieres the bloated WAIK…
3)> for booting boot.wim the net drivers must be already injected; again the WAIK…
4)> the MDT is not for everyone, it is not light at all, it requieres Domain servers etc etc.. but I agree with you, it its very flexible…
5)>yes but for getting all of that we have to be on MDT, then that’s not just a custom PXE server on windows..
If you do not need the ultimate flexibility that MDT gives you for the complexity price of MDT you can get a lot very cheap with Serva.
Hello Pat,
If you prefer to use Serva as preferred solution, it’s fine for me… Regarding your comments, let me add some additional information
2) bcdedit.exe is a command line built-in in Windows Operating Systems (Windows 2008/VISTA and later). -> no WAIK at this stage
3) the boot.wim does not need drivers to boot. boot.wim is sent to the client via tftp server. When image is transferred, the pre-os software will boot without any issues. However, you might need drivers within the winpe environmnent to connect to your network. You can add on the fly the drivers within WinPE by using Drvload.exe. You can add drivers in the offline boot.wim file. to perform that, you will need the WAIK (in fact only a small subset of the WAIK). Note that the WAIK is just a set of tools that can help you customize your wim images. To inject drivers, you would simply use imagex.Exe or dism (2 small exe files) to modify the wim image and save the changes. You do not use WAIK during the deployment process. You use it before to get all things done.
4) Actually, you can have MDT running on one single box (no domain required) and not that difficult to install (see http://c-nergy.be/blog/?p=1970).
5) Yes, to easily customize your deployment and create task sequence, you need to work from mdt server. but once it’s done…it easy to maintain. Note, that you can go the hard way and create your own scripts and unattended file to customize your install as required-> In this case, you would no need the MDT Software…
See ya
Hi Griffon,
I have problems on creating bcd. I copied the code to notepad, change the boot directory to deployment share boot folder, and set it to litetouch. Is it correct that I save it as “MDT.bat”? when I open it it closes immediately. Are there missing steps? Please help! Thank you!
Hello Arnie,
Ensure that you copy the code from the comments section and not from the post. The code in the post when you copy/paste can contains invalid characters. Obviously, you have to modify the script to reflect your situation.
To Diagnose/Debug, you should open a command prompt windows and run the batch file from there. If they are errors, you should then see the output and you can debug
Hope this help
See ya
Hi again Griffon,
This is the one I copied > > >
Rem Creates BCD (boot configuration data) for Windows PE 3.0
set BCD-File=D:\MDT Production\Boot\Boot\BCD (-i created a folder named BCD inside the Boot folder)
del %BCD-File%
Bcdedit /createstore %BCD-File%
Bcdedit /store %BCD-File% /create {ramdiskoptions} /d “Ramdisk options”
Bcdedit /store %BCD-File% /set {ramdiskoptions} ramdisksdidevice boot
Bcdedit /store %BCD-File% /set {ramdiskoptions} ramdisksdipath \boot.sdi -IS THIS CORRECT?
for /f “tokens=1-3? %%a in (‘Bcdedit /store %BCD-File% /create /d “WinPE x86″ /application osloader’) do set guid1=%%c
Bcdedit /store %BCD-File% /set %guid1% systemroot \Windows
Bcdedit /store %BCD-File% /set %guid1% detecthal Yes
Bcdedit /store %BCD-File% /set %guid1% winpe Yes
Bcdedit /store %BCD-File% /set %guid1% osdevice ramdisk=[boot]\LiteTouchPE_x86.wim,{ramdiskoptions}(SHOULD I PUT THE LOCATION WHERE MY LiteTouchPE_x86 is located?
Bcdedit /store %BCD-File% /set %guid1% device ramdisk=[boot]\LiteTouchPE_x86.wim,{ramdiskoptions}
Bcdedit /store %BCD-File% /create {bootmgr} /d “Windows Vista BootManager” -is it correct?
Bcdedit /store %BCD-File% /set {bootmgr} timeout 30
Bcdedit /store %BCD-File% /set {bootmgr} displayorder %guid1%
Bcdedit /store %BCD-File% /enum all
Many thanks Griffon. I badly need your help because I will pass my internship if I’d be successful in MDT2012. Thanks so much!
will this work on Windows Server 2008 R2? And I will deploy Windows 7 on a laptop? Thanks again
yes, this works on a windows 2008R2 but you will have to allow tftp traffic on the windows firewall….
you can deploy any OS version from Vista and later… I’m assuming that you do not care about windows xp
you might want to have a look at this post http://c-nergy.be/blog/?p=2026. This post (part of series explain how to install and configure MDT using a custom PXE server.note that in this post i have used solarwind as tftp server solution but copying the tftpd.exe file from win2003 OS is still working…
Hope this help
Till next time
See ya
I’ll upload a text file containing the correct syntax and attach it to this post…..so you have a valid template to begin with
till then
see ya
Griffon its me again. This is the syntax of my BCD File –>
Rem Creates BCD (boot configuration data) for Windows PE 3.0
set BCD-File=D:\MDT Production\Boot\Boot\BCD
del %BCD-File%
Bcdedit /createstore %BCD-File%
Bcdedit /store %BCD-File% /create {ramdiskoptions} /d “Ramdisk options”
Bcdedit /store %BCD-File% /set {ramdiskoptions} ramdisksdidevice boot
Bcdedit /store %BCD-File% /set {ramdiskoptions} ramdisksdipath \boot\boot.sdi
for /f “tokens=1-3” %%a in (‘Bcdedit /store %BCD-File% /create /d “WinPE x86” /application osloader’) do set guid1=%%c
Bcdedit /store %BCD-File% /set %guid1% systemroot \Windows
Bcdedit /store %BCD-File% /set %guid1% detecthal Yes
Bcdedit /store %BCD-File% /set %guid1% winpe Yes
Bcdedit /store %BCD-File% /set %guid1% osdevice ramdisk=[boot]D:\MDT Production\Boot\LiteTouchPE_x86.wim,{ramdiskoptions}
Bcdedit /store %BCD-File% /set %guid1% device ramdisk=[boot]D:\MDT Production\Boot\LiteTouchPE_x86.wim,{ramdiskoptions}
Bcdedit /store %BCD-File% /create {bootmgr} /d “Windows Vista BootManager”
Bcdedit /store %BCD-File% /set {bootmgr} timeout 30
Bcdedit /store %BCD-File% /set {bootmgr} displayorder %guid1%
Bcdedit /store %BCD-File% /enum all
set BCD-File=D:\MDT Production\Boot\Boot\BCD –> I wish to place my BCD file here.
Bcdedit /store %BCD-File% /set {ramdiskoptions} ramdisksdipath \boot\boot.sdi – is this the correct syntax? May boot.sdi file is located at D:\MDT Production\Boot\Boot\boot.sdi
Bcdedit /store %BCD-File% /set %guid1% osdevice ramdisk=[boot]D:\MDT Production\Boot\LiteTouchPE_x86.wim,{ramdiskoptions}
Bcdedit /store %BCD-File% /set %guid1% device ramdisk=[boot]D:\MDT Production\Boot\LiteTouchPE_x86.wim,{ramdiskoptions} —> is this correct?
Griffon I badly need your help. Do you have a skype or yahoo messenger? This week will be the deadline of my research. You can email me at –removed by admin for privacy reasons–
Thank you so much Griffon!
Hello Arnie,
To answer your questions…
Q1.: set BCD-File=D:\MDT Production\Boot\Boot\BCD –> I wish to place my BCD file here.
=> OK, but you should either remove the space in your path or you should enclose the path between quotes. In other words, replace D:\MDT Production\boot\boot\BCD with “D:\MDT Production\Boot\boot\bcd” or remove the space D:\MDTProduction\Boot\Boot\BCD.
Q2. Bcdedit /store %BCD-File% /set {ramdiskoptions} ramdisksdipath \boot\boot.sdi – is this the correct syntax? May boot.sdi file is located at D:\MDT Production\Boot\Boot\boot.sdi
=> the file should be located at the root of your TfTP server. Move the file at D:\MDT Production\Boot\boot.sdi
Q3.
Bcdedit /store %BCD-File% /set %guid1% osdevice ramdisk=[boot]D:\MDT Production\Boot\LiteTouchPE_x86.wim,{ramdiskoptions}
Bcdedit /store %BCD-File% /set %guid1% device ramdisk=[boot]D:\MDT Production\Boot\LiteTouchPE_x86.wim,{ramdiskoptions} —> is this correct?
=> Again, here either enclose D:\MDT Production\… between quotes or remove space based on the decision you’ve made at question one. If you do not enclose the path, the entry will be truncated and will not recognized it correctly by the system
In other words, Replace Bcdedit /store %BCD-File% /set %guid1% osdevice ramdisk=[boot]D:\MDT Production\Boot\LiteTouchPE_x86.wim,{ramdiskoptions} with
Bcdedit /store %BCD-File% /set %guid1% osdevice ramdisk=[boot]”D:\MDT Production\Boot\LiteTouchPE_x86.wim”,{ramdiskoptions}.
Do the same with the second line
Hope this Help
Till next time
see ya
Hi Griffon!
Thank you I already created my BCD file. My syntax is already correct. However, when I press Boot Network Device F12, there is an error. It says that “The boot selection failed because a required device is inaccesible”
Where should I place the BCD file? I placed it here D:\MDT Production\Boot\Boot..
Thank you Griffon for replying in my queries!
Hello Arnie,
I think I know what’s your problem 🙂
the bcd file you have generated using your batch file is not useable… I didn’t pay enough attention (even though I thought that was strange) but the batch file used to create the bcd has an error in it ….
In this part of your batch file
Bcdedit /store %BCD-File% /set %guid1% osdevice ramdisk=[boot]D:\MDT Production\Boot\LiteTouchPE_x86.wim,{ramdiskoptions}
Bcdedit /store %BCD-File% /set %guid1% device ramdisk=[boot]D:\MDT Production\Boot\LiteTouchPE_x86.wim,{ramdiskoptions} —>
you are using the absolute path…. this is not correct (my apologies I missed it – was very busy lately)
you should use the relative path instead
Bcdedit /store %BCD-File% /set %guid1% osdevice ramdisk=[boot]\LiteTouchPE_x86.wim,{ramdiskoptions}
Bcdedit /store %BCD-File% /set %guid1% device ramdisk=[boot]\LiteTouchPE_x86.wim,{ramdiskoptions}
In my example, I will place the litetouch file under d:\MDT Production\boot\boot\litetouch if the root of the tftp server is set to d:\MDT Production\Boot
the bcd should be placed D:\MDT Production\Boot\Boot
the litetouch files should be stored in D:\MDT Production\Boot\
This should fix all your problems
check your email to have some additional information (and screenshots)
Hope this help
till next time
ps:let me know if this fixed your problem
Hi could you email me your pxeboot.0 file and BCD file? I’m having a few issues also what do i need to do for 64bit win7? lochienichols@live.com
Hello there,
You should have everything you need in the post.
the pxeboot.0 file is a file contained in the WIM file. The original name of the file is pxeboot.n12. We have rename it. The bcd file is unique per each machine. So would not make sense to send mine. But, you can create your own bcd file using the script provided (see the post, there is also a zip file that contain the script that you can download)
Maybe if you describe your problems, we might be able to help you….
Hope this help
Till next time
see ya
usefull imformation thank you for sharing this