|
|
The script hereafter is outdated and has been replaced by a newer version. Please Check the Download page for latest version. |
Hello World,
As a new release of Ubuntu 18.10 has been made available in October 18, 2018, it’s time for us to check if our famous install xrdp script needs to be updated and if the xrdp installation procedure is still working. This year we have put a lot of effort in improving and providing a nice user experience when using xRDP on top of Ubuntu 18.04. The following posts will provide you a small overview of small improvements made for Ubuntu 18.04
- Ubuntu 18.04 – Install xRDP the easy way (Scripted Installation – Version 0.2
- xRDP – The Infamous “Authentication Required to Create Managed Color Device” Explained
- xRDP – How to Fix the Infamous system crash popups in Ubuntu 18.04 (and previous versions)
- xRDP – How to Fix Theme issues in Ubuntu 18.04 remote session
- xRDP – Install xRDP the easy way (Scripted Installation – Version 0.3)
- xRDP – How to Fix different lock screen colors in Ubuntu 18.04 remote session
- xRDP – Install xRDP the easy way (Scripted Installation – Version 0.4)
- xRDP – Install xRDP the easy way (Scripted Installation – Version 0.5)
Since Ubuntu 18.04 is a LTS release and since this version ships with Gnome Desktop instead of Unity Desktop, it sounded logical to provide such effort to build and improve the Std-Install-xrdp script. As mentioned in previous posts, we are now trying to stick to Ubuntu release cycle and we are trying to provide updated version of the script as a new release is delivered by Canonical.
So, in this post, we will provide a updated script version that will provide support for Ubuntu 18.10…So, let’s go for the traditional xrdp installation post…..
The Standard Installation Script – Version 0.5.1
Overview
The version 0.5.1 of the script perform a standard installation of xRDP (i.e using the xRDP package available in the Official Ubuntu Repository) and perform also the additional configuration tasks needed to have a workable xRDP solution. Version 0.5.1 is basically providing support to Ubuntu 18.10.
The script version 0.5.1 includes the logic to detect Ubuntu version from Ubuntu 18.04 and Ubuntu 18.10. Based on some comments and feedback provided, the script will also add the #!/bin/bash at the top of the script. This would ensure that the correct bash engine is selected when running the script and avoiding some issues where the script is not running because the bash engine is not set/detected correctly. Minor changes have been made in order to have the lock screen gnome fix working…Some of the files in Ubuntu 18.04 does not exist in Ubuntu 18.10. So, we have updated the gresouces.xml file and removed any references to the missing files….
Assumptions
Before running this script, be aware of the following assumptions
- We have tested the script on Ubuntu 18.04 and later
- No additional desktop interface has been installed.
- We have performed the test on a Virtual Machine running on Virtual box (on Windows 2012 R2) with Sound enabled !!!
- The following procedure has been performed on Ubuntu 18.10 where xorg is the default Display manager
Click on Picture for Better Resolution
Prerequisites
We assume that you have internet connection on the Ubuntu machine. The internet connection is needed to download the necessary packages that will be installed on your system.
The script version 0.5.1
Important Note :
If you copy/paste the script, you might encounter some issues because font formatting might be not maintained during the copy/paste operation. Please ensure that format is accurate before launching the script. A downloadable version of the script is available at the bottom of the post
Disclaimer : As usual, use this at your own risk !!
#!/bin/bash
#####################################################################################################
# Script_Name : Std-Xrdp-install-0.5.1.sh
# Description : Perform an automated standard installation of xrdp
# on ubuntu 18.04 and later
# Date : October 2018
# written by : Griffon
# Web Site :http://www.c-nergy.be - http://www.c-nergy.be/blog
# Version : 0.5.1
# History : 0.5.1- Add support to Ubuntu 18.10
# : 0.5 - Add logic to enable sound redirection
# - re-write code logic to include functions
# - Removed support for Ubuntu 17.10 as reached end of support
# : 0.4 - Add logic to fix GDM lock screen + minor change
# : 0.3 - Adding logic to fix theme and extensions for any users login through xrdp
# 0.2 - Added Logic for Ubuntu 17.10 and 18.04 detection
# - Updated the polkit section
# - New formatting and structure
# 0.1 - Initial Script
# Disclaimer : Script provided AS IS. Use it at your own risk....
####################################################################################################


#---------------------------------------------------#
# Detecting if Parameters passed to script ....
#---------------------------------------------------#

while getopts g:s: option
do
case "${option}"
in
g) fixGDM=${OPTARG};;
s) fixSound=${OPTARG};;
esac
done

#---------------------------------------------------#
# Script Version information Displayed #
#---------------------------------------------------#

echo
/bin/echo -e "\e[1;36m !-------------------------------------------------------------!\e[0m"
/bin/echo -e "\e[1;36m ! Standard XRDP Installation Script - Ver 0.5.1 !\e[0m"
/bin/echo -e "\e[1;36m ! Written by Griffon - October 2018 - www.c-nergy.be !\e[0m"
/bin/echo -e "\e[1;36m !-------------------------------------------------------------!\e[0m"
echo


#--------------------------------------------------------------------------#
# -----------------------Function Section - DO NOT MODIFY -----------------#
#--------------------------------------------------------------------------#

#---------------------------------------------------#
# Function 1 - Install xRDP Software....
#---------------------------------------------------#

install_xrdp()
{
echo
/bin/echo -e "\e[1;33m !---------------------------------------------!\e[0m"
/bin/echo -e "\e[1;33m ! Installing XRDP Packages...Proceeding... ! \e[0m"
/bin/echo -e "\e[1;33m !---------------------------------------------!\e[0m"
echo
sudo apt-get install xrdp -y
}

#---------------------------------------------------#
# Function 2 - Install Gnome Tweak Tool....
#---------------------------------------------------#

install_tweak()
{
echo
/bin/echo -e "\e[1;33m !---------------------------------------------!\e[0m"
/bin/echo -e "\e[1;33m ! Installing Gnome Tweak...Proceeding... ! \e[0m"
/bin/echo -e "\e[1;33m !---------------------------------------------!\e[0m"
echo
sudo apt-get install gnome-tweak-tool -y
}

#--------------------------------------------------------------------#
# Fucntion 3 - Allow console Access ....(seems optional in u18.04)
#--------------------------------------------------------------------#

allow_console()
{
echo
/bin/echo -e "\e[1;33m !---------------------------------------------!\e[0m"
/bin/echo -e "\e[1;33m ! Granting Console Access...Proceeding... ! \e[0m"
/bin/echo -e "\e[1;33m !---------------------------------------------!\e[0m"
echo
sudo sed -i 's/allowed_users=console/allowed_users=anybody/' /etc/X11/Xwrapper.config
}

#---------------------------------------------------#
# Function 4 - create policies exceptions ....
#---------------------------------------------------#

create_polkit()
{
echo
/bin/echo -e "\e[1;33m !---------------------------------------------!\e[0m"
/bin/echo -e "\e[1;33m ! Creating Polkit File...Proceeding... ! \e[0m"
/bin/echo -e "\e[1;33m !---------------------------------------------!\e[0m"
echo

sudo bash -c "cat >/etc/polkit-1/localauthority/50-local.d/45-allow.colord.pkla" <<EOF
[Allow Colord all Users]
Identity=unix-user:*
Action=org.freedesktop.color-manager.create-device;org.freedesktop.color-manager.create-profile;org.freedesktop.color-manager.delete-device;org.freedesktop.color-manager.delete-profile;org.freedesktop.color-manager.modify-device;org.freedesktop.color-manager.modify-profile
ResultAny=no
ResultInactive=no
ResultActive=yes
EOF

}


#---------------------------------------------------#
# Function 5 - Fixing Theme and Extensions ....
#---------------------------------------------------#

fix_theme()
{
echo
/bin/echo -e "\e[1;33m !---------------------------------------------!\e[0m"
/bin/echo -e "\e[1;33m ! Fix Theme and extensions...Proceeding... !\e[0m"
/bin/echo -e "\e[1;33m !---------------------------------------------!\e[0m"
echo

#Check if script has already run....
if grep -xq "#fixGDM-by-Griffon" /etc/xrdp/startwm.sh; then
echo "Skip theme fixing as script has run at least once..."
else
#Set xRDP session Theme to Ambiance and Icon to Humanity if Ubuntu 18.04.x
if [[ "$version" = *"Ubuntu 18.04"* ]];
then
sudo sed -i.bak "4 a #fixGDM-by-Griffon\ngnome-shell-extension-tool -e ubuntu-appindicators@ubuntu.com\ngnome-shell-extension-tool -e ubuntu-dock@ubuntu.com\n\nif [ -f ~/.xrdp-fix-theme.txt ]; then\necho 'no action required'\nelse\ngsettings set org.gnome.desktop.interface gtk-theme 'Ambiance'\ngsettings set org.gnome.desktop.interface icon-theme 'Humanity'\necho 'check file for xrdp theme fix' >~/.xrdp-fix-theme.txt\nfi\n" /etc/xrdp/startwm.sh
elif [[ "$version" = *"Ubuntu 18.10"* ]];
then
sudo sed -i.bak "4 a #fixGDM-by-Griffon\ngnome-shell-extension-tool -e ubuntu-appindicators@ubuntu.com\ngnome-shell-extension-tool -e ubuntu-dock@ubuntu.com\n\nif [ -f ~/.xrdp-fix-theme.txt ]; then\necho 'no action required'\nelse\ngsettings set org.gnome.desktop.interface gtk-theme 'Yaru'\ngsettings set org.gnome.desktop.interface icon-theme 'Yaru'\necho 'check file for xrdp theme fix' >~/.xrdp-fix-theme.txt\nfi\n" /etc/xrdp/startwm.sh
else
echo "Error Occured somewhere...Exiting..."
exit
fi

fi
echo
}

#---------------------------------------------------#
# Function 6- Fixing GDM - As an Option ....
#---------------------------------------------------#
fix_gdm()
{
echo
/bin/echo -e "\e[1;33m !---------------------------------------------!\e[0m"
/bin/echo -e "\e[1;33m ! Fix for GDM Lock Screen color... !\e[0m"
/bin/echo -e "\e[1;33m !---------------------------------------------!\e[0m"
echo
# Step 1 - Install prereqs for compilation later on
sudo apt-get -y install libglib2.0-dev-bin
sudo apt-get -y install libxml2-utils

# extract gresource info (from url...)
workdir=${HOME}/shell-theme
if [ ! -d ${workdir}/theme ]; then
mkdir -p ${workdir}/theme
mkdir -p ${workdir}/theme/icons

fi
gst=/usr/share/gnome-shell/gnome-shell-theme.gresource

for r in `gresource list $gst`; do
gresource extract $gst $r >$workdir/${r#\/org\/gnome\/shell/}
done

/bin/echo -e "\e[1;33m |-| Creating XML File... \e[0m"
# create the xml file
bash -c "cat >${workdir}/theme/gnome-shell-theme.gresource.xml" <<EOF
<?xml version="1.0" encoding="UTF-8"?>
<gresources>
<gresource prefix="/org/gnome/shell/theme">
<file>calendar-arrow-left.svg</file>
<file>calendar-arrow-right.svg</file>
<file>calendar-today.svg</file>
<file>checkbox-focused.svg</file>
<file>checkbox-off-focused.svg</file>
<file>checkbox-off.svg</file>
<file>checkbox.svg</file>
<file>close-window.svg</file>
<file>corner-ripple-ltr.png</file>
<file>corner-ripple-rtl.png</file>
<file>dash-placeholder.svg</file>
<file>gnome-shell.css</file>
<file>gnome-shell-high-contrast.css</file>
<file>no-events.svg</file>
<file>no-notifications.svg</file>
<file>noise-texture.png</file>
<file>page-indicator-active.svg</file>
<file>page-indicator-inactive.svg</file>
<file>page-indicator-checked.svg</file>
<file>page-indicator-hover.svg</file>
<file>process-working.svg</file>
<file>toggle-off-us.svg</file>
<file>toggle-off-intl.svg</file>
<file>toggle-on-hc.svg</file>
<file>toggle-on-us.svg</file>
<file>toggle-on-intl.svg</file>
</gresource>
</gresources>
EOF
cd ${workdir}/theme
/bin/echo -e "\e[1;33m |-| Modify Css... \e[0m"
sed -i -e 's/background: #2e3436/background: #2c00e1/g' ~/shell-theme/theme/gnome-shell.css

##Delete the file noise-texture.png (grey one)
rm ${workdir}/theme/noise-texture.png

/bin/echo -e "\e[1;33m |-| Download Purple image file... \e[0m"
#Download the noise-texture.png with purple background
wget http://www.c-nergy.be/downloads/noise-texture.png

/bin/echo -e "\e[1;33m |-| Compile Resource File... \e[0m"
#Compile file and copy to correct location....
cd ${workdir}/theme
glib-compile-resources gnome-shell-theme.gresource.xml

/bin/echo -e "\e[1;33m |-| Copy file to target location... \e[0m"

# make a backup of the file and copy the file....
sudo cp /usr/share/gnome-shell/gnome-shell-theme.gresource /usr/share/gnome-shell/gnome-shell-theme.gresource.bak
sudo cp ${workdir}/theme/gnome-shell-theme.gresource /usr/share/gnome-shell/gnome-shell-theme.gresource
echo

}

#---------------------------------------------------------#
# Function 7 - Enable Sound Redirection - As an option.. #
#---------------------------------------------------------#
enable_sound()
{
echo
/bin/echo -e "\e[1;33m !---------------------------------------------!\e[0m"
/bin/echo -e "\e[1;33m ! Enabling Sound Redirection... !\e[0m"
/bin/echo -e "\e[1;33m !---------------------------------------------!\e[0m"
echo

# Step 1 - Install xrdp-pulseaudio-installer package
sudo apt-get install xrdp-pulseaudio-installer -y

# Step 2 - Enable Source Code Repository
sudo apt-add-repository -s 'deb http://be.archive.ubuntu.com/ubuntu/ '$codename' main restricted'
sudo apt-add-repository -s 'deb http://be.archive.ubuntu.com/ubuntu/ '$codename' restricted universe main multiverse'
sudo apt-add-repository -s 'deb http://be.archive.ubuntu.com/ubuntu/ '$codename'-updates restricted universe main multiverse'
sudo apt-add-repository -s 'deb http://be.archive.ubuntu.com/ubuntu/ '$codename'-backports main restricted universe multiverse'
sudo apt-add-repository -s 'deb http://be.archive.ubuntu.com/ubuntu/ '$codename'-security main restricted universe main multiverse'
sudo apt-get update

# Step 3 - Download pulseaudio source in /tmp directory
cd /tmp
sudo apt source pulseaudio

# Step 4 - Compile
pulsever=$(pulseaudio --version | awk '{print $2}')

cd /tmp/pulseaudio-$pulsever
sudo ./configure

# Step 5 - Create xrdp sound modules

cd /usr/src/xrdp-pulseaudio-installer
sudo make PULSE_DIR="/tmp/pulseaudio-$pulsever"

# Step 6 - copy files to correct location

sudo install -t "/var/lib/xrdp-pulseaudio-installer" -D -m 644 *.so
echo

}


#--------------------------------------------------------------------------#
# -----------------------END Function Section -----------------#
#--------------------------------------------------------------------------#


#--------------------------------------------------------------------------#
#------------ MAIN SCRIPT SECTION -------------------#
#--------------------------------------------------------------------------#

#---------------------------------------------------#
#-- Step 0 - Try to Detect Ubuntu Version....
#---------------------------------------------------#

version=$(lsb_release -sd)
codename=$(lsb_release -sc)

echo
/bin/echo -e "\e[1;33m |-| Detecting Ubuntu version \e[0m"

if [[ "$version" = *"Ubuntu 18.04"* ]];
then
/bin/echo -e "\e[1;32m |-| Ubuntu Version : $version\e[0m"
echo
elif [[ "$version" = *"Ubuntu 18.10"* ]];
then
/bin/echo -e "\e[1;32m |-| Ubuntu Version : $version\e[0m"
echo
else
/bin/echo -e "\e[1;31m !------------------------------------------------------------!\e[0m"
/bin/echo -e "\e[1;31m ! Your system is not running Ubuntu 18.04 Edition and later !\e[0m"
/bin/echo -e "\e[1;31m ! The script has been tested only on Ubuntu 18.04 and later !\e[0m"
/bin/echo -e "\e[1;31m ! The script is exiting... !\e[0m"
/bin/echo -e "\e[1;31m !------------------------------------------------------------!\e[0m"
echo
exit
fi


/bin/echo -e "\e[1;33m |-| Detecting Parameters \e[0m"


#Detect if argument passed
if [ "$fixSound" = "yes" ];
then
/bin/echo -e "\e[1;32m |-| Sound Redirection Option...: [YES]\e[0m"
else
/bin/echo -e "\e[1;32m |-| Sound Redirection Option...: [NO]\e[0m"
fi

if [ "$fixGDM" = "yes" ];
then
/bin/echo -e "\e[1;32m |-| gdm fix Option.............: [YES]\e[0m"
else
/bin/echo -e "\e[1;32m |-| gdm fix Option.............: [NO]\e[0m"
fi
echo


#---------------------------------------------------------#
# Step 2 - Executing the installation & config tasks .... #
#---------------------------------------------------------#

echo
/bin/echo -e "\e[1;36m !-------------------------------------------------------------!\e[0m"
/bin/echo -e "\e[1;36m ! Installation Process starting.... !\e[0m"
/bin/echo -e "\e[1;36m !-------------------------------------------------------------!\e[0m"
echo
/bin/echo -e "\e[1;33m |-| Proceed with installation..... \e[0m"
echo

install_xrdp
install_tweak
allow_console
create_polkit
fix_theme


if [ "$fixGDM" = "yes" ];
then
fix_gdm
fi

if [ "$fixSound" = "yes" ];
then
enable_sound
fi


#---------------------------------------------------#
# Step 9 - Credits ....
#---------------------------------------------------#
echo
/bin/echo -e "\e[1;36m !---------------------------------------------------------------------------!\e[0m"
/bin/echo -e "\e[1;36m ! Installation Completed !\e[0m"
/bin/echo -e "\e[1;36m ! Please test your xRDP configuration.A Reboot Might be required... !\e[0m"
/bin/echo -e "\e[1;36m ! Written by Griffon - October 2018 - Ver 0.5.1 - Std-Xrdp-Install-0.5.1.sh !\e[0m"
/bin/echo -e "\e[1;36m !---------------------------------------------------------------------------!\e[0m"
echo
How to Use the Script
Set Execute Right on the script
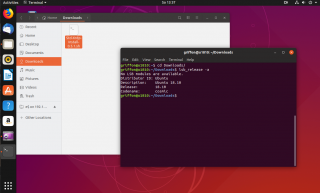
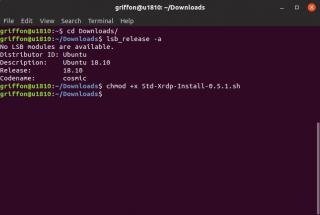
Download the Std-Xrdp-install-0.5.1.sh script to your system. You need to mark the script as executable . To do this, perform the following action in a terminal console
chmod +x ~/Downloads/Std-Xrdp-Install-0.5.1.sh
Click on Picture for Better Resolution
Note : Adjust the path where the Std-Xrdp-Install-0.5.1.sh script to reflect your environment
Execute the script
Like the previous version of the script, you can decide to execute the script with no parameters to perform a “standard installation” or pass some parameters to get more features implemented in your xrdp installation. Before running it, ensure that internet connection is available (so you can download the necessary packages needed for the installation)
Standard way
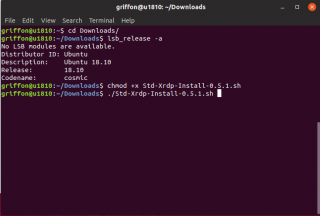
To perform a standard installation, you execute the script with no parameters. Open a Terminal console, browse to the location where the script has been downloaded and issue the following command
./Std-Xrdp-Install-0.5.1.sh
Click on Picture for Better Resolution
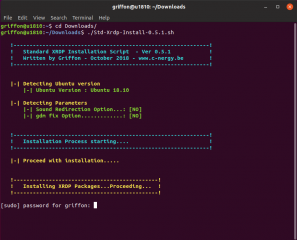
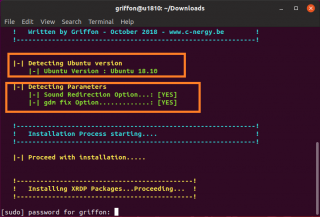
When executing, the script will provide some information about the Ubuntu version and the fact that no options have been selected.
Click on Picture for Better Resolution
When the xrdp installation package will start, you be requested to enter your password. Provide the password and proceed with the installation. Wait for completion of the script. The machine will not reboot automatically when done so you can review the actions performed by the script….
Click on Picture for Better Resolution
This installation mode will provide no fix for the GDM visual issue (see here) or no sound redirection (see here). At this stage, you will be able to perform a remote desktop connection and work against your Ubuntu machine. However, if at a later stage, you want to implement the additional features (GDM fix and Sound redirection), you could re-run the script and pass the parameters to enable the options selected. The script will re-run and pass the new parameters and your system should be working with the additional features enabled.
Advanced way
To enable additional features within your remote desktop session, it’s possible to pass some parameters (in any orders) to the script. The script support up to two parameters. When running the script, a user can decide to enable fix for the GDM lock screen or enable sound redirection or enable both options. The following paragraph explain which parameters can be used….
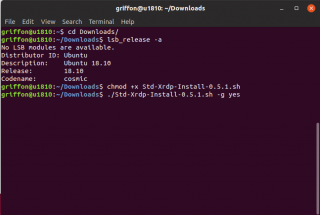
To implement the lock screen fix for GDM within the xrdp session, use this syntax
./Std-Xrdp-Install-0.5.1.sh -g yes
Click on picture for better resolution
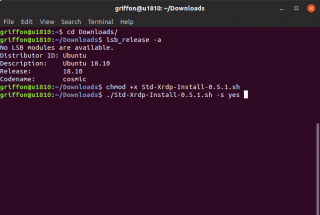
To implement the sound redirection fix within the xrdp session, use this syntax
./Std-Xrdp-Install-0.5.1.sh -s yes
Click on picture for better resolution
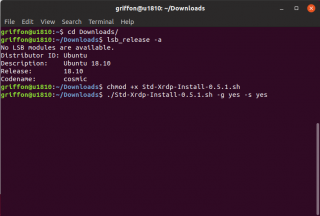
To implement both the sound redirection fix and gdm lock screen fix within the xrdp session, use this syntax
./Std-Xrdp-Install-0.5.1.sh -s yes -g yes
Click on picture for better resolution
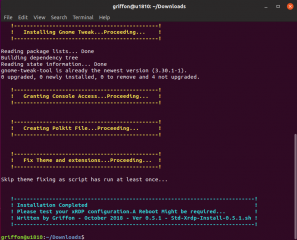
As you can see, whatever the option you are selecting, the script is providing a summary of the options. While the script is running you might need to provide a password. Provide it and let the script complete.
Click on picture for better resolution
When script execution is completed, the machine will not reboot so you can review the installation and detect possible elements that’s preventing the script execution. At completion, it’s recommended to reboot the machine so the changes made to the system can be applied accordingly.
Click on picture for better resolution
Test your configuration
To Test your configuration, you need to perform the following steps
- step 1 – Logout from the Ubuntu machine because you can only have a single connection to the machine for the same user (either local either remote)
- step 2 – Start your favorite remote desktop client and provide the ip address or hostname of your ubuntu machine
- step 3 – At this stage, you should see the xRDP login page. Provide your credentials
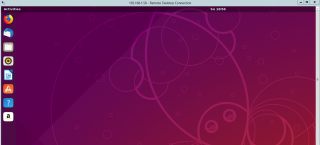
- step 4 – At this stage, you should see your standard Ubuntu Gnome Desktop with the Dock visible, the Ambiance theme displayed and the icons set are set correctly as well
Click on picture for better resolution
- step 5 – Lock the remote session and unlock it again. If you have executed the script with the fixGDM parameter, the background color should be purple (and not gray)… The color is not a one to one color scheme. We have kept the old scheme in this version of the script. When time permit, we might try to update this as well….(or maybe not)
Click on picture for better resolution
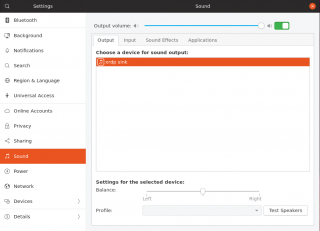
- step 6 – Check if the Sound redirection option has been enabled accordingly. If you open, in your remote session, the Sound Card settings, you should see the xrdp_sink sound card object. If you see this, there is a great chance that the sound redirection would work for your Remote Session
Click on picture for better resolution
Download the Script
Please download the script : Std-Xrdp-Install-0.5.1.zip
Final Notes
That’s it for today !
As you can see, no major changes have been introduced in Ubuntu 18.10 in term of xRDP installation. The script will help users and administrators to perform a consistent xrdp installation and provide a similar look’n feel on a local or remote session. The script version has been set to 0.5.1 because only minor changes have been introduced and the installation logic remains the same. The next post might be covering the custom installation for xRDP. The custom script needs also to be updated in order to provide support to Ubuntu 18.10.
There are time to time some issues that disappear by itself. One of the issue is related to the drive redirection where an error is displayed when trying to access your home folder in the console solution after having performed a successful rdp connection. The other issue is related to the keyboard. The first rdp connection made to Ubuntu, we have been presented with the English keyboard… Login out and login in actions seems to set the correct keyboard to be used (in my case french keyboard layout)…. We will check these issues in another post if still appearing…
As usual, we will kindly ask you to try, test and play around with this version and provide feedback and possibly bugs you might have detected.
Till next time
See ya

You are amazing! Thank you
@Vitor,
Thank you for the feedback and positive comments…. We are open to feedback and if any issues detected, let us know we will try to fix it
Till next time
see ya
Thank you so much for your efforts around xRDP on Ubuntu. My Windows 10 universal RDP-App freezes, when my Ubuntu 18.10. remote desktop plays a sound. I chose both sound redirection fix and gdm lock screen fix when I used your script to install xRDP on Ubuntu 18.10. Is there a way to un-apply the sound redirection fix?
@Marco,
Thank you for the visit, the feedback and the question…. The simplest way to remove sound redirection from Ubuntu would be to delete the files under
“/var/lib/xrdp-pulseaudio-installer” and under “/usr/lib/pulse-$pulsever/modules”
You should delete only two files (in each folders) module-xrdp-sink.so and module-xrdp-source.so
reboot your machine and the sound redirection should not be present anymore
PS:we never tried the remote app universal version…..
alternatively, you could try to simply change the configuration of your mstsc to not redirect the sound and see if this is working
Hope this help
Till next time
See ya
Would this work on Debian too?
@Emmot,
IN theory, the script should be working on Debian. However, because the script is targeting specifically Ubuntu systems, I would not recommend to run it. I would redirect you to the manual installation process and see if it’s working for Debian
Before implementing, please
Read this first – http://c-nergy.be/blog/?p=11336
then read this post – http://c-nergy.be/blog/?p=12073 and this one http://c-nergy.be/blog/?p=12043
Then try to perform the installation and see if this would work for you
Hope this help
Till next time
See ya
Hi,
I am attempting to get this to work on Lubuntu 18.10. The script executes as expected without any issues, but I am unable to connect using remote desktop from Windows 10. Is there anything else that needs to be done under Lubuntu 18.10 to get this to work since Lubuntu 18.10 has switched to the new LXQt desktop environment?
@Quischen,
The script has been specifically written for Ubuntu Default Distro and has not been tested on any other distro because we have no time to do this…
You should not have run the script on your Lubuntu machine……To have remote desktop support on Lubuntu, you can simply execute the command sudo apt-get install xrdp and voila… you should then be able to login into your Lubuntu machine.
Now, you can try to revert back the settings configured by the script…
Hope this help
Till next time
See ya
hi Griffon,
thanks so much – i’ve used your scripts for a while on UBuntu 16.04 and was really happy about it.
Have just reinstalled from scratch Ubuntu 18.04.1 Server on my home server (so no gui as it will run headless anyhow). However, XRDP should come to rescue .
Am testing this wtih Virtual Box on MacBook – vanilla install of server 18.04.1 – apt update; apt upgrade and then your script (nothing else).
Try to connect with Microsoft Remote Desktop (tried the other freeware as well) – it seems to connect but it disconnects immediately…
Do i need to prior to running your script install any specific version of ubuntu desktop ? ie.. ubuntu-gnome-session or anything like that ?
ps. out of desparation i created new VM, just ran apt install xfce4, ran your script and then created .xsession with ‘startxfce4’ and it worked… but i’d prefer standard ubuntu desktop .
Thank yoU !
@Griffon,
thank you very much for this awesome guide&script for XRDP.
Have been using it with my Ubuntu 16.04 two machines for a while.
Have just upgraded my servers (fresh install) to 18.04.1 and was laying in VirtualBox with also vanilla server install, apt-get update/upgrade and running your script.
For some reason it does not work – xrdp is runninng but it seems to connect with black screen and then it disconnects.
There are literally 4 commands being ran in freshly installed server (apt update, apt upgrade, reboot, Std-Xrdp-Install-0.5.1.sh and reboot.
Could you check ? Server ubuntu image is 18.04.1 (ubuntu-18.04.1-live-server-amd64.iso)
Thank you !
@Gaha,
xRDP assumes that you would have a Desktop interface available in order to connect to it…. If you just need remote access to an Ubuntu Server and interact using only a command prompt, you can use SSH solution. If you want to access the Ubuntu server through xrDP and access a desktop interface, you will need to install one as this is not existing by default on Ubuntu server…..
To install the default Ubuntu desktop interface, I think you have to type something like sudo apt-get install Ubuntu-desktop
Hope this help
Till next time
See ya
@Gaha,
yes you need a desktop interface. to have Ubuntu desktop, you have to type something like sudo apt-get install Ubuntu-desktop
Hope this help
Till next time
See ya
I have never been able to figure this out: I have Ubuntu running in Hyper-V. I installed/ran your script and it works great with one caveat. In order to RDP with my Windows 10 Enterprise machine, I first have to connect to the Hyper-V VM with the Console. Once I log in and disconnect, I can then use MSTSC to connect regularly.
If I don’t do the console connection first, it flashes a black screen and then disconnects.
Any thoughts?
@Josh,
sorry for the delay in my answer…..
Never had this issue. we can remote desktop to vm linux running on top of Hyper-v without going to console first…..
can you check your logs to see if more info can leads to the root cause of the issue ?
are you sure that you are not logged into the virtual machine while trying to perform the remote desktop connection. If you use the same user account and if you have one session open (either local or remote), you will have the exact behavior you are describing
waiting for your feedback
Till next time
See ya
Dear Griffon,
Thank you so much for creating this nicely scripted installation routine, however I’m not able to get this running on a G-Cloud hosted Ubuntu 18.04 VM. I am getting only to the xrdp login screen, as soon as I provide my login credentials it always throws the same error message window: “login failed for display 0”
Tried already so many installation routines, it always comes down to this particular error message.
Any clue why this is happening and how could I finally fix this?
Thank you & best regards,
Max
@Griffon – Nice documentation! But however, I never managed to get this running!? Regardless what I do based on there instructions, I always get the “login failed for display 0” error after I connect via xrdp to the instance (running on the GCP Ubuntu VM).
What else can I do to finally get this up and running?
Many thanks!
@Maxamillon,
I do not know G-cloud hosting platform (this is in Belgium ??). This message usually (not always) means wrong password….Can you access the logs for xrdp and sesman (under /var/logs) and have a look into it to see if any info can be found there and point us to the right direction ?
Waiting for your feedback
Till next time
See ya
@Tony,
Provide us the logs from the Ubuntu vm (located under /var/logs/xrdp.log and /var/logs/sesman.log) so we can check if this offers some pointers to the problem and possibly to the solution
Till next time
See ya
Hi Griffon.
Your tutorials are very instructive but I have a problem I can’t figure out :
I need to run a headless Ubuntu box. I have 2 usb webcams connected to it .
When I connect through RDP (from a Mac with the Microsoft RDP Client) everything works fine except the webcams. If I try to open a webcam with vlc (open capture media /dev/video0) I have an error (vlc cannot open v4l2:///dev/video0).
But if I open a session locally on the box first and then another through RDP it works fine, I have no error in vlc.
Do you know how to fix this, as I normally don’t have a monitor connected to my box with a running session ?
Thanks in advance.
@Denis,
No clue so far but some ideas…maybe you are blocked by the polkit inside the Remote Desktop session ? Have you tried to use the webcam while locally logged on in the computer (with an attached monitor) and see if you have the same error. have you checked that the user trying to perform this operation is belonging to the right groups (something called video group)
Hope this help
Till next time
See ya
Hello Griffon!
I tried everything, including just `apt install xrdp` and also your script. But xrdp never worked for me. I can deploy OpenStack in a multi-server env but can’t install xrdp… lol
When I log in via Remmina, I can only see a “blank desktop”, no icons, nothing, just “Xorg”.
It’s kind of sad that `apt install xrdp` doesn’t work out-of-the-box…
So, I just want to say thanks for your help! I’ll try again but, I’m kind of about to give it up and just use nomachine solution (which I honestly don’t like because it isn’t on Ubuntu’s repo).
Cheers!
Hello all!
Does someone know why I can logon in with my standard user but not with root??
When I try loging with root it simply closed the windows after I entered my credential…
A standard user logs in without any problem.
Thanks in advance!
@Thomas,
Root login is disabled on xRDP by default. We assume that you have enabled the root account locally. To have it working at xRDP level, you have to check the file /etc/xrdp/sesman.ini and locate the line
AllowRootloginthe value should be set to 1 or true in order to allow your root login on the terminal server
Hope this help
Till next time
See ya
Great script, guys, thanks a lot. Except it doesn’t work on freshly installed Ubuntu 18.04. And the symptoms are repeatedly posted here in the comments.
@A,
The post and the script you are mentioning are old and out-dated (october 2018). As mentioned multiple times (and also in the comments), please always check for the latest version of the script and use the latest version of the script. Latest version of the script integrate findings and fixes for issues that can exists on Ubuntu Operating System. To check for the latest version of the script, browse to https://www.c-nergy.be/products.html or you could have checked the xRDP section of the blog (http://c-nergy.be/blog/?cat=79)
Ubuntu 18.04 had a known issue impacting xRDP functionality.. Newer version of the script are taking care of this issue and the new script should allow you to install the xRDP software on top of Ubuntu 18.04 with no major issues
Hope this help
Till next time
Saved me a much time, thank you for doing it. I spend the better part of an afternoon struggling with xrdp, but used your script and it was done in a few minutes. I had considered using Teamviewer, but the restriction to the source terminal size was a non starter.
Best to you
@Reese,
Thank you for the feedback and for visiting our Blog. Good to hear that this can be useful. Please be aware that more recent versions of the script exists. Please always visit the page http://www.c-nergy.be/products.html to get the latest version of the script. The most recent version support Ubuntu 16.04, 18.04 and 20.04
Till next time
See ya