Hello World,
Since Ubuntu 18.04 LTS has been made available, we have been quite busy testing and validating the new features and functionalities of this release. Currently, the focus is on xRDP software solution and how to make it works on Ubuntu 18.04. In a previous post, we have provided an updated version of our small script utility that simplify the installation and configuration of xRDP on Ubuntu 18.04.
This new version of the script fixes a recurring issue that any user would have encountered after performing a manual installation of the xRDP software solution on Ubuntu : The Infamous “Authentication Required to create managed Color Device” popup message.
This post will try to explain why the popup appears in remote session and what to do to fix it (partially) or completely…
Let’s do this !
Problem Explained
Describing the issue
This section will briefly explained the problem and how to reproduce it. Let’s assume that you have performed a manual installation of xRDP software package on your Ubuntu 18.04 machine by executing the following command in a Terminal console
sudo apt-get install xrdp
With no additional configurations, you should be able to perform, after the installation of the xrdp package, a remote desktop session to your Ubuntu machine. Open your favorite remote desktop client, type the hostname or ip address of the remote machine and connect. You should see the xrdp login screen

Click on picture for better resolution
Provide your credentials and wait for the login process to complete. At this stage, you should see your Ubuntu Desktop but you should see the following popups showing up. The first popup should look like this one with the following message “Authentication Required – Create a Pr…”. Press Cancel

Click on picture for better resolution
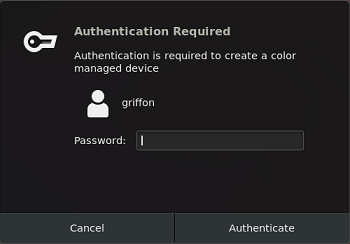
Then another popup will show up again displaying again an Authentication required message (i.e.Create managed color device)… .Press Cancel

Click on picture for better resolution
Depending the Desktop interface, you might see only 2 authentication popup or possibly more (up to 4 popups )
After dismissing all these popups, you will be able to access your desktop and perform your task on the computer using remote connections software solution…

Click on picture for better resolution
The behavior explained
Ubuntu is using the PolKit software component. PolKit is basically an application authorization framework that will capture actions performed by a user and check if this user is authorized to perform such action on the system. PolKit reads some policy files that will specify if the user requested by the user is authorized, not authorized or need authentication. Polkit provide s a way to implement granular authorization to users based on the action requested.
When you perform the remote login on Ubuntu and the popup appears, it simply means that the Polkit Policy file for this action cannot be performed without authentication first. Now, if you logon locally on the system, no popup are displayed because Polkit application has evaluated that this action does not need authentication. This means that Polkit can differentiate between a local session and a remote session. This also means that different authorization policies applies for local sessions and remote sessions.
PolKit application reads some XML files in order to evaluate which user is authorized or not authorized. Some of these files are located under the following location /usr/share/polkit-1/actions. If you list the content of this folder, you will see that there is file called org.freedesktop.color.policy.

Click on picture for better resolution
If you open the file, you will see that this file is exactly the one controlling the authentication requests popping up when connecting remotely on the system.

Click on picture for better resolution
If you scroll down at the end of a section, you can see in the <defaults> section, how the system will treat request to perform the specific action

Click on picture for better resolution
If we look at this section, we have basically the following three lines that dictates the behavior of the system.
(....)
<defaults>
      <allow_any>auth_admin</allow_any>
      <allow_inactive>no</allow_inactive>
      <allow_active>yes</allow_active>
</defaults>
(...)
-
- Allow_action define authorization for user logged on locally on the system. As you can see, the value is set to yes meaning that no popup will be displayed when creating managed device or profile
-
- Allow_inactive define authorization for user with inactive sessions (this means remote sessioins). As you can see, this value is set to no.
- Allow_any define authorization rules for any users either logged on locally on the system or remotely on the system. As you can see the value is set to auth_admin which means that admin account authentication will be requested
Modify <allow_inactive> settings
To identify which value is actually controlling the behavior, we have modified them and checked the behavior in the remote session.
We have first changed the value for the setting <allow_inactive> from no to yes. We have replaced every occurence in the file org.freedesktop.color.policy
(....)
<defaults>
    <allow_any>auth_admin</allow_any>
    <allow_inactive>yes</allow_inactive>
    <allow_active>yes</allow_active>
</defaults> (...)
Changing this value does not change the behavior in the remote session. The popup will still be displayed. So, the xRDP session is not really seen as a remote session, isn’t it ?. We revert back the changes we have made
Modify <allow_any> settings
After reverting back all the changes made in the org.freedesktop.color.policy.xml file, we have changed the setting <allow_any> from auth_admin to yes
(....)
<defaults>
    <allow_any>yes</allow_any>
    <allow_inactive>no</allow_inactive>
    <allow_active>yes</allow_active>
</defaults> (...)
When performing this change, when connecting to the remote session, no more popups are displayed. This settings is basically controlling the popup behavior in the remote sessions. Based on this new understanding of PolKit and the policy applied to the Color managed device and profile, we have been updating our xrdp installation script to offer an even better user experience….
How to “fix” this issue
To fix this issue, there are multiple ways. Some ways are really not recommended and should not be be used in production environment and recommended ways which can be used in production environment.
Not Recommended way
If you want to dismiss this annoying popup in your remote session, you can perform one of the following actions
- delete the file org.freedesktop.color.policy.xml file (located in /usr/share/polkit-1/actions). By deleting this file, you are basically remove the limitations of creating,managing color devices and profiles….
- modify the /usr/share/polkit-1/actions/org.freedesktop.color.policy.xml as described above. for each <allow_any>….</allow_any>, replace the auth_admin value with the value yes. Modifying the section <allow_inactive> from No to yes, (and not changing any other values) will not remove the limitation
Recommended way (so far)
Recommended way is not to modify the files mentioned above but to create authorization files. These files allows to define exception and decide what to do when a user needs to perform a controlled action. So far, if you google or search on internet, the standard way to get rid of the popup in the remote session is to create a file (called 02-allow-colord.conf) in /etc/polkit-1/localauthority.conf.d/ and populated with the following content
polkit.addRule(function(action, subject) {
 if ((action.id == "org.freedesktop.color-manager.create-device" ||
 action.id == "org.freedesktop.color-manager.create-profile" ||
 action.id == "org.freedesktop.color-manager.delete-device" ||
 action.id == "org.freedesktop.color-manager.delete-profile" ||
 action.id == "org.freedesktop.color-manager.modify-device" ||
 action.id == "org.freedesktop.color-manager.modify-profile") &&
 subject.isInGroup("{users}")) {
 return polkit.Result.YES;
 }
 });
This file is basically telling that if the user belong to the group “users” then the create,modify profile and color device can then be performed with authentication prompt. So, far we have been using this solution in our famous script used to automate installation of xRDP. Using this approach, no popup will be displayed anymore and not authentication required will be seen. However, this solution generates a small side effect on your Ubuntu System. This approach will generate a Crash system popup
A Better Recommended way
We have spend some time in reading and searching on Internet in order to explain and find some hints and tips about the Polkit framework and the famous Crash system popup that come with the authorization rules used so far. Based on all these information, we have basically updated our automated installation script in order to dismiss the Authentication required popup and to avoid the famous Crash system popup. Instead of using a .conf file, we have been using a .pkla file….
We are writing a dedicated post about this issue and the information will be made available here
Final Notes
This post has described the internal mechanisms used by Ubuntu and PolKit application that explain why some popups appears in a remote session (if a basic installation of xRDP installation has been performed). Based on this new understanding of the technology behind, we have been able to deliver an improved version of our famous xrdp installation script. The latest version (ver 0.2) of our Standard xrdp install script already contains the code needed to configure properly your system and not having popup displayed in remote session. This code also fixes a recurring issue that will be explained in the next post…..
Till next time
See ya
References
Looking for the /etc/polikit- /config in Ubuntu 18.04 comes up with nothing.
If this folder does not exist, should I create it manually?
@Samer Sultan,
There was a typo in the post…you have to see if the following path exists…./etc/polkit-1/….(complete path is /etc/polkit-1/localauthority.d.conf called 02-allow-color.d.conf )
Howwever, if you want to avoid other issues, you should check this post http://c-nergy.be/blog/?p=12043….
Use a pkla file instead of a conf file
hope this help
till next time
see ya
I did not get this path /etc/polikit-1/config.
what should I do to remove that?
and my VM is also very slow.
@SN Dwivedi,
There is a typo in the post (will be fixed)…. the path is /etc/polkit-1/config
I do not know why your VM is slow….. Which hyper-visor in use, have you installled the vm guest tools,….?
Till next time
See ya
Any way around this without root?
@Patrick,
Do not understand your question…When remote connected Polkit is generating this issue…. To workaround this issue; create a an exception via Polkit rules file….This is is explained in the post (http://c-nergy.be/blog/?p=12043. Read it til the end even it does not look like your issue, it will fix your issue
Till next time
See ya
works as descibed for me in the new focal fossa install
@Uni;
Thanks for the visit and the positive feedback. Note that we have developed a script that can be used to ease installation and post configuration actions of xRDP (including this issue). To know more, have a look at this location to get the latest version of the script and an link on how to use it…. https://www.c-nergy.be/products.html
a HUGE post to explain just a little configuration. Wasting reader’s time for nothing.
@Ask;
Ok, Thank you for your feedback
Pitty you didn’t like the the post….We hope that this post will help other people…
Till next time
See ya
I enjoyed the explanation. Ignore that other guy. Thanks for the info.
@Ethan,
Thank you for visiting our blog and your support…. We think that indeed important to understand a problem and then get to the solution even if the solution is a minor change. But at least you would know what your system is doing
Till next time
See ya
Great writeup – thanks for your help!
Well it is indeed interesting but ALSO TIME WASTING.
Just describe the solution and not the way you have struggled until you found the solution.
It is not really interesting which tries did not lead to the solution. Man! This is not a hollywood movie about slaying ugly dragons before you reach the beautiful princess…
@Mr Smart,
Thank you for your feedback and for visiting our blog.. Sorry that the post was not helpful to you.
Please understand that the goal of this post was to explain why the behavior occur and to learn about polkit technology.
On the other hand, if you have read the post fully, you will see that in the How To Fix Section…. under better way section, there is a link that redirect you the the solution….
The easiest way to fix this issue might be to use our xrdp-installer script that take care of all these small issues and annoyances….
Till next time
See ya
Thanks for the detailed post, some of us appreciate the details.
Great job.
@Oshin,
Thank you for visiting our blog and providing feedback… Sometimes maybe we give too much details but we think it’s important to know why and how things are happening instead of just providing the workaround and solution…Happy to see that information and the way presented is valuable to others 🙂
Till next time
See ya
This worked for me, after reboot I was able to attempt a mount \ umount and it prompted for password (as it should), but did not have the color profile messages.
@Bryan,
Thank you for visiting our blog and providing feedback on this trick. Happy to see that this was helpful
Till next time
See ya
These stupid things are why Linux is never going to be the mainstream OS,
@Jo,
Thank you for visiting our blog and sharing your experience. Happy to see that the information provided could have been helpful to you. Linux is not perfect but it’s getting better and better….
We also hope that more and more popular features and capabilities like RDP will become really no brainer in the future….
Till next time
See ya
Lot of time since the last time I read a tutorial like this: explaining the problem in a simple way, explaining possible solutions, and giving the optimal one.
Thanks for your time on writing it.
@Ignacio,
Thank you for visiting our blog and providing feedback. Always happy to see that the information provided can help :). Thank you for positive feedback on the way we present the needed information through this blog
Till next time
See ya
For Ubuntu 24.04 a more general rule is required:
Create: /etc/polkit-1/rules.d/99-allow_colord.rules
With content:
polkit.addRule(function(action, subject){
if(action.id.match(/^org\.freedesktop\.color\-manager\.create\-*/))
return polkit.Result.YES;
if(action.id.match(/^org\.freedesktop\.color\-manager\.delete\-*/))
return polkit.Result.YES;
if(action.id.match(/^org\.freedesktop\.color\-manager\.modify\-*/))
return polkit.Result.YES;
});