|
|
The script hereafter is outdated and has been replaced by a newer version. Please Check the Download page for latest version. |
Hello World,
Since the release of Ubuntu 18.04, we have put some efforts in improving our famous xRDP Standard installation script. Looking around through our blog, you can see that we have been trying to improve each time the scripted installation process and we have been tackling the most common and annoying issues found during the xRDP installation process. As a reference, the following posts have been published around xrdp and Ubuntu 18.04
- Ubuntu 18.04 – Install xRDP the easy way (Scripted Installation – Version 0.2
- xRDP – The Infamous “Authentication Required to Create Managed Color Device” Explained
- xRDP – How to Fix the Infamous system crash popups in Ubuntu 18.04 (and previous versions)
- xRDP – How to Fix Theme issues in Ubuntu 18.04 remote session
- xRDP – Install xRDP the easy way (Scripted Installation – Version 0.3)
- xRDP – How to Fix different lock screen colors in Ubuntu 18.04 remote session
- xRDP – Install xRDP the easy way (Scripted Installation – Version 0.4)
Today, this post will provide an updated version of the Standard installation script. The version of the script will be set to 0.5 and offer the possibility to enable sound redirection when using xRDP software. The previous post has demonstrated how to configure an Ubuntu 18.04 system with sound redirection. We almost never used sound in our system (either because we are working on servers or because we have virtualized infrastructure where no sound is needed). However, because some users/readers/customers have been requested this feature and wanted to test it, we have decided to update the installation script and to include the sound redirection as an option.
So, Let’s proceed….
The Standard Installation Script – Version 0.5
Overview
The version 0.5 of the script perform a standard installation of xRDP (i.e using the xRDP package available in the Official Ubuntu Repository) and perform also the additional configuration tasks needed to have a workable xRDP solution. Version 0.5 includes the logic to implement sound redirection (for more info – check this post). The script will not enable sound redirection by default. To enable sound redirection, a parameter needs to be passed to the script at execution time. This version of the script comes also with some changes in the way the code has been written…
Assumptions
Before running this script, be aware of the following assumptions
- We have tested the script on Ubuntu 18.04 and later
- No additional desktop interface has been installed.
- We have performed the test on a Virtual Machine running on Virtual box (on Windows 2012 R2) with Sound enabled !!!
- The following procedure has been performed on Ubuntu 18.04 where xorg is the default Display manager
Note : Because we are using the newly available package xrdp-pulseaudio-installer which is only available on Ubuntu 18.04 repository (and because Ubuntu 17.10 has reach end of support status), the script version 0.5 will only run on Ubuntu 18.04 and later versions…..
Prerequisites
We assume that you have internet connection on the Ubuntu machine. The internet connection is needed to download the necessary packages that will be installed on your system.
The script version 0.5
Important Note :
If you copy/paste the script, you might encounter some issues because font formatting might be not maintained during the copy/paste operation. Please ensure that format is accurate before launching the script. A downloadable version of the script is available at the bottom of the post
Disclaimer : As usual, use this at your own risk !!
#####################################################################################################
# Script_Name : Std-Xrdp-install-0.5.sh
# Description : Perform an automated standard installation of xrdp
# on ubuntu 18.04 and later
# Date : August 2018
# written by : Griffon
# Web Site :http://www.c-nergy.be - http://www.c-nergy.be/blog
# Version : 0.5
# History : 0.5 - Add logic to enable sound redirection
#               - Code re-writing to add functions
#               - Remove Support for Ubuntu 17.10 as reached End of Support
#         : 0.4 - Add logic to fix GDM lock screen + minor change
#         : 0.3 - Adding logic to fix theme and extensions for any users login through xrdp
#         : 0.2 - Added Logic for Ubuntu 17.10 and 18.04 detection
#               - Updated the polkit section
#               - New formatting and structure
#         : 0.1 - Initial Script
# Disclaimer : Script provided AS IS. Use it at your own risk....
####################################################################################################


#---------------------------------------------------#
# Detecting if Parameters passed to script ....
#---------------------------------------------------#

while getopts g:s: option
do
case "${option}"
in
g) fixGDM=${OPTARG};;
s) fixSound=${OPTARG};;
esac
done

#---------------------------------------------------#
# Script Version information Displayed              #
#---------------------------------------------------#

echo
/bin/echo -e "\e[1;36m !-------------------------------------------------------------!\e[0m"
/bin/echo -e "\e[1;36m ! Standard XRDP Installation Script - Ver 0.5 !\e[0m"
/bin/echo -e "\e[1;36m ! Written by Griffon - August 2018 - www.c-nergy.be !\e[0m"
/bin/echo -e "\e[1;36m !-------------------------------------------------------------!\e[0m"
echo


#--------------------------------------------------------------------------#
# -----------------------Function Section - DO NOT MODIFY -----------------#
#--------------------------------------------------------------------------#

#---------------------------------------------------#
# Function 1 - Install xRDP Software....
#---------------------------------------------------#

install_xrdp()
{
echo
/bin/echo -e "\e[1;33m !---------------------------------------------!\e[0m"
/bin/echo -e "\e[1;33m ! Installing XRDP Packages...Proceeding... ! \e[0m"
/bin/echo -e "\e[1;33m !---------------------------------------------!\e[0m"
echo
sudo apt-get install xrdp -y
}

#---------------------------------------------------#
# Function 2 - Install Gnome Tweak Tool....
#---------------------------------------------------#

install_tweak()
{
echo
/bin/echo -e "\e[1;33m !---------------------------------------------!\e[0m"
/bin/echo -e "\e[1;33m ! Installing Gnome Tweak...Proceeding... ! \e[0m"
/bin/echo -e "\e[1;33m !---------------------------------------------!\e[0m"
echo
sudo apt-get install gnome-tweak-tool -y
}

#--------------------------------------------------------------------#
# Fucntion 3 - Allow console Access ....(seems optional in u18.04)
#--------------------------------------------------------------------#

allow_console()
{
echo
/bin/echo -e "\e[1;33m !---------------------------------------------!\e[0m"
/bin/echo -e "\e[1;33m ! Granting Console Access...Proceeding... ! \e[0m"
/bin/echo -e "\e[1;33m !---------------------------------------------!\e[0m"
echo
sudo sed -i 's/allowed_users=console/allowed_users=anybody/' /etc/X11/Xwrapper.config
}

#---------------------------------------------------#
# Function 4 - create policies exceptions ....
#---------------------------------------------------#

create_polkit()
{
echo
/bin/echo -e "\e[1;33m !---------------------------------------------!\e[0m"
/bin/echo -e "\e[1;33m ! Creating Polkit File...Proceeding... ! \e[0m"
/bin/echo -e "\e[1;33m !---------------------------------------------!\e[0m"
echo

sudo bash -c "cat >/etc/polkit-1/localauthority/50-local.d/45-allow.colord.pkla" <<EOF
[Allow Colord all Users]
Identity=unix-user:*
Action=org.freedesktop.color-manager.create-device;org.freedesktop.color-manager.create-profile;org.freedesktop.color-manager.delete-device;org.freedesktop.color-manager.delete-profile;org.freedesktop.color-manager.modify-device;org.freedesktop.color-manager.modify-profile
ResultAny=no
ResultInactive=no
ResultActive=yes
EOF

}


#---------------------------------------------------#
# Function 5 - Fixing Theme and Extensions ....
#---------------------------------------------------#

fix_theme()
{
echo
/bin/echo -e "\e[1;33m !---------------------------------------------!\e[0m"
/bin/echo -e "\e[1;33m ! Fix Theme and extensions...Proceeding... !\e[0m"
/bin/echo -e "\e[1;33m !---------------------------------------------!\e[0m"
echo

#Check if script has already run....
if grep -xq "#fixGDM-by-Griffon" /etc/xrdp/startwm.sh; then
echo "Skip theme fixing as script has run at least once..."
else
#Set xRDP session Theme to Ambiance and Icon to Humanity
sudo sed -i.bak "4 a #fixGDM-by-Griffon\ngnome-shell-extension-tool -e ubuntu-appindicators@ubuntu.com\ngnome-shell-extension-tool -e ubuntu-dock@ubuntu.com\n\nif [ -f ~/.xrdp-fix-theme.txt ]; then\necho 'no action required'\nelse\ngsettings set org.gnome.desktop.interface gtk-theme 'Ambiance'\ngsettings set org.gnome.desktop.interface icon-theme 'Humanity'\necho 'check file for xrdp theme fix' >~/.xrdp-fix-theme.txt\nfi\n" /etc/xrdp/startwm.sh
fi
echo
}

#---------------------------------------------------#
# Function 6- Fixing GDM - As an Option ....
#---------------------------------------------------#
fix_gdm()
{
echo
/bin/echo -e "\e[1;33m !---------------------------------------------!\e[0m"
/bin/echo -e "\e[1;33m ! Fix for GDM Lock Screen color... !\e[0m"
/bin/echo -e "\e[1;33m !---------------------------------------------!\e[0m"
echo
# Step 1 - Install prereqs for compilation later on
sudo apt-get -y install libglib2.0-dev-bin
sudo apt-get -y install libxml2-utils

# extract gresource info (from url...)
workdir=${HOME}/shell-theme
if [ ! -d ${workdir}/theme ]; then
mkdir -p ${workdir}/theme
mkdir -p ${workdir}/theme/icons

fi
gst=/usr/share/gnome-shell/gnome-shell-theme.gresource

for r in `gresource list $gst`; do
gresource extract $gst $r >$workdir/${r#\/org\/gnome\/shell/}
done

/bin/echo -e "\e[1;33m |-| Creating XML File... \e[0m"
# create the xml file
bash -c "cat >${workdir}/theme/gnome-shell-theme.gresource.xml" <<EOF
<?xml version="1.0" encoding="UTF-8"?>
<gresources>
<gresource prefix="/org/gnome/shell/theme">
<file>calendar-arrow-left.svg</file>
<file>calendar-arrow-right.svg</file>
<file>calendar-today.svg</file>
<file>checkbox-focused.svg</file>
<file>checkbox-off-focused.svg</file>
<file>checkbox-off.svg</file>
<file>checkbox.svg</file>
<file>close-window.svg</file>
<file>close.svg</file>
<file>corner-ripple-ltr.png</file>
<file>corner-ripple-rtl.png</file>
<file>dash-placeholder.svg</file>
<file>filter-selected-ltr.svg</file>
<file>filter-selected-rtl.svg</file>
<file>gnome-shell.css</file>
<file>gnome-shell-high-contrast.css</file>
<file>logged-in-indicator.svg</file>
<file>no-events.svg</file>
<file>no-notifications.svg</file>
<file>noise-texture.png</file>
<file>page-indicator-active.svg</file>
<file>page-indicator-inactive.svg</file>
<file>page-indicator-checked.svg</file>
<file>page-indicator-hover.svg</file>
<file>process-working.svg</file>
<file>running-indicator.svg</file>
<file>source-button-border.svg</file>
<file>summary-counter.svg</file>
<file>toggle-off-us.svg</file>
<file>toggle-off-intl.svg</file>
<file>toggle-on-hc.svg</file>
<file>toggle-on-us.svg</file>
<file>toggle-on-intl.svg</file>
<file>ws-switch-arrow-up.png</file>
<file>ws-switch-arrow-down.png</file>
</gresource>
</gresources>
EOF
cd ${workdir}/theme
/bin/echo -e "\e[1;33m |-| Modify Css... \e[0m"
sed -i -e 's/background: #2e3436/background: #2c00e1/g' ~/shell-theme/theme/gnome-shell.css

##Delete the file noise-texture.png (grey one)
rm ${workdir}/theme/noise-texture.png

/bin/echo -e "\e[1;33m |-| Download Purple image file... \e[0m"
#Download the noise-texture.png with purple background
wget http://www.c-nergy.be/downloads/noise-texture.png

/bin/echo -e "\e[1;33m |-| Compile Resource File... \e[0m"
#Compile file and copy to correct location....
cd ${workdir}/theme
glib-compile-resources gnome-shell-theme.gresource.xml

/bin/echo -e "\e[1;33m |-| Copy file to target location... \e[0m"

# make a backup of the file and copy the file....
sudo cp /usr/share/gnome-shell/gnome-shell-theme.gresource /usr/share/gnome-shell/gnome-shell-theme.gresource.bak
sudo cp ${workdir}/theme/gnome-shell-theme.gresource /usr/share/gnome-shell/gnome-shell-theme.gresource
echo
}

#---------------------------------------------------------#
# Function 7 - Enable Sound Redirection - As an option.. #
#---------------------------------------------------------#
enable_sound()
{
echo
/bin/echo -e "\e[1;33m   !---------------------------------------------!\e[0m"
/bin/echo -e "\e[1;33m   !   Enabling Sound Redirection...             !\e[0m"
/bin/echo -e "\e[1;33m   !---------------------------------------------!\e[0m"
echo

# Step 1 - Install xrdp-pulseaudio-installer package
sudo apt-get install xrdp-pulseaudio-installer -y

# Step 2 - Enable Source Code Repository
sudo apt-add-repository -s 'deb http://be.archive.ubuntu.com/ubuntu/ '$codename' main restricted'
sudo apt-add-repository -s 'deb http://be.archive.ubuntu.com/ubuntu/ '$codename' restricted universe main multiverse'
sudo apt-add-repository -s 'deb http://be.archive.ubuntu.com/ubuntu/ '$codename'-updates restricted universe main multiverse'
sudo apt-add-repository -s 'deb http://be.archive.ubuntu.com/ubuntu/ '$codename'-backports main restricted universe multiverse'
sudo apt-add-repository -s 'deb http://be.archive.ubuntu.com/ubuntu/ '$codename'-security main restricted universe main multiverse'
sudo apt-get update

# Step 3 - Download pulseaudio source in /tmp directory
cd /tmp
sudo apt source pulseaudio

# Step 4 - Compile
pulsever=$(pulseaudio --version | awk '{print $2}')
cd /tmp/pulseaudio-$pulsever
sudo ./configure

# Step 5 - Create xrdp sound modules
cd /usr/src/xrdp-pulseaudio-installer
sudo make PULSE_DIR="/tmp/pulseaudio-$pulsever"

# Step 6 - copy files to correct location
sudo install -t "/var/lib/xrdp-pulseaudio-installer" -D -m 644 *.so
echo

}

#--------------------------------------------------------------------------#
# -----------------------END Function Section -----------------#
#--------------------------------------------------------------------------#

#--------------------------------------------------------------------------#
#------------ MAIN SCRIPT SECTION -------------------#
#--------------------------------------------------------------------------#

#---------------------------------------------------#
#-- Step 0 - Try to Detect Ubuntu Version....
#---------------------------------------------------#

version=$(lsb_release -sd)
codename=$(lsb_release -sc)

echo
/bin/echo -e "\e[1;33m |-| Detecting Ubuntu version \e[0m"

if [[ "$version" = *"Ubuntu 18.04"* ]];
then
/bin/echo -e "\e[1;32m |-| Ubuntu Version : $version\e[0m"
echo
else
echo
/bin/echo -e "\e[1;31m !------------------------------------------------------------!\e[0m"
/bin/echo -e "\e[1;31m ! Your system is not running Ubuntu 18.04 Edition and later !\e[0m"
/bin/echo -e "\e[1;31m ! The script has been tested only on Ubuntu 18.04 and later !\e[0m"
/bin/echo -e "\e[1;31m ! The script is exiting... !\e[0m"
/bin/echo -e "\e[1;31m !------------------------------------------------------------!\e[0m"
echo
exit
fi

/bin/echo -e "\e[1;33m   |-| Detecting Parameters        \e[0m"

#Detect if argument passed
if [ "$fixSound" = "yes" ];
then
/bin/echo -e "\e[1;32m       |-| Sound Redirection Option...: [YES]\e[0m"
else
/bin/echo -e "\e[1;32m       |-| Sound Redirection Option...: [NO]\e[0m"
fi

if [ "$fixGDM" = "yes" ];
then
/bin/echo -e "\e[1;32m       |-| gdm fix Option.............: [YES]\e[0m"
else
/bin/echo -e "\e[1;32m       |-| gdm fix Option.............: [NO]\e[0m"
fi
echo

#---------------------------------------------------------#
# Step 2 - Executing the installation & config tasks .... #
#---------------------------------------------------------#

echo
/bin/echo -e "\e[1;36m !-------------------------------------------------------------!\e[0m"
/bin/echo -e "\e[1;36m ! Installation Process starting.... !\e[0m"
/bin/echo -e "\e[1;36m !-------------------------------------------------------------!\e[0m"
echo
/bin/echo -e "\e[1;33m |-| Proceed with installation..... \e[0m"
echo

install_xrdp
install_tweak
allow_console
create_polkit
fix_theme


if [ "$fixGDM" = "yes" ];
then
fix_gdm
fi

if [ "$fixSound" = "yes" ];
then
enable_sound
fi

#---------------------------------------------------#
# Step 3 - Credits ....
#---------------------------------------------------#
echo
/bin/echo -e "\e[1;36m !-----------------------------------------------------------------------!\e[0m"
/bin/echo -e "\e[1;36m ! Installation Completed !\e[0m"
/bin/echo -e "\e[1;36m ! Please test your xRDP configuration.A Reboot Might be required... !\e[0m"
/bin/echo -e "\e[1;36m ! Written by Griffon - August 2018 - Ver 0.5 - Std-Xrdp-Install-0.5.sh !\e[0m"
/bin/echo -e "\e[1;36m !-----------------------------------------------------------------------!\e[0m"
echo
How to Use the Script
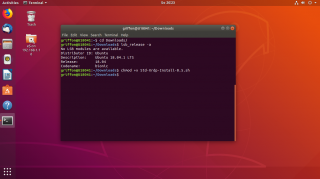
Set Execute Right on the script
Download the Std-Xrdp-install-0.5.sh script to your system. You need to mark the script as executable . To do this, perform the following action in a terminal console
chmod +x ~/Downloads/Std-Xrdp-Install-0.5.sh
Click on picture for better resolution
Note : Adjust the path where the Std-Xrdp-Install-0.5.sh script to reflect your environment
Execute the script
With this version of the script, you have basically the possibility to pass some parameters. These parameters allow the script to perform some additional configuration tasks if desired by the user. Before running it, ensure that internet connection is available (so you can download the necessary packages needed for the installation)
Standard way
In the standard way, you simply execute the script with no parameters. In this scenario, no fix for the GDM visual issue (see here) will be implemented and no sound redirection (see here) will be implemented This mode is basically equivalent to running the Std-Install-Xrdp-0.5.sh script. The script will install xRDP and configure the basic visual theme on the system.
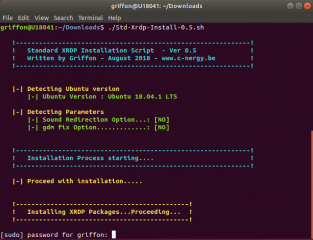
To install xRDP, simply open a Terminal console. In the Terminal console, Browse to the location where the script has been stored and then issue the following command
./Std-Xrdp-Install-0.5.sh
The script will start executing and will also display some basic information about your installation. When the xrdp installation package will start, you be requested to enter your password
Click on picture for better resolution
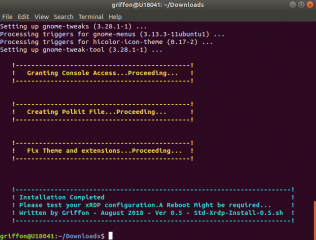
Provide the password and proceed with the installation. Wait for completion of the script. The machine will not reboot automatically when done so you can review the actions performed by the script….
Click on picture for better resolution
At this stage, you have completed a basic installation and you will have a workable remote desktop solution. Now, let’s assume that you want to enable the additional options the script is offering. After running the script in the standard way a first time, you could re-run the script and pass the parameters to enable the options selected. The script will re-run and pass the new parameters and your system should be working with the additional features enabled.
Advanced way
Building on the approach used for version 0.4 of the script, we have changed a little bit the way the script so multiple parameters can be passed to the script (in any orders). Basically, the Std-Xrdp-Install script version 0.5 accepts a two parameters (so far). The script will accept one parameter or both parameters and execute the appropriate actions. To enable the optional xrdp feature using the Std-Install-Xrdp script, you will need to pass parameters to the script (in any order !!)
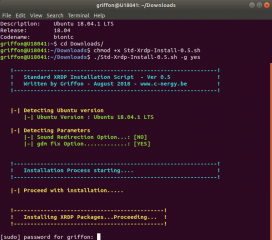
To implement the lock screen fix for GDM within the xrdp session, use this syntax
./Std-Xrdp-Install-0.5.sh -g yes
Click on picture for better resolution
To implement the sound redirection fix within the xrdp session, use this syntax
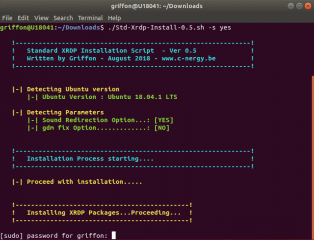
./Std-Xrdp-Install-0.5.sh -s yes
Click on picture for better resolution
To implement both the sound redirection fix and gdm lock screen fix within the xrdp session, use this syntax
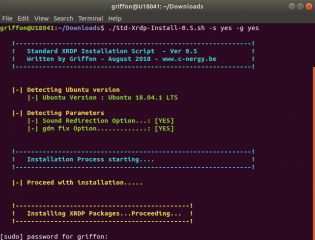
./Std-Xrdp-Install-0.5.sh -s yes -g yes
Click on picture for better resolution
As you can see, whatever the option you are selecting, the script is providing a summary of the options. While the script is running you might need to provide a password. Provide it and let the script complete.
Click on picture for better resolution
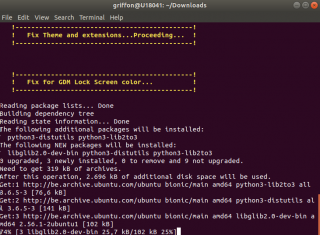
Here, the script has detected that the “fixGDM” parameter has been passed to the command line and that an additional action will be executed by the script
Click on picture for better resolution
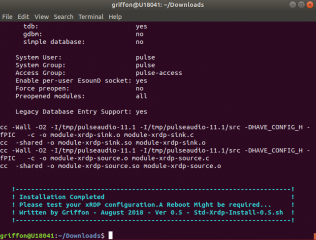
When script execution is completed, the machine will not reboot. At completion, it’s recommended to reboot the machine so the changes made to the system can be applied accordingly.
Test your configuration
To Test your configuration, you need to perform the following steps
- step 1 – Logout from the Ubuntu machine because you can only have a single connection to the machine for the same user (either local either remote)
- step 2 – Start your favorite remote desktop client and provide the ip address or hostname of your ubuntu machine
- step 3 – At this stage, you should see the xRDP login page. Provide your credentials
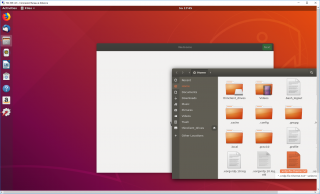
- step 4 – At this stage, you should see your standard Ubuntu Gnome Desktop with the Dock visible, the Ambiance theme displayed and the icons set are set correctly as well
Click on picture for better resolution
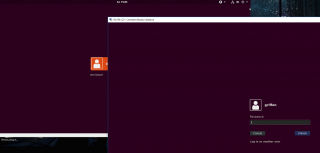
- step 5 – Lock the remote session and unlock it again. If you have executed the script with the fixGDM parameter, the background color should be purple (and not gray)…
Click on picture for better resolution
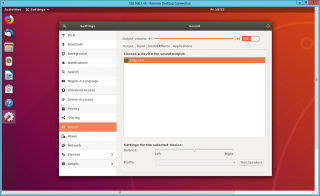
- step 6 – Check if the Sound redirection option has been enabled accordingly. If you open, in your remote session, the Sound Card settings, you should see the xrdp_sink sound card object. If you see this, there is a great chance that the sound redirection would work for your Remote Session
Click on picture for better resolution
Download the Script
Please download the script : Std-Xrdp-Install-0.5.zip
Final Notes
That’s it for today !
As you can see, we have put a lot of efforts in keeping the script running like the previous version and basically performing a “simple” xrdp installation with some default configuration settings to improve the user experience. We also have put some efforts in providing some additional options for the more adventurous users out there. It’s now possible (if options are selected) to fix the GDM lock screen color and have sound redirection in your xRDP session.
So, please give it a try, play around with it and provide us some feedback. We hope that you will enjoy it.
Stay tuned and do not forget to check for the latest version of the script…
Till next time
See ya
On 18.04.1 LTS :
|-| Detecting Ubuntu version
./Std-Xrdp-Install-0.5.sh: 298: ./Std-Xrdp-Install-0.5.sh: [[: not found
!————————————————————!
! Your system is not running Ubuntu 18.04 Edition and later !
! The script has been tested only on Ubuntu 18.04 and later !
! The script is exiting… !
!————————————————————!
@Leroy,
When running this command, what’s showing up ? /bin/bash –version print
The error you have usually come from the fact that /bin/bash is not the real /bin/bash. the command above will tell us which engine your system is using….
You can try to add on top of the file the following line as well #!/bin/bash
Hope this help
Till next time
Griffon, thanks for the reply
I get the following output /bin/bash: –version: No such file or directory
I ended up deleting the block where you check the version, and the script runs fine
I run into all sorts of problems after this point, did a clean install now with a reboot – and I get the blue screen on trying to rdp in
[20180822-13:06:03] [ERROR] X server for display 10 startup timeout
[20180822-13:06:03] [ERROR] X server for display 10 startup timeout
[20180822-13:06:03] [CORE ] waiting for window manager (pid 19564) to exit
[20180822-13:06:03] [ERROR] another Xserver might already be active on display 10 – see log
@Leroy,
you should have read
/bin/bash --version(formatting issues concatenate the double dash notation).. There you should see which bash version you are running…next question, have you downloaded the script or copy/paste from the blog… if you copy paste, you will have issues because of formatting issues (some strange characters not copied correctly). We will double check that the correct version of the script has been uploaded, we will also retest the version uploaded here but we are pretty sure that’s the correct version
BTW, thank you for letting us know (so if there is a problem with the script, we can fix it quickly…;-) )
Keep in touch
Till next time
See ya
@Griffon
Gotcha, I get the following version:
GNU bash, version 4.4.19(1)-release (x86_64-pc-linux-gnu)
Copyright (C) 2016 Free Software Foundation, Inc.
License GPLv3+: GNU GPL version 3 or later
Yeah I downloaded and unzipped the script after reading your note at the start of the instructions 😉
Has anyone had trouble with Google Chrome/Chromium preventing keyboard input? All other programs (Firefox, VSCode, Terminal) work fine, unless Chrome is running. Anytime Chrome is running, all keyboard input is ignored. Close Chrome, and everything is fine again. Just curious if this could be related to xdrp.
@Corey,
Never had this kind of issues so far….If you discover such issues/bug, let us know and we will try to document it and try to provide possible fix….
Thank for you visit, you interest in the topic and the positive feedback
Till next time
See ya
I’ve got the same issue as @Leroy and same bash version. Any help would be appreciated.
Added in #!/bin/bash and the script worked on 18.04.1 LTS.
But I still can’t RDP in. The script runs fine and says everything installed. From Windows I try to remote in, it connects with the blue XRDP login screen. I selected Xorg and enter my login details and it just closes the RDP connection down. I had this same problem with 0.2 of the script.
Any help would be hugely grateful.
Tom
@Tom,
Please add at the top of the script #!/bin/bash to ensure that the proper bash exe is used. When this is done, you should be able to run the .sh script
Hope this help
Till next time
See ya
@Tom,
Based on your description, it seems that the user account you are using to login into the xRDP is the user account that logged into the Ubuntu physical machine. A single user account CANNOT have concurrent connections on Ubuntu machine. Try this and provide feedback :
logoff from the Ubuntu machine on the physical or virtual machine (basically nobody should be connected/logged in to the Ubuntu machine)
Start your remote desktop and try to perform the connection
Hope this help
Till next time
See ya
when i install your script it all works sound and RDP it breaks and uninstalls WINE.
Is pulseaudio not compatible with WINE ?
@John,
I do not know if pulseaudio and wine are mutually exclusive but I do not think so… I will need to perform some additional tests with WINE installed on our Ubuntu infrastructure. After installing the xrdp package, can you re-install the WINE package ? is everything working as expected (both xrdp and wine) or are there any issues ?
We will need to check this but this might take some time as we are busy with heavy project with strict timeline……
Hope this help
till next time
See ya
HI thanks for this script, it installed and fired up without a problem except for not being able to use gui applications as root/admin. For instance nautilus as admin doesn’t prompt for authentication, an “empty” window opens. Using admin:// behaves the same way. Any thoughts on how to get this working?
thanks
@Dale,
Just an idea here ….. possibly polkit is blocking some functionalities within remote session. You might want to disable polkit for testing purposes or try to find which policy is controlling this behavior….
If time permit, we will try to have a look into it. In the mean time, you can have a quick look at this post and see if this can help https://c-nergy.be/blog/?p=12073
Till next time
See ya
nice post, it’s really an attractive article, thank you for sharing
would this script work with ubuntu 18.04.2 ? I cant make to work manual instalation of xrdp in ubuntu version 18.04.2 LTS.
@Fabio,
The script would run fine on 18.04.2. However because of a bug in the xrdp package in U18.04.2, you will have to use a more recent version (see this post https://c-nergy.be/blog/?p=13487
To know more about the bug, look at this post
Hope this help
Till next time
See ya
Hi Griffon,
Why I connected first time on windows, show “VNC error – problem conectiong some problem.” Can you help me, Thanks!
@inestia,
You do not provide enough info about your issue… Which version of Ubuntu are you running ? Ubuntu 18.04.1, Ubuntu 18.04.2 or Ubuntu 18.04.3
Did you know that there is a new version of the script (i.e. 0.6) that fixes some of the issues of xrdp on top of Ubuntu 18.04.2 ?
Have you checked the logs (/var/log/xrdp-sesman.log and /var/log/xrdp.log) to see if they are any info about the error you are having )
Provide us more info and maybe we can try to solve this issue
Till next time
See ya
Hi Griffon,
I’m running on Ubuntu 18.04.3, follow steps:http://c-nergy.be/blog/?p=12551, executed the script as followed:
./Std-Xrdp-Install-0.5.sh -g yes -s no, the result is OK, but when connected with Xorg, show “VNC error – problem conectiong some problem.” Do I need to install the Xorg separately? But I install the lasted Xorg,still show the issue.
Hi Griffon,
There is another question that needs to be consulted. I have another server running on ubuntu18.04.1. Which script do I need to refer to to install xrdp?
Inestia,
Always use the latest version of the script to perform xrdp installation….All scripts version can be found on this page https://www.c-nergy.be/products.html
The latest version of the script for a standard installation is 0.6
The latest version usually contains the latest fixes and findings related to xRDP
Hope this help
Till next time
See ya
@Inestia,
There is a known issue with Ubuntu 18.04.2 and later where indeed the xorg package is not installed properly because the Ubuntu 18.04.2 has introduced a new xorg package that’s not supported by the xrdp package provided by Ubuntu (see more info at http://c-nergy.be/blog/?p=13390. Again, please try to remove the xrdp package and run the latest version of the script (version 0.6) and providing the correct switches you want to use….
What’s bothering me here is the VNC Error log. are you sure to use the proper option in the xrdp login screen (Xorg option and xvnc-sesman) ? If you use the xorgxrdp backend there is no need for vnc protocol…..
Hope this help
Till next time
See ya