Hello World,
Since Canonical has dropped Unity desktop and replaced it with Gnome Desktop, it has been challenging to get a vnc server started at boot up and being able to perform a remote connection to the machine. The process of having x11vnc service started at boot time has changed slightly since lightdm manager has been replaced by the GDM display Manager. GDM display manager has introduced an additional level of complexity in the configuration.
In the past, we already provided some information on how to make the vnc service start at boot time and perform a vnc connection. These information can be found hereafter
- Ubuntu 16.04 – Configure your system to have x11vnc running at startup
- Ubuntu 17.04 – Configure X11VNC Server to Boot at Startup
- Ubuntu Gnome 17.04 – Configure X11VNC Server to Boot at Startup – Part I
- Ubuntu Gnome 17.04 – Configure X11VNC Server to Boot at Startup – Part II
This post will try to provide some updates information on how to perform this configuration against Ubuntu 17.10 and Ubuntu 18.04 Edition
Let’s do this…..
Overview
VNC software has been around for a long time in Linux world. VNC server basically provide remote desktop against Linux machine (it’s the equivalent of remote desktop service client in Microsoft world). Usually, a user needs to be logged on the Ubuntu machine in order to access the remote desktop. When no user is logged into the system, by default, the vnc service will not be running and no connection will be allowed. This post will explain how to configure Ubuntu 17.10 and Ubuntu 18.04 to have x11vnc server started at boot which would allow a user to connect to a system using vnc protocol even if no user is currently logged in.
The following sections will provide some step by step instructions that can be used to have x11vnc started at boot time….
Assumptions
This procedure has been tested only within a specific scenario. These are the following assumptions that needs to be met in order to reproduce this configuration
- This configuration has been tested only on Ubuntu 17.10 & 18.04 edition
- We have performed the test on a Virtual Machine running on Hyper-V Server and virtualbox
- The X11vnc server package has been used to provide vnc server capabilities
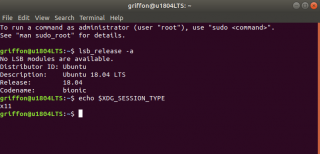
- No Wayland display server is used and we are using the standard X11 session type (in Ubuntu 17.10, you have to disable the Wayland option)
Click on Picture for better resolution
Step by Step Guide
Step 1 – Disable Wayland Server
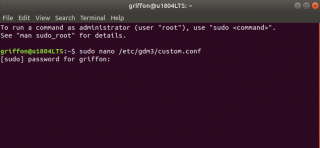
To have x11vnc started at boot, we need to completely disable the Wayland server. To perform such action, we will need to un-comment a line in the following file /etc/gdm3/custom.conf. So, first step would be to edit the file with the sudo command
Click on Picture for better resolution
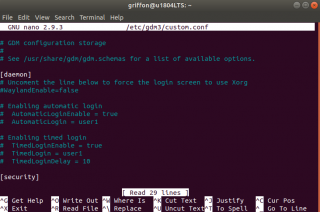
Then, move to the line #WaylandEnable=False
Click on Picture for better resolution
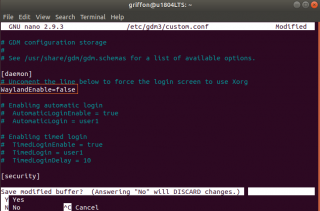
Remove the # sign and save the file. So you should read now WaylandEnable=False
Click on Picture for better resolution
Reboot the system
Step 2 – Installing X11VNC package
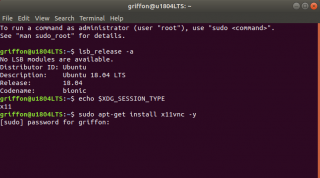
x11vnc package will provide the vnc server software capability. The software is available in the Ubuntu repository by default and can be installed quickly through the command line. To install the x11vnc component, you simply issue the following command.
sudo apt-get install x11vnc -y
you might get prompted for a password. Enter it and wait for the installation to complete.
Click on Picture for better resolution
Step 3 – Securing VNC connection through password usage
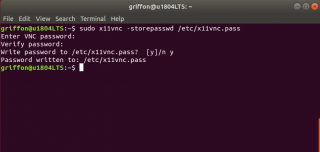
To provide a certain level of protection, it’s possible to configure x11vnc to prompt for a password before performing the remote connection. This password is not super secure and provide a minimum level of control. To configure x11vnc to use a password, you will need to issue the following command in a terminal console
sudo x11vnc -storepasswd /etc/x11vnc.pass
Click on Picture for better resolution
Step 4 – Set correct permissions on the /etc/x11vnc.pass file
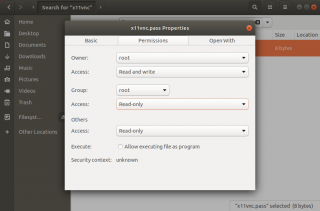
Because standard users will need to read the content of the file in order to get the vnc connection, we will ensure that the file is readable by any user needing an access remotely. This is obviously not the best security approach but we need this to move forward.
So, in nautilus, locate the file /etc/x11vnc.pass, right click on it, go to the tab permission and ensure that the other group has read only access set
Click on Picture for better resolution
Step 5 – Get the UID for GDM Account
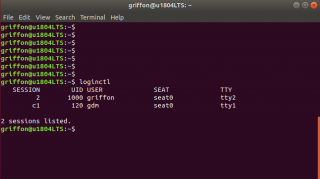
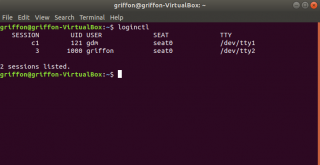
The easiest way to get the correct UID for the gdm account is to execute the following command
sudo loginctl
Click on Picture for better resolution
In this screenshot, we can see the UID of the gdm account. This information is critical for the rest of this post. Run this command and check the value used by your system as this can differ from system to system
Note :
By default, the UID for gdm shoud be set to 120. However, we have encountered situation where the UID is not set to 120. In Ubuntu 17.10, the gdm uid is set on 121 on my system.
Click on Picture for better resolution
Step 5 – Creating the service Unit File for x11vnc
This file will basically control the x11vnc service behavior and make it starts at boot time. To configure the x11vnc service, you will need to create a file called x11vnc.service under /lib/systemd/system. One way to create this file is to issue the following command
sudo gedit /lib/systemd/system/x11vnc.service
This file need to be populated with the following information. As mentioned earlier, the UID for gdm account is critical in this configuration (see text in orange). Ensure that the uid value in the file match your configuration. This information needs to be correct in order to have the service start and running
[Unit]
Description=Start x11vnc at startup.
After=multi-user.target

[Service]
Type=simple
ExecStart=/usr/bin/x11vnc -loop -forever -bg -rfbport 5900 -xkb -noxrecord -noxfixes -noxdamage -shared -norc -auth /run/user/120/gdm/Xauthority -rfbauth /etc/x11vnc.pass

[Install]
WantedBy=multi-user.target
Save the file and move to the next step….
Step 6 – Enable and Start the Service
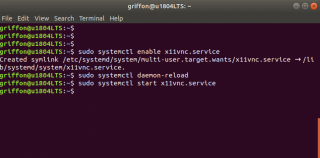
This step will ensure that the service is enabled on your system. Once the service enabled, it will be possible to control the service using the systemctl command. To enable, configure and start the service, issue the following commands
sudo systemctl enable x11vnc.service
sudo systemctl daemon-reload
sudo systemctl start x11vnc.service
Click on Picture for better resolution
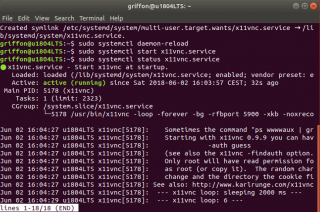
To check that the service is running, we can issue the following command
sudo systemctl status x11vnc.service
Click on Picture for better resolution
It should look like the screenshot here above
Reboot the system
Step 7 – Try to connect
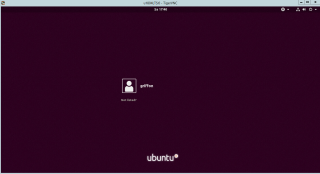
Ensure that nobody is connected/logged into the system and perform the vnc connection (using your favorite vnc client). If everything is fine, you should see the login screen displayed when performing the vnc connection
Click on Picture for better resolution
However, as soon as you logged on, the vnc client will only show a black screen.
Click on Picture for better resolution
if you reach this stage, your vnc service is starting at boot time. However, additional steps are needed in order to view the gnome desktop interface……
Step 8 – Start vnc at login (per user configuration)
When nobody is connected to the remote machine and you perform a vnc connection, the screen will be black and no Gnome desktop will be displayed. This is a limitation of this procedure (or limitation of GDM Display manager). In order to display the gnome desktop, there is no other choice that performing another VNC connection (on another port than the one used by the gdm account).
So, to have this working, each user will need to perform two connections. one connection for gdm display server and one connection for the user session. In this post, we have explained some ways to make sure that the vnc service is also started for the user. Another option might be to create service unit for each user as well. as we do not have time, we will go for the simple option : creating a startup script for each user.
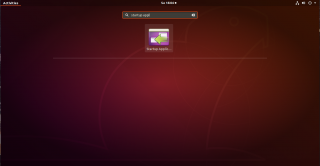
To do this, click on Activities and search for Startup Applications.
Click on Picture for better resolution
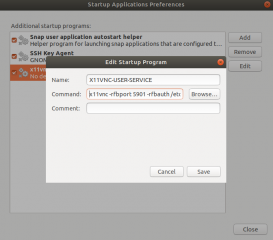
Click on it. This will open the application. Click Add and in the dialog box, provide a name and the command line to be executed (x11vnc -rfbport 5901 -rfbauth /etc/x11vnc.pass).
Click on Picture for better resolution
This configuration is needed for each user performing a remote connection. In the Startup script, ensure that the port used is different for each user as well..
At this stage, you will be able to perform a vnc connection. As mentioned aboved, if no one is connected to the system, two vnc connection would be needed in order to access the gnome Desktop interface
Final Notes
As you can see, it’s still possible to have x11vnc start at boot time as long as the Wayland display manager is disabled. The change in login manager (from lightdm to gdm) does make the vnc connection less straight forward as two connection would be needed when working against Ubuntu 17.10 and later editions. The two connections thing is annoying but at least it’s possible to perform remote connection using vnc software.
VNC software is not the only software that can be used to perform remote connections. An other option that can be used to perform remote connection is the xrdp software package. We have been writing about this piece of software quite extensively now. xRDP offers a good solution and provide interoperability with Windows World. Howerver, xrdp software has also some drawback and limitations. So, it’s up to you to choose the better software solution for your situation….
That’s it for me….
Till next time
See ya
I fixed the problem of needing to run two x11vnc processes to get it working before and after login by just replacing gdm with lightdm (https://docs.j7k6.org/x11vnc-debian-ubuntu-linux/), now it works like it’s supposed to.
@J7k6,
This is indeed a possible approach to make x11vnc working smoothly. I really like the lightdm solution. However, some people will stick to the default provided by Canonical i.e. GDM3, so we had to come up with some solution for them as well. Plus, a better and more secure ? option might be xRDP solution
Till next time
See ya
I followed all the steps carefully but I still see black screen from macOS screen sharing app. Here’s the syslog:
https://pastebin.com/raw/jJS3y8AE
@Marvin;
That’s a really short description of your issue. First, we are not really familiar with MacOS…If you have performed the configuration as described in the post, you should be able to perform an initial connection to Ubuntu using vnc client on port 5900… Is this the case for you ? You see the black screen when performing the connection ?…. Leave this connection open and open a second vnc connection using a different port than the one you used initially. Do you connect or is it a black screen ?
Till next time
See ya
Hi Griffon,
Thank you for your reply, I’m running macOS High Sierra (version 10.13.5). I’m using Screen Sharing app (version 1.7.2). I tried opening two connection and still getting black screen. I also tried installing realvnc viewer for mac but still getting black screen. Here’s another log from Ubuntu:
https://pastebin.com/raw/Q5T48CX3
Thank you!
@Marvin,
Your log show that encryption is not supported…. This is probably why you have a black screen…
You need to ensure that a vnc password is set and that no encryption is used (use dconf-editor to disable encryption)
Try to connect through vnc when somebody is connected as a test to validate your configuration…..
Till next time
See ya
Thanks for this very nice articles on Ubuntu and VNC
Following these instructions on a PC with a fresh 18.04 installed (server + ubuntu-desktop) I also hit a black screen with GDM. Switching to lightDM was the way to go for me
@Michel,
yep, we know we can use the lightdm to have vnc working smoothly on Ubuntu 18.x. However, as Ubuntu has been moving to GDM, our focus is now more on Gnome Desktop and xrdp as a remote desktop solution
Thank you for the visit and the feedback
Till next time
See ya
a great guide, a lot of knowledge based on experience 🙂
Thank you very much!
@Cire,
thank you for the visit and for your positive comments. yes indeed, we have tried and performed hands on activities in order to have it working properly and share the correct info world wide 🙂
Till next time
See ya
I did all the thing according to this Post.
I made it. Login is OK , desktop is also OK with different Port VNC.
However, I can not reconnect to Desktop after I closed VNC client. Connection is refused.
How can I solve this problem?
@SnakeBob,
When you close your VNC connection, Do you perform the vnc connection back on the port 5900 ? or you are trying to go back to the port opened for your user…?
What should be normally the process…
1/ You close your VNC Session
2/ VNC port 5901 is closed
3/ to make a new connection, you need to connect to port 5900 first
4/ the GDM account should be starting the startup script again to listn to port 5901
5/ Perform again connection of port 5901
Check also your logs to see what could be the problem or as alternate solution use xRDP Software (see http://c-nergy.be/blog/?p=12761
Hope this help
Till next time
See ya
Thank you very much for this!
The connection remains unencrypted. Does it mean that when I am typing my password for the login, it goes as it is? How safe it is? I’ve successfully tried tunnelling this with ssh, it works on linux machines however I don’t know how to do it on windows or iOS where I use realVNC. Can you suggest any solution to make the connection encrypted?
Thank you very much for this!
The connection remains unencrypted. Does it mean that when I am typing my password for the login, it goes as it is? How safe it is? I successfully tried tunnelling this with ssh, it works on linux machines however I don’t know how to do it on windows or iOS where I use realVNC. Can you suggest any solution to make the connection encrypted?
@maciej,
If you are using vnc with no ssl connection, connection remain unencrypted and indeed sniffing the network could provide access to password travelling through the network
To try to secure xrdp on top of ssh, you could read this old post (http://c-nergy.be/blog/?p=6020) and see if this would work for you….
Putty works on linux and windows and you might find some putty client for MacOs
hope this help
till next time
see ya
HI,
thanks for this guide which helped me succeed in setting up X11VNC. I can connect from RealVNC and do basically anything I like remotely.
However, there is a weird problem when using IDLE (Python) . As soon as I click on “File” the connection closes and the server absolutely refuses connection until I reboot the VNC server computer. Could you give a hint as to what could be wrong?
Thanks,
Frank
@Frank Hochmuth,
No clue because we are not using IDLE.. Which Ubuntu version are you running ? have you tried to run the IDLE program using sudo. Is this the same effect ?
Do you have any logs to look at which might help identify the issue and thus solve the problem ?
Till next time
See ya
I came here because I am chasing a very annoying bug where x11vnc crashes randomly on mouse input in the session, and the comment about idle gave me a hint that we were dealing with the same thing, and now I can reproduce it easily.
I am running Ubuntu 18.04.3 LTS, up to date. I start x11vnc with this command line:
x11vnc -display :0 -nomodtweak -rfbauth /home/sgala/.vnc/passwd -rfbport 5900 -shared -forever -nowf -norc -notruecolor -bg -noxdamage
I works well, but it crashes from time to time, I need to restart it from a ssh session to keep it working. Now, after reading the comment, I “sudo apt install idle” and started it… voilá, clicking on almost any menu entry in its bar will crash x11vnc in the same way.
I’m seeing in ubuntu that a version 0.9.13-3 is the current in LTS, but a version 0.9.13-6 has been pushed to releases 18.10, 19.04 and 19.10, and solves https://bugs.debian.org/cgi-bin/bugreport.cgi?bug=859213 I think this is the bug I’m seeing, but I can’t find a way to:
* force ubuntu to generate a core to check
* install this 0.9.13-6 version to see if it fixes it
Found the bug: https://bugs.launchpad.net/ubuntu/+source/x11vnc/+bug/1686084 . Sorry for the noise here!
@Santiago,
Thanks for your visit and sharing your issues (and solution) 🙂
No problem about the noise, this can be useful to other people
till next time
See ya
Everything went fine till I ran the command ‘sudo loginctl’ It doesn’t show any UID of the gdm account. Only one session is shown which is of the current user. How to fix this issue? It is working fine in other computers in the network, only handful of them have this issue of not displaying any gdm when executing the command ”sudo loginctl’ Please help.
@Amal,
You didn’t specify which version of Ubuntu your are using…
Another way to get the UID for the GDM user Account would be to issue the following command
cat /etc/passwd | grep gdm
You should find the gdm UID
hope this help
till next time
see ya
Before I could read your response, I tried a dirty hack of cloning the working systems and restoring it on non working systems. Now everything works fine.
@Amal,
Thank you for your feedback. No worries.. happy to see that you have been able to fix your issue
Till next time
See ya
The next issue I am faced with is when end user experiences internet outages. When the internet is back, they are no longer able to connect to 5901. 5900 shows a black screen. During this time, their remote machine is still logged into their OS user account. So I have to manually log them out before they can try connecting to 5900 and login into the computer. I did a bit of research on this issue and came across a solution to add ‘-forever’ in the startup application script. I applied this solution and did some random testing (like unplugging the network cable or disconnecting the internet) to simulate this scenario and VNC Viewer was able to login(after the internet connection came back online) to the remote computer when connecting 5901. But when the actual scenario happened(which is, my users, losing internet connection intermittently), my users were not able to login to 5901. They get a message in TightVNC viewer mentioning ‘failed to recv data from socket’. Some others get the message ‘Connection has been gracefully closed’. I am not able to find a solution for this till now. Please help if you can.
@Amal,
Never encountered this issue but it seems that other people have encountered that same issue. Question for you…. What happens when the user tries to perform a vnc connection to port 5900 first and then try again on port 5901 ? is this working ? Have you have considered using xRDP software solution ? which should provide also remote capabilities to your users ?
Hope this help
Till next time
See ya
Yesterday, when I tried posting a comment to this blog, I got a message ‘You have been flagged as spam/malicious by WordPress Zero Spam.’ So, I am trying a test comment to see if it goes through today.
Also, the email ID that we mention in the reply section, is that supposed to alert us when you post a comment? If so, it is not working. I never get any alert when new comments are posted.
The last test comment went through, so I guess the reason why it got marked as spam might be because I used the URL reference of your blog in my comment. I will strip out those URLs and submit the comment in reply to your earlier reply.
To the issue I mentioned in my last comment(before my test comment), I found a solution mentioned by you ‘Workaround 2 – Vino server’ in your blog 11231. As of now, things are working fine. I did a live scenario test with a few end-users who disconnected their internet while connected to 5901. When they restored their internet connection, they were able to connect to 5901 without any trouble.
To answer your question; previously; after the internet connection is restored, when they connect to 5900, it asks for VNC password and on success shows a black screen (you can see the mouse pointer dot) and when they try connecting to 5901, they get the error message I mentioned in the last comment.
xRDP is definitely in the pipeline for me, but I heard that it has enough cons to leave sleepless nights for me. But I haven’t given it enough time to research and arrive at a conclusion. I was pushed into this due to the sudden lockdown imposed in our area due to the pandemic and as a result, I was in a total hurry to come up with a safe working solution that safeguards our intellectual property (preventing theft of our company source code).
Is there any loophole in ensuring the safety of our intellectual property using your solution mentioned in blogs 12220 and 11231? Looking forward to your advice.
@Amal,
Ok, That’s a lot of questions 🙂
First, we are happy to see that you have found some solution to your disconnect issue through the vino usage…. Vino is indeed a good alternative especially for Gnome Desktop
About the loophole. VNC (and any other remote desktop protocols) are at risk of being hacked. You need to ensure that you protect your system accordingly by applying the most appropriate security settings. Depending of the version and make of VNC, you would ensure that encryption option is always set on. If you do the startup trick, ensure to use passwords to prevent unauthenticated access to your session.
xRDP is an interesting alternative since it basically create a separate session for each users and you can improve security through some configuration tweaks or by ensuring that you perform the xrdp over ssh connection
But at the end, the choice is yours….
Hope this answser all your questions
About the email – indeed, it’s normally used to notify you that a reply has been provided but since we had a lot of spams we might have disabled too many features…. will have a look into this
Hope this help
Till next time
See ya
If I use xRDP, will I be able to see the screen of the remote user? If not, how can I enable that? The reason for asking this is that with VNC we can monitor what the remote user is doing by looking at their respective computer screen. If this can be achieved in xRDP let me know.
@Amal Xavier,
The newest xRDP package does not allow you to access the same session locally and remotely. With xRDP the same user account can either be logged on locally or remotely. If you want to access the same session, you will need to use VNC like software solution or the sharing screen feature in Ubuntu. The only drawback with the sharing screen feature is that a user needs to be logged on. Sharing Screen feature now support rdp or vnc protocol (for more info, check https://c-nergy.be/blog/?p=18110)
Hope this help
till next time
See ya
this works for me 😉
sudo nano /etc/gdm3/custom.conf
uncomment WaylandEnable=False
sudo apt-get install x11vnc -y
sudo x11vnc -storepasswd /etc/x11vnc.pass
sudo chmod +r /etc/x11vnc.pass
nano .config/autostart/x11vnc.desktop
[Desktop Entry]
Type=Application
Exec=x11vnc -bg -rfbauth /etc/x11vnc.pass
Hidden=false
NoDisplay=false
X-GNOME-Autostart-enabled=true
Name[en_US]=x11vnc
Name=x11vnctv_
Comment[en_US]=
Comment=
@Pieter,
Thank you for visiting our blog and sharing your findings 🙂
Happy to see that people share their findings and this can be useful to other
Till next time
See ya