Hello World,
Today, we continue our journey through the Ubuntu flavors and the most useful tool to perform remote desktop sessions to Ubuntu machines i.e. xRDP. One of the frequent request we receive is how to have xRDP working against a Kubuntu operating system.
In one of our previous posts, we have been demonstrating that it was indeed possible to connect through xRDP to a Kubuntu desktop interface. Since Ubuntu 16.10 (and other Ubuntu flavors) ship with the latest version of xRDP (0.9.0), which brings many features and improvements, the process of having xRDP installed and working with a Kubuntu machine is far more easy than in the past. The magic lies in the new xrdp rdp driver developped by the xRDP team which replaces the need to install a VNC Server software package.
Ubuntu 16.10 + xRDP 0.9.0 really brings a standard way to install configure and use remote desktop session to Linux world. So, it’s time to show how easy the process has become
So, let’s do this….
Step by Step Process
Assumptions
For this post, we have make some assumptions.
- Kubuntu 16.10 (Final Release version) is used
- Installation is performed on fresh new install
- No Alternate Desktop interface is needed. We will connect directly to the kubuntu Desktop
- We will configure our system to match on localized version (i.e. we are using a Belgian french keyboard)
- No additional configuration is needed to reconnect to the same session if you are using the latest version of the xrdp package found in the Ubuntu Repository
- Your system is connected to Internet (so you can download necessary packages)
Step 1 – Install the xRDP package
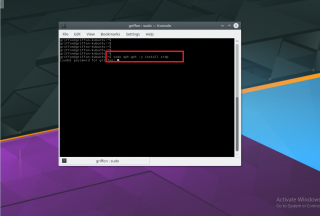
As mentioned earlier, the installation process of xRDP is becoming easy and follow the standard process of installing any ubuntu packages. To have the xrdp package installed, you simply open a Terminal Console and you issue the following command
sudo apt-get -y install xrdp
Click on Picture for Better Resolution
Because of the sudo command, you will be prompted for a password. After entering your password, your xrdp installation will start. Wait for completion
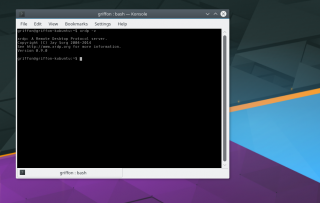
To check which xrdp version has been installed, issue the following command
xrdp -v
You can see that the version of xRDP package is set to 0.9.0 (as on the screenshot), we can proceed to the next step
Click on Picture for Better Resolution
Step 2 – Configuring xRDP to use your desktop environment
Actually, if we are running Kubuntu as Operating system and we want to connect to Kubuntu Desktop; there is no need to make any modification to the xrdp configuration file. the /etc/xrdp/startwm.sh will try to detect automatically your Kubuntu desktop while performing your remote desktop connection.
Step 3 – Configuring xRDP Keyboard
By default, the xRDP login screen should be using the actual keyboard layout you are using. However, inside the remote session, the English layout keyboard is still defined as default and not changed automatically. To try to set the proper keyboard layout within your remote session, you can execute the following commands
# Set keyboard layout in xrdp sessions
cd /etc/xrdp
test=$(setxkbmap -query | awk -F":" '/layout/ {print $2}')
echo "your current keyboard layout is.." $test
setxkbmap -layout $test
sudo cp /etc/xrdp/km-0409.ini /etc/xrdp/km-0409.ini.bak
sudo xrdp-genkeymap km-0409.ini
Step 4 – Test your configuration
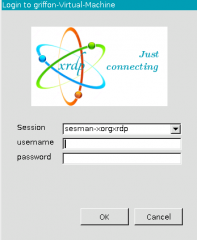
If everything went fine, you should fire up your Remote Desktop client, insert the name or ip address of the remote linux machine you want to connect to and you should see the xRDP Login page presented to you (see screenshot below). Ensure that the Sesman-xorgxrdp option is selected
Click on Picture for Better Resolution
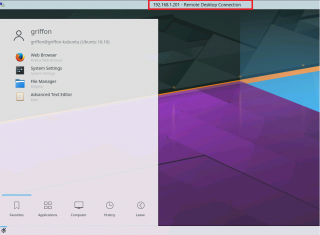
Provide your credentials, hit ok and after a few seconds, you should have access to your Budgie Desktop environment and start working remotely on your system.
Click on Picture for Better Resolution
Final Notes
Voila ! It’s that simple nowadays. Using xrdp package version 0.9.0 makes it really easy to setup remote desktop connection capabilities on a Linux machine. We do not need to change xrdp config file in order to connect to desktop environment in the remote session.
Because xRDP 0.9.0 provides its own xrdp server, there is no need to select, install and configure complex VNC server package. The final thing that xRDP 0.9.0 brings to any Ubuntu flavors is the drive redirection feature out of the box. In the past, there was a need to compile xRDP from source to get this option available. I think we were one of the first on the web to demonstrate this capability (see Teaser and step by step process ) on Ubuntu 16.04.
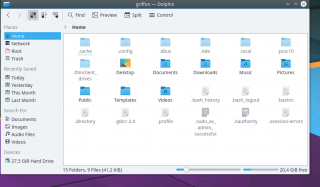
The only thing with Kubuntu desktop (compared to other distros) is that the drive redirection is not obvious or visible immediately. Indeed, you have to go to your home folders (in Dolphin) and make visible hidden files (Alt +.) When this is done, you would see the .thinclient_drives folder which will show you the redirected drives available within your remote session…
Click on Picture for Better Resolution
This is it for this post ! So far, we have been installing xRDP on the following distributions or Ubuntu Flavors
- Ubuntu 16.10 – xRDP- How to Remote Connect to Unity Desktop on Ubuntu 16.10
- Linux Mint – xRDP – How to Install on Linux Mint – Part I and Part II
- Ubuntu Remix – xRDP – How to Install on Ubuntu Remix 16.10
and we have seen that the process is really becoming straight forward…
We do not know yet what would be the topic of the next post…..Wait and see
Till next time
See ya
