Hello World,
We are proceeding with our journey where we install xRDP latest package available on top of Ubuntu flavors. The installation process is really quite similar across the different ubuntu flavors or distribution based on Uubuntu. However, sometime, in order to make it work, there is a slight change that needs to be implemented. This is basically the purposes of these posts:to check and ensure that a standard and common installation way can be defined for all these flavors.
So far, we have checked the following distributions :
- Linux Mint 18.1 (standard installation or custom installation)
- Ubuntu Remix (which will be officially a supported ubuntu flavor with release of Ubuntu 17.04)
- Kubuntu 16.10
- Ubuntu 16.10
It’s time to have a look at the Xubuntu Distribution…Let’s do this 🙂
Please read it till the end as there is a small catch….
Step by Step Process
Assumptions
For this post, we have make some assumptions.
- Xubuntu 16.10 (Final Release version) is used
- Installation is performed on fresh new install
- No Alternate Desktop interface is needed. We will connect directly to the Xubuntu Desktop
- We will configure our system to match on localized version (i.e. we are using a Belgian french keyboard)
- No additional configuration is needed to reconnect to the same session if you are using the latest version of the xrdp package found in the Ubuntu Repository
- Your system is connected to Internet (so you can download necessary packages)
Step 1 – Install the xRDP package
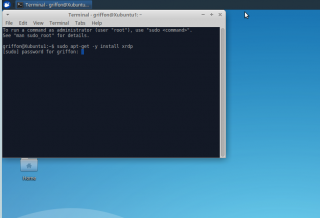
This should become a routine action for you now. To install the xrdp package from the Ubuntu repository (which provides the xrdp 0.9.0 version of the package); you will simply issue the following command in the Terminal Console
sudo apt-get -y install xrdp
Click on Picture for Better Resolution
Because of the sudo command, you will be prompted for a password. After entering your password, your xrdp installation will start. Wait for completion
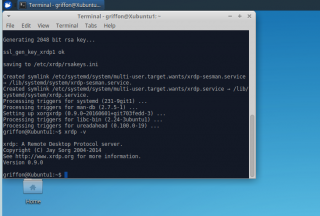
To check which xrdp version has been installed, issue the following command
xrdp -v
The screenshot below shows you that indeed version 0.9.0 has been installed. Because this version is installed, we do not need anymore to install a vnc server component. A new xrdp server component ships with version 0.9.0
Click on Picture for Better Resolution
Step 2 – Configuring xRDP to use your desktop environment
xRDP vers 0.9.0 tries to detect automatically your desktop environment. In the past, you would need to modify either .xsession file or the /etc/xrdp/startwm.sh file to specify which Desktop environment to use. With Xubuntu 16.10, there is no need to do that.
However, there is a big catch.
The user who initiates the remote session to the Xubuntu machine must not be logged on locally on the console. If this is the case, the connection will fail. You will have either a grey screen or a black screen or a initial connection that terminates immediately.
The same applies when the user is logged on through xRDP. if the user tries to connect locally on the Xubuntu, the user will encounter a loop login effect. The user will be presented with the login but will be logout immediately after passing the credentials.
This means that you have to use either a local console or a remote session connection through your user account and you need to ensure that you have performed a proper logoff operation from either sessions (local or remote) in order to be able to use this with Xubuntu.
Step 3 – Configuring xRDP Keyboard
Configuring the xRDP keyboard is still a necessary step. When performing your remote connection, the xRDP login screen will match your localiwed keyboard layout. This will work out of the box. However, inside the remote session, this is a different story. Within your remote session, if you didn’t configure anything, the keyboard layout will be set to English as default.
To try to set the proper keyboard layout within your remote session, you can execute the following commands (through a local connection and not when running through remote session)
# Set keyboard layout in xrdp sessions
cd /etc/xrdp
test=$(setxkbmap -query | awk -F":" '/layout/ {print $2}')
echo "your current keyboard layout is.." $test
setxkbmap -layout $test
sudo cp /etc/xrdp/km-0409.ini /etc/xrdp/km-0409.ini.bak
sudo xrdp-genkeymap km-0409.ini
Step 4 – Test your configuration
It time to test your configuration and your setup… Before trying to connect remotely to your system, ensure that the user account that will be used is not logged locally on the system. If this is the case, in order to have the remote connection working, you will need to logoff this user account from the system.
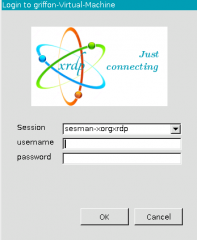
When this is done, open your remote desktop client, type in the ip address or hostname and initiate your connection. You will be presented with the xRDP login screen which know your localized keyboard layout. Ensure that the Sesman-xorgxrdp option is selected
Click on Picture for Better Resolution
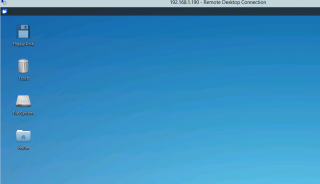
Provide your credentials, hit ok and after a few seconds, you should have access to your Budgie Desktop environment and start working remotely on your system.
Click on Picture for Better Resolution
Final Notes
As you can see, the installation process is quite straight forward and similar to the procedure provided for other Ubuntu Flavors. However, with Xubuntu, in order to use xRDP and perform a remote session, it’s mandatory that the user that needs to login remotely is not locally logged on into the system. If this is the case, the remote session will fail.
To sumarize, if you use xrdp package 0.9.0, you can have drive redirection and clipboard and no need to install vnc component servers. On the other hand, a user cannot be connected at the same time (locally and remotely) on the linux machine. This might be a problem as this would block a user to perform remote connection if user is already logged into the system.
Possibly, as alternative, it would be still valid approach to install the vnc server component and have the user the possibility to use the Xvnc-sessman profile to still have a remote connection whiled logged in. We didn’t test this yet but we will have a look into it
Hope you enjoy these posts…Keep reading if you want to know more about Lubuntu and xRDP
Till next time
See ya


is there a tweak or command to play sound on local audio device ( on remote server) ?
By default, a virtual device redirection is made.
@cuchulainn,
audio redirection should be supported in the latest version of the xrdp package (see info at https://github.com/neutrinolabs/xrdp). You might need to perform a custom installation so you can include the sound option in your setup… Please have a look at https://github.com/neutrinolabs/xrdp/wiki/Audio-Output-Virtual-Channel-support-in-xrdp
Hope this help
till next time
See ya
Hello,
After I try to manually set the layout via “setxkbmap -layout br” the following error occurs:
Cannot open display “default display”
@Dexter,
have you run this command when locally connected to your Ubuntu machine and not in the remote desktop session as described in the post…..
if not try again, and provide feedback
Till next time
See ya
@Griffon,
I ran the commands locally and it worked. 😀
When I’m home I’ll test and give you an feedback. Thanks!