Hello World,
Based on the positive feedback we have received from our posts about XRDP and Ubuntu 14.04, we are providing hereafter an update on how to install XRDP from the sourceforge web site (and not the one found in Ubuntu Repositiories)
The Official version of XRDP is 0.6.x. However, the team behind xrdp has been working on the next version. In this post, we will be using the version 0.9. This version is not officially supported and considered as in developpment for the moment.
Why a custom installation ?
Some people might be wondering why performing a custom installation of XRDP. If you work with xrdp, you know that the main issue is the fact that you cannot reconnect to the same session if you are using the default packages available in Ubuntu Repositories. However, if you tweak a little bit some configuration files, you can overcome this limitation and connect to the same remote session (see our posts : http://c-nergy.be/blog/?p=4471, http://c-nergy.be/blog/?p=5382 – Check the section reconnecting to the same session)
If we perform a custom installation, we do not need to tweak the configuration files and we will be able to reconnect to the same session after finishing our installation (see http://c-nergy.be/blog/?p=4168, http://c-nergy.be/blog/?p=4242). This post will describe how to perform this custom installation and as you will see, it’s really not that difficult.
So, Let’s go !
Custom Installation of xrdp
Step 1 – Get the xrdp package
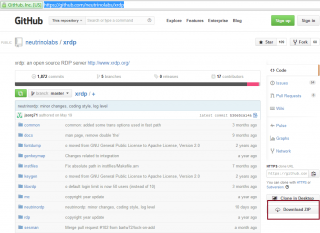
As mentioned earlier, we will be using the xrdp packages 0.9 available here. From this location, on the right side, you will be able to download the xrdp.zip package.
Click on picture for better Resolution
By default, the package will be dowloaded at ~/Downloads directory
Step 2 – Install necessary dependencies for xrdp installation
In order to be able to compile the xrdp package from source, you will need to download some additional packages that will be used by the compilation script.
Execute the following command in order to install the pre-requisites for the xrdp installation.
sudo apt-get install autoconf libtool libpam0g-dev libx11-dev libxfixes-dev libssl-dev libxrandr-dev
Step 3 – Install alternate desktop to be used with XRDP
Then we will need to install a alternate desktop interface. Indeed, as you probably know, xrdp and Unity or Gnome Shell 3 is not working. We have to install a desktop interface that can work with xrdp. You can choose from xfce,LXDE or MATE Desktop). You can have a look at the following posts to see how you can install these desktops and use them with XRDP
Because I want to you the MATE Desktop interface, I will need to install the following component by issuing the following commands.
sudo add-apt-repository “deb http://repo.mate-desktop.org/archive/1.8/ubuntu $(lsb_release -cs) main”
wget -q http://mirror1.mate-desktop.org/debian/mate-archive-keyring.gpg -O- | sudo apt-key add -
sudo apt-get update
sudo apt-get install mate-core mate-desktop-environment mate-notification-daemon
I have then to say to xrdp to use the MATE Desktop as default desktop while connecting. You will be doing this by issuing the following command
echo mate-session> ~/.xsession
Step 4 – Install X11VNC Component
Finally, I can install the X11VNC component (which replaces the vnc4server software)
sudo apt-get install x11vnc
Step 5 – Compile and install xrdp package
You can then go to the location where the package has been downloaded (in my case /home/griffon/Downloads) and extract the content of the archive by right-clicking the package and selecting extract here. We are ready to perform the installation of the xrdp package.
sudo ./bootstrap
sudo ./configure
sudo make
sudo make install
Post Setup Actions
Step 1 – Install/remove ubuntu xrdp package
We will first install/remove the xrdp packages from ubuntu repository. This action will create the startup script needed to have xrdp service running when the computer restarts. To perform this; from the console; we executre the following commands :
sudo apt-get install xrdp
sudo apt-get remove xrdp
Step 2 – Configuration changes
To finalize our custom installation, we will need to issue 4 additional commands in order to have a working xrdp solution
sudo mv startwm.sh startwm.sh.backup
sudo ln -s /etc/X11/Xsession /etc/xrdp/startwm.sh
sudo mkdir /usr/share/doc/xrdp
sudo cp /etc/xrdp/rsakeys.ini /usr/share/doc/xrdp/rsakeys.ini
Step 3 – Restart your computer
Everything should be ready and you should be able to use the xrdp software after rebooting your machine. Rebooting the computer ensure that the xrdp service will effectively be restarted automatically and thus making it useable for remote connection.
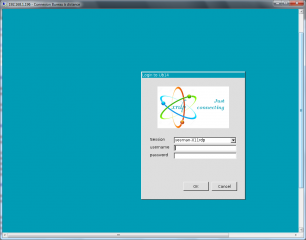
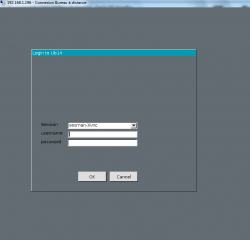
If you try to perform a remote connection, you will see the new login screen from xrdp software. In the dropdown menu, you will have to select the option sesman-Xvnc in order to complete the login process.
Click on picture for better Resolution
Customize XRDP Login Screen
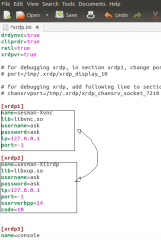
If you open the file /etc/xrdp/xrdp.ini, you will see that you have some option that can help you control the look and feel of the login screen. The fist thing I modify in the xrp.ini file is the order of the dropdown box menu. Because we are using x11vnc, we have to select it in the drop down menu. By switching section 1 with section 2 (see screenshot), the sesman-x11vnc will always be the first on in my drop down list.
The image below shows the final result
Click Picture for better Resolution
By changing some other settings; you can also customize the color and the size of the login box. for the moment, I have configured my login screen as following
Click Picture for better Resolution
Bonus
We have compiled all the commands into a script so that you can use it to easily perform the installation. The only thing you need is an internet connection. The script has not been fully tested but should be working.
########################################################################################
# Script_Name : xrdp-install.sh
# Description : Perform an automated custom installat of xrdp
# on ubuntu 14.04
# Date : May 2014
# written by : Griffon - http://www.c-nergy.be - http://www.c-nergy.be/blog
#
# Disclaimer : Script provided AS IS. Use it at your own risk....
#
########################################################################################
#-Go to your Download folder
echo "Moving to the ~/Download folders..."
echo "-----------------------------------"
cd ~/Downloads
#Download the xrdp latest files
echo "Ready to start the download of xrdp package"
echo "-------------------------------------------"
wget https://github.com/neutrinolabs/xrdp/archive/master.zip
#Unzip xrdp package
echo "Extracting content of xrdp package..."
echo "-----------------------------------"
unzip master.zip
#Install prereqs for compilation
echo "Installing prereqs for compiling xrdp..."
echo "----------------------------------------"
sudo apt-get -y install autoconf libtool libpam0g-dev libx11-dev libxfixes-dev libssl-dev libxrandr-dev
#Install the desktop of you choice - I'm Using Mate Desktop
echo "Installing alternate desktop to be used with xrdp..."
echo "----------------------------------------------------"
sudo add-apt-repository "deb http://repo.mate-desktop.org/archive/1.8/ubuntu $(lsb_release -cs) main"
wget -q http://mirror1.mate-desktop.org/debian/mate-archive-keyring.gpg -O- | sudo apt-key add -
sudo apt-get -y update
sudo apt-get -y install mate-core mate-desktop-environment mate-notification-daemon --force-yes
echo "DoNE ??"
#Configure the Xsession file
echo mate-session> ~/.xsession
#Install the X11VNC
echo "Installing X11VNC..."
echo "----------------------------------------"
sudo apt-get -y install x11vnc
#Add/Remove Ubuntu xrdp packages
echo "Add/Remove xrdp packages..."
echo "---------------------------"
sudo apt-get -y install xrdp
sudo apt-get -y remove xrdp
#Compile and make xrdp
echo "Installing and compiling xrdp..."
echo "--------------------------------"
cd xrdp-master
sudo ./bootstrap
sudo ./configure
sudo make
sudo make install
#Final Post Setup configuration
echo "Post Setup Configuration..."
echo "---------------------------"
sudo mv /etc/xrdp/startwm.sh /etc/xrdp/startwm.sh.backup
sudo ln -s /etc/X11/Xsession /etc/xrdp/startwm.sh
sudo mkdir /usr/share/doc/xrdp
sudo cp /etc/xrdp/rsakeys.ini /usr/share/doc/xrdp/rsakeys.ini
echo "Restart the Computer"
echo "----------------------------"
sudo shutdown -r now
Save this script into a file (I called it xrdp-install.sh).
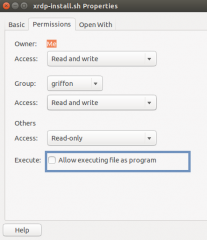
Before executing the script, do not forget to mark it as executable. Right-click on the file, go to properties, then select permissions and tick the box allow executable….
Click on Picture for better resolution
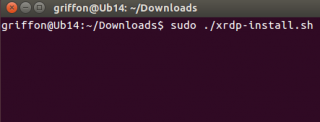
When this is done, open the Terminal and issue the following command (from the location where you saved the script) sudo ./xrdp-install.sh
Click on Picture for better resolution
Final Notes
This is it for this post. You should be able to perform a custom installation of xrdp and play around with the latest version in development. Using this solution, you will be able to reconnect to the same remote session with no tricks or workaround.
I hope you enjoyed this post
Till next time
See ya
@Mike,
Sorry for the late answer but we have been busy with a heavy project and didn’t got the chance to look at this one…..
in the .vnc folder, what’s the name of the password file you are looking at ? Is the name of the file something like sesman_passwd ?
have you created your own vnc password file ?
if this is the case, you need to have a file called sesman_passwrd in the .vnc folder in order to have the xrdp software working…
You also have mentioned that you are using the xubuntu 16.10 version. So, by default, in this version, to have xrdp working, you should not need any custom installation.. simply perform a standard install (sudo apt-get install xrdp) and the latest version of xrdp would be installed on your system…
we are planning to release an post about how to install xrdp on xubuntu 16.10…if you can wait one or two weeks you would get the procedure that could help you having xrdp installed. The xrdp version shipped with Xubuntu 16.10 does not need any vnc server as it ships with a new xrdp server component.
Xrdp should be enough for you to remotely access the system. If you really need to access the machine through vnc then you would need to install on top of xrdp install, the vnc server version you want to use
Hope this help
Till next time
See ya
Hi Griffon,
Can you help me reslove below issues?
I follow your action steps about “Ubuntu 14.04 – Perform a custom XRDP Install (using X11VNC)”, everythins is OK, but when I select the option sesman-Xvnc, and do connect, can establish a connection, but the connection is disconnected immediately. I need your help , Thanks!
@Iniesta,
Which version of Ubuntu are you running ? Don’t tell me you are still using Ubuntu 14.04 ?…..
If you have performed a custom installation of XRDP, you should be using a more recent Ubuntu version and you have to look at more recent install scripts..
in new xrdp releases, x11vnc server is not used anymore and a new xrdp backend has been made available….
My advice.. would be if possible install Ubuntu 18.04 and try the new installation scripts (they can be found: http://www.c-nergy.be/products.html)
Till next time
See ya
@Griffon
Thank you very much for your reply. The reason why I till use 14.04 because of doing android system compiled. Google officially recommends using 14.04. Thank you very much for your help. I also try to compile Android on Ubuntu 18.04. If it is OK, I will follow the suggestions and use the newer Ubuntu 18.04. Thanks again!