Hello World,
Today, again, we will be talking about MDT 2012. This post should be quite short and quite straightforward. If you read this blog, you know that we have spent some time on writing about MDT 2012, how to have a standalone custom installation, how to integrate PowerShell scripting and how to create and use Applications Bundles,… It’s time to wrap up everything together and try to have a fully automated deployment process.
If you want to read previous post about MDT 2012, have a look at
- Part I : Installing MDT
- Part II : MDT Deployment Share
- Part III : Deploying OS with MDT
- Part IV : Adding PXE Capabilities to MDT
- Part V : Perform a Basic MDT Deployment
- Part VI: Branding your MDT Infrastructure
- Set Screen Resolution automatically with MDT
- Part IX : Applications and Applications Bundles
- Part X : Using Powershell Script with Task sequences
- Part XI : How to join computer into domain
This post will quickly describes what you need to change in your configuration in order to have a zero touch installation process.
Let’s go !
Step 1 – Create the Perfect task Sequence
Before we start the process, we assume that you have tested your deployment process and you are able to deploy operating system as required. In this step, we assume that you want to fine tune your deployment. We assume that you have slightly modify your task sequence in order to automate the following settings
- Automatically generate the computer name (based on a naming conventions)
- Automatically set the screen resolution
- Add a build number to the system
- Install applications by using Applications bundle approach
- Automate the Join Domain Process
After fully testing your deployment process and you are confident that the process is working as expected and that the scripts and applications are installed correctly, you can move to the next phase which consist of getting rid of the deployment wizard when booting the target machine in pxe mode. We will mention later in this post, the changes we have made in order to have the perfect task sequence…Keep reading….
Step 2 – Control the Deployment Wizard
To hide the Deployment wizard page and have a fully automated process, you will have to edit two files
- Bootstrap.ini
- CustomSettings.ini
These two files control the way the deployment Wizard will behave. Let’s have a look first at the bootstrap.ini
Bootstrap.ini file
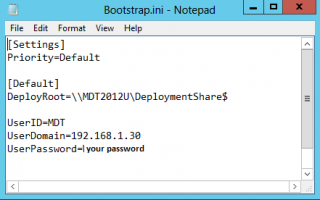
We will need to add some information into this file in order to
- skip the Welcome page you see when starting the deployment wizard
- skip the credential page needed to connect to the Deployment Share
- configure the keyboard locale in the WinPE environment.
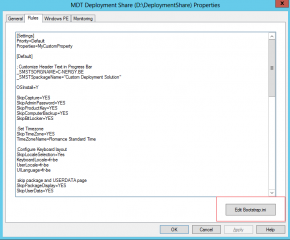
To have these settings configured, you will edit the bootstrap.ini file. To access the file, you can simply open your Deployment Workbench Console, navigate to your deployment share, right-click on it and select properties.
In the properties page, click on the rules tab. At the bottom, click on the button Edti BootStrap.ini
Click on Picture for Better Resolution
and it should look like the screenshot below
Click on Picture for Better Resolution
This is quite easy
CustomSettings.ini file
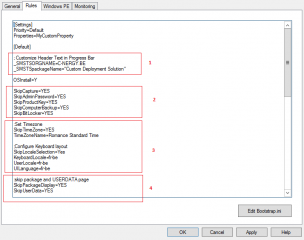
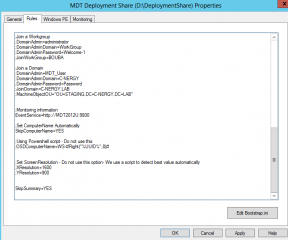
The customSettings.ini file will need to be populated with more information. Basically, for each Wizard page displayed during the deployment process, you can decide to skip it or to display it. We want to have a real unattended deployment scenario, we will thus hide all the Wizard page. In our scenario, we are deploying OS to new computer (New Computer scenario). We have configured the task sequence we want to use accordingly. The screenshot below shows you the content of our CustomSettings.ini file.
Click on picture for better Resolution
Click on picture for better Resolution
Click on Picture for Better Resolution
I think that the content is quite self-explanatory. But we can quickly go through each main sections
- In the section 1, we have simply set the parameters to customize and brand the Progress Bar dialog box display during the deployment process
- In section 2, we have used the variable Skip<%Page%> in order to hide Wizard pages during the Deployment. In the screenshot, you can see that we are skipping the Product key page, the Admin password page, the Bitlocker page and so on
- In section 3, we are configuring the keyboard layout to use and the time zone to be used. Because this has been configured through the customSettings.ini file, we do not need to have the page display and we simply skip it by setting the value of SkipTimeZone to Yes
- In Section 4, we have specified that no user data or packages page will be displayed.
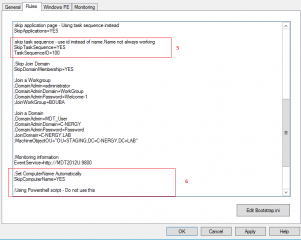
- In Section 5, we have configured the MDT Server to hide the Task Sequence page. Note that we have used the task id (and not the display name of the task as described in numerous blog. We have seen better results by using the ID instead of the display number. If you have used the display name, you might notice that the target machine is rebooting without executing the task. If you use the ID, it’s seems that’s working better (at least for us)
- In Section 6, we have configured the MDT Server not to prompt for the computer account. Here, we have decided to use a PowerShell script to set the computername instead of using the OSDCOMPUTERNAME Variable
- In the last screenshot (above), we have configured the MDT Server in order to hide the summary page (skipSummary=Yes).
This is the content of our CustomSettings. ini file. You can see in the comments that some settings have been moved to the task sequence
[Settings] Priority=Default Properties=MyCustomProperty[Default]; Customize Header Text in Progress Bar _SMSTSORGNAME=C-NERGY.BE _SMSTSpackageName="Custom Deployment Solution"OSInstall=YSkipCapture=YES SkipAdminPassword=YES SkipProductKey=YES SkipComputerBackup=YES SkipBitLocker=YES:Set Timezone SkipTimeZone=YES TimeZoneName=Romance Standard Time;Configure Keyboard layout SkipLocaleSelection=Yes KeyboardLocale=fr-be UserLocale=fr-be UILanguage=fr-be:skip package and USERDATA page SkipPackageDisplay=YES SkipUserData=YES:skip application page - ;Using task sequence instead SkipApplications=YES:skip task sequence - ;use id instead of name.Name not always working SkipTaskSequence=NO TaskSequenceID=100;Skip Join Domain SkipDomainMembership=YES ;Use Powershell script to ;automatically join the domain;Set ComputerName Automatically SkipComputerName=YES ; Use PowerShell Script to set the ;computer name automatically;Using Powershell script - Do not use this ;OSDComputerName=WS-#Right("%UUID%",8)#;Set ScreenResolution - Do not use this option- ;We use a script to detect best value ;automatically ;Use SetScreenResolution.vbs ;script in the task sequenceSkipSummary=YES ;Monitoring information EventService=http://MDT2012U:9800
Task Sequence configuration
In order to have a fully automated deployment process and some level of flexibility, we have configured a series of operations inside the task sequence instead of using variables within the CustomSettings.ini. This approach has been preferred in order to provide more flexibility and make the task the most common one which would fit in most scenarios.
As already mentioned, we have included in the task sequence the following operations
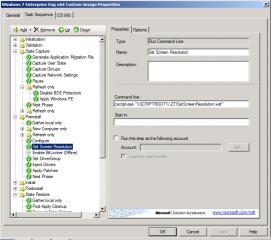
Set best Screen Resolution Settings
As described in this post, we have added a step in our task sequence in order to automatically detect the best screen resolution to be set during the deployment process. This assume that you have injected the appropriate graphic drivers within your MDT infrastructure.
Click on picture for better resolution
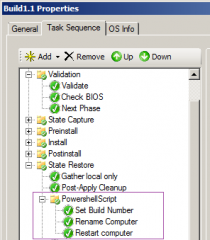
Set computer name automatically
As described in this post in details, we have also configured this operation within the task sequence. We have created a simple powershell script that would set the computer name during the deployment process based on the naming conventions to be used. The Task sequence would look like this
Click on picture for better resolution
Note : You can have a look at this post to see how to Integrate PowerShell Script in your task sequence
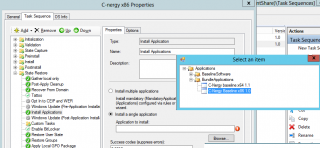
Install Applications using Bundles
We have described the usage of application bundles in this post. We have configured the task sequence to use a bundle because again it’s ease the lifecycle management of the applications to be deployed. You can update the application bundle without need to edit your task sequence.
Click on Picture for Better Resolution
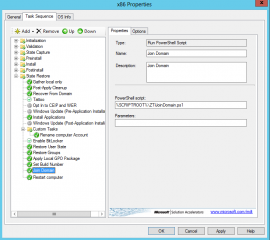
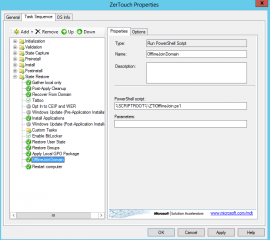
Join automatically the computer into the domain
In this post, we have seen how you could automate the join process. We could have used variables within the CustomSettings.ini file but again in order to have a more flexible solution we have decided to move this process in the task sequence. You can join the computer into a domain using a small PowerShell script or you can even perform offline Domain Join operation if required using again a simple PowerShell Script.
Click on Picture for Better Resolution
Click on Picture for Better Resolution
Final Notes
And Voila ! With a little bit of work and patience, you can have a really nice working deployment solution. MDT 2012 is a good alternative to other deployment solutions. It’s free, easy to install and configure and generally well accepted within organizations. Moreover, by tweaking a little bit the MDT solution, you can create a perfect “portable” solution that can be used in different locations and/or situation.
This is it for the series post related to MDT 2012. I hope you enjoyed it
Till Next Time
See ya

Informative website! amazing! Thanks!
Hi,
i would like to use the last portion of IP address in OSDComputername, how can i point it to the last portion of IP Address?