
Hello World,
We are almost done with MDT 2012 Update 1 and the deployment process. We have spend some time in documenting the deployment process using MDT 2012. In order to achieve Zero Touch installation, a lot of people needs to have the computer joined into the domain and obtain the final custom settings (GPO) from the domain. In this post, we try to demonstrate 3 ways to join the computer into the domain.
Note : If you want to read the previous posts about MDT 2012, have a look at
- Part I : Installing MDT
- Part II : MDT Deployment Share
- Part III : Deploying OS with MDT
- Part IV : Adding PXE Capabilities to MDT
- Part V : Perform a Basic MDT Deployment
- Part VI: Branding your MDT Infrastructure
- Set Screen Resolution automatically with MDT
- Part IX : Applications and Applications Bundles
Let’s go !
Using the CustomSettings.ini file
At this stage, you should be quite familiar with this method given that we have explained this approach in our previous posts in order to automate other actions. In order to automatically join the computer into the domain, you will need to add in your CustomSettings.ini file the variable that will hold the information needed to join the domain or the workgroup.
To modify your customSettings.ini file, you can perform the following actions :
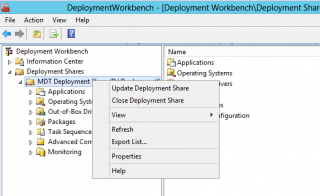
Open the Deployment Workbench console, navigate to the Deployment Share. Right-click on it and select properties
Click on picture for better resolution
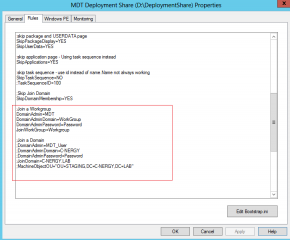
In the properties page, click on Rules
Append the information needed to join the Workgroup or domain. The screenshot below shows you the parameters to use while joining a domain or a workgroup. It should be obvious that you cannot use both options at the same time. It’s joining the domain or joining a workgroup. Comment the options you will not use.
Click on picture for better resolution
When using this option, you have to understand that these variables will be injected in the Unattend.xml file generated by the MDT application. During the deployment process, the setup process will use the information found in the unattend.xml file and try to join the machine into the domain. This works great if deploy your workstation in a simple environment. However, for large deployment scenario, you might have additional requirements and constraints that will make the join of the domain more difficult.
A good example of complication while deploying an operating system and having the machine joined into the domain is when you have restrictire group policies that would for example display a legal disclaimer (and thus breaking the auto logon capabilities). MDT team has taken this situation into consideration and you can delay the join of the domain till the last moment. To achieve this, you will need to first modify the unattend.xml file and delete a specific node (see http://systemscenter.ru/mdt2012.en/deladomajointoavoiapplofgroupoli.htm for instructions or check the MDT help file). Then, you will need to add a step in your task sequence in order to have the JoinDomain.wsf script running and performing the join of the domain.
To update your existing task sequence to delay the joining of the domain, you can perform the following :
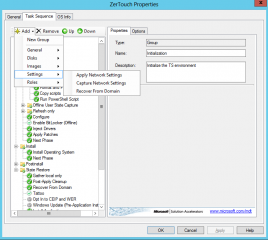
Open the Deployment Workbench console, navigate to the Task Sequence node. Select the task to be updated. Right-click on it and select properties. In the properties page, select the Task sequence tab
In the task sequence tab, click on Add, select Settings and then select Recover Domain
Click on picture for better Resolution
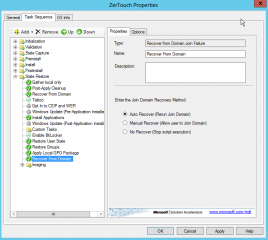
Accept the default and ensure that the step is set at the correct location in the task sequence tree. In our example, this is the last step that will be performed in our situation.
Click on picture for better Resolution
Using a PowerShell Script and Task sequence
We think that using a PowerShell script within a task sequence provides more flexibility than using CustomSettings.ini file. As you know, the customsettings.ini files paramaters are common to any deployment you will perform. If you need to join computers into different domains, you could simply create additional Task sequences to use the appropriate script. You could also use a single task sequence and run the appropriate join domain operation if your script is able to make the distinction between different domains.
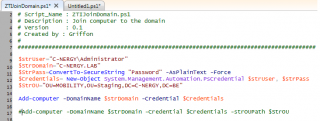
The following screenshots shows you a sample Powershell script that can be used to join a domain or a workgroup
Code to Join a workgroup
Click on picture for better Resolution
Code to Join a domain
Click on picture for better Resolution
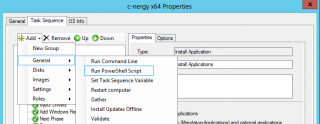
You will have to copy the script in your Scripts folder under you deployment share. When this is done, you can add a additional step in your task sequence. You will need to select the Run a Powershell Script when adding the step in the task
Click on Picture for better Resoluion
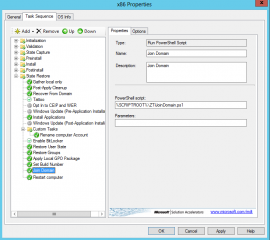
The following screenshot shows the configuration of the step. Note also that again, the task is one of the last one that will be performed.
Click on picture for better Resolution
Using Offline Join Domain capabilities
The third option will allow you to join a domain even if you have no access to the Active Directory infrastructure. We had to come up with such solution in some projects for multiple reasons. One of the reasons was that the deployment was performed in a staging area where no network connectivity to the production environment was available. On another situation, network connectivity was there but the network was configured with mac filtering. Because of this, we had to configure a disconnected deployment infrastructure again and haved used the Offline Join Domain.
I’ve found some good information on how to use MDT 2012 and offline join Domain capabilities. The one that comes first is the following one http://myitforum.com/cs2/blogs/maikkoster/archive/2012/06/25/offline-domain-join-with-mdt.aspx. However, we will not use the same approach. Since MDT 2012 support powershell scripting capabilities, we will simply add at the end of the task sequence an additonal step that will perform the offline join operation. You could use the run command line too.
The offline Join domain operation is a two way process. You will first need to provision the computer into your active Directory. You will need to run the following command
Djoin /provision /domain <name of domain> /machine <name of the computer> /savefile <FolderPath\%computerName%>
You will need to run this command for each computer that needs to be joined while offline. The above command will generate a text file that will be named as the computer name you have just provisioned. In a real life scenario, you will probably want to automate the process. You will need to get or create a input file which will contain the name of the computers to be deployed. The name should be based on your naming conventions such as prefix-serialNumber. This means that you will need to prepare a little the work by gathering the serial numbers or possibly getting a list of serial numbers from the manufacturer. In one of our projects, we have automated the process by using a really simple powershell script (see screenshot below).
Click on picture for better resolution
Note that this is just a sample script that you can use as starting point.
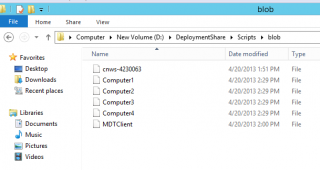
When the script has run completely, you can go to your folder where you have stored your blobs. You should see something like this. In our scenario, we have used the DeploymentShare\Scripts\blob folder to store the files that have been generated by the djoin.exe command line.
Click on picture for better resolution
The second step in the Offline join process is to run the djoin command again but on the client and use the blob file (which contains information to join the domain) in order to perform the offline join operation. You will need to execute the following command (or similare based on your scenario) on the workstation or server to be joined into the domain
djoin /requestODJ /loadfile <path_of_blob> /windowspath %systemroot% /localos
Again, we have created a small PowerShell script that will be used to automate the Offline Join process during the MDT Deployment process. The sample script you can use would look like the following screenshot
Click on picture for better resolution
You will store this script in the Scripts folders under the MDT Deployment Share.
Click on picture for better resolution
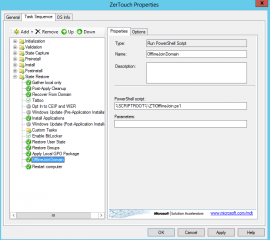
When this is done, you can update the task sequence in order to add the offlineJoinDomain step. This will follow the same principle as before. You will add a step at the end of the task sequence tree and select the option Run Powershell Script. The following screenshot shows you the settings we have configured on the page.
Click on picture for better resolution
We have added as a last step a restart computer step (needed when performing offline join domain)
Final Notes
This ends up this post ! As you can see, you have several options in order to automatically join a computer into the domain. We prefer to use task sequences in order to join computers into the domain because we have the feeling that the process provides more flexibilty. However, there is security question while automatically joining the computer into the domain. If you use the CustomSettings.ini, the user account and password are stored in clear text. To mitigate the risk, you should create a dedicated user (or a group where the user will be a member of) and delegate the right to join the computer accounts into the domain.
The usage of PowerShell script also store the password in clear text. With Powershell script, we might have options to either encrypt the password or encrypt the script. (I do not know I have not tested this). The blob approach is really the most flexible one but once again the blob file contains some sensitive information you do not wanna spread widely.
I think that there should be a trade off between the security risk and the level of automation you want to achieve.
I hope you enjoyed this post
Till next Time
See ya
Related Links: http://technet.microsoft.com/en-us/library/offline-domain-join-djoin-step-by-step(WS.10).aspx




Thanks man…very usefull information…especially the scripts 🙂
Hey Man,
Thank for the visit and the positive feedback.
Good to hear that this is usefull to somebody out there….
Do not hesitate to share and distribute (and keeping the original Copyrights :-p )
Till Next Time
See ya
This has been a Gold Mine for MDT setup and general windows deployment automation.
Hello Ben,
Take you for the feedback and the positive comments
Till next time
See ya
Thanks so much!
Awesome
Hello George,
Thank you for the feedback. Sorry for not having be more proactive lately but I was really busy….
Till next time
See ya
Hello,
you can simply join the domain into a specific OU where you blocked inheritance and just linked the default policy.
@JohnDoe,
do not get your point…I’m not sure you have read the full post…
Till next time
See ya
FYI It’s just “OUPath” to specify an OU to join.
@Mark,
I’m assuming you are speaking about the add-computer command. Yes, we know that the -OUPath to add computer to a specific OU.. the screenshot shows a typo
Thank for noticing and for your visit
Till next time
See ya
Hi Griffon,
I’ve been using your domain join powershell script for the past couple of years (via MDT) and it has been a god-send! It allowed me to be very modular and even used your script using a third party tool to join computers to our domain outside of MDT.
I do have a question though since I’ve been running into a few instances where the MDT logs showed the following :
“Computer ‘test-work001’ failed to join domain ‘domain.com’ from its current workgroup ‘WORKGROUP’ with following error message: You can’t connect to the file share because it’s not secure. This share requires the obsolete SMB1 protocol, which is unsafe and could expose your system to attack.
Your system requires SMB2 or higher. For more info on resolving this issue, see: https://go.microsoft.com/fwlink/?linkid=852747.”
Funny thing is out of 30 systems only 5 ran into this error.
Just asking to see if you have any advice or point me in a direction to investigate. I’m just throwing this out to you as I literally ran across this issue, and looked at the script….and yes, I have this page link in my script to show who the original author is ….you! Hence the reason I dropped by this page again to see if there was any updates or comments who may be experiencing the same as myself.
I’ll probably look into the link and the whole SMBv1 to see what the main sys admin says as well.
btw, tested this with Windows 7 & Windows 10. MDT v8443 and MDT v8450. Along with ADK 1607 & 1803. Still working! (except the 5 so far today).
Thanks again!
@Patrick,
This is definitly smb protocol issue. Based on GPO settings or hardening of the machine or newer OS version, SMBv1 is indeed not supported or enabled by default as this represent a security risk to the system…
The best thing to do is to ensure that all your systems are configured the same you in order to use SMBv2 only.. Cannot provide more info travelling at the moment…maybe later on will have a look
Hope this help
Till next time
See ya