Hello World,
This week I’ve been experimenting again with the beta release of Proxmox VE 2.0. After getting used to the new management interface, we decided to start playing a bit with the “new” cluster architecture. The new cluster model is based on a new “Proxmox Cluster file system” (or in short pmxcfs). To simplify, this file system (database-driven) will be able to replicate in real time configuration files of a proxmox ve node to the otner proxmox ve nodes (using the corosync technology). Using this technology, there will be no more master/slave cluster model but a multi-master cluster architecture.
I’ll not go into too much details right now. I just want to show you how you can build up a 2 node cluster and how easy this can be. By building up a cluster, you will be able from to centrally manage the proxmox ve physical servers and have access to the objects hosted on any of these servers.
Our test Lab
Note : I had limited hardware during this tests so I’ve created 2 Virtual machines and installed Proxmox VE 2.0. This post will just demonstrate how to build up the cluster. a coming post will focus on the migration and failover aspect of the cluster.
In order to build up a cluster, you will need at least 2 Proxmox ve hosts. In our example, the PROXMOX VE hosts will have the following settings :
HOST 1
- Hostname : NODE1.c-nergy.be
- IP Address : 192.168.1.16
- Subnet Mask : 255.255.255.0
HOST 2
- Hostname : NODE2.c-nergy.be
- IP Address : 192.168.1.17
- Subnet Mask : 255.255.255.0
Networking
- Unmanaged switch
- Each host has only one network card
Based on the Proxmox Ve Cluster 2.0 documentation, all nodes must be located on the same network. This can be a limitation if you want to place proxmox ve hosts on different locations with different IP segments. A workaround might be to implement a streteched VLAN infrastructure. The machines should be located on the same network because the replication model used relies on IP Multicast protocol. If you have an “unmanaged” switch, you do not need to perform any additional actions. If you have a “managed” switch, you have to ensure that it has been configured to support IP Multicast protocol.
Building up the Cluster
After installing the Proxmox VE 2.0 (beta) software on 2 machines (physical or virtual) using the settings defined above, you can move to the next step : building up your cluster.
Note: If you need some help to perform the Proxmox ve Installation, you can have a look at this post.
At moment of writing, you will see that the creation and configuration can only be performed from the command line. The process and logic of creating a cluster hasn’t change dramatically. If you compare the process of creating a cluster with the previous version and the PVE 2.0 beta version you will find definitely similarities.
Okay, stop talking. It’s time for action.
Checking Time/Date Settings on your nodes
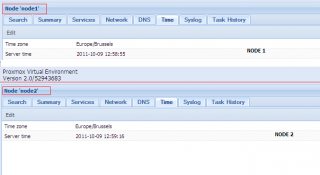
In one of the previous posts about PVE cluster, I was recommending to check that Date/time are in sync in both nodes. This recommendation is still valid. You have to ensure that both nodes are using exactly the same date and time value in order to be able to manage nodes from a central web management console.
Click on the picture for better resolution
If they are not in sync, you can from the command line issue the following command to resync the hosts so they will be using the same time/date information.
-
date +%F -s <%YYYY-MM-D%> (ex: date +%F -s 2011-10-10)
-
date +%T -s <%HH:MM:SS%> (ex: date +%T -s 13:00:25)
The first command will configure the day/month/year information needed to be used by the system. The second one will configure the time to be used.
Creating the Cluster “Object”
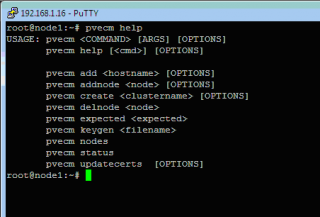
Using Putty.exe or using the “shell” functionality found in the new interface, you can make a console connection to one of your node. In this example, I’ll be creating the cluster from the node 1. To create a cluster, you will use the pvecm command line utility (see screenshot below)
Click on the picture for better resolution
As you can see, the command line is really easy to use and there is not too much choices.
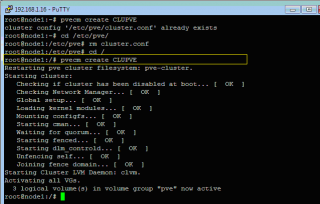
As a first step in creating the cluster, we need to give a name to this cluster. We will then issue the following command
- pvecm create <ClusterName>
Click on the picture for better resolution
In my lab, I’ve created a cluster called CLUPVE (see screenshot)
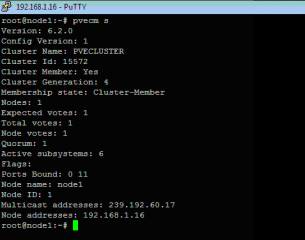
You can check that the cluster has been created succesfully by issuing the command
- pvecm status or pvecm s
Click on the picture for better resolution
You can also check that the node (node 1) is listed as member of the cluster by issuing the command
-
pvecm nodes or n
Click on the picture for better resolution
The screenshot shows effectively that the first node of the cluster is basically a member of this newly created cluster.
Adding Node 2 to the Cluster
At this stage, you are ready to add an additional node into the cluster. Again, you can make a remote console connection through putty.exe (or the shell option available within the new management interface). When connected, you will need to issue the following command to have the node 2 joining the cluster.
-
pvecm add <%IP_Address_of_Node_of_the_cluster%>
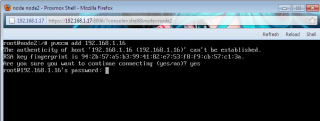
This means that in my case, I’ll type the following command pvecm add 192.168.1.16. To be clear, you provide the IP address of a node that’s already member of the cluster (and not the Ip of the node where you are working on). You will be then asked to confirm the fact that you want to connect to the remote host. Type yes. You will then be prompted for the password of the remote node (node 1 in my scenario).
Click on the picture for better resolution
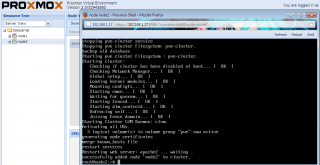
At this stage, you will some outputs on the console showing you that the node2 is being configured to use the cluster services. If you have used the Shell option in the web interface, you will notice that within the web interface node 1 has been added under the datacenter in the treeview
Click on the picture for better resolution
At the end of the process, you can again check the status of the cluster by running the command
-
pvecm status or pvecm s
-
pvecm nodes or pvecm n
Managing the Cluster from the centralized web Interface
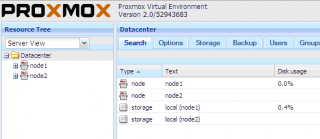
If everything went fine, you should be able to connect to one of the node (any of them) using your favourite browser and log into it. You will notice that within your management interface, you have under datacenter folder both nodes listed.
Click on the picture for better resolution
From now on, you should be able to manage from this interface any nodes that are part of the cluster.
Final Notes
As you have seen, the process of creating the cluster is really not too difficult. At this stage of my test, I do not know if the cluster provide high availability only at the PVE cluster or if this cluster can also provide HA for kvm virtual machines… We will check that in our coming tests.
I had 2 issues (and still have these issues). If I try to connect the the web interface from Internet Explorer 9, I only see a blank page. The interface does not come up. I can see a error message related to an undefined pve object. The workaround is to use another browser (Chrome,Firefox or Opera) or try to tweak th IE9 to allow the application to run. (if somebody can help would be nice)
The second issue is that when I join the second node to the cluster everything is fine till I reboot the machine. After the reboot, the ssl certificates are gone and the apache web services cannot start. This happened time to time. I had to reinstall the server and recreate the cluster. In a coming post, we will see how we can renew ssl certifcates for Proxmox VE
A final strange behaviour that happen to one of my friend when playing with the PVE Cluster is that after successfully creating the cluster, he was able to connect to the central web interface but when he was trying to connect to the other node, the login box was constantly prompting for the password. Guess What ! After some checks, we found out the the systems were not in sync and the prompt for credentials was due to an invalid ticket !!!!
So check your Date/Time Settings
That’s it for today…
Till next time see ya


Excellent post, again thanks
Thank you Bumiga..
see you around for more posts
Hello,
What about HA and how to resolve quorum disk?
Hello There,
I didn’t go so deep with my tests. I still have to perform some tests (but not much time). I have indeed (and i think that was mentioned in the post) to work on the HA aspects and summarize my findings (HA at PVE Hosts and/or VM level). I have to check also the quorum stuff (chec if quorum-tool is available,how to set settings,…)
I have also to check how the PVE team has integrated the Corosync technology into their products…. but this might take some times…
I’ll be working on it…promise :-))
Stop using ie9 now…
… and next week stop using windows… It will save you time, money, and will make you smarter.
Thanks for your posts about pve 2.0.
I have a 2 node Proxmox VE (1.9) in cluster configuration. Everything works well. Server and Node. From server web interface I can create a virtual machine on Node using nodes local directory storage. Problem: I have a lot of other drives on Node. I have been trying for a week to configure Node so that when I create a virtual machine from Server on Node they show up. However they never do. I have tried volume groups and directories…. I even take node out of cluster, add the new drive to the storage of node. It shows up and I can create a vm with it. However as soon as I add node back into cluster the storage disappears!!!!! I am going crazy. I know it can be done b/c I know that when I create VM on Node through Server Web interface it is using the Volume Group on Node to store the VM. I can see the size of the VG on Node decrease as the install continues. ANY help would be GREATLY appreciated. Thanks Jon
Hello Jon,
If you can wait a bit, I’ll have a look on it this Weekend. If I understand your problem, when you are adding storage to your PVE Cluster, the new storage element does not appear on the Web Interface. Does your nodes have the same configuration ? Are you creating additonal storage on both nodes ? are using the same name in both nodes(if you are using local lvm) ?
Where are you adding on storage devices ? You should create the additional storage on the master node and then the Cluster should sync that back to the other node
Hello Jon,
I do not fully understand the problem (may be can you provide some screenshots on what you are trying to do ). What are you not seeing Additional storage within Proxmox Ve or created Virtual machines on these additional Storage ?
I’ve done a quick test within my virtual infrastructure. I’ll explain what I’ve done first. I have 2 nodes Proxmox VE configured in a Cluster. I have first created the cluster. I have then added additional local storage to each node (same disk size). On each node, I have formatted the new disk and mount the disk into the proxmox ve nodes (I’ve edited the /etc/fstab file). At this stage the Proxmox OS should see the additional disk and mounted. I can reboot the machine as many time I want the storage is there
Then from the Web Interface, connecting the the Master, I’m adding the local storage. I’ll be creating an Direcotory Storage type.
At this stage, If I create a KVM machine, I can see the additional Local storage (I’ve call it Local2) and I can create the virtual disk on this storage.
If I go to the storage section and browse the content of the Local2 Directory I can see my files. If I perform a migration operation to the slave node, then the vm disk will be visible on the Slave node.
At this stage, I can see my additional storage and I can create KVM machines.
Is this helping you ?
Having the same problem with latest edition. The Web interface will work swimmingly for half the nodes and then the ticket will be invalid for the other half. Time is in sync, Any ideas?
Hello Brad,
You do not give me much info here 🙂
can you provide a little bit more details about the error you are getting (in Web Gui > PVE HOST > Syslog Tab ) and about your setup ( how many nodes have you in your cluster…)
Invalid ticket is generally linked to date/time settings but you are telling me that this should be ok.
Can you double check that same time zone; date/time are set on your nodes).
Clear up cookies from your browser,
can you check if the cluster RSA keys are the same on both hosts? (something like md5sum /etc/pve/pve-root-ca.pem)
Logoff, wait a few minutes for the nodes to sync and try to login again ?
Do you have 1 network card/multiple network cards (and thus IP)…
Hope this help
Best regards
If you want HA your gonna need a fencing device like an APC PDU AP7920 or AP7921. I was going down this road but opted for hot standbys instead! I’m using laptops as the proxmox servers so a PDU would be useless unless I took the battery out of the laptops. I like having the battery as an inbuilt UPS and do all my backups to an iSCSI target which can be hauled back to a hot standby at any time. Next I’ll be looking into rsync and RTRR with this setup.