
|
|
The script hereafter is outdated and has been replaced by a newer version. Please Check the Download page for latest version. |
Hello World,
This is it ! The day has just arrived. Ubuntu 18.04 LTS has just been released and it’s time to have a look at the xRDP software solution and see if any major changes have been introduced with this version of the Operating System.
Usually, we would describe how to perform a manual installation providing step by step instruction guide. As the process of installing xRDP and have it working didn’t change much since the Ubuntu 17.10 release, we will update the standard installation script that we have developed for Ubuntu 17.10 and make it working for Ubuntu 17.10 and Ubuntu 18.04 editions.
Note :
This post is basically an update of an existing post that was covering the version Ubuntu 17.10 (see this post). Please use the search function or go to the xrdp section of this blog if you need xRDP installation instructions for different Ubuntu Editions.
The Standard Installation Script – Version 0.2
Overview
The version 0.2 of the script perform a standard installation of xRDP (i.e using the xRDP package available in the Official Ubuntu Repository) and perform also the additional configuration tasks needed to have a workable xRDP solution. The script version has been updated to version 0.2 which includes the logic to detect Ubuntu 17.10 and Ubuntu 18.04 editions and introduce some additional configuration changes…
Assumptions
Before running this script, be aware of the following assumptions
- We have tested the script on Ubuntu 17.10 and later
- No additional desktop interface has been installed.
- We have performed the test on a Virtual Machine running on Virtual box and Hyper-V Virtual machine (on Windows 2012 R2)
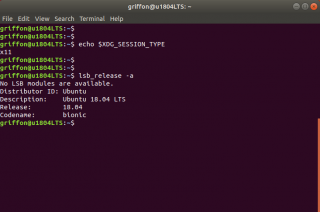
- The following procedure has been performed on Ubuntu 18.04 where xorg is the default Display manager (see screenshot below)
click on Picture for better resolution
Prerequisites
We assume that you have internet connection on the Ubuntu machine. The internet connection is needed to download the necessary packages that will be installed on your system.
The script version 0.2
Important Note :
If you copy/paste the script, you might encounter some issues because font formatting might be not maintained during the copy/paste operation. Please ensure that format is accurate before launching the script. A downloadable version of the script is available at the bottom of the post
Disclaimer : As usual, use this at your own risk !!
################################################################
# Script_Name : Std-Xrdp-install-0.2.sh
# Description : Perform an automated standard installation of xrdp
# on ubuntu 17.10 and later
# Date : April 2018
# written by : Griffon
# Web Site :http://www.c-nergy.be - http://www.c-nergy.be/blog
# Version : 0.2
# History : 0.2 - Added Logic for Ubuntu 17.10 and 18.04 detection
#               - Updated the polkit section
#               - New formatting and structure
#           0.1 - Initial Script
# Disclaimer : Script provided AS IS. Use it at your own risk....
##################################################################

echo
/bin/echo -e "\e[1;36m#-------------------------------------------------------------#\e[0m"
/bin/echo -e "\e[1;36m# Standard XRDP Installation Script - Ver 0.2 #\e[0m"
/bin/echo -e "\e[1;36m# Written by Griffon - April 2018- www.c-nergy.be #\e[0m"
/bin/echo -e "\e[1;36m#-------------------------------------------------------------#\e[0m"
echo

#---------------------------------------------------#
# Step 0 - Try to Detect Ubuntu Version....
#---------------------------------------------------#

echo
/bin/echo -e "\e[1;33m#---------------------------------------------#\e[0m"
/bin/echo -e "\e[1;33m! Detecting Ubuntu version # \e[0m"
/bin/echo -e "\e[1;33m#---------------------------------------------#\e[0m"
echo

version=$(lsb_release -d | awk -F":" '/Description/ {print $2}')

if [[ "$version" = *"Ubuntu 17.10"* ]] || [[ "$version" = *"Ubuntu 18.04"* ]];
then
echo
/bin/echo -e "\e[1;32m.... Ubuntu Version :$version\e[0m"
/bin/echo -e "\e[1;32m.... Supported version detected....proceeding\e[0m"

else
/bin/echo -e "\e[1;31m!!!!!!!!!!!!!!!!!!!!!!!!!!!!!!!!!!!!!!!!!!!!!!!!!!!!!!!!\e[0m"
/bin/echo -e "\e[1;31mYour system is not running Ubuntu 17.10 Edition.\e[0m"
/bin/echo -e "\e[1;31mThe script has been tested only on Ubuntu 17.10...\e[0m"
/bin/echo -e "\e[1;31mThe script is exiting...\e[0m"
/bin/echo -e "\e[1;31m!!!!!!!!!!!!!!!!!!!!!!!!!!!!!!!!!!!!!!!!!!!!!!!!!!!!!!!!\e[0m"
echo
exit
fi

#---------------------------------------------------#
# Step 1 - Install xRDP Software....
#---------------------------------------------------#
echo
/bin/echo -e "\e[1;33m#---------------------------------------------#\e[0m"
/bin/echo -e "\e[1;33m! Installing XRDP Packages...Proceeding... # \e[0m"
/bin/echo -e "\e[1;33m#---------------------------------------------#\e[0m"
echo

sudo apt-get install xrdp -y

#---------------------------------------------------#
# Step 2 - Install Gnome Tweak Tool....
#---------------------------------------------------#
echo
/bin/echo -e "\e[1;33m#---------------------------------------------#\e[0m"
/bin/echo -e "\e[1;33m! Installing Gnome Tweak...Proceeding... # \e[0m"
/bin/echo -e "\e[1;33m#---------------------------------------------#\e[0m"
echo

sudo apt-get install gnome-tweak-tool -y

#---------------------------------------------------#
# Step 3 - Allow console Access ....
#---------------------------------------------------#
echo
/bin/echo -e "\e[1;33m#---------------------------------------------#\e[0m"
/bin/echo -e "\e[1;33m! Granting Console Access...Proceeding... # \e[0m"
/bin/echo -e "\e[1;33m#---------------------------------------------#\e[0m"
echo

sudo sed -i 's/allowed_users=console/allowed_users=anybody/' /etc/X11/Xwrapper.config

#---------------------------------------------------#
# Step 4 - create policies exceptions ....
#---------------------------------------------------#
echo
/bin/echo -e "\e[1;33m#---------------------------------------------#\e[0m"
/bin/echo -e "\e[1;33m! Creating Polkit File...Proceeding... # \e[0m"
/bin/echo -e "\e[1;33m#---------------------------------------------#\e[0m"
echo

sudo bash -c "cat >/etc/polkit-1/localauthority/50-local.d/45-allow.colord.pkla" <<EOF
[Allow Colord all Users]
Identity=unix-user:*
Action=org.freedesktop.color-manager.create-device;org.freedesktop.color-manager.create-profile;org.freedesktop.color-manager.delete-device;org.freedesktop.color-manager.delete-profile;org.freedesktop.color-manager.modify-device;org.freedesktop.color-manager.modify-profile
ResultAny=no
ResultInactive=no
ResultActive=yes
EOF
#---------------------------------------------------# # Step 5 - Enable Extensions .... #---------------------------------------------------# echo /bin/echo -e "\e[1;33m#---------------------------------------------#\e[0m" /bin/echo -e "\e[1;33m! Install Extensions Dock...Proceeding... # \e[0m" /bin/echo -e "\e[1;33m#---------------------------------------------#\e[0m" echo gnome-shell-extension-tool -e ubuntu-dock@ubuntu.com gnome-shell-extension-tool -e ubuntu-appindicators@ubuntu.com echo #---------------------------------------------------# # Step 6 - Credits .... #---------------------------------------------------# echo /bin/echo -e "\e[1;36m#-----------------------------------------------------------------------#\e[0m" /bin/echo -e "\e[1;36m# Installation Completed\e[0m" /bin/echo -e "\e[1;36m# Please test your xRDP configuration....\e[0m" /bin/echo -e "\e[1;36m# Written by Griffon - April 2018 - Ver 0.2 - Std-Xrdp-Install-0.2.sh\e[0m" /bin/echo -e "\e[1;36m#-----------------------------------------------------------------------#\e[0m" echo
How to Use the Script
Set Execute Right on the script
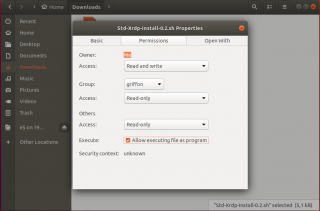
Download the Std-Xrdp-install-0.2.sh script to your system. To have it running, the script has to be marked as executable. To mark a script/file as executable, the following actions needs to be performed
Right-click on the file, go to properties, then select permissions and tick the box allow executable….
Click on picture for better resolution
or from the command line, issue the following command
chmod +x ~/Downloads/Std-Xrdp-Install-0.2.sh
Note : Adjust the path where the Std-Xrdp-Install-0.2.sh script to reflect your environment
Execute the script
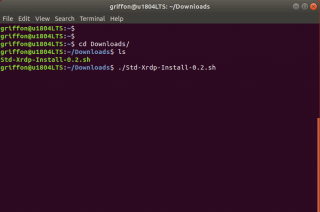
To execute the script, ensure that internet connection is available (so you can download the necessary packages needed for the installation) and simply open a Terminal console. In the Terminal console, Browse to the location where the script has been stored and then issue the following command
./Std-Xrdp-Install-0.2.sh
Click on picture for better resolution
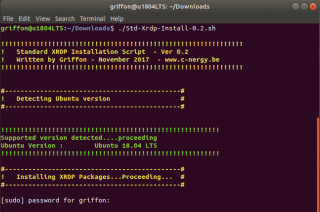
The script will start executing and when the xrdp installation package will start, you be requested to enter your password
Click on picture for better resolution
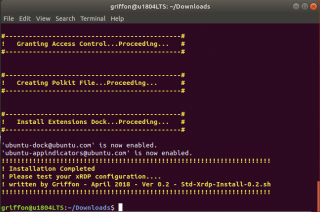
Provide the password and proceed with the installation. Wait for completion of the script. The machine will not reboot automatically when done so you can review the actions performed by the script….
Click on picture for better resolution
Test your configuration
To Test your configuration, you need to perform the following steps
- step 1 – Logout from the Ubuntu machine because you can only have a single connection to the machine for the same user (either local either remote)
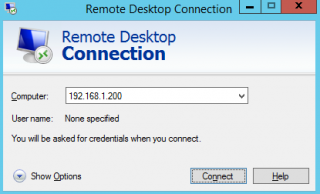
- step 2 – Start your favorite remote desktop client and provide the ip address or hostname of your ubuntu machine
Click on Picture for Better Resolution
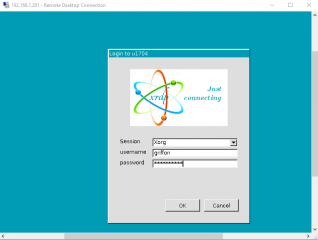
- step 3 – At this stage, you should see the xRDP login page. Provide your credentials
Click on picture for better resolution
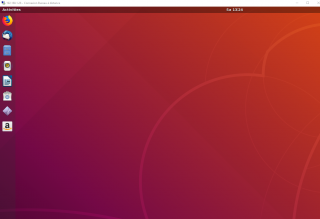
- step 4 – At this stage, you should see your standard Ubuntu Gnome Desktop with the Dock visible….
Click on picture for better resolution
Download the Script
Please download the script : Std-Xrdp-Install-0.2.zip
Final Notes
Ubuntu 18.04 LTS seems to be a good polished release and in a few weeks we will probably start deploying some computers as pilot projects. The choice has been made to move away from Unity Desktop as it will be discontinued in the future.
xRDP and Ubuntu 18.04 are working well together. On my LAN network, I had the feeling that the desktop interface was quite responsive (less sluggish than previous implementation of xRDP). I do not know if this is due to the fact that the Gnome desktop is used instead of Unity Desktop which might introduced some additional load on the remote session….
xRDP software seems to be a good replacement solution for VNC software solution even more since Gnome Desktop is used as default Desktop. The advantages of using xRDP are that the service starts at boot time and nobody needs to be connected to the machine to perform a remote desktop session. Another advantage of xrdp solution is that it creates a new display when performing the remote connection and nobody can monitor your actions if screen is connected to the remote machine which provide more security in way.
Yes, it’s possible to have vnc server start at boot time but since Ubuntu is now using GDM3 login manager the process is really complex and the process to make the remote connection is also cumbersome (you need to perform two remote desktop connections – see this post). We are not even sure that the process described here still works for Ubuntu 18.04….
xRDP has still some drawbacks. The first one is that you cannot connect to the console (Display :0). The other limitation of xRDP is that a user can only remote connect if the user is not physically logged on into the system. However, xRDP seems to provide a standard way of accessing remote machines and provides easy inter-operability capabilities with Windows world….
The updated version of the script should provide you automation and simplify the installation and configuration of xRDP software solution. The manual installation is always an option but then you have to perform the configuration of your desktop when performing your first remote desktop connection….The updated version of the script streamline the installation process and configure (partially) your remote desktop session and will make the Dock and the top bar menu available by default in your remote session.
This is it for the day.
Stay tuned as we are preparing next posts about xRDP and possible problem resolution encountered by many people …
Keep in touch
Till next time
See ya
Will this script also work for Lubuntu 18.04?
When running without a graphics card or on a virtual machine I have to install xorgxrdp to make XRDP work at all.
@RKantos,
is this a question or a fact ? With xrdp package in Ubuntu 18.04, the xorgxrdp package is installed by default… So
till next time
see ya
@Wes,
The script has been specifically written for Ubuntu 18.04 (and no other editions). All the customization done by the script is mainly targeted to Ubuntu edition (Dock – gnome extension installation,….)
We have no time (for the moment) to check additional flavour. However, you could try to install the xrdp package from (L)Ubuntu repository and see if this working out of the box (To install it, use sudo apt-get install xrdp and that it’s). This will install the xrdp software and you can check if this is working for you or if you need to tweak your system
Hope this help
Till next time
See ya
Hi.
I tell my experiences with Ubuntu 18.04.
I install Ubuntu virtualizado with Proxmox, with the previous versions and the information of this web, I have not had big problems to work with the different flavors of Ubuntu (Mate, Xubuntu, etc).
With this latest version installed with the sript on this page, it works perfectly when I enter xRDP, but when I share the disk drive, the folder “home / user / thinclient_drives” is created with the disk or disks comprated from xRDP, This folder fucniona bien until I close the session and reconnect, at that time the folder is inaccessible giving an error. If I restart Ubuntu or dismount the folder with “fusermount / home / user / thinclien_drives” the next connection is correct and I will have access to the shared disk again.
I have access to the “Share printers” connection, only the Clipboard and Units are active.
The same result I get with Xubuntu, Lubuntu and Mate without the sript.
I want to inform you that, in my experience, in Xubuntu, Lubuntu, Mate, etc, installing xrdp (sudo apt install xrdp) is enough to work correctly, even the keyboard, except the problem I mention sharing local resources.
That is all.
Thank you and sorry for the automatic translation from Spanish.
@Jose Manuel,
Thank you for the information…We will try to perform some tests and we will possibly describe this issue/behavior in a coming post…
thank you for your sharing your findings with us and for visiting our blog
till next time
See ya
Hi,
Downloaded the script and run it. Everything installed properly, but when testing from windows-PC, the session is never activated.
Only with the user logged in, I can see the splash image from xorg, but, when credentials are entered, black screen first, and then disconnected.
With user logged out, no connection at all…
Will try “xhost +”…
@Jorge,
No clue for the moment… Can you check your Logs and see if there is any additional hints…..
You might need to remove/reinstall the xrdp software and try again
Thank for the visit and the feedback
Till next time
See ya
Does 18.04 really only allow a single connection per user (local or remote)? What is the point of xrdp then if I have log out locally first? Any suggestions around this restriction?
After I log in remotely, I can no longer login locally with GDM3. If I switch to another terminal (Ctl+Alt+F6), I can login. If I then run /etc/init.d/gdm3 restart, I can login again. This is annoying.
Also, I would very much like a solution where I didn’t have to logout of my session. It’s ok if xrdp makes a new session, just don’t force me to logout of the local one. However, it would be perfect if it actually behaved liked a Windows box and let me remote into my local session.
I have been trying to set up remote access to an ubuntu vm the entire day. Finally at 1am I find this post and within seconds RDP is up and running. I wish I knew about you sooner.
@Tony,
Thank you for the visit and the positive feedback. it’s really cool that we have been able to provide some help through this blog
Enjoy the day
Till next time
See ya
@Todd,
In the past, it was possible to connect to a session locally and/or remotely. Changes introduced in the latest version is not allowing concurrent connection from the same user. You can connect either locally or remotely but not both. It might be possible to change this behavior but you have not checked that… Now, depending your usage, you might find some workarounds….An easy trick we have been using is to define a additional user account on the computer that can be used to kill a user session and allowing to connect to the ubuntu machine….
till next time
see ya
@Aaron
We completely understand the frustration here. However, we would need to push these requests to the team behind xRDP…. There might be a way to bring back the possibility to connect locally and remotely with xRDP but we have not looked and find that option….
till next time
See ya
Days (on and off) trying to get VNC to work properly and reliably with no luck. Minutes if not seconds with this and I have a perfectly working connection. This is brilliant thank you so much for the time taken to create and share this. It really is appreciated.
@Chris,
Thank you for the visit and the positive feedback. It’s good to know that sharing info through this blog can be helpful
Keep in touch
Till next time
See ya
For those of you using this script on Ubuntu server this does not install a desktop environment as a part of the script. This causes the problem that Jorge saw above. I usually use Ubuntu Server and have used your instructions in the past to install Mate along with xRDP. I just wanted to point that out for others who might run into this.
From experience with your past instructions I used:
sudo apt-get install mate-core mate-desktop-environment mate-notification-daemon
and then this:
sudo sed -i.bak ‘/fi/a #xrdp multiple users configuration \n mate-session \n’ /etc/xrdp/startwm.sh
Then I was able to RDP without issue.
@thep,
The script is indeed targeted to Ubuntu Desktop Edition and no Server edition.. Obviously, if you want to use the script on a server edition, you will need to install a desktop interface as by default, Ubuntu Server edition does not come with one
thank for the visit and the feeback
till next time
See ya
Thanks for the script, also since I used the Bionic image on AWS I executed it manually. For the record here is what you have to do in addition to the script:
sudo apt-get install ubuntu-desktop
Enable the service and start it (I wonder why this step is not necessary with the desktop edition)
sudo systemctl enable xrdp
sudo systemctl start xrdp
Add RDP (3389) to your security group or create a new security group and add it to the instance.
Set a password:
passwd ubuntu (or create a new user and create a password for them)
If you want a different desktop instead of the gnome shell install it (e.g. xfce4)
sudo apt-get install xfce4
and create an .xsession (or .Xsession both work) in your home directory:
echo “xfce4-session” > ~/.xsession
xrdp has gone a long way, this is so ridiculous easy now 😉
What is the differences between working directly on local ubuntu to working through Xrdp ?
I mean the sessions etc..
I came to that cause I get strange behavior in Xrdp situation
I work with intellij Rubymine IDE on my ubuntu 18.04 TLS in work
when I connect from home (after I logged out in office) in the Rubymine can’t run the project because the gem path or any other parameters not the same as local session
when I back to the office PC everything working fine
@Johannes,
Thank you for the feedback and for visiting the blog… This is good to have also information about Cloud configuration as the instructions are indeed slightly different
Till next time
See ya
@Shmulik,
in XRDP, the env variables are not the same or need to be defined through the xrdp config file….
You have to either start your application using the full path (/usr/bin/x-app) or you have to modify the environment variable in your xrdp session…. maybe check this link http://manpages.ubuntu.com/manpages/artful/man5/sesman.ini.5.html and have a look at the SEssion Variable section
Hope this help
Till next time
See ya
Hi All, and thanks for the hard work.
I first tried an Ubuntu 16 patched to 18 the script was unable to detect the version properly, I am very new to linux so did not care so much, so I ended up performing a clean setup of Ubuntu 18.
I have deployed it into an Intel Compute Stick which works like a charm.
Once executed the script, I was able to connect, but after noticing I cannot login into local session, I rebooted.
Since reboot, I cannot connect to xrdp, the service seems not to start at system boot and when I launch it manually it starts listening, I can login, but just after entering user credentials the connection gets disconnected.
Can anyone give any clue o help on why this is happening.
Thanks a lot!!!
Regards, Carlos.
Oooh I see, completely my fault… on Spain we use to refer to this with the following statement:
“Manolete, si no sabes torear… pa qué te metes”
I should have noticed that RDP connection closes immediately because the local user is logged on, once logged out it works like a charm.
For anyone interested, I am using it behind a “Terminal Services Gateway” and it works flawlessly.
And… another one, just in case this helps someone…
For XRDP auto-start, I needed to modify service files, as stated in an old post also by you…
http://c-nergy.be/blog/?p=8316
Also, I needed to re-enable IPv6 on GRUB, actually I don’t know if it makes so much difference on performance but I decided to disable it, just because I don’t use it on my internal network and because someone on another forum claimed it will solve some issues with Intel Compute Stick compatibility.
Once registered, XRDP will start at boot and work so well.
Thanks a lot for your work.
Spend a couple of hours trying to fix xrdp on Ubuntu 18.04 until I found your script. Works now perfectly. Thanks for sharing your findings.
@Carlos,
Happy to see that you have found your own solution…. manolete 🙂
Thank for the visit and the feedback
Till next time
See ya
@BJ,
Thank you for positive feedback and for visiting our Blog… This means our work is useful in some ways
Check out for most recent version of the script which might bring more “features”….
Till next time
See ya
Hello! I have a blog about home automation. I will include your script in a guide. I will add a reference to your site as it should. It is necessary to give to Caesar what belongs to Caesar. I know how to recognize all the work behind this script. Once again thank you.
@Stephane,
No problem for me (as long as you put reference). We are happy to see that our work is helping others and we love to share this work with others (because they share their finding as well). Please note that new version of the script are available… You might you to browse the blog to look for them. Lately, each version of the script brings a little improvement…
Thank for the visit and for sharing the info…
Till next time
See ya
Read / Do this:
Before execute the downloaded script (Std-Xrdp-Install-0.2.sh) Do this:
Edit the downloaded script and:
1.- Remove the part where is checking you ubuntu version (Only if are you sure that you have Ubuntu Desktop 18.04), save and execute the script, then
2.- Restart all you Ubuntu Desktop 18.04 and do not login in, in windows side connect using remote desktop.
Tip: If can not connect to ubuntu 18.04, login in Ubuntu 18.04 and type this in a terminal: sudo systemctl enable xrdp, then restart again you Ubuntu Desktop 18.04 and do not login in, go to windows side and try again the connection using remote desktop.
@Charly,
not clear what you want to do here… BTW, there are new versions of the script that you might wanna try as well
Thank for the visit and the feedback
Till next time
See ya
Because my version is 18.04.1 your script is aborted because you have a condition in your script that validates that the version is 18.04 and if it is not fulfilled it ends the execution of it. I deleted in your script the section where that condition is and then run your script again and everything worked wonders. Maybe you could add to your script that if the version is 18.04.1 then proceed with the execution and do not abort the installation as it does at this moment.
@Charly,
Thank you for your visit and your feedback. About your suggestion… Please note that you are using an old version of the script (0.2). This script is updated on regular base and new versions are available… The latest version of the script is 0.5 and take into account the fact that update releases are present.. So, it will detect that you are running Ubuntu 18.04.1… So, please check for newer version which brings some additional options and some bug fixing…..
Till next time
See ya
Thanks for this. I just tried the script and it worked perfectly with a fresh Ubuntu 18.04.01 LTS (for x86) installed into a virtualbox VM running on a Win 10 host.
However, I could only get this running on vanilla Ubuntu 18.04 and 18.04.01. Though it would’ve been my preference, I couldn’t get xrdp to work with Lubuntu 18.04/18.04.01 or Kubuntu 18.04/18.04.01; that is, not using your script. On both Lubuntu 18.04.01 and Kubuntu 18.04.01, the xrdp session would start but only a black desktop would show and nothing else on RDP client.
@StoneCracker,
Thank you for the visit and the feedback… Indeed, the script has been developed with focus on standard Ubuntu edition and we have slowly moved away from the other Ubuntu flavors. In the past, we have written some posts about xrdp and lubuntu and kubuntu… You can try to have a look a these posts and see it this can help…. if time permit, we will see if we can work on additional desktop environment
Hope this help
Till next time
see ya
i had to add #!/bin/bash at the beginning.
Otherwise i got: [[: not found
Used a fresh 10.04.1 installation.
Thank you very much worked for me
@Angelos,
Thank you for the visit and the positive feedback. Please not that new versions of the script exists…you might want to try them next time and provide some feedback
till next time
See ya
@AK,
Thank you for the visit and the feedback… We might update the script in order to include the #!/bin/bash as multiple users reported the issue. This is actually a best practice as well
Till next time
See ya
Please update the article to point to the latest version of the script at
http://www.c-nergy.be/downloads/Std-Xrdp-Install-0.5.zip
Please update the article to point to the latest version of the script at
http://www.c-nergy.be/downloads/Std-Xrdp-Install-0.5.zip
@KRN,
Thanks for the suggestion and the feedback
we will see what can be done
Till next time
See ya
See message above or below 🙂
I’m not sure where I went wrong here. I have 18.04 LTS on my server, and I’m trying to connect from a Windows 10 machine. Ubuntu says that xrdp is running. netstat agrees that xrdp is listening on 3389. However, I only get “Remote Desktop can’t connect to the remote computer ” blah blah blah. I can ping both ways. This is usually a no-brainer, but I’m stumped.
@Chris,
I would first check basic stuff like indeed network connectivity, firewall….
Then I would try to create a second account on the ubuntu server and try to connect via xrdp from the Ubuntu server hosting xrdp and see if this is working…if this is working xrdp is not the problem…
Then I would try to connect via xrdp from another machine (Linux or Windows) and see if this is working….
Then, I would check if any windows 10 settings (GPO) or patches (ex. Oracle Encryption remediation) might causing the issue
Hope this help
Till next time
See ya
First of all, I would like to thank you Griffon for sharing your knowledge with us.
Then, I would like to point out, that:
– RDC Connection works with clean Ubuntu 18.04.1! Which is great.
– When connected via RDC, the window’s header section lacks minimize, maximize, and restore buttons.
– RDC Connection does not work at all with Hyper-V Ubuntu 18.04.1 image. https://winaero.com/blog/ubuntu-virtual-machines-hyper-v-quick-create/
@Konstantin,
Thank you for the visit and the positive feedback…. First of all, there is a new version of the script in order to perform the xrpd installation..This might fix the issue for the windows headers.
About the Ubuntu on Hyper-v, if you are using the quick create VM, the ubuntu image includes already the xrdp software and configured in a specific way. configuration allows to enable enhanced mode in Hyper-v but does not allow you to connect remotely (check this post http://c-nergy.be/blog/?p=12429)
Do not know if this could help but we hope so
Till next timee
see ya
hey Chris,
I have the exact issue you are experiencing. Have you found a way to fix it?
thx
Thanks for sharing, Griffon! The installation of your xRDP script worked well and I can connect to an Ubuntu 18.04 from my Mac using ms remote desktop for mac v10. However, on the Ubuntu machine there are a couple of partitions (on separate hard drives) which only can be mounted as read-only and I can’t perform write/delete operations. Is there a way to resolve this or this is one of the limitations of xRDP.
Thank you!