Hello World,
In this post series, we are investigating how to install xRDP on different Ubuntu editions. We are almost at the end of the road. So far we have looked at the following Ubuntu editions :
- Linux Mint 18.1 (standard installation or custom installation)
- Ubuntu Remix (which will be officially a supported ubuntu flavor with release of Ubuntu 17.04)
- Kubuntu 16.10
- Ubuntu 16.10
- Xubuntu 16.10
- Lubuntu 16.10
We are almost done with this post series. We still need to look at the Ubuntu Mate Edition and the Ubuntu Gnome Edition. This post is focusing on Ubuntu Gnome Edition….Because we do not repeat too much of the information already provided, we will simply jump into the subject….
Shall we proceed ?
Step by Step Process
Assumptions
For this post, we have make some assumptions.
- ubuntu Gnome 16.10 (Final Release version) is used
- Installation is performed on fresh new install
- No Alternate Desktop interface is needed. We will connect directly to the Ubuntu Gnome Desktop
- We will configure our system to match on localized version (i.e. we are using a Belgian french keyboard)
- No additional configuration is needed to reconnect to the same session if you are using the latest version of the xrdp package found in the Ubuntu Repository
- Your system is connected to Internet (so you can download necessary packages)
- We have installed Ubuntu Gnome as a Virtual Machine using Virtualbox
Step 1 – Install the xRDP package
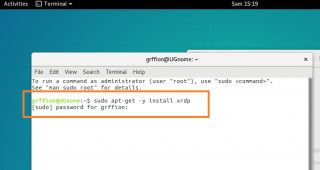
To perform the installation of xRDP package version 0.9.0, you simply need to execute the following command inside a Terminal Console
sudo apt-get -y install xrdp
Click on Picture for Better Resolution
When the password is prompted, enter your credentials and wait for completion.
To check which xrdp version has been installed, issue the following command
xrdp -v
You should see version 0.9.0
Step 2 – Configuring xRDP to use your desktop environment
Like Xubuntu or Kubuntu, there is no need to specify any desktop environment in your /etc/xrdp/startwm.sh file because the system will try to detect it automatically. So, we can move to the next stage….
Step 3 – Configuring xRDP Keyboard
This step ensure that the keyboard layout within your remote session is using the proper keyboard layout in use. By default, the layout is set to English US by default.
To try to set the proper keyboard layout within your remote session, you can execute the following commands (through a local connection and not when running through remote session)
# Set keyboard layout in xrdp sessions
cd /etc/xrdp
test=$(setxkbmap -query | awk -F":" '/layout/ {print $2}')
echo "your current keyboard layout is.." $test
setxkbmap -layout $test
sudo cp /etc/xrdp/km-0409.ini /etc/xrdp/km-0409.ini.bak
sudo xrdp-genkeymap km-0409.ini
Step 4 – Test your configuration
Like other Ubuntu editions, before trying to perform the remote connection, ensure that the selected user is not logged on locally on the Ubuntu Gnome computer. If this is the case, in order to have the remote connection working, you will need to logoff this user account from the system. If you do not perform this step, you will be immediately disconnected from your remote session after passing your credentials.
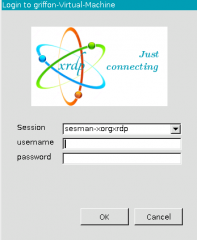
To perform your test, open your remote client, provide ip or hostname and connect. You will be presented the well-known xRDP login page.
Ensure that the Sesman-xorgxrdp option is selected and proceed with your connection
Click on Picture for Better Resolution
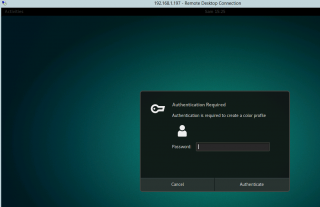
After some time, you should see your Ubuntu Gnome Desktop but you might be prompted with a popup box about color profile.
Click on Picture for Better Resolution
To fix this issue, using admin privileges, create a file called 02-allow-colord.conf under the following directory /etc/polkit-1/localauthority.conf.d/ and copy the content below into it.
polkit.addRule(function(action, subject) {
if ((action.id == "org.freedesktop.color-manager.create-device" ||
action.id == "org.freedesktop.color-manager.create-profile" ||
action.id == "org.freedesktop.color-manager.delete-device" ||
action.id == "org.freedesktop.color-manager.delete-profile" ||
action.id == "org.freedesktop.color-manager.modify-device" ||
action.id == "org.freedesktop.color-manager.modify-profile") &&
subject.isInGroup("{group}")) {
return polkit.Result.YES;
}
});
This should fix your problem. Next time you connect to it, you should have your beautiful Gnome 3 Desktop.
Click on Picture for Better Resolution
Final Notes
In this post, we have seen that by installing on xRDP version 0.9.0 package, we can perform remote desktop connection to Ubuntu Gnome systems. Like for some other Ubuntu Editions, there is a catch : the user that tries to remote desktop into the system cannot be already logged on locally. If this is the case, the remote connection will not be successful.
The other minor thing to mention is the performance of the system. While we can connect to the Gnome 3 Desktop, the performance are not that great but this is workable. We still need to have a look at the Ubuntu Mate Edition and see how xRDP is working. This would be the final Ubuntu Edition to be tested….
Stay tuned and till next time
See ya


Hi,
I tried to follow your above instructions today against the gnome version of Ubuntu 17.04.
Everything installed correctly (0.9 of xrdp). But then I tried to rdp to the box (using MS Remote Desktop Beta v8.2.31 from a Mac) all I get is a black screen (not a grey screen). It appears the connection is correctly established, but I don’t see any desktop.
I previously had this working with Ubuntu Gnome 16.04.2 by following one of your other tutorials and using (xrdp 0.6 and tigervnc), but I could not get the Mac Magic mouse to work correctly there so I was hoping that the newer version of xrdp (and the Beta version of MS RD) might have fixed this.
Any ideas ?
@Ian,
No clue at the moment as xrdp and Ubuntu have been changed recently… we need to have a look into it..Behavior has changed definitely
as we have a lot of work lately, might take some days before we coming back with some possible workarounds….
Till next time
See ya
@Ian
try
sudo dpkg-reconfigure xserver-xorg-legacy
and change xserver-xorg-legacy allowed user from “console user only” to “anybody”
for unbuntu 17.04
and the filename of km-0409.ini
should be change to km-00000409.ini in unbuntu 17.04:
“””
setxkbmap -layout us
sudo cp /etc/xrdp/km-00000409.ini /etc/xrdp/km-00000409.ini.bak
sudo xrdp-genkeymap km-00000409.ini
“””
it works well on my gnome ubuntu 17.04
@exeex;
Please check for the most recent information through the blog… we have published a step by step guide for Ubuntu Gnome 17.04 (see http://c-nergy.be/blog/?p=10887) that covers this topic specifically..
anyway, thank you for your visit and your comments…..
Till next time
See ya
@exeex,
normally; there is no need to configure keyboard layout anymore if you are using ubuntu 17.04 with xrdp 0.9.x package… This is handled automatically
Till next time
See ya