Hello World,
As announced recently in our previous post, we will provide the necessary instructions (and tips and tricks) to enable drives redirection and clipboard features while performing a remote desktop to a Linux machine using the xRDP software.
Actually, a lot of people is asking for these functionalities. Based on comments, feedback and requests coming from all sides, we have decided to tackle this topic and to see how difficult it would be to enable these features. We have made a quick video (that can be viewed here) that illustrate what we want to achieve in this post.
Now, you are wondering how difficult it is to enable these features… and how you could implement this too. This post will try to provide some answers to these questions. This post only focuses on drive redirection capabilities. Clipboard feature will be addressed later in a coming post….
So, get ready and let’s go !
Step by Step Instructions
Overview
In this post, we will describe how to include drive redirection feature within the xRDP software solution. The first thing to mention is that the xRDP has support for drive redirections and clipboard feature for some time now. If you check their official web site (see this link), you will see that some information is already provided on how to include this feature in your xRDP installation process.
So, the good news is that xRDP provide support for drive redirection and clipboard options. The bad news (at least some people might think so) is that you will need to compile the xRDP binaries in order to use these features. The really good news is that we already have demonstrated how to perform a custom installation of xRDP and we have provided an easy to use script to do that.
So, basically, most of the work is already done. To introduce drives redirection, we have modified a little bit the original script and included the necessary steps to enable this most wanted features.
To have the drives redirection feature working, you need to have the backend infrastructure that needs to understand the extensions that are used to provide such capabilities. A lot of posts related to xRDP are using the x11RDP backend which provide such functionalities.
Using x11vnc software solution in conjunction with the xRDP software, it’s possible to provide Drives redirection capabilities. The x11vnc does not seems to understand the clipboard extensions. However, this issue will be addressed in the coming post where we are replacing the x11vnc session manager by a new one.
The script provided below will compile all the necessary modules and binaries and perform an automated installation of xRDP that will include drive redirection capability. The script is self explanatory and contains comments explaining actions performed.
So, it’s time to have a look at the script…..
The Custom Installation Script (version 1.6)
Assumptions
Before running this script, be aware of the following assumptions
- We have tested the script on Ubuntu 16.04 Beta
- We are installing Mate-Desktop as alternative Desktop. If you want to use another, you will have to update the script provided hereafter
- We have performed the test on a Virtual Machine running on Hyper-V Server and Virtualbox
- Your virtual machine is connected to Internet (so you can download the necessary packages for the installation to occur). If you are not connected to internet, you can still manually download the xrdp package and modify the install-xrdp-1.6.sh script accordingly
The script version 1.6
Important Note :
If you copy/paste the script, you might encounter some issues because font formatting might be not maintained during the copy/paste operation. Please ensure that format is accurate before launching the script.
Version 1.5 included the possibility to configure automatically the keyboard layout to be used during xrdp session (still experimental).
Version 1.6 includes the necessary logic to perform a custom xRDP installation which will include Drives Redirection while using the standard x11vnc session manager.
The script can be downloaded. A link has been made available at the end of this post
Disclaimer : As usual, use this at your own risk !!
################################################################
# Script_Name : xrdp-install.sh
# Description : Perform an automated custom installation of xrdp
# on ubuntu 16.04 when systemd is used
# Date : April 2016
# written by : Griffon
# Web Site :http://www.c-nergy.be - http://www.c-nergy.be/blog
# Version : 1.6
#
# Disclaimer : Script provided AS IS. Use it at your own risk....
#
##################################################################

##################################################################
#Step 1 - Install prereqs for compilation
##################################################################

echo "Installing prereqs for compiling xrdp..."
echo "----------------------------------------"


sudo apt-get -y install libx11-dev libxfixes-dev libssl-dev libpam0g-dev libtool libjpeg-dev flex bison gettext autoconf libxml-parser-perl libfuse-dev xsltproc libxrandr-dev python-libxml2 nasm xserver-xorg-dev fuse

#Install git
echo "Installing git software..."
sudo apt-get -y install git

##################################################################
#Step 2 - Install the desktop of you choice
##################################################################

#Here, we are installing Mate Desktop environment

echo "Installing alternate desktop to be used with xrdp..."
echo "----------------------------------------------------"
sudo apt-get -y update
sudo apt-get -y install mate-core mate-desktop-environment mate-notification-daemon --force-yes
echo "Desktop Install Done"


##################################################################
#Step 3 - Obtain xrdp packages and xorgxrdp packages
##################################################################

#-Go to your Download folder
echo "Moving to the ~/Download folders..."
echo "-----------------------------------"
cd ~/Downloads

#Download the xrdp latest files
echo "Ready to start the download of xrdp package"
echo "-------------------------------------------"
git clone https://github.com/neutrinolabs/xrdp.git

#move to xorgxrdp folder and download needed packages
cd xrdp/


##################################################################
#Step 4 - using x11vnc sesman
##################################################################

#Install the X11VNC
echo "Installing X11VNC..."
echo "----------------------------------------"
sudo apt-get -y install x11vnc

#Add/Remove Ubuntu xrdp packages (used to create startup service)

echo "Add/Remove xrdp packages..."
echo "---------------------------"
sudo apt-get -y install xrdp
sudo apt-get -y remove xrdp

##################################################################
#Step 5 - compiling xrdp packages
##################################################################

#Compile and make xrdp

echo "Installing and compiling xrdp..."
echo "--------------------------------"

# needed because libtool not found in Ubuntu 15.04 and later
# Need to use libtoolize

sudo sed -i.bak 's/which libtool/which libtoolize/g' bootstrap

sudo ./bootstrap
sudo ./configure --enable-fuse --enable-jpeg
sudo make
sudo make install

#Final Post Setup configuration
echo "---------------------------"
echo "Post Setup Configuration..."
echo "---------------------------"

echo "Set Default xVnc-Sesman"
echo "-----------------------"

sudo sed -i.bak '/\[xrdp1\]/i [xrdp0] \nname=Xvnc-Sesman-Griffon \nlib=libvnc.so \nusername=ask \npassword=ask \nip=127.0.0.1 \nport=-1 \ndelay_ms=2000 \n' /etc/xrdp/xrdp.ini

echo "Symbolic links for xrdp"
echo "-----------------------"

sudo mv /etc/xrdp/startwm.sh /etc/xrdp/startwm.sh.backup
sudo ln -s /etc/X11/Xsession /etc/xrdp/startwm.sh
sudo mkdir /usr/share/doc/xrdp
sudo cp /etc/xrdp/rsakeys.ini /usr/share/doc/xrdp/rsakeys.ini

## Needed in order to have systemd working properly with xrdp
echo "-----------------------"
echo "Modify xrdp.service "
echo "-----------------------"

#Comment the EnvironmentFile - Ubuntu does not have sysconfig folder
sudo sed -i.bak 's/EnvironmentFile/#EnvironmentFile/g' /lib/systemd/system/xrdp.service

#Replace /sbin/xrdp with /sbin/local/xrdp as this is the correct location
sudo sed -i.bak 's/sbin\/xrdp/local\/sbin\/xrdp/g' /lib/systemd/system/xrdp.service
echo "-----------------------"
echo "Modify xrdp-sesman.service "
echo "-----------------------"

#Comment the EnvironmentFile - Ubuntu does not have sysconfig folder
sudo sed -i.bak 's/EnvironmentFile/#EnvironmentFile/g' /lib/systemd/system/xrdp-sesman.service

#Replace /sbin/xrdp with /sbin/local/xrdp as this is the correct location
sudo sed -i.bak 's/sbin\/xrdp/local\/sbin\/xrdp/g' /lib/systemd/system/xrdp-sesman.service

#Issue systemctl command to reflect change and enable the service
sudo systemctl daemon-reload
sudo systemctl enable xrdp.service

# Set keyboard layout in xrdp sessions
cd /etc/xrdp
test=$(setxkbmap -query | awk -F":" '/layout/ {print $2}')
echo "your current keyboard layout is.." $test
setxkbmap -layout $test
sudo cp /etc/xrdp/km-0409.ini /etc/xrdp/km-0409.ini.bak
sudo xrdp-genkeymap km-0409.ini

## Try configuring multiple users system
sudo sed -i.bak '/set -e/a mate-session' /etc/xrdp/startwm.sh

echo "Restart the Computer"
echo "----------------------------"
sudo shutdown -r now
Note : Check the end of the post, we are providing a link so you can simply download the script.
How to use and execute the script
Step 1 – Make the script executable
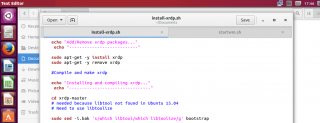
You first need to obtain a copy of the script. At the end of this post, we have provided the script as a downloadable file. If you perform a copy/paste from this post, be aware that formatting might be lost and errors might be thrown while running the script. Please review the content of the file as the copy/paste action might change formatting settings. Save the file as xrdp-install-1-6.sh
After downloaded the script (or copy/paste it) to your machine, you will need to mark the script as executable. To mark the script as executable, you can use the command line or the Graphical interface. In our scenario, we have placed the xrdp-install-1.6.sh script in the ~/Downloads/ folder. So to make it executable (based on our path), you can use the command line and issue the following command
chmod +x ~/Downloads/xrdp-install-1-6.sh (adapt the path to reflect your situation)
Click on Picture for better resolution
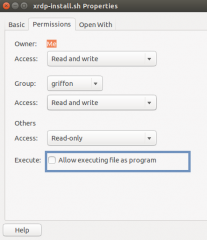
To make the script executable using the GUI, locate the script and right-click on the file, go to properties, then select permissions and tick the box allow executable….
Click on Picture for better resolution
Step 2 – Execute the script
To execute the script, simply open your terminal console and issue the following command
sudo ./xrdp-install-1-6.sh
As mentioned before, we assume that you have internet connection and you will be able to download all the necessary packages needed to perform this configuration.
Note : The script will download the necessary files under the ~/Download folders.
Wait for completion of the script. The machine will reboot automatically when done. The operation can take some time as you will need to install alternate desktop, some dependencies and compiling some new components as well.
Test your xRDP Connection
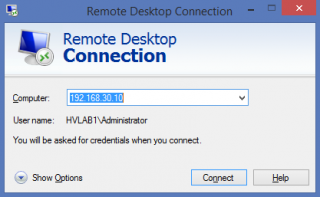
The final step in this procedure is to check that an rdp connection can be made to the remote Ubuntu machine. To test this, you will first need to obtain either the ip address or hostname or FQDN of the Ubuntu machine. When this information is available, start the remote desktop client on your windows client, type the ip address of the Ubuntu machine and click connect
Click on picture for better resolution
If everything has been running as expected, you will see the xrdp login screen displayed. In the drop down box, the option Xvnc–Sesman-Griffon should be selected. Do not change this option. Provide your user account and password and proceed.
Click on picture for better resolution
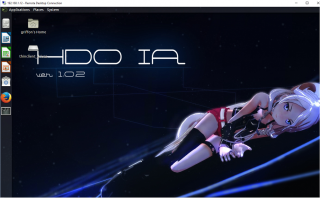
When the login process has been completed, you will access your MATE Desktop through the rdp client. As you can see on the screenshot below, we have customized a little bit our mate desktop and we have taken advantage of the mutiny capabilities (to see how to use mutiny, see this post). As you can see, when we perform a remote desktop connection to our Ubuntu machine where mate-desktop and mutiny, the interface look similar to the Unity one.
Click on picture for better resolution
Minor Issues & fixes
Issue 1 – Ubuntu Theme not set when you login locally to Ubuntu
After running the script, if you login into Ubuntu session (console not via xrdp), you will noticed that the interface is a little bit different and if you start the Terminal console, you have a white background.
Click on picture for better resolution
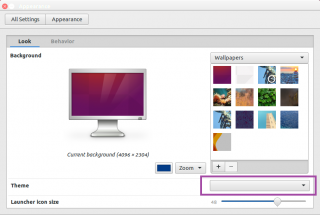
This is due to the fact that the Mate-Desktop has been installed on your system. There is an easy fix for that. You simply need to specify a theme to be used within your console session. You can set it back right-clicking on your desktop and select change desktop background. This will open the appearance applet where you can reset the default Theme (see screenshot below)
Click on picture for better resolution
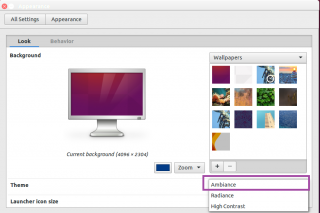
You can see that at the theme level, no option is selected. Select the default theme for Ubuntu (which is called Ambiance) or any other theme you would like to use.
Click on picture for better resolution
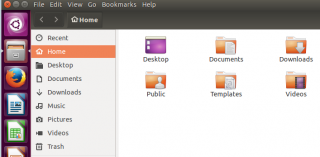
After a few seconds, you should see the familiar look n feel of your Ubuntu desktop
Click on picture for better resolution
Issue 2 – No Drives are redirected in the xrdp session
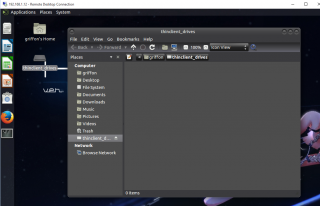
The first you will make the remote desktop connection to your Ubuntu machine through the xrdp software, you might end up with the following screenshot. The icon for the thin clients pointer is created but no drives have been redirected to your xrdp session.
Click on picture for better resolution
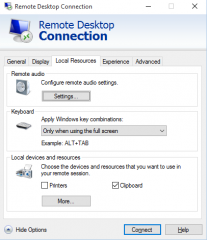
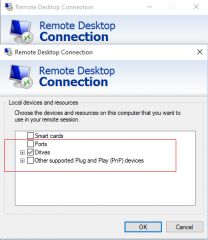
The good news here is that the fix is really easy. You will need to tweak your remote desktop client settings. When performing the connection to the xrdp server, you will need to ensure that the only option selected in the local resources tab are the Clipboard option and the drive option. Check the screenshot below and ensure that you have the same settings.
Click on picture for better resolution
Click on picture for better resolution
When this configuration change has been performed, you will see in the xrdp session the redirected drives and you will be able to use these redirected disks to exchange data between your Windows and Linux systems.
Issue 3 – Copy/paste between Linux and Windows
As mentioned earlier, the script allows drives redirection but does not seems to support the clipboard function. This seems to be a limitation of the x11vnc backend software. However, the video published in our previous post clearly shows that copy/paste (i.e. clipboard feature) is working.
The Clipboard support can be enabled as well but we need to again modify slighly the proposed script above. In the next post, we will modify again the script and include a new session manager that will then enable the clipboard function.
Download Script
For your convenience, we are providing a downloadable version of the script. You can find it here
Final Notes
Voila ! This is it for this quite lenghty post. Using the script and instructions provided here, you should be able to configure your xRDP solution to provide drives redirection capabilities. However, as mentioned, we are still missing the clipboard function. This is really a nice to have feature as the drives redirection will allow users to exchange data between windows and linux machine while working in the xRDP remote session.
To provide Drives Redirection & Clipboard capabilities, we need to tweak our install script slightly. We will share this modified version in the next post… So, stay tuned…..
Till next time
See ya
I really appreciate all the information and detail you provide. However, I have tried script 1.6 and 1.7 (not consecutively) on an Ubuntu 16.04 LTS with no joy. I never get the “Xvnc–Sesman-Griffon” within the xrdp login screen. The pre-selected session manager is “Xorg”, the one below that is “X11rdp”. Neither work. Also, after the final reboot, when the script finishes xrdp is not running. For that matter no RDP session manager seems to be running at all because the RDP connections (from a Windows 7 system) are rejected. I have to use the terminal to perform a “sudo xrdp” to get a session manager started…
Can you assist?
Thanks!
@Mark Stokes,
This post is kind of out dated. There were so many changes that occurred lately with the xrdp package that this post should might not reflect the latest information……Please have a look at the following post http://c-nergy.be/blog/?p=10752. This one provide a newer script that you could test and see if this is working for you..
Please test and provide feedback
Hope this help
Till next time
See ya
ACE- This fixed by drive connections 🙂