Hello World,
I’ve recently received a request about explaining how you could perform a VNC over SSH connection to a kvm virtual machine located on a Proxmox VE server. There is some information available on the Proxmox VE wiki page (check here).The page provides a really quick explanation (and may be not easy to read for people how never performed VNC over SSH connections.)
So, today, we will try to provide a step by step procedure on how you could use an external vnc viewer to connect to your virtual machine through secure SSH connection channel.
If you are ready, just let do this !
Before you start !
Before you start performing this procedure, we assume that
- you have already setup a proxmox ve infrastructure (for installation instruction, you can have a look at this post)
- you have configured you proxmox ve server to accept external vnc viewer request. If you do not know how to perform this, have a look at http://c-nergy.be/blog/?p=2923
- a workstation (Linux or Windows) with
- putty.exe ssh client (can be downloaded here)
- TigerVNC client (can be downloaded here)
If you meet these requirements, we are ready to move the next step.
Scenario 1 – Proxmox VE Host as the SSH Server
Setup and Configuration Overview
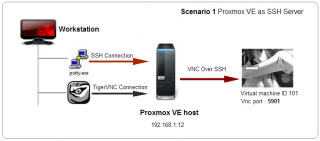
The following illustration describes our infrastructure for scenario 1 . As you can see, we will perform a vnc over ssh connection directly to the Proxmox VE host server. This means that the Proxmox VE host will be at the same time the VNC Server and the SSH server.
Click on picture for better resolution
To summarize our configuration,
- The SSH server will have the ip address 192.168.1.12
- The VNC Server will have the ip address 192.168.1.12
- The virtual machine (we want to connect to) will be accessible through the port 5901 using the tigerVNC Client (*)
(*) This will depend on your own infrastructure. You can read the following information in order to configure the port on which the vnc client will be able to access the virtual machine.
VNC over SSH : Step by Step Configuration
When you want to perform an VNC over SSH connection, you would first need to connect to the SSH server. When the configuration is established, you will be then able to perform your VNC connection to the target machine. However, you will need to perform an additional configuration change in the ssh client in order for him to “forward” your request to the destination server. Let’s demonstrate this !
Configuring putty SSH Client
In scenario 1, you will need to connect to the Proxmox VE Host server which has been configured with the ip address 192.168.1.12. We assume that you have putty installed. Start the putty application. In this screen, provide the IP address (or hostname) of the SSH Server you want to connect to. In my case, It would be 192.168.1.12.
Click on picture for better resolution
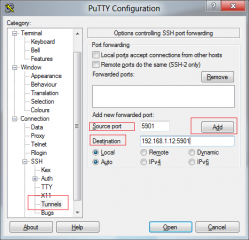
Then in the left menu, expand the ssh node and select the Tunnel node. In the right node, you will need to specify Source port and Destination Port
Click on picture for better resolution
In our scenario, we will need to put the following values
- Source Port : 5901 (the port on which you will need to connect)
- Destination : 192.168.1.12:5901 (you specify the ip address of the VNC server + the port to be used for the vnc connection)
Press the Add Button
Then, simply press the open button (in the putty.exe interface) to establish the SSH connection. You will be asked to pass credentials in order to establish the ssh session.
Click on picture for better resolution
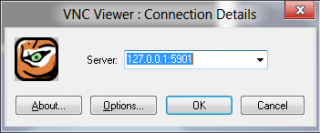
When the session is established, you can start your tigervnc client. In the server box, provide the localhost (or 127.0.0.1) information followed by the port used by the virtual machine. In our example, we type 127.0.0.1:5901
Click on picture for better resolution
If you have performed the correct configuration, you will be prompted for credentials. These are the credentials needed to connect to the Proxmox VE server.
Click on picture for better resolution
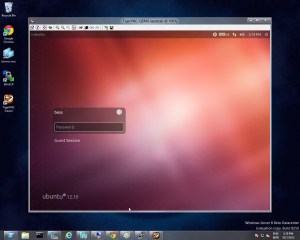
Finally, if you’ve passed the correct credentials, you should see that the vnc client has performed indeed the connection to the requested virtual machine.
Click on picture for better resolution
And voila ! We have just performed a vnc over ssh connection. This scenario was quite basic. Let’s spice this up by decoupling the SSH server and the VNC server.
Scenario 2 – Using a dedicated SSH Server
Setup and Configuration Overview
The following illustration describes our infrastructure for scenario 2 . In this scenario, we have a dedicated SSH Server. This will change a little bit the way you will need to configure your SSH Client in order to perform the vnc connection.
Click on picture for better resolution
In this scenario, we will have the following configuration :
- The SSH server will have the ip address 192.168.1.65
- The VNC Server will have the ip address 192.168.1.12
- the virtual machine (we want to connect to) will be accessible through the port 5901 using the tigerVNC Client (*)
SSH Client Configuration
Click on picture for better Resolution
When configuring the tunnel, from the putty client interface, I will need to specify the IP address of the target VNC server (which is the Proxmox VE host server to which you need to connect to). In my example, I will need to connect to the IP address 192.168.1.12 and specify the port 5901 (as described in scenario 1 )
Click on picture for better resolution
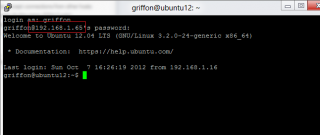
At this stage, you should click on the open button within your putty client. You will be prompted for credentials in order to connect to the SSH Server.
Click on picture for better resolution
When SSH connection has been established, you can the start the TigerVNC client and as in the previous scenario, provide the following ip address when prompted for it 127.0.0.1:port
Click on picture for better resolution
You will then again be prompted for Credentials. Here, you provide the credentials of the Proxmox VE host. If the credentials are correct, you should again see that the VNC client has performed the connection to your virtual machine.
Click on picture for better resolution
Final Notes
In this post, we have quickly explained how to perform a vnc over ssh connection to your Proxmox VE infrastructure. We have shown 2 situations in order to illustrate the process. Now, if you want to perform the same kind of configuration via Internet, you will need to perform some additonal configurations. Indeed, you will need to publish the ssh port on your firewall. When the ssh port is open, you will be able to access the ssh server in a secure manner and you should be able to perform your vnc over ssh connection.
Voila ! Thatt’s it for this post
Till next time
See ya






Cool! This would work much in the same manner for OSX->ssh/vnc->PVE->Windows-VM? Right?
yes
i think so
Hello,
from the hell you put me out !!!
thanks a lot !!!!!
Hey; that a strong statement. But If it’s true that I helped you out with this post, I’m really glad to hear that.
Thank for you visit
Till next time
See ya