Hello World,
In one of our previous posts (Ubuntu – Join Ubuntu 20.10 Desktop in Active Directory Domain during Setup), we have demonstrated how easy it was to join an Ubuntu 20.10 Desktop edition into an Active Directory during the Setup process. Indeed, Ubuntu 20.10 ubiquity version offers a easy to use interface to provide the minimum necessary information to access the Active directory domain and the wizard perform its magic in the background.
However, some readers have been asking to provide some more information about how to join an Active Directory domain when the Ubuntu machine has already been installed. This post will try to provide enough information to join an Ubuntu 20.04 Desktop machine into an Active Directory…
So let’s do this….
Overview
The Active Directory joining option in the Ubuntu 20.10 Setup Wizard might seem a really minor feature. Actually, it’s a really a great feature. Think about it ! Active directory has been deployed in a lot of corporate environment. By simplifying the process to join Active Directory, Canonical is positioning Ubuntu as a real alternative and help to leverage Active Directory investments. This feature is providing really interoperability between Ubuntu Operating system and windows Operating system and the best part is that the process is really simple and appealing to companies.
Assumptions & Scenario
In this post, we will assume the following
- You are running Ubuntu 20.04.1 Desktop
- You have already an Active Directory up and running (let’s use the domain name : c-nergy.lab)
- You have a Active Directory DNS server up and running (server ip could be 192.168.1.180/24)
- Active Directory is providing Time services
- You have internet access in order to download the additional packages that needs to be installed
If you have all these prerequisites met, we can move to the next section
Initial Ubuntu Desktop Configuration Settings
Before attempting to join Active Directory from your Ubuntu 20.04 Desktop, you will need to perform some per-configuration activities. Indeed, in order to successfully join AD Domain, you will need to configure you machine with the following settings
- Fully Qualified domain Name (matching the AD Domain name)
- Configure proper DNS so name resolution for AD Domain would be possible
- Configure Time services (needed for Kerberos authentication and validation)
- Installing necessary packages on Ubuntu to enable Authentication to remote directory service.
Step 0 – Installing SSSD software & Tools
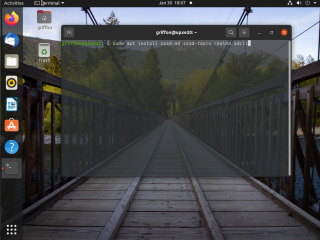
SSSD stands for “System Security Services Daemon” which basically manage access and retrieve information to remote directories. SSSD is basically connecting to Active Directory and check if the account has the rights to perform the connection. This package is not installed by default. So, first we will need to install this package. To do that, open up a Terminal console and issue the following command
sudo apt-get install sssd-ad sssd-tools realmd adcli
Click on Picture for Better Resolution
Wait for installation to complete and move to the next steps
Step 1 – Hostname & Hostname Resolution
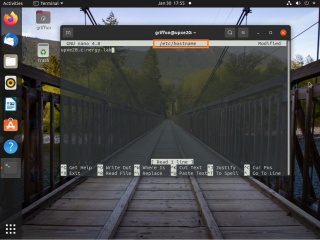
In this step, we will ensure that our Ubuntu machine is already configured with a proper name and that the fully qualified domain name is used. To validate or configure your system with a proper computer name, you will need to edit the file.
/etc/hostname
In this file, you will have to enter the fully qualified domain name (FQDN) that will be used. It’s important to note that the FQDN of the Ubuntu machine needs to match the Domain name of the Active Directory. So, in our scenario, the FQDN will look like ubuntuwks01.c-nergy.lab
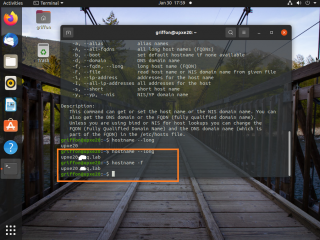
To check that the change is applied accordingly, you can issue the following command
hostname -f
As you can see, this command should return the FQDN you have defined in the /etc/hostname configuration file
Click on Picture for Better Resolution
Step 2 – Configuring valid DNS Servers on Ubuntu machine
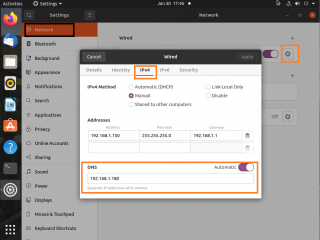
If you are using a DHCP infrastructure, no need to perform any changes as long as the DHCP server provide the IP address of the Active Directory DNS server. If you are using a static ip address, you might need to change the DNS Server Address in your Ubuntu machine to point the AD DNS server.
Click on Picture for Better Resolution
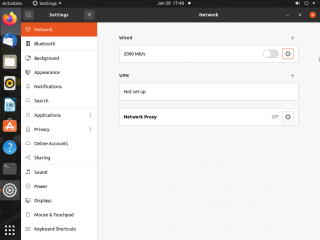
If you do change the ip configuration of your Ubuntu machine, do not forget to disable/enable the interface to ensure that the change will be committed. In the system settings > Network tab, slide the button to bring it down.
Click on Picture for Better Resolution
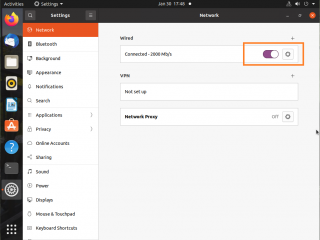
When done, enable the network interface back to ensure that the changes you have performed are applied accordingly
Click on Picture for Better Resolution
Step 3 – Configure Time services on Ubuntu machine
Time service is an important element in Active Directory and more specifically when using Kerberos protocol. If you have a large time difference between your ubuntu machine and a domain controller that will check your credentials, the login will fail (clock skew). Default clock skew is 5 minutes. To ensure that no time drift occur, we will need to configure ubuntu machine to point to a reliable time source.
By default, Ubuntu get its time from a public NTP server (usually ntp.ubuntu.com). To ensure that no time drift would occur, we will configure our Ubuntu machine to point to the Active Directory Time Source Server. In our scenario, we are using the Domain controller in AD as authoritative source for our Ubuntu machine.
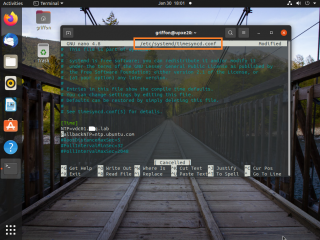
To configure time service, edit the file
/etc/systemd/timesyncd.conf
Look for the NTP line. Delete the information and enter the FQDN of your Time source server (see screenshot below)
Click on Picture for Better Resolution
At this stage, we should be ready to move forward to the next step….
Connecting to Active Directory
Step 1 – Discovering Active Directory
At this stage, we should be ready to connect to your Active Directory. Indeed, we have installed the necessary packages to “talk” to Active Directory (i.e. SSSSD) and the name resolution process has been configured accordingly (ip address and dns server settings). Before we effectively join the domain, we will first check that our configuration is valid and that we will be able to join our Active directory domain.
Open a Terminal console and issue the following command
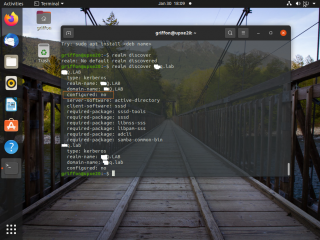
realm discover <%AD Domain Name%>
As shown in the screenshot below, if your configuration is correct, you should see information about the AD domain you are about to join. Notice the line Configure : no which basically tells you that you are not yet connected to the Active Directory
Click on Picture for Better Resolution
Step 2 – Joining Active Directory
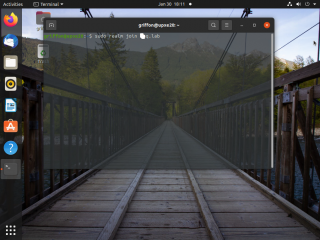
Time to join the Active Directory. The joining process is quite simple actually. From your Terminal Console, simply issue the following command
realm join <%AD Domain Name%>
Click on Picture for Better Resolution
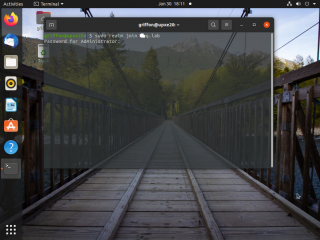
You will be prompted for a password. The password to be provided is for an account in Active Directory that has the right to join machines into the domain. Lot of people would be using the AD Administrator account
Click on Picture for Better Resolution
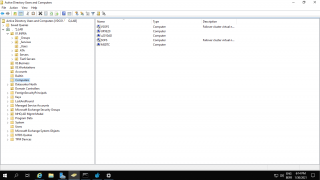
If no error messages are displayed, you can go to your Active Directory and check that a computer account for your Ubuntu machine has been created accordingly. By default, the computer account will be created and located under the Computers container.
Click on Picture for Better Resolution
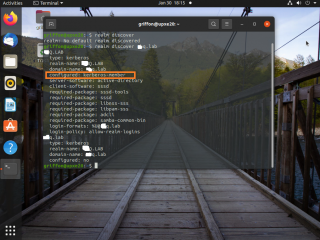
You can also use the following command line to check and retrieve information about the Active Directory Domain our Ubuntu machine is connected to
realm list <%AD Domain Name%>
Click on Picture for Better Resolution
Note :
You can also see the configured field that has changed from no to kerberos member. So, now your machine is able to retrieve information from your Active Directory and authenticate against it.
Step 3 – Creating home directory automatically
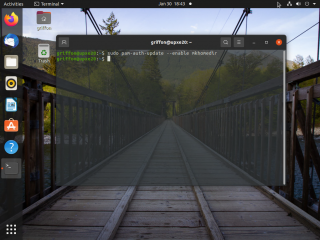
If you want to have user home directory created automatically when the user logs in, you will need to perform an additional step. This might not be needed in the future as this was detected as a bug in the realmd packages. To enable this feature, we will need to execute the following command in a Terminal console
# pam-auth-update --enable mkhomedir
Click on Picture for Better Resolution
Step 4 – Test your setup
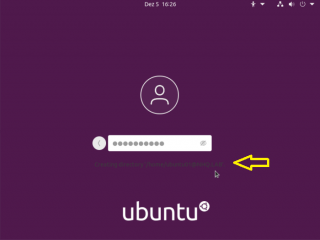
You can test and validate the login process using the command line or by simply login in though the desktop interface. In our scenario, we will be using the Graphical interface to login into our Active Directory Infrastructure. You will simply need to follow these steps
Step 1 – In the login screen, click on Not Listed ?
Click on Picture for better Resolution
Step 2 -In the Username screen, provide your AD User account using the upn structure (something like user01@mydomain.com)
Click on Picture for better Resolution
Step 3 – In the Password screen, provide your AD password…Wait for the login process to complete
Click on Picture for better Resolution
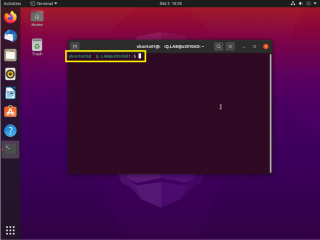
Step 4 – Once you are logged into the Ubuntu machine, you can perform an additional check and assess that you are indeed using an Active Directory user account….
Click on Picture for better Resolution
Note :
We had a small issue when we first logged into Ubuntu machine using our Active Directory User account, the login process was looping and we were presenting the login screen time over again. To fix this issue, the easiest solution is to simply reboot your Ubuntu machine and try again
Leaving Active Directory
For whatever reasons, you would need to remove the Ubuntu machine from the Active Directory domain, you can simply issue the following command
sudo realm leave <%AD Domain Name%>
If no errors are displayed on your screen, you have successfully left the AD Domain and you can use your Ubuntu machine as a standalone machine.
Final Notes
This is it for this post !
As you can see, nowadays, joining an Active Directory is relatively easy. Ubuntu 20.10 can join an Active directory Domain during the initial setup. If you need to join an Active directory domain after the initial setup, the process is really simplified through the usage of the sssd and realmd packages as long as you have all the necessary per-requistes in place.
We have provided here a really basic overview of Ubuntu integration with Active Directory. If you are interested in knowing more about Active Directory and Ubuntu integration, you might want to have a look at the two links provided below. They would provide you more detailed information about how the sssd is working and how to ensure that secure configuration can be achieved
Till next time
See ya
References and additional readings
- https://ubuntu.com/server/docs/service-sssd
- https://discourse.ubuntu.com/t/service-sssd/11579



does not work for remote clients….
a workstation bound to an AD server blocks at the XRDP connection
@Bob,
Not enough information ! What are you trying to perform…?
till next time
See ya
Cannot run “sudo” commands as an Enterprise Login user. I tried adding the user to the “sudo” group, but that does not work. How would you give admin rights to the Enterprise Login user?
@NG;
Have you used the command visudo and populate the file accordingly…. ?
From terminal console, run sudo visudo, this zill open the file /etc/sudoers
locate the line
# Members of the admin group may gain root privileges
and add the group that needs sudo rights
Hope this help
Till next time
See ya
i added /etc/sudoers still not working. please let me know thanks
Cannot run “sudo” commands as Login user. I tried adding the user to the “sudo” group, but that does not work. How would you give admin rights to the Login user?
@imran,
Have you used the command visudo and populate the file accordingly…. ?
From terminal console, run sudo visudo,
this will open the file /etc/sudoers
locate the line
# Members of the admin group may gain root privileges
and add the AD group that needs sudo rights
as an example, add this line “%domain admins@contoso.com” ALL=(ALL) ALL
Hope this help
Till next time
See ya
As a linux newbie, I found sssd is painful. I’ve come across pbis-open which joins Linux VMs to AD smoothly. I’ve not used pbis-open long enough to know if it’s secured and stable. Has anyone have extensive experience with pbis-open?
@Vinh,
We have no experience with pbis-open but we will publish your comments…maybe someone has information about that. if you have some knowledge about this soft; please share with us
Hope this help
Till next time
See ya
Hey, thanks for that; I’ll try it later.
Do you know if it’s possible to achieve the same user experience(from gdm login to sudo rights..) but instead of joining it to AD, use AAD with MFA activated? If it’s, is there any place that you may point me out to?
Thanks!!
@Laercio,
Thanks for visiting our blog and providing feedback to us…
In the past, we know that it’s indeed possible to join ubuntu to Azure Active Directory… There was some documentation about MFA activation but it seems that this feature has been deprecated.
To find more information, you should check Microsoft Documentation…however, note that this documentation is changing quickly as well…
Hope this help
Till next time
See ya
hi
Could you please explain me the steps of radius authentication. I have joined the ubuntu and active directory. but now, I want to join with radius server. please explain me about it.
thanks
hi Could you please explain me the steps of radius authentication. I have joined the ubuntu and active directory. but now, I want to join with radius server. please explain me about it.
moreover, I need clarification for step 2 joining active directory. I got errors about password is not set.
thanks
@Jass,
Thanks for visiting our blog and sharing your ideas and thought.
We are not really working with Radius servers and we do not think we will be able to provide you the correct information. Moreover, the problem description does not provide enough information… which Radius software are your using ?
Sorry we are not able to help at this time but maybe later we might want to publish a post (after experimenting) about Radius, Ubuntu and Active directory
Concerning the step 2 in joining AD, you need to have an AD Account with a password (no blank password) with enough rights to join the domain. This user account and the associated password should be used to join the domain. Based on the error message you are receiving, no password are associated with the user account you are trying to use for the join operation
Till next time
See ya
not working
@Thibault,
Thank you for visiting our blog and providing feedback…. Based on your comments, we cannot really investigate or offer your some help.. Can you elaborate your issue… WHat’s not working ? Where are you blocked ? What’s are the symptoms you are encountering….? At which stage in the guide are you facing issues ?
If you provide more info, maybe we can provide you some useful tips to move forward
Till next time
See ya
HI Thanks for the tutorial, i was able to join the domain and login with a domain user account. I configured SSH and wanted to ssh using domain user account but i am unable to do so. local account works fine but not domain accounts. I’ve tried ‘AllowUsers username’ in sshd_config without any luck.
the auth.log shows below
>>>
Oct 15 12:58:21 ubunduad2 sshd[2545]: pam_unix(sshd:auth): authentication failure; logname= uid=0 euid=0 tty=ssh ruser= rhost=192.168.89.1 user=user@domain.com
Oct 15 12:58:22 ubunduad2 sshd[2545]: pam_sss(sshd:auth): authentication success; logname= uid=0 euid=0 tty=ssh ruser= rhost=192.168.89.1 user=user@domain.com
Oct 15 13:02:52 ubunduad2 sshd[2545]: pam_sss(sshd:account): Access denied for user user@domain.com: 6 (Permission denied)
Oct 15 13:02:53 ubunduad2 sshd[2545]: pam_sss(sshd:account): Access denied for user user@domain.com: 6 (Permission denied)
Oct 15 13:02:53 ubunduad2 sshd[2545]: Failed password for user@domain.com from 192.168.89.1 port 54920 ssh2
Oct 15 13:02:53 ubunduad2 sshd[2545]: fatal: Access denied for user user@domain.com by PAM account configuration [preauth]
>>>
any guidance would be much appreciated.
@Saggy,
We have tried the configuration on a brand new Ubuntu 21.10. The machine is joined to Active Directory (Windows 2012 R2) and with no changes in configuration….we are able to login via SSH with a domain account….
When we login, we use the following format
ssh user@domain.com@Ubuntu_machineWe provide password and we are logged in….
You should double check that the user account you are using is not locked out and that password is not expired..
Check also that your keyboard layout is correct
reading your logs, the error message that show up is the Failed Password for user (…)
maybe create a brand new user, simple password and give it a try
Hope this help
till next time
See ya
This exact setup worked for me running Ubuntu 21.10 and Windows AD running on WinServer 2022 Eval.
So many other tutorials and walkthroughs seemed to make it so much more difficult than it needed to be and I was stuck for hours trying to track down SSSD and LDAP issues and yours had me up and running in 30 minutes.
Superb guide. Relative newbie to Linux and this worked perfectly for me. Thankyou
@Seth,
Thank your for visiting our blog and sharing your feedback… Happy to see that info provided here is useful
Till next time
See ya
@Seth,
Thank your for visiting our blog and sharing your feedback…Appreciate your positive feedback 🙂
Till next time
See ya
Let me say thanks for your good work!
It took me days to successfully log into the xrdp desktop with the AD-credentials. I wish I had come across your xrdp-script earlier. The fiddling with the polkit gave me a very hard time.
Your xrdp-script just works like a charme!
@Jobst;
Thank you for visiting our blog and sharing your experience. We are happy to see that our work is somehow useful 🙂
Thank for sharing your positive feedback
Till next time
See ya
You forgot about
realm permit
or
realm permit -g
to permit logon for ad user or ad group of users.
@SnowBars,
Thank you for visiting our blog and sharing your knowledge. As far as I remember, by default, ubuntu will allow any ad users to login. Now indeed, if you want to control who can login into your ubuntu machine, you can use the realm permit command. Thank you for adding this piece of information 🙂
Till next time
See ya
Need help.
all steps done when typing the command ID user_name it is showing no such user.
Any expert help me into this
Thanks
@Bhupendra Singh Chouhan
Thank you for visiting our blog and providing some feedback. So, the first question would be… have you logged on on the system using your active Directory Account ? How do you issue the ID command ?
id myuser or id myuser@domain.name ? When using the id command, you have to put the format <%username@domainName%>
Hope this help
Till next time
See ya