Hello World,
In our previous post, we have quickly prepared an infrastructure that we have used to test Active Directory Authentication process while using xRDP remote desktop software solution. We provided the necessary info needed to join an Ubuntu 20.10 computer into an Active directory domain. We have also quickly provided guidelines on how to install xRDP on the Ubuntu machine. We performed some tests as well in order to ensure that Authentication against Active Directory was working as expected. We also checked that a remote desktop connection against the Ubuntu machine was working as well.
At the end of our previous post, we finally tried to use an Active Directory Account when connecting through the xRDP Software interface and we could see that the operation was not successful. We have been able to access some log files and find some interesting information about the failure. Based on this information, we should be able to configure our Ubuntu machine and ensure that remote access would be successful…
So, Let’s go back to work and see what needs to be done in order to have a working configuration….
Why Active Directory Authentication is Failing with XRDP ?
Situation Overview
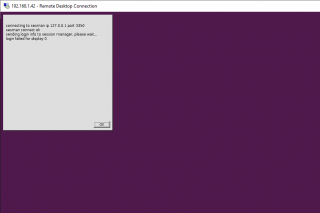
Since xRDP configuration and Active directory Authentication mechanism have been configured accordingly, we would expect that accessing a remote Ubuntu machine through xRDP software while using an Active directory Account should be working. When we tried the first time, using AD credentials, the xRDP login screen throw the following error message
Click on Picture for better Resolution
We had to look for some log files in order to find some hints that would explained the error preventing the xRDP Login process to go through. Looking into the /var/log/auth.log, we could find some interesting information about the error.
Click on Picture for better Resolution
The logs shows that the authentication process (at xrdp level) is successful. However, the error message generated concerns the Authorization process that’s failing. This process is managed by the SSSD software.
Problem Explained (in short)
SSSD stands for “System Security Services Daemon” which basically manage access and retrieve information to remote directories. SSSD is basically connecting to Active Directory and check if the account has the rights to perform the connection. Looking further in the documentation, SSSD is also retrieving a number of Group policies Objects from the Active Directory. Based on the retrieved GPO configuration, user will be able to login into the Ubuntu machine or not. Yes, you read it right. Linux is capable (via the SSSD software) to understand and apply Microsoft Group Policies
The following table shows which GPO will be retrieved by the SSSD when AD account is used for authentication.
| Windows logon rights | Corresponding sssd.conf option |
|---|---|
|
Allow log on locally
Deny log on locally
|
ad_gpo_map_interactive |
|
Allow log on through Remote Desktop Services
Deny log on through Remote Desktop Services
|
ad_gpo_map_remote_interactive |
|
Access this computer from the network
Deny access to this computer from the network
|
ad_gpo_map_network |
|
Allow log on as a batch job
Deny log on as a batch job
|
ad_gpo_map_batch |
|
Allow log on as a service
Deny log on as a service
|
ad_gpo_map_service |
|
|
|
By default, a standard Active Directory user is not permitted to perform remote desktop connections as this would be defined in some Group policies. The error encountered during the xRDP login process while using an AD account is due to the fact that the Allow Log on through Remote Desktop Services prevent the login process.
To overcome this limitation, we will need to update the SSSD Configuration file….
Allowing xRDP connection when using AD Credentials
Updating the SSSD Configuration file
Configuration file for sssd process is located at /etc/sssd/sssd.conf. Multiple sssd configuration options exists. We will quickly go through them and provide when needed a short explanation…
XRDP & AD Authentication – Configuration option 1
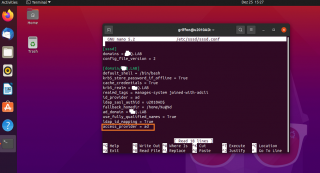
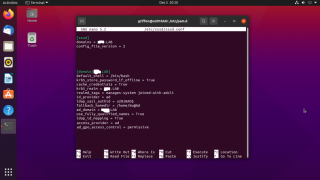
If you open the /etc/sssd/sssd.conf file, the following default configuration should be displayed (see screenshot)
Click on Picture for better Resolution
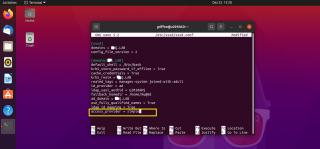
To have xRDP login process working against Active Directory, you will need to replace the line
access_provider = ad
by
access_provider = simple
Click on Picture for better Resolution
Restart sssd service by issuing the following command
sudo systemctl restart sssd.service
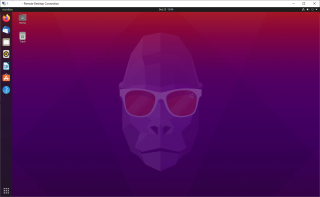
Go back to your remote desktop client and try again…This time, you should have a successful connection operation….
Click on Picture for better Resolution
The access_provider settings control the way you can grant or restrict login into your Ubuntu machine. The simple access provider is not recommended because it does not check if an account is active or expired. Changing the value from ad to simple implies that GPO settings are not retrieved and will not prevent remote login process…
XRDP & AD Authentication – Configuration option 2
A better option would be to keep the ad access provider as it overcome the limitation specified above with the simple provider. ad access provider checks for active account and check if an account is expired or not. If you are using the ad access provider, you will need to perform some additional configuration in your sssd.conf file. These additional settings will define how the GPO settings will be retrieved and how it can restrict or allow the access to the Ubuntu system.
In option 2, you will need to append the following line at the end of the /etc/sssd/sssd.conf file (see screenshot below)
ad_gpo_access_control = permissive
Click on Picture for better Resolution
The permissive value specifies that GPO-based access control is evaluated but not enforced which means that the user will be able to login through xRDP using AD Credentials
Click on Picture for better Resolution
Restart sssd service by issuing the following command
sudo systemctl restart sssd.service
You should be able to login to your remote session using AD Credentials
XRDP & AD Authentication – Configuration option 3
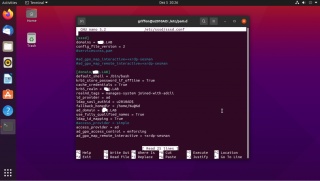
The most complete configuration can be achieved by populating the /etc/sssd/sssd.conf file with the following settings
ad_gpo_access_control = enforcing
ad_gpo_map_remote_interactive=+xrdp-sesman
Click on Picture for better Resolution
The enforcing value specifies that GPO-based access control is evaluated and enforced. To ensure that the login process will be successful, we have to specify which “Ubuntu User” needs to be granted the remote desktop right. This is done via the ad_gpo_map line
Restart sssd service by issuing the following command
sudo systemctl restart sssd.service
Again, You should be able to login to your remote session using AD Credentials
Final Notes
This is it for this post ! As you can see, yes, it’s possible to use xRDP software solution and use Active directory Authentication mechanism to access your Ubuntu machine remotely. To achieve such result, some configuration changes are needed. sssd software needs to be tweaked in order to authorize remote login on Ubuntu computers joined to an Active Directory. Once the changes are implemented, you will be able to remote connect to your Ubuntu computer.
Till next time
See ya
References
- https://access.redhat.com/documentation/en-us/red_hat_enterprise_linux/7/html/system-level_authentication_guide/sssd-configure-additional-provider-options
- https://access.redhat.com/documentation/en-us/red_hat_enterprise_linux/7/html/windows_integration_guide/sssd-gpo
- https://sssd.io/docs/design_pages/active_directory_access_control.html



Thanks Griffon for this post,
I need to say that also worked with Rocky linux and a remote gateway 😉
Cheers,
@Elio,
thank you for visiting our blog and providing feedbacks.
Happy to see that the script seems to work on more distribution..will be released with Ubuntu 21.10 🙂
Till next time
See ya
You guys are the boss! I spent hours explaining the problem on Ask Ubuntu but they never clearly understood the issue. Your explanations and corrections are crystal clear! Worked on Ubuntu 22.04.1 LTS like a charm! Thanks guys!
Really useful and great explanation. I can confirm this works on Red Hat Enterprise v8.7
@Martyn,
Thank you for visiting our blog and providing feedback.. nice to see that this hidden post can help people
Till next time
See ya
Thanks a lot for the mitigation steps. Appreciated !!
@Nagaraj,
Thank you for visiting our blog and providing feedback. We are always happy to see that the information we are providing is useful and can help people
Till next time
See ya
I’m moving from Windows to Linux and I’ve found your xrdp pages (and other pages) to be very helpful, thank you! I’m using Linux Mint 21.3 running Cinnamon. The script and instructions on connecting with AD worked great. Two issues that I need to track down are a) allowing remote login when still logged in locally and b) I seem to lose sound after my xrdp session.
@Michael,
Thank you for visiting our blog and providing feedback. So, one limitation of xRDP is that it allows only one connection (either local or remote) for the same user. You cannot take over an existing local session from remote using xRDP (there are some workaround but we do not recommend them since they have also their own issues). For the other issue related to the sound, we will have a look. Our understanding is that after performing your remote connection and moving back to your local session, sound feature is gone from that session… is this correct ?
Till next time
See ya