Hello World,
In some previous posts, we have demonstrated how to deploy Ubuntu 18.04 through PXE technology. Ubuntu 20.04 has been released for some time now, it’s time to provide some updates about the PXE deployment. Ubuntu 20.04 has introduced some changes that might impact the way a deployment through the network can be performed. If you look for information on how to deploy Ubuntu 18.04 through PXE, please read the following posts
- Ubuntu – Ultimate PXE Server Setup – BIOS & UEFI Support
- Ubuntu – Setup PXE Server using pxelinux files only (Bios & UEFI Support)
- Ubuntu – Ubuntu PXE Server using only Grub files (BIOS & UEFI Support)
- Ubuntu 18.04 – How to install Ubuntu 18.04 Server through PXE – Part I
- Ubuntu 18.04 – How to install Ubuntu Desktop through PXE – Part II
- Ubuntu 18.04 – How to install UEFI Ubuntu client through PXE infrastructure – Part III
So, let’s focus on Ubuntu 20.04 and see how the process has changed (or not !!)
Overview
This guide will describe the necessary steps needed in order to deploy Ubuntu 20.04 Desktop through the network using PXE technology. To deploy operating systems through PXE technology, there are some server roles and services that needs to be present on the network. PXE deployments relies on DHCP,DNS, TFTP, File and Web Services. In this post, we will prepare the infrastructure needed to have PXE capabilities. This setup guide will allow the deployment of Ubuntu 20.04 Desktop Edition to UEFI or Bios based systems.
Let’s go !
Step by Step Guide
Assumptions
The following assumptions have been made in order to have this scenario working
- You have internet connection in order to download additional necessary packages
- You have Ubuntu 20.04.1 Desktop ISO or installation files
- The PXE Server will be hosted on Ubuntu 20.04 Desktop
- Our virtual plaftorm is based on Hyper-V Server
- VM Generation 2 will be used in order to have UEFI and SecureBoot option is Enabled (detailed instruction can be found here)
Step 0 – Installing Ubuntu 20.04 Desktop
We will need to have a “PXE Server” deployed on the network. In our scenario, an Ubuntu 20.04 Desktop system will be used. This machine will host the necessary services needed to deploy operating system through network. Obviously, you could have used Ubuntu Server Edition as the steps and processes are quite similar. Be sure that Ubuntu 20.04 Desktop has the latest updates installed.
Step 1 – Download necessary packages
In this post, we assume that the Ubuntu Desktop 20.04 will be hosting all the necessary services needed to implement a proper PXE Infrastructure. To setup a PXE infra, we need to install the following packages
- dnsmasq (providing DHCP,DNS and TFTP services),
- apache web for storage purposes and
- NFS packages if you are planning to deploy Ubuntu Desktop through your PXE infrastructure.
Step 1.1 – Install apache web server
To install the apache package, you will issue the following command
sudo apt-get install apache2
Step 1.2 – Install NFS packages
NFS packages will provide file services capabilities. To install the nfs packages, execute the following commands
sudo apt-get install nfs-kernel-server
Step 1.3 – Install dnsmasq packages
To install the dnsmasq package, you will issue the following command
sudo apt-get install dnsmasq
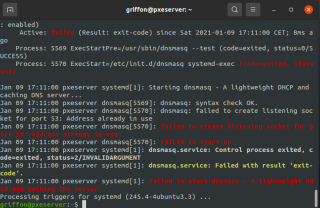
During the installation, you will see some errors and warnings. At this stage, this is an expected behavior. Additional configuration will be needed at later stage
Click on Picture for Better Resolution
Step 1.4 –Download pxelinux Packages
We will first download the PXELinux package from the web site creator
mkdir ~/Downloads/syslinux
cd ~/Downloads/syslinux
wget https://mirrors.edge.kernel.org/pub/linux/utils/boot/syslinux/syslinux-6.03.zip
unzip syslinux-6.03.zip
Step 1.5 –Download “UEFI” Packages
The commands below basically will download the necessary signed bootloader files and grub files needed by PXE server and extract the contents on their dedicated folders (shim and grub). These files are needed to pxeboot uefi clients…..
apt-get download shim.signed
dpkg -x <%name of deb package%> shim

apt-get download grub-efi-amd64-signed
dpkg -x <%name of deb package%> grub
Step 2 – Setup Static IP Address
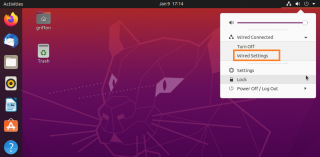
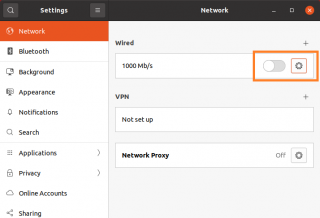
Usually, Ubuntu installation are using dynamic ip addresses (DHCP). We will move from the dynamic configuration to a static configuration. To perform such operation, you will click on the network icon on the right side of the top bar > expand the wired connected and select wired settings
Click on Picture for Better Resolution
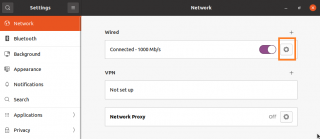
In the right pane, click the gear to open the properties pages
Click on Picture for Better Resolution
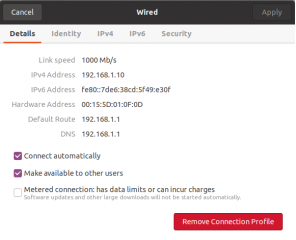
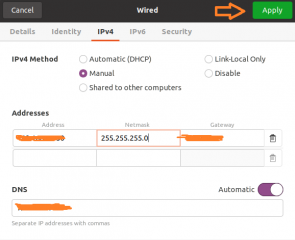
Go to the IPv4 tab
Click on Picture for Better Resolution
Change from Automatic to Dynamic and set the necessary ip address information. Press the Apply button and you are back to the network settings page
Click on Picture for Better Resolution
To effectively apply the changes, you have to disable and re-enable the network by using the slider button (or you can reboot the computer)
Click on Picture for Better Resolution
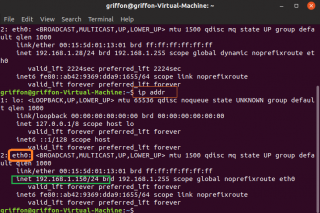
To check that the correct ip address has been set, you can open the terminal console and issue the following command ip addr. In the screenshot, we can see that the ip address is set accordingly. take also a note of the name of the interface (in the screenshot, it’s eth0) as this information will be needed at a later stage
Click on Picture for Better Resolution
Step 3 – Create the TFTP Folder Structure
We will create a folder called tftp at root of the filesystem (/tftp). Within this folder, the following structure will be create
tftp
 |-bios
 |-boot
 |-grub
To create this structure, you will need to execute the following commands in your Terminal Console
sudo mkdir /tftp
sudo mkdir /tftp/bios
sudo mkdir /tftp/boot
sudo mkdir /tftp/grub
Step 4 – Create the web Folder Structure
Because you are using the Apache Web server, we will be copying all sources files under /var/www/html directory. We will copy the iso files contents of Ubuntu 20.04 Desktop and Ubuntu Server under this location.
Our structure will look like the following representation. Obviously, you can create your own structure
var
 |-www
   |-html
     |-server
         |-ubuntu-20.04
         |-ubuntu-18.04
         |- ...
     |-desktop
         |-ubuntu-20.04
         |-ubuntu-18.04
         |- ...
To create the following folder structure, you can use the following commands in a Terminal Console
sudo mkdir /var/www/html/desktop/
sudo mkdir /var/www/html/desktop/ubuntu-20.04
sudo mkdir /var/www/html/desktop/ubuntu-18.04
sudo mkdir /var/www/html/server
Step 5 – Populate the web folder structure
So, mount your iso file into your Ubuntu PXE machine. To mount it, issue the following command
sudo mount /dev/sr0 /media
Copy the files from the iso image into the correct directory. You can use the following syntax to perform the operation
sudo cp -rf  <%Your Path To Install Files%>/*  /var/www/html/desktop/focal
example : sudo cp -rf /media/*  /var/www/html/desktop/u2004
The command below is copying all the contents of the source cdrom except a hidden folder which is needed to have the pxe process working as expected. So, you have to run an additional command in order to ensure that all the files you need have been copied accordingly. From a Terminal Console, issue the following command
sudo cp -rf  <%Your Path To Install Files%>/.disk  /var/www/html/desktop/focal
example : sudo cp -rf /media/cdrom_Name/.disk /var/www/html/desktop/u2004
When the copy is finished, unmount the iso/DVD image from your machine by issuing the following command
sudo umount /media
You can check that your files have been copied accordingly by browsing to /var/www/html/desktop/xxxx.
Step 6 – Configuring your NFS Server Settings
Since our folder structure is ready, we can start configuring the different services that are used by the PXE server. To ensure that our directory structure is accessible through the network and through the nfs protocol, we will need to edit the following file by issuing the following command
sudo nano /etc/exports
Insert at the bottom of the file, the path where you have stored your installation files, which subnet can access it and which kind of right you want to grant. In our scenario, we want to grant access to the following directory /var/www/html/desktop through the network subnet 192.168.1.0/24 and we are granting read only access (ro). So, at the end of the file, we would add the following line
/var/www/html/desktop 192.168.1.0/24(ro)
When this has been done, it’s time to restart the nfs service. To do that, you simply execute the following command
sudo systemctl restart nfs-kernel-server
Step 7 – Configuring the dnsmasq service
Almost there ! Now, we need to configure the dnsmasq service which will provide the glue between the different services. dnsmasq configuration file will be used to provide the necessary information to the pxe client when it boots. This file will dictate where to look for pxe bootloader based on the client architecture (uefi or bios). So, let’s edit the /etc/dnsmasq.conf file and at the bottom add the following information
To edit the configuration file, issue the following command
sudo nano /etc/dnsmasq.conf
Copy and update the following information at the bottom of the file
Note : You will need to modify it accordingly to reflect your own infrastructure
#Interface information
#--use ip addr to see the name of the interface on your system
interface=eth0,lo
bind-interfaces
domain=c-nergy.local

#--------------------------
#DHCP Settings
#--------------------------
#-- Set dhcp scope
dhcp-range=192.168.1.160,192.168.1.200,255.255.255.0,2h

#-- Set gateway option
dhcp-option=3,192.168.1.1

#-- Set DNS server option
dhcp-option=6,192.168.1.1

#-- dns Forwarder info
server=8.8.8.8

#----------------------#
# Specify TFTP Options #
#----------------------#

#--location of the pxeboot file
dhcp-boot=/bios/pxelinux.0,pxeserver,192.168.1.150

#--enable tftp service
enable-tftp

#-- Root folder for tftp
tftp-root=/tftp

#--Detect architecture and send the correct bootloader file
dhcp-match=set:efi-x86_64,option:client-arch,7
dhcp-boot=tag:efi-x86_64,grub/bootx64.efi
To have the change applied to your system, you will need to restart the dnsmasq service. To perform such task, you will execute the following command
sudo systemctl restart dnsmasq
Then, you should check that the dnsmasq is started correctly and that no errors are reported by issuing the command
sudo systemctl status dnsmasq
Step 8 – Populate TFTP Folder
Now, we need to populate the TFTP folder structure.
Step 8.1 – Populate bios folder
We have created the folder /tftp/bios in a previous step. This folder will hold the needed pxelinux files that we will be using to boot from network
sudo cp <%your download location%>/bios/com32/elflink/ldlinux/ldlinux.c32  /tftp/bios
sudo cp <%your download location%>/bios/com32/libutil/libutil.c32  /tftp/bios
sudo cp <%your download location%>/bios/com32/menu/menu.c32  /tftp/bios
sudo cp <%your download location%>/bios/com32/menu/vesamenu.c32  /tftp/bios
sudo cp <%your download location%>/bios/core/pxelinux.0  /tftp/bios
sudo cp <%your download location%>/bios/core/lpxelinux.0  /tftp/bios
Step 8.2 – Populate grub folder
We will do the same for the grub folder. The grub folder contains files that are needed for UEFI computers. We will need to obtain the correct version of grub files (the ones that are signed).
When this is done, we can simply copy the needed file into the tftp boot folder. So, execute the following commands. Change the path accordingly based on your settings…
sudo cp ~/Downloads/grub/usr/lib/grub/x86_64-efi-signed/grubnetx64.efi.signed  /tftp/grubx64.efi
sudo cp ~/Downloads/shim/usr/lib/shim/shimx64.efi.signed  /tftp/grub/bootx64.efi
Finally, we will copy two additional files from the source iso image. They will server as base for the next step. So, execute the following commands
sudo cp /var/www/html/desktop/u2004/boot/grub/grub.cfg  /tftp/grub/
sudo cp /var/www/html/desktop/u2004/boot/grub/font.pf2 /tftp/grub/
Step 8.3 – Populate boot folder
In this step, we need to place the correct bootloader in order for the installation process to start accordingly. We will copy the necessary files from the /var/www/html location. Issue the following commands to copy the necessary files to the correct location
Note : Ensure that the folder /tftp/boot/casper has been created and exists….
sudo cp /var/www/html/desktop/u2004/casper/vmlinuz      /tftp/boot/casper
sudo cp /var/www/html/desktop/u2004/casper/initrd       /tftp/boot/casper
Step 8.4 – Create symbolic link to boot folder
You will also need to create a symbolic link to the /tftp/boot folder. You will need to issue the following command
sudo ln -s /tftp/boot /tftp/bios/boot
Step 9 – Creating/Updating pxelinux.cfg & grub.cfg file
These are the most important files of the configuration. These files tells the target machine where to connect and where the file source files needed to perform the network installation. So, let’s create them…
Step 9.1 – create you pxelinux configuration file
We will also need to create the folder called pxelinux.cfg under the /tftp/bios folder.
sudo mkdir /tftp/bios/pxelinux.cfg
Inside this folder, we will create an empty file called default. This file control the pxelinux behavior. We will populate it with the following code
DEFAULT menu.c32
MENU TITLE ULTIMATE PXE SERVER - By Griffon - Ver 2.0
PROMPT 0
TIMEOUT 0

MENU COLOR TABMSG  37;40  #ffffffff #00000000
MENU COLOR TITLE   37;40  #ffffffff #00000000
MENU COLOR SEL      7     #ffffffff #00000000
MENU COLOR UNSEL    37;40 #ffffffff #00000000
MENU COLOR BORDER   37;40 #ffffffff #00000000

LABEL Ubuntu Desktop 20.04
    kernel /boot/casper/vmlinuz
    append nfsroot=192.168.1.150:/var/www/html/desktop/u2004 netboot=nfs ip=dhcp boot=casper initrd=/boot/casper/initrd systemd.mask=tmp.mount --
Save it
You are ready to move to the next section
Step 9.2 – create you grub configuration file
We are almost done ! Now, we need to create also a grub boot menu and get the proper option available and working. The grub boot loader reads information from the grub.cfg file. If you have followed this step by step guide, the content of the grub.cfg file should look like this
if loadfont /grub/font.pf2 ; then
set gfxmode=auto
insmod efi_gop
insmod efi_uga
insmod gfxterm
terminal_output gfxterm
fi

set menu_color_normal=white/black
set menu_color_highlight=black/light-gray
set timeout=5

menuentry "Ubuntu Desktop 20.04" {
set gfxpayload=keep
linux /boot/casper/vmlinuz ip=dhcp nfsroot=192.168.1.150:/var/www/html/desktop/u2004/ netboot=nfs ip=dhcp boot=casper systemd.mask=tmp.mount --
initrd /boot/casper/initrd
}
Save it
Step 10 – Testing your implementation
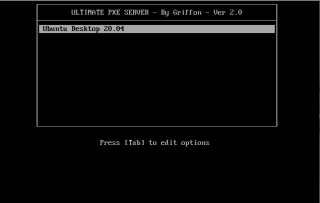
At this stage, we have to validate our work. If everything is working as expected, you will be able to boot a BIOS based computer from the network and you would see the following PXE Menu.
Click on Picture for Better Resolution
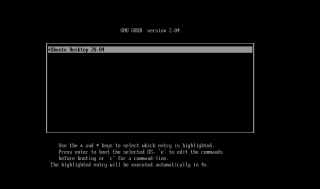
If you start the process from a UEFI based computer, you will see the following menu
Click on Picture for Better Resolution
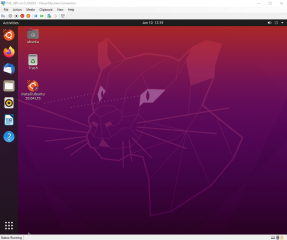
Selecting the menu option, you will see the boot process starting and at the end of the process, you should be see presented with the live version of the Ubuntu 20.04 Desktop Edition. From there you can perform your manual installation.
Click on Picture for Better Resolution
Using some “answer file”; it’s possible to automate the installation of your Ubuntu machine. The automation process will not be explained in this post as the post is becoming really long. Possibly in a future post, we might want to describe and demonstrate the process…..
Final Notes
This is it for this post ! At the beginning of the post, we said that Ubuntu 20.04 introduced some changes and that these changes could impact our ability to perform pxe installation. As we have been specifically discussing the desktop version, we can see that the process is quite similar to the methods and techniques we used with Ubuntu 18.04. The change introduced in Ubuntu 20.04 are more related to the deployment of the server edition where the netboot image is being deprecated. Moreover, the new installation wizard of the Server edition also introduces changes in the way the installation process would occur through the network…
We might publish a post about Ubuntu 20.04 Server Edition and how to work with the new wizard (called Subiquity). We will be able to test and see if deployment through the network is still possible and easy enough to implement
Till next time
See ya

Can you please specify the iso file you have used ? It is giving me an error “unable to find live file system on network ”
Can you please help , it will be highly beneficial for my project ?
Step 1.5: `apt-get download grub-efi-amd-signed`
should that read `apt-get download grub-efi-amd64-signed`?
@Sanjeet,
Ubuntu Desktop 20.04.1 as mentioned in the assumption sections… Ubuntu 20.04 was showing the same error for us
hope this help
till next time
see ya
@Steve,
Typo fixed… Thanks for letting us know
Till next time
See ya
Hi
Can you please show a way around to do a complete automated installation where we set up the username , hostname and a custom password and also do not have to select each of the parameters by default while installing the ubuntu.
@Sanjeet,
Since we are really overloaded with work, it will take us some times before providing a detailed guide on how to automate the installation… you can either pass parameter in the command line or you can use preseed files or you can use kickstart script to automate your installation… as a starting point, you could have a look at this location https://help.ubuntu.com/lts/installation-guide/amd64/apbs04.html
Hope this help
till next time
See ya
What is the path to the grub.cfg file you created in the 9.2 step?
@Yang,
Thank you for visiting our blog and providing feedback to us.
To answer your question, as mentioned in Step 7.3. Populate Grub Folder the grub.cfg will be located under /tftp/grub/
Hope this help
Till next time
See ya
@Griffon,
I’ve been properly guided,”Kernel /boot/vmlinux” and” initrd=/boot/initrd “should be the correct kernelThe/boot/and casper vmlinux, initrd = / boot/and casper/initrd, in 7.1 has been copied to/TFTP/boot/and casper folder.
What does the 7.1 inside the 8 point mean? Populate the folder with what?
@Andrès,
Thank you for visiting our blog and providing some feedback. We have changed the numbering since there was a small mistake. Under point8, everything should be numbered 8.x…..as it should have been initially
If you have read the post completely, you have downloaded in point 1.4, the syslinux package and unzip it.
In point 8.1 (the old notation 7.1) you simply need to copy the files from the syslinux package into the tftp folder
Assuming that you have followed exactly the steps provided, the following folder ~/Downloads/syslinux exists on your system. Copy the necessary files (as mentioned in point 8.1) into the target /tftp/bios folder
sudo cp ~/Downloads/syslinux/bios/com32/elflink/ldlinux/ldlinux.c32  /tftp/bios

sudo cp ~/Downloads/syslinux/bios/com32/libutil/libutil.c32  /tftp/bios

sudo cp ~/Downloads/syslinux/bios/com32/menu/menu.c32  /tftp/bios

sudo cp ~/Downloads/syslinux/bios/com32/menu/vesamenu.c32  /tftp/bios

sudo cp ~/Downloads/syslinux/bios/core/pxelinux.0  /tftp/bios

sudo cp ~/Downloads/syslinux/bios/core/lpxelinux.0  /tftp/bios
Hope this help
Till next time
See ya
I have tried using iso ubuntu 20.4.1 and 20.4.2. In both cases, the download ends with busybox: Unable to find a live file system on the network
@Vladimir,
Thank you for visiting our blog and providing feedback… We will need to test the process against Ubuntu 20.04.2. Recent updates might have changed something
will take us some time to check this…please be patient….
Till next time
See ya
“I have tried using iso ubuntu 20.4.1 and 20.4.2. In both cases, the download ends with busybox: Unable to find a live file system on the network”.
You must copy also .*-files and directories from install-cd. Without them it does not work.
@Tom,
thank you for visiting our blog and sharing your findings…. Indeed, you need to ensure that all files from the cd are copied accordingly. We will try to update the post in order to mention this
Till next time
See ya
Hello,
Was able to get legacy bios clients to boot perfectly with this setup. However uefi clients only get as far as being thrown into a grub terminal, the grub boot menu never shows up. I can see that /tftp/grub/bootx64.efi and /tftp/grub/grubx64.efi are being sent to the client but that is as far as it gets.
@William,
Thank you for visiting our blog and sharing your findings… Can you provide a little bit more info details ?
are you deploying to a virtual machine or physical machine ?
Can you share you grub.cfg file ?
Can you capture some more information on the screen when uefi boot proceed.. in order to have a hint on what could be the issue ?
it seems that the grub.cfg file is not found… Can you ensure that the grub.cfg file is located in the correct directory ( /tftp/grub/)
Hope this help
Till next time
See ya
I am attempting to deploy to a workstation, used it to test legacy pxe boot which worked (of course then changed mode to secure boot with legacy disabled after).
WordPress keeps marking the contents of my grub.cfg as spam so unfortunately am unable to provide that. I have confirmed via another few sets of eyes that it is pretty much the same as the config posted in the guide. Also confirmed that it is in the proper location.
As for how far the screen progresses this is roughly what happens:
PC Boots -> starts ipv4 pxe boot -> PC receives IP address, bootx64.efi file and grubx64.efi file -> moves into grub bash terminal. (there are no errors presented at any time during this process)
Thanks!
Turns out I just needed to re-install the shim.signed file and now it works with secure boot enabled just fine.
@William,
Sorry for the late answer…lately we are extremely busy and we no much time left to work on the blog… we hope that this will get better in the coming weeks 🙂
Happy to see that you have fixed your issue…..
Till next time
See ya
HI,
I need support to buil Ubuntu 20.04 PXE server to deploy windows os.
previous tuturials do not work. I have found this in which works very well for linux, but I would like to use the same structure but to deploy windows os. (Win 10).
Can someone support me on this please?
Regards,
@Edgar,
thank you for visiting our blog and sharing your questions and Comments….
First thought to come into our mind… why would you not use Microsoft Technology instead (something like MDT software which is free and actually quite usable)
Second thought -> have you investigated existing Linux solution like FOG project…. ?
Finally, if you really want to create your own solution, you would first need to install Samba server on your pxe server (or infrastructure). The samba server will ensure that you windows client can access the shared folders.
Then you will need to upload Winpe files on your pxe server and adapt your pxe menu…
if some readers have detailed instructions, please share some links… thank you
Hope this help
Till next time
See ya
Hi! Can you please tell me how to install Windows10 iso via Grub2 ?
@Max,
Thank for visiting our blog and providing some feedback. We actually never needed or tried to boot windows 10 iso from Grub 2
We have found some instructions on the web (see: https://www.linuxbabe.com/desktop-linux/boot-from-iso-files-using-grub2-boot-loader). This might help you
At the moment, we are still overloaded and we have not much time to post new stuff…When time permit, we could give it a try and provide a step by step guide
Till next time
See ya
Hi, I am new to Linux and am trying to follow through this example. I got all the way to step 1.5 where I used apt-get. My question is how do you know/figure out the “name of deb package”? I have tried following the link on the ubuntu webpage and can’t seen to figure it out. Thanks in advance!
@Eric,
Thank you for visiting our blog and sharing your questions with us. Welcome to Linux world ! .
so in step 1.5, let’s assume that have open your Terminal console and you have moved to the Downloads Software (i.e. cd ~/Downloads).
When you issue the command apt-get download shim.signed, you are basically downloading the shim package.
if you look into your Downloads folder, you should see a package available looking like grub-efi-amd64… This file has a .Deb extension.
This is the name of the file you need to pass in the command dpkg -x <%name of the package%> grub
In your Terminal console, in the directory where you have dowloaded the package, type the dpkg -x grub and use the autocomplete function by using the tab key
You would do the same for shim package
you can also check this post where you can see a screenshot (https://c-nergy.be/blog/?p=13334) with the packages
hope this help
till next time
see ya
Guess that in /tftp/bios/pxelinux.cfg/default should be “kernel /boot/casper/vmlinuz”, or copy vmlinuz and initrd into /boot/
@Serg,
Thank you for visiting our blog and sharing your findings ! indeed the path for the kernel should be /boot/casper/vmlinuz… We have corrected the typo and the missing information..So check again the information provided, give it a test and provide feedback….
Hope this help
Till next time
See ya
looks like a killer config – but , what if you already have DHCP on your router and you do not want to conflict with a DHCP on UBUNTU?
Do you have the CONFIGURATION for doing this with the Network providing DHCP?
@JoeAdmin,
Thank you for your feedback and for visiting our blog. Usually, you should avoid to have multiple dhcp server serving the same subnet. When we perform pxe deployment, we are using a dedicated subnet
you can always modify the configuration to have your DHCP (the router) and setup TFTP server on your PXE server….This configuration is possible….
Hope this help
Till next time
See ya
I deploy Ubuntu 20.04 UEFI on vamware, and it will prompt an error: file /tftp/casper/initrd not found
But the BIOS is OK
@Bruce,
Thank for visiting our blog and sharing your findings…
We have to look into this but we have not much time…at the moment…. we will need to retest that and see where the problem can be..
thanks for your patience
till next time
see ya
In UEFI, the menu loaded, then when loading the image I get an error: trying netboot from 192.168.0.165……….. /cdrom Connection time out.
In legacy, everything hangs on tftp ….. (I tried it in various ways)
@Laroslav,
Thank you for visiting our blog and providing some feedback.
Ok, for this one, not sure… have you unmount any cdrom on the server hosting the TFTP server ? We will need to check this but it will take us some time since we are overloaded and holidays are there as well
till next time
See ya
Hello Griffon,
I’ve a problem with start boot image, not start.
When click “Ubuntu Desktop 20.04” return in this screen.
Please help me understand the problem.
Thank you.
@Riccardo,
Thank you for visiting our blog and providing some feedback.
First guess…. some errors in your grub.cfg or pxelinux.cfg or you are missing important files (boot or image files…)
You do not provide enough information about your problem… Have you followed the step by step guide, is the problem related to BIOS or UEFI ?
Can you share your grub.cfg and/or your pxelinux.cfg file to see what’s inside ?
Till Next time
See ya
this step confuses me
mkdir ~/Downloads/syslinux
peno@pxeboot:~$ mkdir ~/Downloads/syslinux
mkdir: cannot create directory ‘/home/peno/Downloads/syslinux’: No such file or directory
@Peter ,
So, mkdir ~/Downloads
and then mkdir ~/Downloads/syslinux
Hope this help
Till next time
Hello,
Can someone add what steps are needed if you wanted to add another OS, Ubuntu Server, for example to this setup.
I can create the separate folder structure to hold the server files. Add additional lines in “exports file, default file and grub.conf file,” but think I’m missing something as the install fails.
Created additional directory for server initrd and vmlinuz ( /tftp/boot/casper/ubuntu-server ) not sure if that is correct thing to do.
Don’t understand how the following line comes into play if there is a second OS:
sudo ln -s /tftp/boot /tftp/bios/boot
Ideas greatly appreciated.
Joe
@Joe;
Thank you for visiting our blog and sharing your experience… To answer your question, you might want to check this “old post” (see https://c-nergy.be/blog/?p=13771) which might provide some useful information
Hope this help
Till next time
See ya