!! This information is outdated !!
Updated Information available at this location !!
Hello World,
As Ubuntu 19.04 has been released recently, we are revisiting our famous installation scripts and we are checking if any changes have been introduced since Ubuntu 18.xx that might affect xRDP functionality. To detect any possible changes introduced in Ubuntu 19.04, we have performed a manual installation of xRDP on top of Ubuntu 19.04 in order to see if any unknown behavior would popup. Performing a manual installation implies that you need to perform some post-configurations actions in order to have the best user experience. More specifically, additional actions are needed in order to show the same desktop interface to the user (look n’ feel).
These activities have been already described in the following posts
- xRDP – Manual Installation on Ubuntu 19.04
- xRDP – Fixing Look n’ Feel settings in Ubuntu 19.04 remote session
While tackling these activities, a minor issue has been detected that was not present when installing xRDP on top of Ubuntu 18.xx. Actually, the root cause (and the solution) are known as they are related to the Infamous Authentication Required dialog box within the Remote session. If you are following us for quite some time, you know that you have already explained this topic in some previous posts (check here).
This post should be quite short…… So, let’s move forward…..
Problem Explained
Describing the issue
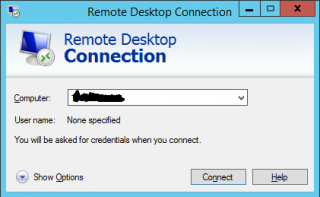
Let’s assume that you have performed a manual installation of xRDP on top of Ubuntu 19.04. You have performed the additional post-configuration tasks needed to have the same look’n feel when connecting locally or remotely on your system (see here). So, at this stage, you are ready to perform your first remote desktop connection. Start your favorite remote desktop client and enter ip address or host name
Click on picture for better Resolution
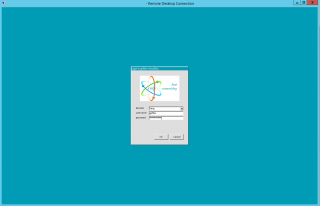
You might see some warnings dialog box. Accept them and then you should be presented with the xRDP login page. Provide your credentials
Click on picture for better Resolution
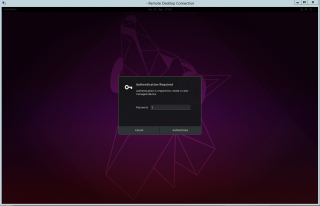
If your credentials are valid, you will be logged into the remote session but you will be immediately prompted with an Authentication Required to create managed color device popup box. Again, this behavior is expected and solution has been provided already in one of our previous posts (see here).
Click on picture for better Resolution
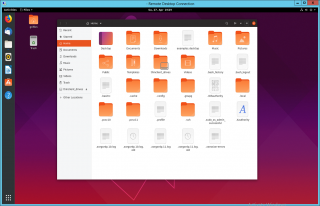
At this stage, you can decide to either pass your credentials or cancel the request. This will grant you access to the desktop interface through the remote session.
Click on picture for better Resolution
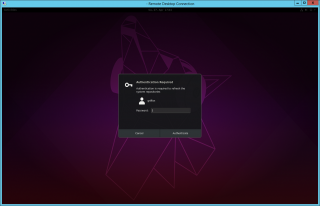
However, after some times, you should see another Authentication Required popup box asking permissions to refresh system repositories. Ok, this message is new and never showed up in Ubuntu 18.xx version…
Click on picture for better Resolution
The Solution
As described in our previous post, Ubuntu is using Polkit software solution that check if a user is authorized to perform such actions. When logged on locally, no popups are displayed because these actions (create managed color device or refresh system repositories) have been authorized. However, when we are performing a remote login and try to perform the same actions, the polkit configuration detect the remote login and might be blocking common actions performed by a standard user.
Multiple ways exists to bypass this Polkit authorization framework application. The recommended way consist of creating some additional files that would override the default authorization rules. In our famous xrdp installation scripts, to overcome the authentication required popup box for managed color device, we basically create a file and save it as 45-allow-colord.pkla and place it in the following directory (you need admin rights to copy files in this location !!)
/etc/polkit-1/localauthority/50-local.d/
We then populate the file with the following content
[Allow Colord all Users]
Identity=unix-user:*
Action=org.freedesktop.color-manager.create-device;org.freedesktop.color-manager.create-profile;org.freedesktop.color-manager.delete-device;org.freedesktop.color-manager.delete-profile;org.freedesktop.color-manager.modify-device;org.freedesktop.color-manager.modify-profile
ResultAny=no
ResultInactive=no
ResultActive=yes
The configuration above only fixes the managed color device popup box. To bypass the system repositories refresh authentication popup box, we have to either create an addition file or update the file we have just created.
To keep it simple, we have added all the necessary authorization rules in a single file (i.e. /etc/polkit-1/localauthority/50-local.d/45-allow-colord.pkla). The content of the file should be similar to the one below
[Allow Colord all Users]
Identity=unix-user:*
Action=org.freedesktop.color-manager.create-device;org.freedesktop.color-manager.create-profile;org.freedesktop.color-manager.delete-device;org.freedesktop.color-manager.delete-profile;org.freedesktop.color-manager.modify-device;org.freedesktop.color-manager.modify-profile
ResultAny=no
ResultInactive=no
ResultActive=yes

[Allow Package Management all Users]
Identity=unix-user:*
Action=org.debian.apt.*;io.snapcraft.*;org.freedesktop.packagekit.*;com.ubuntu.update-notifier.*
ResultAny=no
ResultInactive=no
ResultActive=yes
When done, try to perform a remote connection and if everything works as expected, you should have access to your desktop with no Authentication Required Popups..You are basically ready to work 🙂
Final notes
This is is for this post !
We have been already explained and describe the issue and the solution for the Authentication Required Popup. We have described the process on how to fix it in the following two posts already
- xRDP – The infamous “ahtnetication Required to Create Managed color device explained
- xRDP – How to fix the infamous system crash popups in Ubuntu 18.04 (and previous version)
However, a new Authentication required popup seems to be displayed when using Ubuntu 19.04. Because the issue was known, it was quite easy to provide the workaround. The most difficult part was to get the correct code to avoid this popup to show up after a remote login. A minor issue that has been tackled easily
Voila ! The issue is solved and it’s time to go and relax
Till next time
See ya
Thanks for the great guides.
@Doug,
Thanks for the positive feedback and the visit. We are happy to share our finding about xRDP and we hope that this is somewhat useful to others
Till next time
See ya
how can I access the software manager as it is not allowing me permissions. This is also same with other admin tasks like modifying users for example.
Please let me know if anyone else having similar issues?
@Kamrul,
This is a known issue that seems to occur on a random bases… Sometimes it works sometimes it fails…. depends Ubuntu version we are running…
The easiest fix I can offer you is to run the following command from Terminal
sudo gnome-software
This will start the software center in admin mode and you should be able to perform your installation
You can also perform installation from command line using sudo (ex. sudo apt-get install “radio-player”
Hope this help
Till next time
See ya
1) Thanks a lot for your job, you bring a very important mission because many processes depend on the xRDP.
2) How can I subscribe for Your blog?
3) Do you plan to analyze other ways of remote access? For example, the native way for remote access to a server is SSH+X11 forwarding. It works perfectly at Linux<=Limux configuration. But I have not been able to launch Windows<=Linux configuration normally.
4) Do you offer paid consultations?
@Kamrul,
For your information, this issue can be fixed by following the information provided in the following post (http://c-nergy.be/blog/?p=14051)
Hope this help
Till next time
See ya
Great Bro,
It worked Really.
Thanks
Abhishek Sharma
this didn’t work for me in Ubuntu 23.10
@HelloMihai,
Thank you for visiting our blog and providing feedback.
First… what are you trying to fix ? Color Device Popup or Refresh Repositories Popup ?
Second, as the title of the post shows, the tips is valid for Ubuntu 19.04… and tackle specifically the system repository refresh….
Ubuntu 23.10 has updated the pkaction version and you should know use .rules files (and not .pkla files) in order to create your polkit exceptions.
Please have a look at this post that explains the issue in Ubuntu 23.10 (see https://c-nergy.be/blog/?p=19242) and provides some hints on how to create your rules files….
Hope this help
Till next time
See ya