Hello World,
In this previous post, we have demonstrated how to install and configure a PXE infrastructure that can be used to deploy Ubuntu Server edition through the network. The previous post presented really a quick way to get you started. After playing around with Ubuntu Server deployment through PXE infrastructure, one of the next steps would be to try to do the same with Ubuntu Desktop image. Surprisingly, the process to achieve this was not that straight forward.
So, let’s see what’s different between Ubuntu server and Ubuntu Desktop when deploying them through PXE…..
IMPORTANT NOTE
In this post, we will continue our journey into the PXE installation process but this time for Ubuntu Desktop Edition. In order to follow the instructions described in this post, you will need to go through this post which describes which software components and packages are needed to setup a PXE infrastructure.
Overview
Deploying Ubuntu Desktop through PXE is not that straight forward as we thought. Googling around, we have found out that apparently a lot of people have tried to perform such operations but didn’t really succeeded. There are even bug reports in the Launchpad (see for example here).Based on all the information we have gathered, we have been able to perform such operation. So,let’s move to hands on activities….
Assumptions
To have a working solution, we are assuming that
- a single computer hosting DHCP,TFTP,PXE and storage services is already present on your network
- the pxe computer has been configured based on the instructions found in our previous post
- Ubuntu 18.04.x Desktop will be deployed through PXE. You have an Ubuntu 18.04.x valid iso file
- Only BIOS computer will be able to connect to the PXE server and start the installation (no UEFI yet !)
- You have internet connection in order to download necessary packages
So, if you meet all these requirements, we can move to the next section…
Step by Step Guide
Step 1 – Build up your PXE Infrastructure
Again, as a reminder, before proceeding here, you will first need to follow the instructions found here in order to setup the appropriate PXE Infrastructure
Step 2 – Copy Ubuntu Desktop Install file to your local repository
Based on the setup explained in our previous post, we are ready to copy the necessary Ubuntu Desktop installation file in our PXE Repository infrastructure. By default, we are using the /var/www/html location as our repository and where we place our installation files.
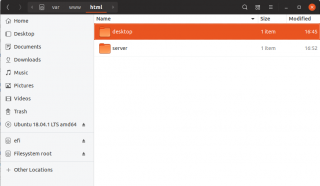
It’s important to have a clean directory structure. This is why we have created the following sub folders (screenshot)
Click on Picture for Better Resolution
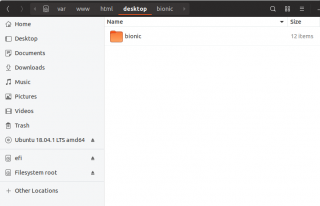
The server folder will contain Ubuntu Servers installation files. For each Ubuntu release, a dedicated subfolder will be created within this folder. The desktop folder will contain Ubuntu desktop installation files. For each Ubuntu release, a dedicated sub folder will be created within this folder. In the screenshot below, we have at the moment only one sub folder called bionic… You’ve got the idea….
Click on Picture for Better Resolution
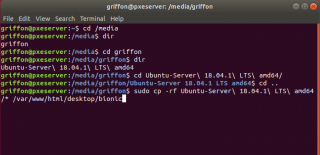
At this stage, you can mount the Ubuntu Desktop iso image into your computer. When the image is mounted, you can navigate to the location where the installation files are located and you can copy them in the correct folder under your /var/www/html/desktop/bionic (in our example)
Click on Picture for Better Resolution
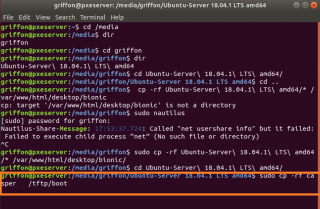
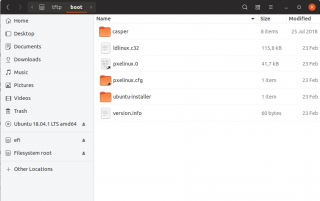
Step 2 – Copy additional Boot files in TFTP Directory
Click on Picture for Better Resolution
Click on Picture for Better Resolution
Step 3 – Install NFS packages
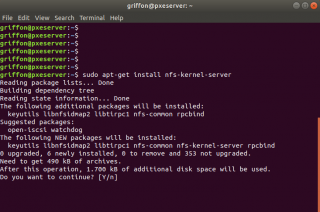
To be able to deploy Ubuntu desktop, you will need to install the nfs-kernel package on top of what has been provided in the previous post. To install this package, you simply execute the following command in a terminal console
sudo apt-get install nfs-kernel-server
You might be prompt to confirm your choice. Proceed and wait for the operation to complete
Click on Picture for Better Resolution
Step 4 – Configure NFS packages
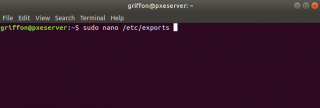
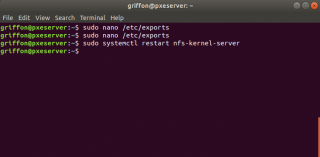
Now that we have a file service available through the NFS protocol, we need to ensure that the directory is made available through the network. To achieve that, we will need to edit the /etc/exports file.
Click on Picture for Better Resolution
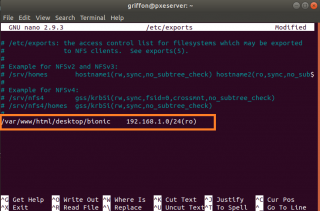
Insert at the bottom of the file, the path where you have stored your installation files, which subnet can access it and which kind of right you want to grant. In the screenshot below and based on your scenario, we want to make the path /var/www/html/desktop/bionic available to the network subnet 192.168.1.0/24 and we want to grant read only access (ro)
Click on Picture for Better Resolution
When this has been done, it’s time to restart the nfs service. To do that, you simply execute the following command
sudo systemctl restart nfs-kernel-server
Click on Picture for Better Resolution
Step 5 – Edit the pxe configuration files
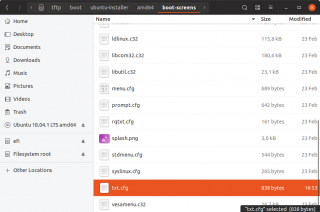
This is the final step of our configuration. Now, we have to modified the pxe files in order to tell the system where to find the correct file when trying to boot Ubuntu Desktop from the network. We will need to modify a file called txt.cfg located under /tftp/boot/ubuntu-installer/amd64/boot-screens
Click on Picture for Better Resolution
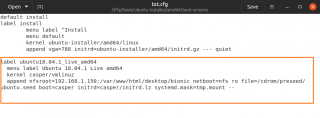
You will have to append the following text at the bottom of the file
label ubuntudesktop
  menu label Ubuntu Desktop 18.04 Live
  kernel casper/vmlinuz
  append nfsroot = 192.168.1.150:/var/www/html/desktop/bionic netboot=nfs  ro file=/cdrom/preseed/ubuntu.seed boot=casper initrd=/casper/initrd.lz systemd.mask=tmp.mount --
Click on Picture for Better Resolution
Finding these commands was the most difficult part of this post. We had to look in a lot of location and a lot of googling. Actually, some of the commands can be found in the /boot/grub.cfg (if you are interested)
Test your configuration
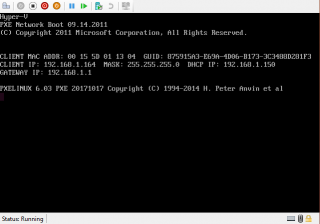
It’s time to test this configuration. So, we have used a virtual machine and configured to boot from the network card. As you can see in the screenshot, the client is receiving an IP address leased by the DHCP Server and the PXE connection starts….
Click on Picture for Better Resolution
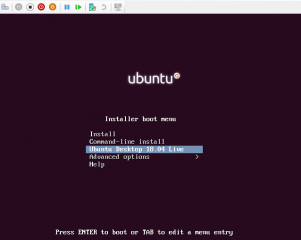
Again, you will see the familiar Ubuntu installation menu. However, because we have modified the txt.cfg file, we can see the additional option in the menu. So select the option Ubuntu Desktop 18.04 Live option and wait for the system to boot into the live system
Click on Picture for Better Resolution
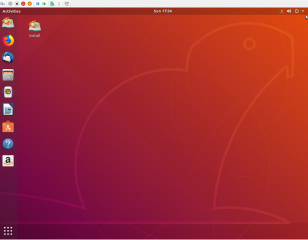
After some time and if everything goes fine, you should see the familiar desktop interface that is presented to you when starting the installation process.
Click on Picture for Better Resolution
To proceed with the installation, simply click on the desktop icon Install and again the well known installation wizard will be displayed and you can proceed with your installation…
Final Notes
This is it ! When you know exactly which commands you have to execute and where to place the files, performing a pxe installation for Ubuntu server or desktop is not that complicated. At this stage of our journey, we have only covered the foundations of pxe network installation. If you need to mass deploy ubuntu operating system; you might want to automate the installation process as well so you can have something useful within your network. We might cover these topics in some future posts…we do not know yet
Hope you enjoyed this post
Till next time
See ya
How to install Linux Mint 19.1?
@Olamar,
We didn’t test this process against Linux Mint but I would guess the principle and technologies described in this post should be applicable to Linux Mint 19.1 as its (still?) based on Ubuntu
So technically, you can follow this step by step guide and simply replace Ubuntu files with Linux Mint files
Hope this help
Till next time
wired unmanaged shows after installing ubuntu desktop from pxe server. What may be the issue.??
@Jena,
didn’t got this issue… might need to check the config file
/etc/NetworkManager/NetworkManager.conf and check if at the line managed, you have the correct value…..
Try this and see if this could help you
Till next time
See ya
Hi,
I’m Murugan. I’ve followed your instruction to install ubuntu desktop via pxe method. but i’m end up with error like, “nfsmount: need a path” on the booting terminal.
Below is the my default pxe config.
label ubuntudesktop
menu label Ubuntu Desktop 18.04 Live
kernel casper/vmlinuz
append nfsroot = 192.168.1.193:/var/www/html/desktop/bionic/ netboot=nfs rw file=/cdrom/preseed/ubuntu.seed boot=casper initrd=/casper/initrd systemd.mask=tmp.mount —
I’m very much sure, there is nothing wrong in nfs setup. I’ve tested it.
please help me to find cause of the issue.
@Murugan;
This is is your entry
label ubuntudesktop
menu label Ubuntu Desktop 18.04 Live
kernel casper/vmlinuz
append nfsroot = 192.168.1.193:/var/www/html/desktop/bionic/ netboot=nfs rw file=/cdrom/preseed/ubuntu.seed boot=casper initrd=/casper/initrd systemd.mask=tmp.mount —
This is mine entry
label ubuntudesktop
menu label Ubuntu Desktop 18.04 Live
kernel casper/vmlinuz
append nfsroot = 192.168.1.150:/var/www/html/desktop/bionic netboot=nfs ro file=/cdrom/preseed/ubuntu.seed boot=casper initrd=/casper/initrd.lz systemd.mask=tmp.mount —
I see small difference in the way you are trying to pxe boot…. Try to use the command as mentioned in the post….. and see if this is working….
Check also your exports file to be sure that you have put the right command into it
Hope this help
Till next time
See ya
@Griffon
Thank you very much for coming back to me.
As you said, I changed and tried the txt.cfg but facing same nfs mounting issue at the pxe boot up.
label ubuntudesktop
menu label Ubuntu Desktop 18.04 Live
kernel casper/vmlinuz
append nfsroot = 192.168.1.193:/var/www/html/desktop/bionic netboot=nfs ro file=/cdrom/preseed/ubuntu.seed boot=casper initrd=/casper/initrd systemd.mask=tmp.mount —
—->
You are right. Yes, I did some small changes. It’s because, there is no named “initrd.lz” in the ubuntu 18.04.3-desktop iso( only “initrd” file ).
please have a look at the ubuntu iso folder below:
-bash-4.2# ls
boot casper dists EFI install isolinux md5sum.txt pics pool preseed README.diskdefines ubuntu
-bash-4.2# ls -al casper/
total 1990848
dr-xr-xr-x 2 root root 4096 Dec 26 19:17 .
drwxrwxrwx 11 root root 4096 Dec 30 12:32 ..
-r–r–r– 1 root root 59785 Dec 26 19:17 filesystem.manifest
-r–r–r– 1 root root 2905 Dec 26 19:17 filesystem.manifest-minimal-remove
-r–r–r– 1 root root 4211 Dec 26 19:17 filesystem.manifest-remove
-r–r–r– 1 root root 11 Dec 26 19:17 filesystem.size
-r–r–r– 1 root root 1987817472 Dec 26 19:17 filesystem.squashfs
-r–r–r– 1 root root 916 Dec 26 19:17 filesystem.squashfs.gpg
-r–r–r– 1 root root 42008003 Dec 26 19:17 initrd
-r–r–r– 1 root root 8707832 Dec 26 19:17 vmlinuz
NFS config:
—————
-bash-4.2# cat /etc/exports
/var/www/html/desktop/bionic 192.168.1.0(ro)
-bash-4.2# exportfs
/var/www/html/desktop/bionic
192.168.1.0
please help m to fix the issue. Thanks Again
@Murugan,
will try to come back to you with some more info…. I would needs some time before replying back to you.. expect an answer/questions within the next 5-10 days…. (We are working on projects and opportunities for 2020…)
Till next time
See ya
@Griffon
Thanks!.
Take your time. I’m waiting for your reply.
the txt.cfg lines aren’t correct.
these worked for me:
label ubuntudesktop
menu label Ubuntu Desktop 18.04 Live
kernel casper/vmlinuz
append nfsroot=192.168.2.1:/var/www/html/server/bionic netboot=nfs boot=live boot=casper initrd=/casper/initrd systemd.mask=tmp.mount —
@Murugan,
Based on your issue regarding pxe linux and Ubuntu Desktop, we have been able to reproduce your issue and to fix it 🙂
As crazy as he might sound, if you are using the following entry in the txt.cfg file
label ubuntudesktop

menu label Ubuntu Desktop 18.04 Live

kernel casper/vmlinuz

append nfsroot = 192.168.1.193:/var/www/html/desktop/bionic netboot=nfs ro file=/cdrom/preseed/ubuntu.seed boot=casper initrd=/casper/initrd systemd.mask=tmp.mount --
You will need to have the Ubuntu Desktop CD Rom mounted in your PXE SErver (See the part with file=/cdrom)…So we are guessing that you have no UBuntu CD rom mounted on your PXE SErver…..
To fix the issue, simply modify the entry using one of the following option
label ubuntudesktop

menu label Ubuntu Desktop 18.04 Live

kernel casper/vmlinuz

append nfsroot = 192.168.1.193:/var/www/html/desktop/bionic netboot=nfs ro boot=casper initrd=/casper/initrd systemd.mask=tmp.mount --
or as suggested by another reader……
label ubuntudesktopmenu label Ubuntu Desktop 18.04 Live
kernel casper/vmlinuz
append nfsroot=192.168.2.1:/var/www/html/server/bionic netboot=nfs boot=live boot=casper initrd=/casper/initrd systemd.mask=tmp.mount --
if you still want to use the ubuntu.seed file, you can try to replace the file part with a path location accessible from the network (nfs or http)
Give it a try and provide feedback please (so we can update the post and provide the missing piece of information 🙂 )
Hope this help
Till next time
See ya
@Rui,
Thanks for the feedback and for sharing info with us
I would not say that the txt.cfg lines are not correct…. Indeed, these lines are valid if certain conditions are met…
These lines are working as long as the Ubuntu cd is available and mounted on the pxe server…
So, I would say that the information provided in the post was not complete and we will update it in order to reflect the necessary changes to be provided….
Again, thank you for the sharing your findings and helping us in providing improved solutions and guidances 🙂
Till next time
See ya
@Griffon and @Rui
Thank you so much for your inputs on this setup. I would like to have some more knowledge on the PXE setup, so could you please share me some documents/links.?
Email: cmurugan@mcci.com
FYI, All the three methods are working fine.
Thanks!
@ Griffon
I want make sure one thing that please avoid spaces between nfsroot and nfs path” append nfsroot = 192.168.1.193:/var/www/html/desktop/bionic ”
so it should be ” append nfsroot=192.168.1.193:/var/www/html/desktop/bionic”
@Griffon
Step 2 – Copy additional Boot files in TFTP Directory :
At step 2, you are using ubuntu server’s netboot files for ubuntu desktop ; is it correct?
How can we setup this netboot files for multiple ubuntu dektop pxe installation?
Thanks!
@Griffon & @Murugan,
+1 for step 2 issue as proposed by Griffon.
I thought this was typo so I used desktop image files instead, but no response after type “Enter” on the boot label. Is it because I copied wrong files or other issues?