Hello World,
I’vn’t got much time to play around with Proxmox VE lately but still I managed to find some to experiment something. As you probably know, it’s possible to install and boot a system from usb stick when using software like VMware ESXi or Hyper-V. I was wondering if this would be an option with Proxmox VE. Guess what ? Yes, it’s possible to have a “portable” Proxmox VE environment on a USB stick. You wanna know how….. follow the guide : -)
Why ProxMox VE on a USB
Some people might be wondering why would you bother installing and booting Proxmox VE. I can see some situation where this approach would make sense.
Imagine you would like to test Proxmox VE but you do not have available hardware. You can perform some tests by creating a virtual machine and loading the Proxmox VE software on it. (see this post to create hyper-v Proxmox VEVirtual machine). With a virtual machine, you can perform quite a lot of test and get a grip on the product. However, you will not be able to test KVM virtual machines functionalities… A workaround would be to boot from a USB Stick on a capable hardware and perform some of these tests.
Other situation…You have already some computers configured with an operating system or with another Hypervisor like ESXi. You would like to keep the existing environment but still perform some tests with Proxmox VE. Here again, you could simply boot your machine from your magic PVE USB Stick, perform your tests and when it’s done, you can simply go back to your existing infrastructure… This would be cool huh !
The really cool thing is that not too difficult to load Proxmox VE on a USB stick.
ProxMox VE on a USB – My Way
To create this Proxmox VE Usb Stick (PVE_on_USB), you would need
- a USB stick that big enough to hold the Proxmox VE software. I would recommend a USB Stick of minimum 8 GB.
- VirtualBox software (or equivalent) to create the USB bootable Stick
Using VirtualBox, I’ll be creating a Virtual Machine that will allow me to create a “generic” USB Stick.
Step 1 – Create your Virtual Machine
I quickly provide hereafter the settings I’ve used to create my virtual machine using Virtualbox. These are the big steps…
Note : I’m assuming you have experience with VirtualBox Software and that you have installed the software on your environment
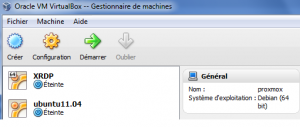
Step 1 – Click on the Virtualbox icon
Step 2 – The program opens, on the menu bar, click on Create button… A Wizard will start
click to Enlarge Picture
Step 3 – In the Create a New Virtual machine Wizard Welcome page, press Next
click to Enlarge Picture
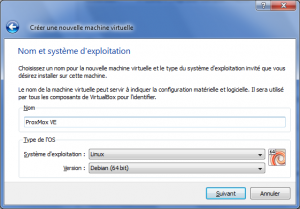
Step 4 – In the Type of OS and Version, select Linux and be sure to Select Debian 64 bit version. Press Next
click to Enlarge Picture
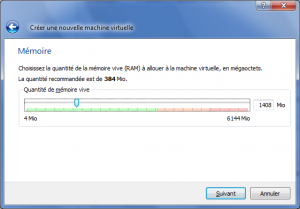
Step 5 – Provide the amount of ram the virtual machine should have (based on your requirements/resources)
click to Enlarge Picture
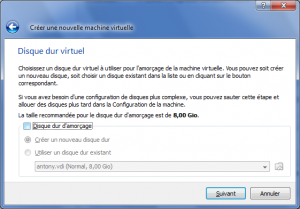
Step 6 – In the Virtual Disk Page, untick the checbox. We do not want to have any vitual disks associated to this virtual machine….
click to Enlarge Picture
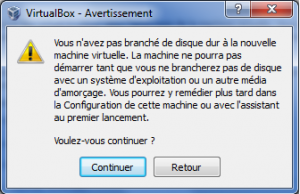
Step 7 – You will get a warning stating that no disks are present. Press Continue
click to Enlarge Picture
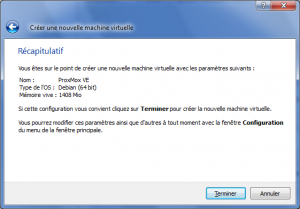
Step 8 – In the Summary page, Simply click finish
Step 2 – Configure your USB Port within Virtual Machine
Step 1 – Plug in your usb stick on the physical machine
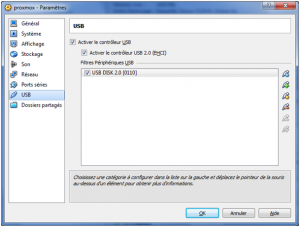
Step 2 – In the Virtual box software, select the newly created virtual machine, right-click on it and select configuration. Click on USB link. You will see a page similar to the screenshot.
Step 3 – Click on the Add Button and select the usb stick that will be used to hold the Proxmox VE software
Note : You might receive a warning stating that you need to download the Oracle_VM_VirtualBox_Extension_Pack-4.0.8-71778 software. You need this software to enable USB capabilities within VirtualBox. So, yes, you need to download it and install it
click to Enlarge Picture
Step 3 – Install Proxmox VE within the Virtual machine
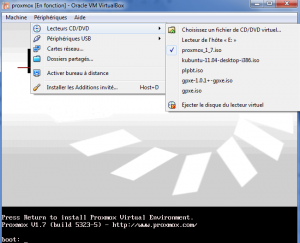
click to Enlarge Picture
At this stage, you simply perform a standard Proxmox VE installation (instructions can be founded here)
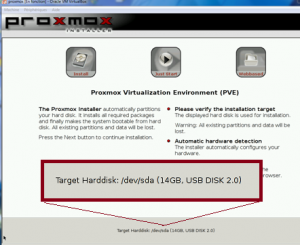
When the Wizard will ask you which disk to format (because we have not specified any virtual disk), the only disk available will be the USB Stick
click to Enlarge Picture
At the end of the Wizard, you will be asked to reboot the virtual machine. Simply shut down your virtual machine, your PVE_on_usb is almost ready to be used.
Caution !!
Some of you might be wondering why I’ve used a virtual machine to build up my PVE_on_Usb. To have the GRUB Boot manager installed on the Usb stick and not on a hard disk. If you perform a Proxmox VE on a physical computer loaded with an operating system, the PVE installer will overwrite the existing boot manager (Windows or Linux). By using the Virtual machine, I’m avoiding this issue. Another option would be to “disable” the disk from the bios and have only the usb stick visible from the PVE Installer. A Third option is to tweak the Grub manager to display your other operating system. That’s up to you !
Final Steps & Tweaks
It’s time to test your PVE_on_USB stick… So, you plug it on your physical machine and you boot from the USB stick.
The first time you boot your system you will probably get an error message similar to the following
Gave up waiting for root device. Common Problems:
– Boot args (cat proc/cmdline)
– Check rootdelay= ……
– Check root= …..
(…..)
can’t access tty…..
(…)
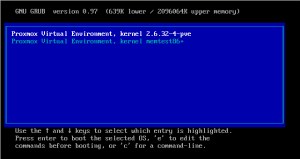
click to Enlarge Picture
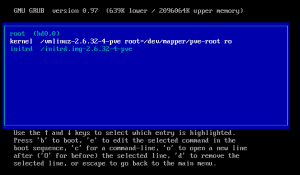
You will land in a command line environment similar to the screenshot below. here you can update the information of the grub file
click to Enlarge Picture
In the command line environment, you simply add the following text at the end of the line rootdelay=90. On my system, I have adjusted the value to 60 and it’s working, you have probably to make your own test
click to Enlarge Picture
Press Enter
In the returning screen, you can simply press the b key (on your keyboard) and you will see your PVE_on_Usb booting successfully….
Note
To make the change permanent, after your system has booted successfully, you can edit the file /boot/grub/menu.lst and perform exaclty the same changes you have performed manually here above (adding rootdelay=<%value%>
Final Words
Nervertheless, I think that this approach give a lot of flexibility. I’ll probably perform some additional tests and try to build a test Proxmox VE Infrastructure based on Usb Stick + Centralized storage for the VM’s (Iscsi or NFS) and see if performance wise, this would be acceptable. I would recommend not to use this approach in a production enviromnent….but only in a test environment.
If you test this, let me know if it’s working for you…..
Till Next Time
See ya



Very cool! What I would like to do is to actually run Proxmox permanently on from a USB key, even if I have other drives in the system. Similar to how VMware’s ESXi runs. However, if doing so, I would need to modify the local VM storage point, moving the mount point of locally stored VMs to my RAID array. A follow-up tutorial of how to do that, would be great. 😉
Hello Martin,
Thank for the feedback. As soon as I will have some spare time, I plan to publish additonal information about this topic… Currently working abroad…so might take some time
See ya
Hi
thanks for the instructions. Just a quick addition, as of ProxmoxVE 2.1, which uses Grub2, the file to change is /etc/default/grub, and the line to modify is
GRUB_CMDLINE_LINUX=””
to
GRUB_CMDLINE_LINUX=”rootdelay=60″
the booting instructions stay the same. Thanks a lot!
Hey Asmo,
I didn’t checked this setup with Proxmox VE 2.1. indeed
Thank you for sharing the tip with Us
Till next time
see you around : -))
That’s what I’ve been looking for. But I readed that it’s not a good idea because all the r/w operations and it will fall in a usb fail after a few months. How do I install proxmox on usb drive in a reliable way? I’ve thinking in install all on USB, and only the swap partition on raid.
What I want is to let all (or almost) storage for a LVM and VM images. Can I do this in a production enviroment? or is it a bad idea?
Hello Julio,
I’m using Proxmox VE on usb stick only on test and lab environment. This is true that you will have a lot of read/write activities on your USB Stick. To mitigate the risk, I usually put only the PVE software on the stick and place the Virtual machines on a different storage infrastructure (NFS or isci)
So far, I didn’t break my usb stick and I’m still using this technique to test some Proxmox VE features
Hope this help
Till next time
See ya
Thanks for your comments
So, If I install only PVE software on USB stick and let the virtual machines on local RAID Storage, Can I trust in this setup for production enviroment?
Hello Julio,
As I said, I’ve used this config mainly on test and lab environment and didn’t really encounter issues. However, if I had to implement this in production, I would ensure that I have a disaster recovery plan in case something goes wrong (i.e. somebody removes the stick from the machine)
IF the usb stick breaks, you should have a spare one ready to be used. Plus you should document your infra. The data on the stick would contain the PVE software but also the configuration files that your implementation is using .
If you want to implement that in production, I Strongly recommend you to first perform somes tests and validation activities and see if this is a viable option…
The interesting question I would have for you is :
Why do you want to put pve on a stick given that you have RAID storage ? The PVE software on itself will not consume a lot of disk space.
Hope this help
See ya
Hi Griffon,
I am interested too about running Proxmox VE on USB, let me explain one one interesting USE CASE.
Recently I installed Proxmox on a small disk, just to make it boot from there, and put an array of 2 disks (mirror). I planned to store all my virtual machines on the mirror.
Then my boot/root disk had problems, to fix this I had to reinstall proxmox to a new disk, and did a tricky/undocumented set up to mount the mirror on the new build and set up the virtual environment because, the virtual machines store some data on the mirror and some data on the boot/root drive.
There would be great to boot proxmox from USB and have the root and everything else protected on the mirror, so if the USB fails I can just change the USB Stick with a new one, and don’t have to reconfigure anything (I should have a spare, already prepared with the Proxmox USB boot on it).
I can have the same USB Stick copied for all my servers, because the configuration of a particular server is on it and on a protected array (mirror, raid, etc).
Actually I am using Native ZFS on Linux from this great article http://alexsluiter.com/blog/native-zfs-proxmox, just need this addition to make it perfect.
Thanks for your blog, and I will be waiting for your comments on this (if any).
See you
Jumping on ams0 response:
I had to use the trick in the article to boot the first time.
Then I modified /etc/default/grub (using vi), and the line to modify is
GRUB_CMDLINE_LINUX=””
to
GRUB_CMDLINE_LINUX=”rootdelay=10″
10 was more then enough for my usb drive to mount.
The only thing am0 was missing was to run “sudo update-grub2” at the end, to automatically modify your grub’s /boot/grub/grub.cfg
Hello There;
Thank you for sharing the info with us
Till next time
See ya
Hey Griffon,
I tried installing ProxMox 4.4 like you described but am booting only in emergency mode. Are you still using this setup with an updated ProxMox?
@Erik,
Have you read the important note at the beginning of post ? You should not use this method anymore and a new method has been described. On the Proxmox VE wiki page, they also describe the procedure to be used if you want to boot from usb stick
Hope this help
Till next Time
see ya
hello there 🙂
@Griffon : I would really be interested by the official procedure to boot from usb stick you mentioned, but I can’t find it… Are you sure you don’t mix install ON and install FROM ?
If the wiki page exist would you please provide the link because I made a lot of search, found nothing official 🙁
Thank you in advance
bests regards
@IpGenius,
No we are not mixing on and from…. You have two options
You can boot from a USB to perform the installation of proxmox ve (and you should find the official procedure on their wiki page – see https://pve.proxmox.com/wiki/Install_from_USB_Stick or you can use an aged post we wrote long time ago – see http://c-nergy.be/blog/?p=1628
The Post called install Proxmox Ve on a usb stick is the other option. With this post, we wanted to demonstrate that it was possible to have the proxmox ve software installed on a stick and run it from the stick. As far as I know, there is no official guide about that. If you have read the post carefully, we have mentioned that this procedure was possibly not supported by Proxmox VE Team
Hope this answer your questions
Till next time
See ya
hello please HELP !!!
i followed your instructions using proxmox 5 and installation went just fine! all good and started up in physical PC without even doing the trick for the GRUB.
But the main issue im having is that after i got to the command prompt, showing me the URL to access the GUI, the network configuration is a total MESS! since i did the installation in the VM ware, how in the world should I reconfigured EVERYTHING for proxmox to recognize the physical network card, the new IP , DNA, etc? please help !!
@Jhon Stone,
As long as you can boot from the usb stick and have access to the web interface, this means the installation worked properly…if you are having issues with networking, you will need to login at the console and edit necessary configuration files to configure your network cards. When this is fixed, you should be able to login to the web interface and adapt your configuration as required.
Possibly you can have a look at this post (http://c-nergy.be/blog/?p=498) and see if this could help you in going to the right direction
Hope this help
Till next time
I guess this is an old article, but as of 2022 this doesn’t work with Proxmox 7.2. Virtualbox no longer mounts the USB as /dev/sda so the Proxmox installer doesn’t detect it.