
Hello World,
Ubuntu 14.04 has been released on April 17th 2014 and we already released the traditional post about how to perform a fresh install. We didn’t covered the upgrade process because it’s quite easy nowadays. Basically, you will be notified that a new version is available and you will be asked if you want to upgrade to the latest version.
Some readers and some of my colleagues have been asking for a post about XRDP functionality in Ubuntu 14.04. If you follow me, you know that we have been using xrdp package in order to connect to linux machines using the built-in remote desktop client available within Windows Operating System.
You probably also know that since the introduction of Unity Desktop Interface in Ubuntu you need to tweak the configuration in order to have it working. The most annoying part while using xrdp (with Ubuntu) is the fact that you have to install an alternate desktop environment.
So, in this post, we will describe the steps needed in order to install xrdp and the xfce alternate desktop that will be used while remoting into your Ubuntu 14.04 machine.
Let’s Go !
Install XRDP Package from Ubuntu Repository
In this post, we will be installing the standard xrdp package from the Ubuntu Repository. In order to perform the installation of the xrdp package, you will login into your ubuntu 14.04 machine.
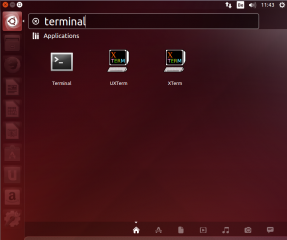
Using the Dash button, in the search box, type Terminal
Click on Picture for Better Resolution
Click on the terminal icon and the Terminal console will open
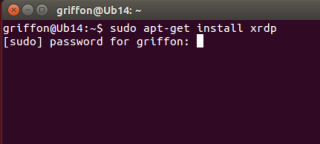
In the Terminal, type the following command
sudo apt-get install xrdp
You will be prompted for your password
Click on Picture for Better Resolution
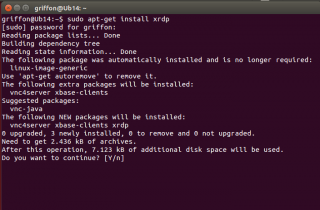
You will be then informed about the package size. To proceed with the installation, press Y
Click on Picture for Better Resolution
Wait for the completion
When done, you need to install an alternate desktop environment. In our scenario, we are using xfce4
Installing the xfce4 Desktop environment
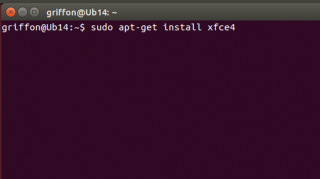
In the Terminal console; type the following command
sudo apt-get update
sudo apt-get install xfce4
Click on Picture for Better Resolution
You might be prompted for a password.Enter the password and press enter
You will be then informed about the package size. To proceed with the installation, press Y
Wait for the completion
Configure xrdp to use xfce desktop environment
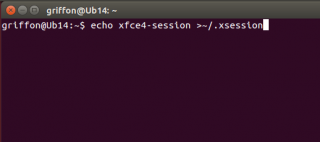
At this stage, you have to configure your Ubuntu machine in order for xrdp to know that the xfce desktop will be used instead of the Unity or Gnome (which are not working anymore in Ubuntu). To configure this, from the terminal console, you will issue the following command
echo xfce4-session >~/.xsession
Click on Picture for Better Resolution
Restart the xrdp service by issuing the following command
sudo service xrdp restart
Test your xrdp connection
At this stage, you should have a basic xrdp working solution. When I say basic, I mean that you can indeed connect to your remote Ubuntu machine but if you disconnect your session and try to connect again, you will each time open a new session. (Read below section in this post to see how you can reconnect to the same session)
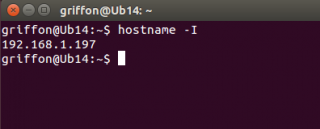
To test your xrdp solution, find the ip address of your linux machine (or use the name if you have DNS Infrastructure in place). To find the ip address, issue the command
hostname -I
Click on Picture for Better Resolution
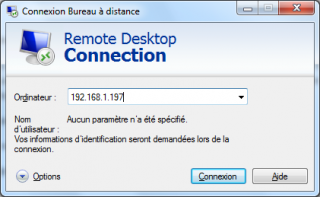
Now go to your windows machine, start remote Desktop client and enter the ip address/name of your ubuntu machine
Click on Picture for Better Resolution
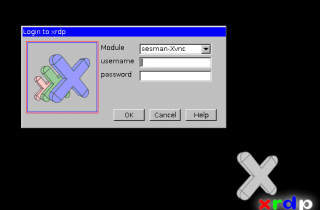
You should see then the login screen of xrdp presented to you. Note that, at this screen (and because we have not configured keyboard layout yet), the keyboard layout is set to English by default.
Click on Picture for Better Resolution
Enter your username and password and Press OK
You will see a dialog box showing the login process
Click on Picture for Better Resolution
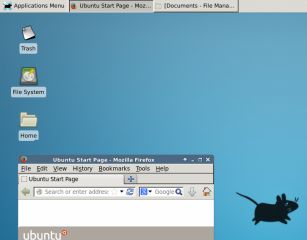
If everything is configured correctly,you should see your xfce desktop loading and you should be able to perform you work through this desktop environment.
Click on Picture for Better Resolution
To set Keyboard layout at the xrdp Login screen, perform the following steps
As explained above, with no special configuration, the xrdp login screen keyboard layout is set to english by default. if you need to change it to another keyboard layout, you should proceed with the following actions
This is the command you should issue in order to change the keyboard layout to be used during xrdp sessions…
Step 1 : You go to the /etc/xrdp directory
Step 2 : you issue the command setxkbmap -layout <%your layout%> to define which keyboard map/layout to use
Step 3 : create a copy of the km-0409.ini file into the same directory. It seems that this is the default file used by xrdp to define the keyboard layout. You will need to use sudo in order to be able to write into the directory
Step 4 : Check that you have a backup of your file by typing the dir or ls command
Step 5 : update the file by issuing the following command sudo xrdp-genkeymap km-0409.ini
Reconnect to the same session throug xrdp
You have mutliple ways to reconnect to the same session through xrdp. we have explained two of them. One method is based on performing a custom installation and use the X11VNC software. This is one is working well but requires a little bit more effort. (http://c-nergy.be/blog/?p=4168)
The other one is to use the xrdp package from ubuntu repository and tweak some configuration files whil connected to the session. This solution is really a workaround and it’s not our favourite one. (see http://c-nergy.be/blog/?p=4471)
Here, we will use a third method that can be used if you use the xrdp pakcage from the ubuntu repository. This method is much better than the one provided by us some time ago. In this method, we will tweak the xrdp login screen. We will add a field in the login box where the user can specify the port to be used when remoting to the ubuntu machine.
You will first need to edit xrdp.ini file located under the /etc/xrdp. To edit the file, issue the following command
sudo gedit /etc/xrdp/xrdp.ini
You might be prompted for a password. if this is the case, provide the password and Press enter
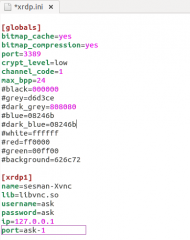
When the file is open, locate the section [xrdp1] and replace the following line
port=-1
with the line
port=ask-1
Save the file. The file should look like this
Click on Picture for Better Resolution
When done, restart the xrdp service by issuing the following command
sudo service xrdp restart.
You are done.
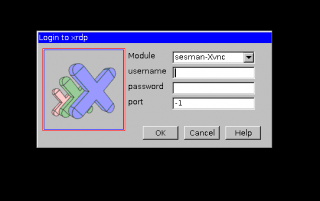
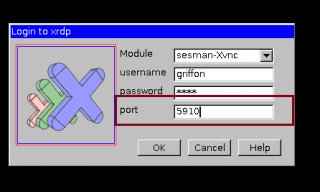
When trying to access your Ubuntu machine through via the remote desktop client, you will see that the xrdp login screen has indeed an additional field called port.
Click on Picture for Better Resolution
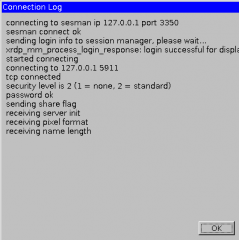
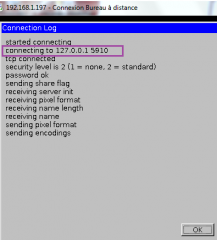
If this is your first connection, leave the default value in the port field (i.e. -1), you will be then connecting through xrdp to your ubuntu machine using a specified port that can be seen on the login process dialog box.
Click on Picture for Better Resolution
Take a note of this port.
When you need to reconnect, you will have to specify the same port as your first connection and you should see the same screen as you left it.
Click on Picture for Better Resolution
Note : This tip has been provided to us by one of our reader (Thank you Wei 🙂 )
This is it for this post. Using only the ubuntu xrdp package, we have been able to install and configure a remote access solution. By tweaking the xrdp.ini file, we even have been able to provide a simple and easy to use solution in order to reconnect to an existing session.
However, we still have a problem with xrdp used in conjunction with Ubuntu. In order to remote into your ubuntu machine, you have no other choice than using an alternate desktop environment (in our case its xfce). I find it quite irritating that we cannot have the xrdp package working with Unity or Gnome desktop environment.
We have installed fedora distribution and installed the xrdp package. And guess what ! I can connect through xrdp to fedora and have the gnome desktop environment working. Moreover, I can disconnect and when reconnecting I will be reconnecting to the existing session I just left. And all of this with no tweak in configuration files.
I would love to see the same functionality in Ubuntu. As one of our readers mentionned, it might be time for Ubuntu users to fill in a bug report about xrdp and try to have it fixed. If more and more users complains, maybe Ubuntu team will take the request into account.
Till next Time
See ya
Thank you !
it worked perfectly
Thank you for the visit
have fun with Ubuntu 14.04
Till next time
See ya
Typo. On line “sudo gedit /etc/xrdp/xrp.ini”, that should have been “xrdp.ini”
Thank for the remark….
We are correcting the typo
Till next time
See ya
Thank you so much! This post helped me a lot. Excellent.
Wow . . . finally somebody that seems to know what they are talking about. It has been a wild ride getting xrdp to work . . . I originally thought I’d be up in 15 or 20 minutes . . . half day later it finally works.
I wish it was my default desktop, but I prefer “works” to that stupid gray screen.
THANK YOU.
Frank
thank you for the visit
Indeed; it’s not the perfect solution but at least it works…
Till next time
See ya
Thank you for the post. Runs perfect.
Sorry. Nothing works at all. I still get halfway through the logging in process and then get an error telling that “cannot connect”. No clue as to WHY I can’t connect, just that I can’t.
Hello,
Can you provide a little bit more info in order for us to help you ?
Can you explain what you did ? have you followed the steps in this post ?
Can you have a look at the log files for xrdp (/var/logs/xrdp or something like this)
have you installed the xfce desktop ?
Have you performed an upgrade ?
Till next time
Hi, I’m able to log on remotely via windows RDC but all I get is a grey screen. Do you know why this might be?
Hi,
thanks for the description, it worked for me. I use a variant of your solution to reconnect to the existing session:
I created two sections in my xrdp.ini:
[xrdp1]
Name=First Connection
[…]
port=-1
[xrdp2]
Name=Restore Connection
[…]
port=5910
Now the user can choose if it is a new connection or if he wants to reuse the existing (first) connection. Some descriptions state that I could just define the port also for the first connection, but this does not work for me.
Peter
have you installed an alternate desktop kfce for example .
If you use the standard Unity or Gnome, you will have a grey screen
Hope this help
Till next time
See ya
Hello Peter,
Thank you for share the tip…It’s indeed a good idea but will work only if a single user is connecting through xrdp.
If you have multiple users accessing the linux box via xrdp, you will have multiple port in use (5910,5911,…)
Till next time
See ya
Obrigado
Thank you !
is perfectly
i did everything iqual, but when i try to connect from windows seven i had this error:
Connection Log:
connecting to sesman ip 127.0.0.1 port 3350
sesman connect ok
sending login info to session mananger ;
xrdp_mm_process_login_response:login successful for display startd connceting
connecting to 127.0.0.1 5910
error – problem connecting
ok
we will hava look on it and see if we can reproduce the error
please be patient as I’m abroad for some days
can you post the content of the sesman-log file (look at var/log/xrdp or sesman.log)
so we can investigate
till next time
see ya
Everything works, but terminal does not work when I remote in. Any ideas?
Thanks!
I have to use XTerm to work in the cmd line.
thank you
indeet there is a problem with the terminal and indeed the workaround is to use Xterm
thank for the visit and sharing your findings
till next time
see ya
no problem
thank for visiting us and sharing the fact that’s working as expected
till next time
see ya
This worked perfectly! Thank-you for a good write-up!
Good to hear
Enjoy your xrdp session with Ubuntu
🙂
Till next time
See ya
Hi,
Thanks so much for providing this write up, it helps me!
xrdp connection gray screen window
Hello there,
Can you explain what you did exactly,
Have you installed Xrdp ?
have you installed Xfce or LXDE or MATE Desktop on your ubuntu machine ?
have you configured your .xsession file ?
have you selected the correct option in the xrdp login box
can you check or post the ~/.xsession-errors.log and see what error you are getting ?
If you provide some more details, you might be able to help you out
Till next time
see ya
Hi
Thanks for solution!I succeded to connect from win7 client to unbunto 14.04 server with xrdp and xfce4 session. But it’s run very slow – both client and server on my LAN and it take about 10 sec between button press to response in server
Please assit
Michael
We didn’t encounter this issue. You can try to use another desktop interface (like mate or LXDE – check http://c-nergy.be/blog/?p=5382) and see if this solve your problem.
You can try to do a custom installation and use X11VNC which people says is more performant.
You can try to change the settings on the rdp client and change the network type and see if it goes better.
Hope this help
Till next time
See ya
How do I get the authentication window when installing software or changing settings to come up through the remote desktop?
hello Andrew,
that seems to be a limitation of xfce…if you login locally to your machine using the xfce interface, do you encounter the same issue ??
workaround : use command line and type sudo
or change desktop interface.. check
http://c-nergy.be/blog/?p=5382
http://c-nergy.be/blog/?p=5357
hope this help
till next time
see ya
I was using the Mate desktop environment instead. It did come up once, then stopped coming up after the first time.
For a not working Terminal (not XTerm), you can get it to work by: Settings -> Appearance -> Style, select style to, for example, Radiance.
Hello There,
Thank you for sharing the tip
till next time
See ya
I followed instructions and was able to make the first rdp connection. I noted down the port assigned to me, 3350, however when I quit rdp and tried to reestablish a connection I got the grey login log box but it hangs. the log window shows:
started connecting
connecting to 127.0.0.1 3350
tcp connected
has anybody come across this issue?
I think you are using the wrong port…
Please read the post again…. you port should be something that start with 591.
You are trying to connect to the port used by Sesman process.
You need to connect to the VNC port when you are prompted for it….
Again…. please read carefully instructions in the post. The pictures outline where to find the port to connect to…
Hope This help
Till next time
See ya
Thank you so much.
Your method was the only one that worked for me. I needed to be able to RDP to a GUI on my Droplet server with DigitalOcean. This did it. I spent at least 8 hours on other methods.
Thank you!
Happy to hear that the post is working…. 🙂
Thank for the visit and the feedback provided
Till next time
See ya
Great!! Thanks a lot for this detailed post…
No Problem…. happy to see that we can help people
Thank for the visit and the feedback
Till next time
See ya
Thanks a lot for the instructions.
I am trying to connect from my windows server 2012 to Ubuntu 14.04.
After loading the xfce desktop(selected default) I am able to see desktop environment but,anything on the terminal is not visible.
Opening the terminal is showing a blank screen.Could you please advise?
Thanks in advance.
Hello Venky,
One of our reader has suggested the following
For a not working Terminal (not XTerm), you can get it to work by: Settings -> Appearance -> Style, select style to, for example, Radiance.
The other workaround is to use the XTERM application instead of the Terminal
Till next Time
See ya
Hi Griffon,
Thanks a lot for sharing this!
I followed each steps and it did connect successfully. But the remote desktop showed up and closed in a couple of seconds. Could you please help with this?
Thank you very much!
Hello Linda;
Sorry for the late answser.. I was abroad working on a quite intense project….
Can you provide use a little bit info… Do you receive an error message ? Can you check the sesman.log and the .xsession.log files…
Check if you have any errors on there.
Which option are using using when performing the connection Sesman-X11Vnc,….
As last resort; I would try to use the procedure described here (http://c-nergy.be/blog/?p=5439)
Hope this help
Till next time
See ya
Hi Griffon,
I’m having the same issue as Linda.
Were able to login the first time, but the RDP window suddenly closed.
Tried to login again, and it showed up and closed in a couple of seconds, it doesn’t show any error it just close the window.
I’m using the Sesman-Xvnc option to login.
Tried to find the logs you mention, but couldn’t find it.
Thanks for your help.
Hi,
I followed this guide exactly and still get the same outcome as I had in previous guides.
I have a clean install of 14.04 and I am able to connect from Windows 8.1 but once connected I get a criss crossed or fuzzy screen depending on the resolution of the client computer with an X for a cursor.
The display drivers on the 14.04 machine are standard.
Thanks for your help.
hello,
please provide your log files as we cannot reproduce this error
check on ~/.xsession
and
/var/log/xrdp.log
till nest time
see ya
hello there,
are you sure you have installed an alternate desktop (xfce,mate,lxde…)
and are you sure you have configure the ./xsession file for the user who s trying to connect
please post your log file (in /var/log/ something like /var/log/xrdp-sesman.log or sesman.log)
post the ~/.xsession file as well
till next time
see ya
Hi Griffon,
Thanks for the guide.
I followed the first option step by step.. however, everytime i log in from win 7 i get following error
xrdp_mm_process_login_response: login failed.
Do you know how i can fix that?
thanks for your help
Hello There,
Option 1 – Password is incorrect
are you sure that the keyboard layout during xrdp connection is set to the correct one. By default, keyboard layout is set to EN-US. Type the password in the user line and check if the keyboard layout is IOK
Option 2 – Your user account is not part of the tsusers groups used by xrdp to grant rdp access
Option 3 – You have changed the password of the user account but the “old” vnc password is cached. In your profile, delete the .vnc file
option 4 – in the xrdp login page, try to use sesman-xvnc or sesman-X11RDP and see if you connect
Option 5 – we need to check the logs…check /var/log/xrdp and /var/log/xrdp-sesman. check also /var/log/auth to see if you have login error
check this post as well : http://linuxtoolkit.blogspot.be/2013/03/xrdpmmprocessloginresponse-login-failed.html
hope this help
till next time
see ya