Hello World,
It has been some time since my last post about Proxmox VE. I’ve been busy with other technologies and projects. The good news is that the ProxmoxVE team has made available a new release of their virtualization solution : Proxmox VE. This is the perfect opportunity for me to start writing about the product.
Yes, you read correctly ! Proxmox VE 2.3 is out and ready to use. Cool !
Upgrading to the lastest version
New to Proxmox VE
If you are new to Proxmox VE, you can download the latest version of the software at this location. If you look around this blog, you should find some information about how to install the software. Have a look at
Note :
If you do not have a 64 bit physical machine, there is a way to have proxmox ve running inside a virtual machine. This offer a good alternative to test/evaluate the product. You will be able to run kvm or OpenVz virtual machine inside your virtual Proxmox VE. Do not expect great performance. Again, this approach is only for evaluation the product and its features. Check this post to see How to run Proxmox VE in a virtual machine
Already using Proxmox VE 2.x
If you are already using Proxmox VE and you have a running infrastructure, you probably know that you can simply update/upgrade your infrastructure by downloading the necessary packages from the proxmox ve repository.
Upgrade your Proxmox VE installation – How To
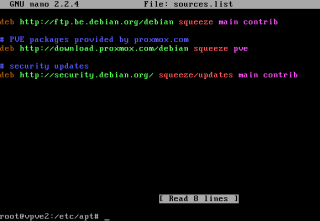
Based on the instruction found on the proxmox ve wiki, you will first ensure that you are pointing to the correct repositories. To check this, you will simply open the file sources.list located at /etc/apt. To see the content of the file, you can simply issue the following command :
nano /etc/apt/sources.list
If the content looks like this (see screenshot below), you should be good to go
Click picture for better resolution
Then, from a command line (via putty or via the console option in the web interface), you can issue the following command in order to update your repository and packages
apt-get update
Click picture for better resolution
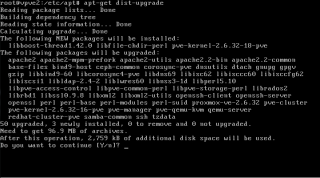
Finally, you are ready to perform the upgrade. To do this, you will simply issue the following command :
apt-get dist-upgrade
Click picture for better resolution
You might get prompted to confirm your choice. Press Y to proceed with the upgrade Process
Click picture for better resolution
When done, you should restart your Proxmox VE server in order to activate the new features
After the reboot, you can check that you are running the lastest version of the software by issuing the following command
pveversion -v
or by checking the version number via the web interface.
Click picture for better resolution
So, What’s new in this release
The Proxmox VE 2.3 does not seems to be a major release. However, this version introduces improved features that shows that the Proxmox VE team are still improving their products. We will summarize the most important improvement included in this version..
Bug fixes
As the previous releases, a number of bugs have been fixed in this release which make the product more reliable. If you are interested on the bug fixes, you can retrieve them on https://bugzilla.proxmox.com/
Updated Drivers
This version also includes a bunch of updated drivers for the hardware used by the Proxmox VE server. The latest drivers for the network cards, raid cards,… have been integrated in this version. This should allow proxmox ve to better detect and support more recent hardware components
Updated OS and kernel
This version of Proxmox VE will update the Debian operating system version. After the upgrade, you will be using the latest version (which is 6.0.7). the qemu kernel and the vzkernel have also been updated to the latest stable ones. The latest kvm kernel seems to bring better support for live migration and seems to work in more situation than before.
KVM Live Backup feature
Now, we can start to describe the visible changes brought by this release. The proxmox VE team as redesgined the backup/restore functionality in this release. As you probably know, you can perform live backups of a virtual machine. You do not need to shutdown the virtual machine, take a backup and restart the virtual machine. However, in the previous version, you needed to use LVM storage in order to benefit of the live backup functinality.
Proxmox VE 2.3 changes this behavior. Now, you are not limited to LVM storage anymore. You can use NFS,ISCSI, or distributed storage (i.e. CEPH or Sheepdog) and still be able to perform live backups. Moreover, the backup technology has been optimized as well (i.e. optimized for backing up VM files) which improves the backup time (faster backup). Remember that when performing a backup, you are performing a full backup
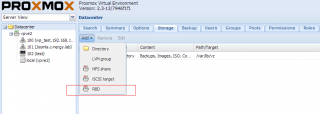
Add CEPH RBD (Rados block Devices) via the GUI
Proxmox VE team has added distributed storage capabilities into Proxmox with the version 2.1 (see this post). Proxmox VE team is currently working on integrating sheepdog and CEPH distributed storage capabilities into their product. In Proxmox VE 2.3, you will notice that you can add via the GUI RBD storage. However, note that you will still need to manually configure your CEPH infrastructure.
Click picture for better resolution
Click picture for better resolution
Distributed storage seems to be an important elements in any modern virtualization solution.
Small Changes in Interface when creating Virtual machines (KVM)
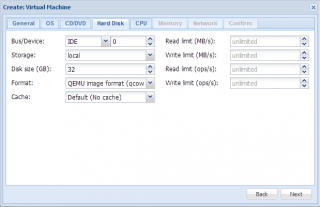
In this release, you will notice also some minor changes in the interface when creating new KVM machines. Basically, Proxmox VE 2.3 defines the new default settings that should be used when creating new VM. By default, the wizard will set the default format of the hard disk to qcow2. The previous verions were using raw format.
Click picture for better resolution
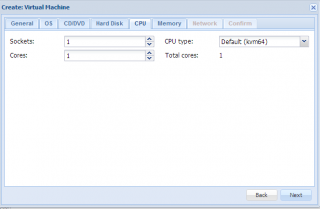
The CPU type has been also changed. By default, when using the create VM Wizard, you will be using the CPU type KVM64 (which seems to support modern cpu architecture). In previous releases, the default was qemu64 cpu type which was used because of its large compatibility base.
Click picture for better resolution
Memory Ballooning
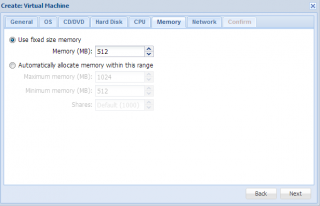
Dynamic management memory has become a standard in virtualization products. Memory ballooning (or dynamic memory management) is a feature that enable a guest machine to dynamically change it’s memory usage based on its load. If the machine is not using memory during run time, this unused memory can be given back to the host. Memory ballooning works only for KVM virtual machines.
Memory ballooning was available in previous version of Proxmox VE. But, I have to say that I didn’t see a lot of people knowning about it or using it. Proxmox VE 2.3 might change this situation. Indeed, this feature is more visible and can be configured via the web interface. When you start the wizard to create a new KVM machine, when reaching the memory tab, you will see that you can indeed configure dynamically the ram settings for your virtual machine.
Click picture for better resolution
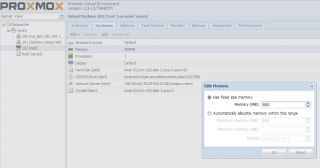
If you have an existing virtual machine and you want to change the settings, you simply needs to go to the hardware page of the virtual machine, click on the memory option and click on the Edit button. You will then be able to modify the memory settings and use if you want to the dynamic memory feature.
Click picture for better resolution
In order to use this feature, you will need to use virtio drivers (virtio ballon) and install it within your virtual machine. I’ll not describe the process here. I’ll probably write a post about it.
Kernel Samepage Merging (KSM)
Again, this feature was available in previous version of Proxmox VE. However, not a lot of people know about it. KSM is a feature that allow the hypervisor to share the same memory process between different virtual machines. Proxmox VE will scan memory of the virtual machines and if duplicates processes are found, they will be merged. Basically, this allows you to increase the density of virtual machines that can run on a Proxmox ve host.
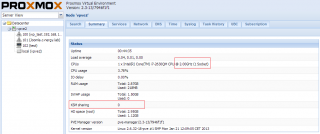
As mentioned, this feature was already available in previous version. In Proxmox VE 2.3, you can have visual information about the ksm feature by navigating to your proxmox ve host and click on the summary tab. In the summary page, you will see the ksm sharing details (see screenshot below)
Click picture for better resolution
Resizing Disk via the GUI (KVM only)
This is also a common issue in virtualization world. You have created your virtual machine and provision your disk accordingly. However, with time, you might end up with disk space problem. We have discussed this topic in our blog. We have shown how to resize disks (increase or shrink) using command line. You can read about this topic here and here
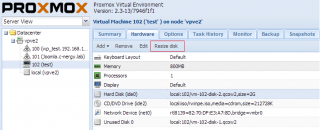
The good news here is that you can resize (increase only) the size of the disk through the GUI. To resize a disk, you will simply need to locate the virtual machine, go to the hardware page,select the disk to be resized and then click on the resize disk button
Click on picture for better resolution
Click on picture for better resolution
Note : The option resize disk will be available while your virtual machine is online. However, the change will not be visible till the next reboot.
Final notes
This is it for this post. As you have seen, this release brings some new features while maintaining coherent user experience. Actually, a lot of this small improvements provides a better user experience. The GUI become richer and some basic tasks such as resizing disks are available out of the box via the web interface. Proxmox VE is still improving its product. I think they have no choices given that competitions is become stronger in the open source world. Solution such as open stack are becoming popular
Till next ime
See ya
