Hello World,
Lately, as you might have noticed, I’m focusing on KVM Virtual machines running Windows operating systems (the recent versions). This post will again focus on KVM virtual machines. We will talk about resizing virtual disks.
It might happen that your virtual machine is running out of space or that you have provisioned too much disk space and you want to change this. This operation can be performed within a Proxmox VE (PVE) infrastructure but only from the command line (the Web interface does not provide this option yet – maybe in version 2.0)
The resizing process is basically a 2-step process and the order of these steps are different if you are increasing or shrinking the size of the disk.
To increase the size of the disk, you will perform the actions in the following order
- increase the size of the virtual disk (through the command line)
- Then, you will increase the size of the partition within the Operating system in order to reflect the changes in disk size.
To Shrink the size of the disk, you will perform the actions in the following order
- first,you will shrink the size of the partition within the Operating system in order to reflect the changes in disk size.
- and then you will reduce the size of the virtual disk (through the command line)
Resizing the Virtual Disk file- How To
Let have a look to the first part of the process.
Step 1 – Backup your Virtual Machine
Before performing this operation, you should first backup your virtual machine in case something goes bad – shouldn’t but you never know 🙂
Step 2 – Power off your Virtual Machine
You should power off your virtual machine before applying changes. This ensures that the modifications are committed correctly by the PVE infrastructure.
Step 3 – Resizing the virtual disk
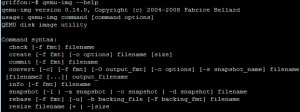
As mentioned earlier, to perform this change, you need to go through the command line (no GUI available yet). You will need to connect to the PVE Console locally or remotely via putty for example. From the console, if you type the following command
qemu-img –help
Click to enlarge
You will see a list of supported options. If you have a recent Proxmox VE installation, you will see an option called resize. As the name implies, using this option will allow you to increase or shrink the size of the virtual disk in qcow2,raw or vmdk format. (that’s cool all supported format used by PVE). The command can be used as follow
qemu-img resize <%location of the file%> +| – <%size%>
Note : Wait before using this command – read this till end !!
Step 4 – Checking news the virtual disk size
You can use the ls –lh command to check that the file has been modified accordingly.
Click to enlarge
Or you can use the qemu-img info <%name of the virtual disk file%> to check that the file has been resized as required.
Click to enlarge
All in all the process is really not too difficult and you should be able to resizing disks image file as needed. Before closing this post, I thought that having practical examples might be useful.
Practical Examples
Example 1 – Increasing disk size
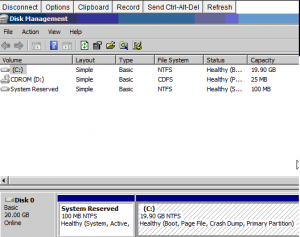
In this scenario, we have a virtual machine with the VMID 111 that has a c: drive partition set to 20 GB. We need to increase the size of the partition to 25 GB.
Click to enlarge
We shutdown the virtual machine and as described earlier, I’ll make a console connection (through putty) to the PVE host. I go to the folder holding all my virtual disks files (by default, all the virtual disks are located in /var/lib/vz/images) and then cd to the folder holding the virtual disk I want to resize. (In my case the vmid is 111 – view screenshot)
Click to enlarge
I need to increase the size of the disk up to 25 GB. I basically need to add 5 GB to the initial file. I’ll then type the following command
qemu-img resize vm-111-disk-1.raw +5GB
Click to enlarge
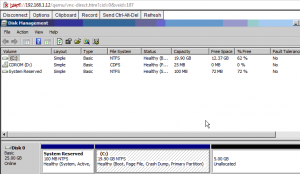
I can now reboot the virtual machine and you will see that the disk size has been set to 25 GB within the Operating system
Click to enlarge
Example 2 – Shrinking disk size
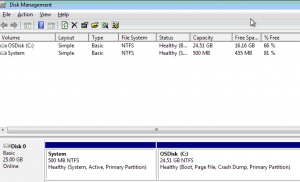
In this scenario, we have a virtual machine with the VMID 111 that has a c: drive partition set to 25 GB. We need to decrease the size of the partition to 20 GB.
Click to enlarge
Note :
You will first need to shrink the size of the disk in the Operating system first. To see how you can shrink the disk within the Operating System, check out the part II
I’ll shutdown the virtual machine, make a putty connection to the PVE host and go to the directory holding the virtual disk file I need to resize. To shrink a disk, you need to type the following command
qemu-img resize <%name of the virtual disk%> – – -5GB
Click to enlarge
If you boot your virtual machine, you will see that the disk has been reduced accordingly.
Note :
There is a difference in the notation between increasing and shrinking disk. If you type this command,
qemu-img resize <%name of the virtual disk%> -5GB
the new virtual disk will be only 5 GB in size. Pay attention when using the command to reduce the size. This is not what you want. Instead you need to type
qemu-img resize <%name of the virtual disk%> – – – 5GB
to shrink the size of the disk by 5 GB.
Source:
I have found the correct shrinking command here http://forum.proxmox.com/threads/6580-Shrink-a-disk-with-qemu-img-parsing-error
Final Notes
So far, we have just changed the size of the virtual disk. Proxmox VE knows now that disk size has been updated. However, we might still need to perform additional actions within the Operating system to apply these changes. This will be explained in the next part of this post
Till then
See ya


sry, have you tested it. as i guessed it does not work as the booloader has not been updated with the new size. please delete this desaster of a howto
Hello There,
Yes It has been tested and validated multiple times…
I might have helped you if you could have provided a more detailed description of your problem and the steps you’ve performed….Again, this procedue has been tested so this should be working
Till next time
Thank you! It’s work perfectly. How enlage disk in windows?
Hello there,
you can read the part II of the post. This will explains how to resize disks within Operating system. You’ve missed the link to part II…. so have a look at
Hello.
It appears when browsing to /var/lib/vz/images, these are virtual drives on the hosts’ local storage, correct? If so, how would one go about resizing a drive in an LVM group on an iSCSI SAN?
Also, I’m running Proxmox 2, so I’m guessing there may be more to the web GUI now?
Thank you!
– – Dave
Hello Dave,
If you can wait a little bit…I’ll have to check first… This might become a new post….
See ya
Hello.
Sounds good, thank you.
If it helps your next post, I was able to find that the drives on an iSCSI SAN are referenced under /dev/dm-0, dm-1, etc. You can run ‘dmsetup ls’ to see exactly which drives are behind the ‘dm-x’ symbolic links.
What I did was:
– Shut down the desired VM
– Add/create a second hard drive to it, the full desired size
– SSH into the Proxmox server and run a dd command, if=vm-101-disk-1 of=vm-101-disk2
– When that copy/duplication job is done, remove the smaller drive from the VM
– Start the VM and tell Windows to expand the volume to occupy the new additional free space
Let me know if you find a more elegant/streamlined way. 🙂
Thanks again.
– – Dave
Hello Dave,
To answer your question (short version), yes there is an easier way to increase the size of the virtual machine….
– first, get info about LVM – typing lvdisplay
– locate the vg name that needs to be modified
– type lvresize -L+SizeGB <%vg name%>
– type lvchange –refresh <%vg name%>
– within the os, need to resize the disk or create additional partition….
A post is on its way…..
Hope this answer your question
See ya
FYI – I tried to shrink the Windows 7-64 virtual disk (virtio driver) by 10Gb. The VM did not boot up with new image file. I’ve got a restore interface with no dirve found.
Hello Vlad,
Sorry to hear that, have you followed all the steps – more specifically Step 1 where I mention about the backup of your VM in case something goes wrong….
anyway, can you check one of the following
Have you typed the correct command
This is the correct command to shrink size of a disk qemu-img resize vm-101-disk-1.raw – – -1OG If you have typed qemu-img resize vm-101-disk-1.raw -10G, then the new size of the disk would be 10 GB. this is not a correct command. You might have deleted some files now
-> in your Proxmox Console, what’s the size of the disk ?
can you boot up your virtual machine and start in Recovery Mode and see if the wizard can restore/repair your Windows Installation ?
Possibly, still using recovery Mode (Press F8 during the boot Process), can you open a command prompt and see if you can list disk and partitions using Diskpart.
If recovery mode is not detecting disk, you will need to load the virtio drivers. Try to repair from this mode. If this fail, open a command prompt and check that you can see the disk and partitions using diskpart utility. check that the partition size and filesystem is showing up correctly.
Let me know what you can see and I’ll try to help out
I’ll check again the procedure but I’ve used many times with Windows 7/windows 2008 R2 64-bit and had really minimum issues with that
Hope this help
See ya
Hello,
Yes, I have a backup and already restored the VM.
I followed your instructions closely and am sure that the command line was correct. The resultant size of .raw file was what I expected.
The Window restore/repair wizard was started automatically upon boot with the new image.
The C: drive was not found and I was prompted to insert disk with drivers as if virtio scsi driver was lost.
I did not experiment with further recovery options.
Do you think if the disk defragmentation might be needed prior to shrinking?
I am going to try drive shrinking again on the same file and will report results.
Follow up.
It looks like with drive shrinking two basic steps should be taken in reverse order. First, you shrink drive in Windows client. The shrink wizard queries disk for available shrink space up to the point where any unmovable files are found. (In my case the maximum shrink size was 7GB, not 10GB.)
Second, you shrink the drive on host using maximum shrinkage size determined by the client.
So, instead of my voluntaristic 10GB I shrank the volume by 7GB and everything went perfectly!
Thanks for very useful tutorials.
Hello Vlad,
This is great news….(I’m Happy you have your virtual machine back online). You might be right in your statement.
It might be indeed good to warn the user that you have a max shrinking size.
I’ll probably update this post to be more specific about the shrinking part..thank to you
Good job Man !! :-))
See ya around
Till Next Time
STOP BEFORE YOU LOOSE DATA!!!
Do not follow the steps in this tutorial for reducing the virtual hard drive size.
BEFORE you try reducing the size of a virtual hard drive (VHD) you MUST reduce the partition size first so that the empty space at the end of the VHD is at least the same or greater than the amount you are going to reduce the VHD by. Otherwise you will simply chop the end of the partition off thereby corrupting it and the underlying filesystem and loose any files that are stored in that chopped of section of the partition.
The steps for reducing a vhd should largely happen the reverse order and with the reverse effect of enlarging a vhd.
As a quck example at a minimum (not tested):
Step 1 – backup your VM!!
Step 2 – Reduce the size of the partition(s) on the VM. This is done within the VM itself using whatever appropriate tools are necessary such as windows disk management or a gparted boot disk etc. So if you are reducing the VHD from 25GB to 20GB, then reduce the partition so that it is now less than 20GB e.g. 19.8GB.
Step 3 – Turn off the VM
Step 4 – resize the vhd using the instructions provided in this tutorial (probably)
Step 5 – Optional – If you reduced the partition in step 2 to be less than the reduced VHD size, you might want to increase that partition to fill up the remaining space on the now resized vhd. Example, reduced the partition to 19.8GB, resized the vhd to 20GB, so now increase the partition to fill up the remaining 0.2GB.
Good luck and don’t forget to backup and then test the procedure.
Hello there,
thank you for the feedback. indeed, for the shrinking action, you need to first shrink the disk in the vm and then shrink the virtual disk file. We have updated the post slightly to reflect the differences in the process when increasing or shrinking the disk size. This was already mentioned in the comment section but we never had the time to update this post
Till next time
See ya
If you’re on Windows 10 and wondering why you can’t see a partition change, look here:
https://forum.proxmox.com/threads/increase-windows-disk-space.38399/
(you need to do a “full” shutdown, rather than the fast shutdown on Win 8+)