
Hello World,
Today, we will start our new serie about MDOP. We will start with something that’s quite easy. We will show you how to create a DaRT media and see what you can do with it. The main utility of DaRT is to reset lost password. In our blog, we have shown you how to perform the reset password operation without any specific tool but simply using the Microsoft built-in tools. (see here,and for the core version check out here)
However, the DaRT tool offer a little bit more than resetting passwords. You can uninstall problematic hotfixes, repair non bootable partion, recover deleted files and more.
Let’s first create the DaRT media and then we can see what it has to offer to us… so Let’s go !
Creating the DaRT media
Pre-requisites
We are using the DaRT 8.1 which is included in the MDOP 2014 release. In order to be able to install and create the DaRT media, you will need to meet some requirements :
- DaRT 8.1 can only be installed on Windows 2012 R2 or Windows 8.1. If you try on other Operating system, you will receive a notification message
- you need to install the Deployment tools from the ADK software. You can find installation instructions at ADK (automated Deployment Kit) – You might need to download the latest version ADK 8.1
- You need to ensure that .net Framework 4.5.1 is installed on your machine as well
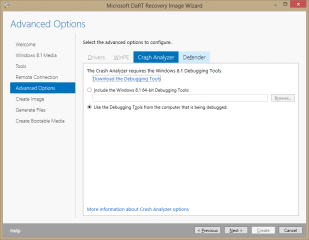
- If you need to use Crash Analyzer tool in DaRT 8.1, you will need to install additional software (debugging tools) which are part of the Windows SDK for Windows 8.1 (you can downloaded it from here)
- Obviously, you need to have a copy of the MDOP 2014 software
When you have that, we are ready to proceed with the installation of the DaRT creation tool.
Install DaRT Software on Windows 2012 R2 or Windows 8.1
Step 1 – Insert the MDOP media (dvd or iso) into your computer
Step 2 – With the autorun, you will be presented with the following screen (or go to Launcher\launcher.hta). In the splash screen, select the option Diagnostics and Recovery Toolset
Click on Picture for Better Resolution
Step 3 – In the DaRT page, click on the DaRT 8.1 (32 or 64 bit). Note that you have the previous version available as well.
Click on Picture for Better Resolution
Step 4 – The DaRT wizard starts. In the Welcome Page, press Next
Click on Picture for Better Resolution
Step 5 – In the License Agreement Page, accept and Press Next
Click on Picture for Better Resolution
Step 6 – In the Microsoft Update, Select your option and press Next
Click on Picture for Better Resolution
Step 7 – In the Installation folder, select your location or accept default and Press Next
Click on Picture for Better Resolution
Step 8 – in the Setup Option page, select your options and press Next
Click on Picture for Better Resolution
Step 9 – In the Ready to Install page, Click Install
Click on Picture for Better Resolution
Step 10 – Wait for installation to proceed and Press Finish
Click on Picture for Better Resolution
Creating the DaRT Media
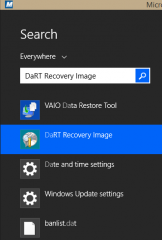
You should have everything you need in order to create your DaRT media. Before starting the creation process, you need to have the Windows 8 media (boot.wim) in order to create your DaRT bootable rescue disk. If you are ready, you can start the DaRT Recovery Image Wizard. To start the Dart Recovery Image Wizard, you can go to the search box and type Dart REcovery Image
Click on Picture for Better Resolution
Step 1 – In the DaRT Recovery Image Wizard Weclome page, click next
Click on Picture for Better Resolution
Step 2 – In the Windows 8.1 Media page, specify the version you want to use (32-bit or 64-bit) and specify the location of the Windows 8.1 media file
Click on Picture for Better Resolution
Step 3 – In the tools page, you can select the tools that you want to have available on your DaRT media.
Click on Picture for Better Resolution
Step 4 – In the Remote Connection page, you can specify if you want to allow remote connections into the machine where the DaRT will be running. In my screenshot, you can see that I allow remote connection through port 3389
Click on Picture for Better Resolution
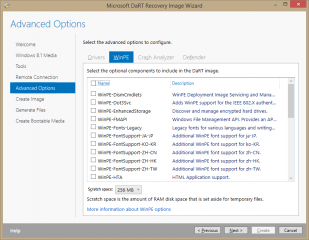
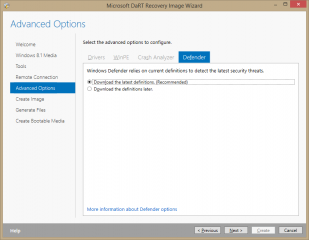
Step 5 – In Advanced options, you can specify additional drivers, winpe settings, defender and crash analyzer settings. This can be useful for servers where specify drivers are needed for the storage controllers
Click on Picture for Better Resolution
Click on Picture for Better Resolution
Click on Picture for Better Resolution
Click on Picture for Better Resolution
Step 6 – In the create page, specify your settings and press Create. I have selected the option Wim and iso file. You could use the wim file to stream the DaRT via the network (pxe boot)
Click on Picture for Better Resolution
Step 7 – In the Generate files page, wait for the process to complete
Click on Picture for Better Resolution
Step 8 – When completed, press next
Click on Picture for Better Resolution
Step 9 – In the Create bootable Media page, you can decide to burn your iso file into a cd. Press Close
Click on Picture for Better Resolution
Using the Tool DaRT
At the end of the procedure above, you have basically created your recover tool medi. The DaRT media can be distributed as an iso file, as a wim file, as a bootable cdrom media or a more modern approach is the bootable usb stick. So, how to you use the DaRT tool. The simplest approach is to boot your problematic computer from the cdrom/usb (or from the iso file if you are running from a virtual machine).
When booting from the DaRT media, you will be presented with the following screens,
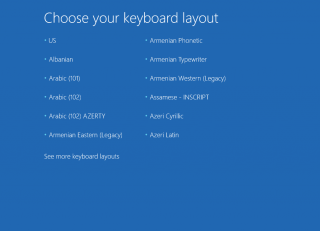
Step 1 – You can choose your keyboard layout and your language
Click on Picture for Better Resolution
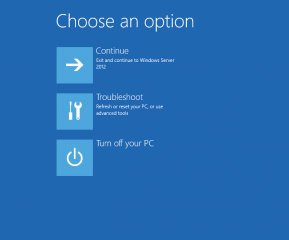
Step 2 – In the choose an option page, you will need to click on the Troubleshoot option
Click on Picture for Better Resolution
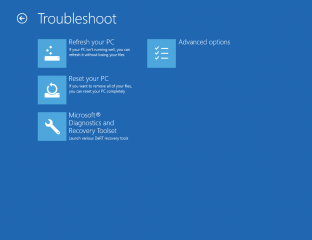
Step 3 – In the Troubleshoot page, you will see at the bottom left on my screenshot the option to load the DaRT tool. Click on it
Click on Picture for Better Resolution
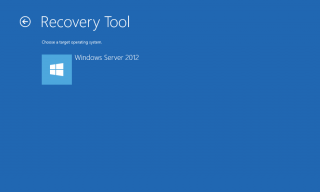
Step 4- In the recovery tool, you will be asked to select which OS to load. If you do not see any Os, this might mean that you do not have the correct storage drivers for the computer you are working on. So, you will need to recreate a new DaRT media with the correct drivers inside. The other option is to go back to troubleshoot menu,select the Advanced options, start the command prompt and load on the fly the missing drivers.
Click on Picture for Better Resolution
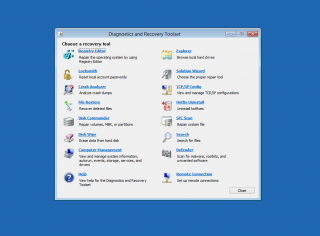
Step 5- After selecting the target OS, you will be presented with the DaRT dashboard where you can call the tool you need in order to fix your issue.
Click on Picture for Better Resolution
At this stage, you simply select the tool you need to perform the job (i.e. reset a lost password) and reboot your machine and you should be good. If you look at the DarT Dashboard, you can see all the opitons/actions that can be performed
Final Notes
And Voila ! We have quickly explained what’s DaRT is, how you can create a media and how you can use it. Instead of hacking operating system to reset lost password, you could use the DaRT as the official tool to perform such activities. I see some opportunities in using DaRT in a way to implement creative solution in specific scenarios. The tools I would use the most within the DaRT would be definitely the Reset Password tool and the Remote Connection viewer option.
As an example, you might encounter a situation where a hotfix has broken the boot process of a computer. Because the DaRT create for you a ready to use wim, we could take advantage of our pxe infrastructure and stream the DaRT tool to the target computer. The user would be asked to press F12 and guide the user through the initial pages. Once the DaRT Dashboard is lauchned, you could ask the user to click on the Remote connection viewer. You can then remotely connect to the pc and fix the possible issue.
As you can see, using such capability can help you providing a better service to the end-user.
In some future posts, we will investigate a little bit further what can be done with the DaRT Tool.
Till next time
See ya
Hi ,
I am using DART 10 in SCCM 2017 (1702) ADK 1610. During creating the RE image.Its showing the below error
Preparing DaRT image
Installing and configuring DaRT tools…
The running command stopped because the preference variable “ErrorActionPreference” or common parameter is set to Stop: The request is not supported. (Exception from HRESULT: 0x80070032)
Cleaning up temporary files
Temporary folder: C:\Users\Administrator\AppData\Local\Temp\2\DaRT_Mount_2017.06.14.14.47.07
The clean-up has successfully been completed.
@Selvakumar,
no clue why this could happen….
somebody else maybe
till next time
see ya