Hello World,
Some time ago, I’ve started a post about VDI pool and RDS 2012 R2. At the end of this post, we had all the necessary elements to create VDI pool. However, the vdi pool creation failed for a stupid error (on my side). So, we decided to split the post in two part. This post is the second part of the vdi collection topic. In this post, we will see how to create a VDI collection from RMDS console.
Let’s go !
Check and Recheck your VM Template
So, in order to create our first vdi collection, we first need to have a valid vm template. In the previous post, the integration services were not up to dated and thus the vdi collection creation failed because of that. So, we had to fix our VM template first. We have started our Template, updated the integration services, sysprepped the image and turn it off. Now we are ready to try again the vdi pool collection.
Note:
a VM template is simply a virtual machine (created on your RDS Virtualization hosts) that has been sysprepped. If you are using Windows 7, ensure that the integration services are up to date. To sysprep windows 7, you will run the following command
%windir%\system32\sysprep\sysprep.exe /generalize /oobe /shutdown.
If you working with Windows 8 or later, apparently the sysprep command that needs to be executed in order to have a successful vdi collection creation is
%windir%\system32\sysprep\sysprep.exe /generalize /oobe /shutdown /vm
Creating the VDI pool Collection
To create a VDI collection, you can perform the following tasks :
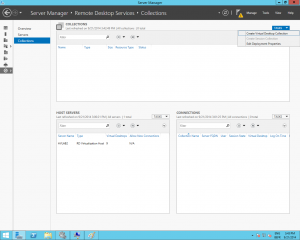
Step 1 – Open Server Manager > Remote Desktop Services > Collections node. In the collection page, click on tasks and select Create Virtual Desktop Collection
Click on Picture for Better Resolution
Step 2 – In the Before you begin page, read the info on the page (at least the first time you start the wizard) and Press Next
Click on Picture for Better Resolution
Step 3 – In the Name of the Collection, provide name and description. Press Next
Click on Picture for Better Resolution
Step 4 – In the Specify Collection Type page, select your collection type. In this example we have selected Pooled.
Click on Picture for Better Resolution
In this page, you can in fact decide to have managed or unmanaged vdi pool. By default, the option automatically create and manage virtual desktop is ticked. If you unselect this, you move to a scenario where you vdi pool become unmanaged. This simply means that if you deselect this option, you will have to choose from an existing virtual machine available on the RDS Virtualization Host and add this one to the VDI Collection.
Press Next
Step 5 – In the Specify Virtual Desktop Template page, Select your VM template to be used and Press Next
Click on Picture for Better Resolution
Step 6 – In the Specify Virtual desktop Settings page, accept default and Press Next
Click on Picture for Better Resolution
Step 7 – In the Unattended Settings, select your time zone and the location where the computers account will be created.
Click on Picture for Better Resolution
If you have a complex OU structure, you will need to select the option specify Distinguished Name. The first option is limited to the domain name and top OU structure.
In this page, you also have a warning message (you should read this one). You have to grant AD rights to the connection broker in order to be able to create computer accounts in the Active Directory. Here you have two options:
- Click on the Generate script and run it
- provision permissions in advance in Active Directory. In our scenario, this is the rights that needs to be granted to the broker (screenshot)
Click on Picture for Better Resolution
Press Next.
Step 8 – if everything was ok (permissions wise), in the Specify users and groups page, specify who can access the VDI, number of VDI you want to create and how you want to name them. When Ready, Press Next
Click on Picture for Better Resolution
Step 9 – In the Virtual Desktop Allocation page, you have to select where to create your VDI. IN our scenario, we just have one RDS Virtualization host. Press Next
Click on Picture for Better Resolution
Step 10 – In the Specify Virtual Desktop Storage page, select where to store you virtual machines. The option will depends of your infrastructure.
Click on Picture for Better Resolution
Note also the option to rollback when user logs off. This option is ticked by default. This means that user settings will not be kept between logon/logoff operations.
Step 11 – In the user Profile Disks Page, you can decide to use or not a user profile disks. We will talk about this option later on. Basically, this is the way found by Microsoft to preserve users settings between sessions. The user settings will be stored on the disks. When a user logs back to a VDI machine, the user profile disk will be mounted and user should see its settings.
Click on Picture for Better Resolution
Step 12 – In the Confirmation page, Review your settings and Press Create
Click on Picture for Better Resolution
Step 13 – In the View progress page, you can monitor the progress
Click on Picture for Better Resolution
Step 14 – In the View progress Page, when operation is completed, you can press the close button
Click on Picture for Better Resolution
Step 15 – In the RDMS Console; you can check that virtual machines have been created for you
Click on Picture for Better Resolution
Accessing the VDI pool Collection
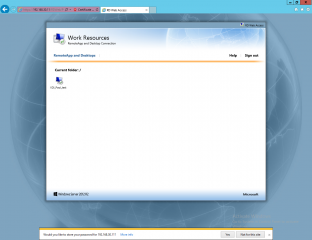
To easily access a vdi pool, the user will benefit of integration between RD Web Access and RD Virtualization host. With no configuration, the VDI pool will be published to the RD Web Access page.
Click on Picture for Better Resolution
This integration offers an additional advantage. Indeed, normally there is single sign on process. once you are logged into the web interface, you should be able to access your Virtual desktop with no prompt (however, I have seen situation where this is not working immediately).
Final Notes
Here you go ! Now you can try to create VDI pool or personal pool (managed or unmanaged) and see how it behaves. In the coming posts, we will see how we can manage VDI pool and have a look into the user profile disks capability.
Till next time
See ya


Griffon,
Your RDS blog is fantastic and very helpful. I do have one question and was hoping your HA column would come out soon. I have been slowly compiling a 2012 r2 RDS infrastructure for about a year. Currently I have 1 server that has the GW, Web and CB roles. I then have 5 collections made up of 6 hosts. I also have 6 legacy 2008r2 hosts. This is to support a growing company currently at 650 employees. I’m trying to build this with HA and more importantly fast applications in mind. I was thinking of removing the CB role from my main server and spreading that to two different servers which would then attach to our SQL server. Does that seem logical? Where is the biggest constraint for RDS when it suports more users? Also is there a guide in terms of best resources that should be allocated to the environment? It is 100% vmware. Thanks!
Hello Sean,
Sorry for the late answer but I was really really busy (and a little bit tired).
First, you should start think about your High level design. We have implemented a RDS infrastructure for about 700 users. We have implemented a
2 servers for CB roles
2 Servers for RD Gateway and Web Access
For the RDS Host, this depends on the number of applications you want to use…
Migration wise. I would already create the CB cluster and add additional CB. When ready, you can remove the “old” CB server.
constraint wise, you would need to monitor your RDS infrastructure to check performance impact of applications on the RDS Host servers. network bandwith would be also another topic to check… Use builtin tools or use monitoring tools third party tool
Hope this help
Till next time
See ya
Thank you so much for the quick reply. It will be fantastic to see your blog on HA with the gateway/web access. There are many written about making the Connection Broker HA, there are very few on getting the Gateway/Web HA.
It seems with regards to the hosts there are speed benefits to be running 2012 r2 and not 2008 (like we still have 6 of). Do you agree?
Thank you, Sean
Hello Sean,
Technology improvement made in Windows 2012 R2 make it worthy (IMHO) to move the latest RDS platform. UDP usage, GPU and RDP compression make it really useable.
Stay tuned
Till next time
See ya
Perfect thank you! Again thanks for the blog, very helpful information!
I know this post is a year old but I can’t find an answer to my question anywhere. I built an RDS system with 2012. I have worked thru everything and it appeared to be working fine. Then I tested from multiple locations. That is when I noticed they all logged into the last virtual machine created Win7Pro-02. By doing that the previous connection by my other computer was disconnected. What am I missing? Why won’t it connect to the other 2 computers in the pool? If I turn win7pro-02 off then I can’t connect at all. Even though the other two virtual computers are running. Any help would be greatly appreciated.
@Darrel,
Hello Darrel,
are you sure you have created a vdi pool and not personal pool ?
are you sure you have enabled remote desktop on all the vm you have created ?
In the RDMS console, can you check that the status of your VDI POOL and check user connections ?
have you checked your log file on the hyper-v system hosting the vdi pool to see if any hints could be found ?
Hope this help
Till next time
See ya