Hello world,
This post will describe a common problem within distributed IT infrastructure: transfer of files over slow networks. The post will provides an efficient way to transfer the files over networks by using Powershell cmdlet and a technology called BITS (Background Intelligent Transfer service).
Ready ? So let’s go !
Problem Description
Recently, I had to transfer large files over a “slow network”. The standard approach in my current assignment was to download the files from FTP servers or HTTP Servers. Because the network connection was slow and/or unreliable, FTP connections would time out and the download would fail miserably. Another classical approach was to use robocopy.exe utility. Using this tool, you can resume your download if your connection times out. You can then restart your download where it fails.
These options have serious drawbacks. The FTP/HTTP download will use all the available bandwidth to perform the download and will impact negatively the network performance on the remote site. Robocopy.exe approach was not an option in my case because of the presence of firewalls between the two locations.
The only option for us was to download the file from HTTP server but in a smart way. This is where PowerShell and Bits technology come into play.
BITS technology and Powershell
BITS or Background Intelligent Transfer service is basically a windows service that is used to transfer files from websites. Windows updates and SCCM already uses this technology in order to download files to target computers.
BITS is around since windows XP and some utilities (such as bitsadmin.exe) were made available to help administrators to take advantage of the bits technology. Bitsadmin.exe is still around but has been deprecated in favor of Powershell cmdlets.
When using BITS, you can basically transfer files (Downloads and Uploads) between 2 computers. The service is intelligent because Bits uses idle network bandwidth to transfer the files and does not impact the network performance. If an application requires more bandwidth, BITS will adjust automatically in order to decrease its transfer rate avoiding any negative impact on user’s interactive experience. The service is also intelligent because it will automatically resume file transfer if you have a time out on your network or if a computer needs to restart.
BITS was exactly what I was looking for in order to transfer the files to this remote location and not to impact their day to day business.
Amazing….
How to Use PowerShell to perform Bits Transfers
We will quickly demonstrate how you can perform and Bits transfer and how easy it has become when using PowerShell cmdlets.
If you have Windows Vista or later or Windows 2008 or later, BITS is built-in in the operating system. As long as you have Powershell V2.0, you should be able to use Bits PowerShell Cmdlets. If you have Windows 2003, you will still be able to use this approach. However, you will need first to install the update package for Bits and you will need to install PowerShell V2.0 on your system. When this is done, you should be able to start your bits transfer.
Downloading files using PowerShell and Bits
We assume that the file you want to download is stored on an HTTP server (for example http://c-nergy.lab/ISO/MySoftware.iso). We also assume that anonymous access has been configured. We will see later that you can also implement authentication mechanism on your web server and pass valid credentials to your Powershell Bit Transfer command.
Import Bits modules
In order to start the transfer, on the target computer (in the remote location), you will open a PowerShell command prompt and type
-
Import-Module BitsTransfer.
When the module is imported, you can quickly get a list of available commands by typing something like
-
get-command *-BITS
Click on picture for better resolution
Bits Synchronous Transfer
To initiate a download, you will simply type the following command (see screenshot below)
Start-bits –source <%Source path %> -destination <%destination Path%>
Click on picture for better resolution
This cmdlet starts the transfer operation in synchronous mode. This means that this transfer is similar to a copy operation. In this mode, you have a progress bar (see screenshot above) that’s displayed and you can monitor the transfer operation. My understanding is when using this mode, if you restart the computer, the transfer will stop and will not resume.
Bits Asynchronous Transfer
In order to have a persistent Bits Transfer Job; it’s recommended to start the process in asynchronous mode. How do you do that ? Simply by adding the switch – asynchronous.
Click on picture for better resolution
In this mode, if something happens (network outage, reboot of computers), the job will resume automatically and the download will proceed. This is so cool !
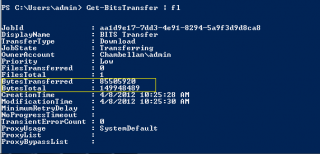
The small drawback here is that you do not have the visual hint about the operation progress. You will have to use the Get-BitsTransfer cmdlet to check the download progress. In the screenshot below, you can see the bytes transferred vs total bytes
Click on picture for better resolution
In asynchronous mode, you will need to perform a small additional action in order to complete the transfer process. When the transfer is complete (you can check that with the Get-BitsTransfer cmdlet), you end up with a TMP file that has been created. To convert this TMP file into the final file version, you will need to run the command Complete-BitsTransfer as shown in the screenshot below
Click on picture for better resolution
At this stage, you have completed your download and everything should be fine.
As mentioned earlier, if the server holding the files you need to download requires authentication, you can provide the credentials via the Powershell cmdlet and the download will still be possible… You would type a command similar to the one on the screenshot
Click on picture for better resolution
Note :
When using BitsTransfer in asynchronous mode, you will need to type multiple timeGet-BitsTransfer in order to monitor the download progress. This is not really practical and not elegeant. A better option would be to create a small script that would monitor the job for you and notifies you when the jobs is completed. When completed, the script would also issue the complete-Bitstransfer for you. I have provided you in the following screenshot a sample script that could do that
Click on picture for better resolution
Uploading files using PowerShell and Bits
In our environment, we will mainly use Bits to perform download operations. However, you have to know that you can also perform upload operations if required. To be able to upload files to an HTTP server, you will first need to configure your server accordingly. You will need to install IIS and install the BITS Server Extension Feature.
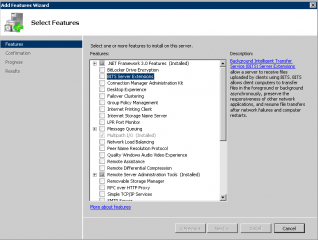
We assume that you have Windows 2008 server (or later) running and you have already installed IIS (or web server role on top of it). To install the Bits Server Extensions, you simply open your Server Manager Console, go to the features node, right-click on it and select Add Features. The Wizard will start. You will be presented with the following screen. Ensure that you select the Bits Server Extension option.
Click on picture for better resolution
Note :
IIS 6 Management Compatibility roles must be installed.
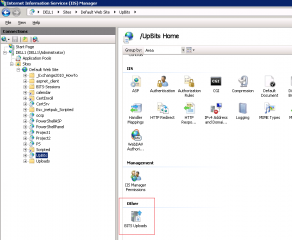
After that, you can create you Bits Upload virtual directory within IIS. Click on it and you will see at the bottom of the mid pane, the icon to configure Bits extension for the directory.
Click on picture for better resolution
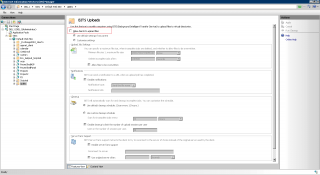
Click on it and will be presented with a screen similar to the screenshot. You simply need to ensure that you enable the option “allow clients to uploads files”. The other options can be configured as required or you simply accepts default configuration
Click on picture for better resolution
You have to ensure that permissions on the virtual directory are configured correctly. If you have scripting and execute permissions enabled, the upload job will fail (this is a security feature). Microsoft recommends to turn off write access to the virual directory as well given that bits does not require it.
Finally, you will need to ensure that the physical directory to which the virtual directory is mapped has the correct permissions set. If you use anonymous access to upload files, ensure that the IIS anonymous user has Change permissions on that folder. If you use an authenticated user, ensure that this user has Change permission as well on the physical folder.
When you have done, all this stuff, you should be ready to upload files to your Http server by issuing a command similar to
Start-bits –source <%Source path %> -destination <%destination Path%> – Transfertype Upload
Click on picture for better resolution
I had problems to upload larger files onto my Windows 2008 BITS server. I tried to upload an iso image into my upload folder and the powershell command failed returning an error HTTP 404 – The requested Url Does not Exist
Click on picture for better resolution
This behavior is by design. IIS is configured to allow files upload no larger than 30 MB. On Windows 2008, I had to change the configuration of the Web.config file of the virtual directory. I had to add the <security> section into the file. the web.config file should look similar to the following screenshot. Change the value of the maxAllowContentLength to fit your needs and you should be good to go.
Click on picture for better resolution
Final words
Bits and Powershell is the best combination I’ve found so far to download large files over slow networks. The download will still take some times but I will not need to restart the download from the beginning either will I negatively impact the network during the transfer file. And that’s a big plus for me. This technique will be part of my “Scripting Toolbox”.
You have to give it a try and see how simple and efficient it becomes to download one or multiple files accross networks in a smart way….
We have not covered all the possibilities that offers Powershell and Bits but you can have a look here and start playing around http://msdn.microsoft.com/en-us/library/windows/desktop/ee663885(v=vs.85).aspx
I hope you’ve enjoyed this post.
Till next Time
See ya
Source
mainly http://msdn.microsoft.com/en-us/library/windows/desktop/ee663885(v=vs.85).aspx


Nice post! Lots of good info and nicely explained.
thank for the visit and the positive feedback Jason
Till next time
See Ya
Hi Griffon,
My question is: BITS transfer can be scheduled using Task Scheduler, whether the user is not logged on or not?
Thanks in advance and kind regards,
Augustin
Hello Augustin,
In theory, yes. As long as you have your bits transfer script that has been defined, you should be able to create a scheduled task to run the script when a user is logged on or not.
All the options or settings you can use are displayed when you create the Scheduled task
Hope this help
Till next time
See ya
Hi Griffon,
But I think. practically not. I’ve already seen a lot of posts on the Internet that confirms it.
Then I’ve decided to ask you also.
Thanks for your kindness,
Augustin
Helpful post.
In http://c-nergy.be/blog/wp-content/gallery/bits/bits_7.png, in he h=while loop, the $Job variable doesn’t exist.
The variable is $job.
@amit,
I do not understand your statement…In powershell, the data are case insensitive so logically $job is exactly the same oas $Job
Till next time
See ya