I don’t know if you’ve heard of PROXMOX VE software but If I tell you Hyper-V, VMWARE, Xen,KVM(kernel-based Virtual Machine), you immediately think of Virtualization. Proxmox VE is an remarkable virtualization solution based on Open source software. In one of my first posts, I already mentioned this software solution.
ProxMox VE or ProxMox Virtual Environment is an easy to use Open Source Virtualization platform based on a Linux kernel. From the ProxMox wiki, one of the goals of the project is to “Setup a complete virtual infrastructure within 1 hour (…)” and I think they’ve succeeded in their goal….
Let’s introduce the ProxMox VE software solution!
ProxMox VE presentation
ProxMox VE is an Open Source project developed and maintained by Proxmox Server Solutions GmbH with financial support from Internet Foundation Austria (IPA) and combines existing technologies into a useable enterprise class ready software solution for Virtualization. PROXMOX VE supports 2 types of virtualization technology:
-
Container Virtualization based on the OpenVZ Project
OpenVZ is a container-based virtualization for Linux. OpenVZ creates multiple secure, isolated containers. The concept is also known as OS virtualization. Using OpenVZ, you can run multiple Linux boxes on top of the ProxMox software. Container-based virtualization uses the host operating system to create the containers. This means that, with ProxMox, you will only be able to run Linux guests when using the OpenVZ technology.
For more info about OpenVZ, go to http://wiki.openvz.org/Main_Page
-
Full Virtualization based on the KVM project
KVM (Kernel-based Virtual machine) technology is similar to products such as VMWARE Server, Hyper-V, Virtual Iron… and allows you to create a full virtual machine. The virtual machine can be Linux or Windows. Each virtual machine will be separated to each other and they will have their own virtualized hardware.
For more info about KVM, go to http://kvm.qumranet.com/kvmwiki
Installation & Configuration Overview
PROMOX VE Software Installation is really easy. Simply download the latest ISO file from http://pve.proxmox.com/wiki/Downloads, burn it into a CD and boot your system. A Wizard will guide you during the setup process. You will have to provide minimum information such as IP address information, administrator password and email, keyboard layout…
In order to take full advantage of the software, your hardware should be using a 64-bit processor that supports Hardware-assisted virtualization (Intel VT or AMD-V Capable). However, if you want to test only OpenVz technology, it’s possible to perform the installation (using version1.0) on a 32-bit capable machine. I have to check that this is an option with the version 1.5 given that the underlying Operating system distribution has changed since version 1.0.
Note: I’ve installed the software on different types of hardware (workstations, servers and even as a virtual machine) and i never had any hardware related issues
When you start you computer from the Proxmox installation media, the setup wizard will start and you will see something like this

The installation wizard will come up with 5 or six screens. You have to accept the license agreement and read the information page. then you need to provide the networking information to the wizard (see screenshot below)

You will be then asked to select on which hard disk you want to install PROXMOX VE software. It’s important to note that the software will use the full disk and the entire disk will be formated. You cannot create partitions within the Wizard.

When the system reboots, you will be able to connect to your ProxMox VE server through a Web Browser. In the Console, you can retrieve the IP Address of your PROMOX VE server. You can also logon onto the system through the console if you are not afraid to use command line to perform your operations : -)

(Easy) Management of the ProxMox VE server is done through a web browser. You simply type the IP Address or hostname of the PROXMOX VE server into your favourite browser and you will be prompted to login into your system

Once logged in, you can perform your initial configuration tasks based on your needs. If needed, you can change your settings (IP Address, Keyboard layout,…) through this web interface.

You can change your settings via the web Interface. Again, ProxMox VE has focused on having a simple, easy to use and performing management tool. The Web interface is fast, intuitive and really well-designed. You will become quickly familiar with the management interface.
As you can see, the PROMOX VE Solution is really well designed. Setup Wizard is small, simple and allows the user to quickly install the software. Compared to the VMWare Server 2.0, the web management interface seems more friendly, faster and provide a really smooth experience.
Virtual Machines and Virtual Containers
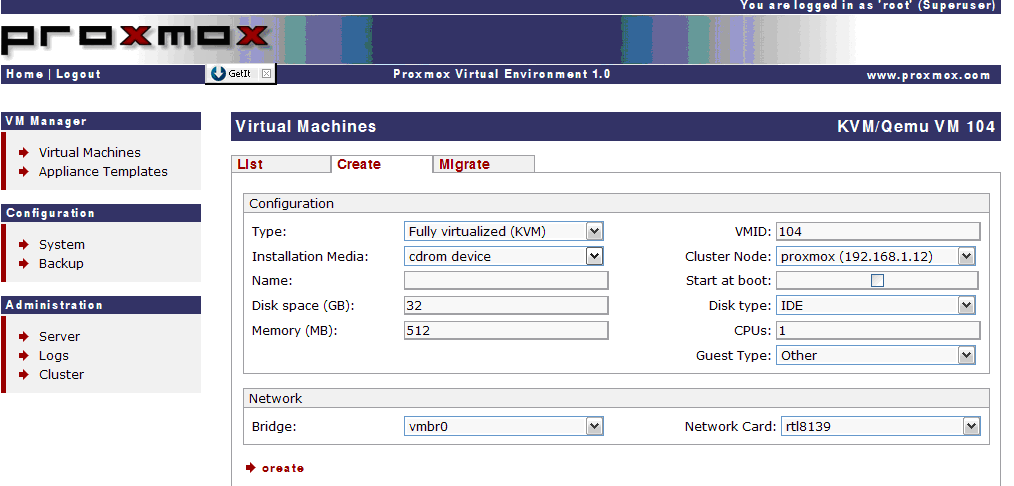
When your ProxMox VE Server is installed, you can immediately create your virtual machines or virtual Containers. In my environment, I have Windows 2003 and Windows 2008 Virtual machines running. In order to start the process, on the left menu, click on virtual machines. A screen similar to the screenshot below will be displayed. Click on the tab labeled Create

The Web page will allow you to configure your settings for your virtual machine (network card, IP address, Disk size,type of OS you want to install…). When you are satisfied with your settings, simply click on create link at the bottom of the page. When the Virtual machine is created, you still need to perform the OS installation.
After the virtual machine creation process, you will be able to open a remote connection to it by using the VNC console software. Again, this function is available through the web interface.


Tip : If you have to manage a lot of virtual machines, you might find that using the web interface is not always convenient. If you have a windows environment, you can use the Remote Desktops MMC console to centralize the management of your virtual machines. The only thing you need to do is to enable remote desktop inside your virtual machine

You can also create Virtual Containers. Remember that Virtual Containers can be only Linux Operating system. The first step in creating a Virtual Container is to download the appliance template you want to use. ProxMox VE comes with more or less 10 ready to use Appliance templates

When the download is completed, you can create your Virtual container using the web based interface. Again, you will simply provide the requested information in order to create the virtual machine. When you first boot your virtual machine, you have access directly to the appliance. You simply need to make a VNC console trough the web interface and start working with your virtual machine

Clustering and Live Migration
Clustering is a must have feature when talking about virtualization. If you are not using a high available configuration, not only the physical host is down but all the virtual machines running on top of the system will be affected. Is ProxMox VE Cluster capable? Sure it is! And again, the setup procedure is really simple even if this procedure is performed on the console. The Web Interface does not provide Cluster interface yet.
In order to create a clustered ProxMox VE infrastructure, you will need at least 2 ProxMox VE servers, each with its own hostname. The next step will be to design a master server and slave servers. To promote a ProxMox VE server as master, you type from the console the following command : pveca –c.
To join the second node (or slave) to the cluster, you will need to connect to the slave server and type the following command: pveca -a -h <% ip address of the master node%>
That’s it! You’ve just created your ProxMox VE Cluster. You will need to wait some time in order to let the nodes synchronize. When synchronization is completed, you will be able to manage from the Web interface, both nodes and virtual machines.
When your cluster is created, you will be able to move “on the fly” the virtual machines from one node to another node. Yes, ProxMox VE also provides Live migration functionality.
Backup and Restore
To finish with this review, ProxMox VE does offer Backup & Restore functions. The latest version provides a GUI for Backup & Restore operations. In the beta release, the GUI was not available and the console was used in order to perform these operations. ProxMox VE uses Vzdump utility to make consistent snapshots of running Virtual machines. Because ProxMox VE is using LVM2 disk format, it’s possible to perform a consistent backup (snapshot) online with no downtime. Vzdump creates a single tar file on the disk. To restore a virtual machine, you will be using the same utility to copy back to the tar file
ISCSI & NFS Stores
This is a “new” feature of the PROXMOX VE Cluster. Originally, PROMOX VE approach was to build a virtualization infrastructure on cheap hardware. The idea was to use internal storage and avoid expensive SAN infrastructure that all other Virtualization solution uses and recommend. Even if you are using local disks, you can still create your PROXMOX VE cluster and have a redundant environment. The PROXMOX VE Version 1.4 introduces some changes and especially in the field of storage an High availability (HA). We will not go into details on these “new” features in this post but in the next posts we will present these new options.
Conclusions
ProxMox VE is really a great piece of software. It makes virtualization affordable and easy to use. ProxMox VE is affordable because you do not need specific hardware. The only requirement is to have a 64-bit CPU with hardware assisted technology. Have you ever tried to install VMWARE on a non certified Server ? The chances are high that the installation will fail (Note: with the new release of ESX 4.0, it’s seems that you can install the software on more hardware than before but still VMWARE will recommend specific hardware). Another great thing about ProxMox VE is the price: you can use it for free.
ProxMox VE is easy to use thanks to the well-designed web interface. You can quickly create your virtual infrastructure. ProxMox VE also offers features such as clustering, backup & restore, live migration that make it ready for enterprises. You can use local storage, ISCSI infrastructure or NFS storage. You could also use a simple windows file server and use one of the share as storage repository for your virtual machines.
Time to time some bugs or minor issues might appear. Support from the ProxMox VE is as good as their product. They release quite quickly updates and through the ProxMox VE forum, you can quickly find a solution/workaround to your problem. The software provides a real alternative to others existing solution. However, ProxMox VE is quite new and there is room for improvements. As an example, there is no provisioning option available at the moment (or an easy way to create VM Templates). If you compare PROXMOX VE to other commercial solutions, you might find that some features are not (yet) available but all in all PROXMOX VE seems to me a viable option for enterprises (small or bigger one) & test labs. Even without whisles and bells , I’m already using ProxMox VE as virtualization solution and I haven’t got too much trouble using it.
Give it a try and you will see how easy it’s to perform virtualization (and cheap)
That’s it for today ! In my next posts, i’ll publish a step by step guide on how to install PROXMOX VE and create virtual machines. Stay tuned !

I went through your site was quite informative, as per your recommendations I downloaded the Proxmox VE and installed the same latest version on Hyper V but I am facing issues such as I cannot ping to Proxmox host machine from any where (Internal, Host machine etc, still I cannot reach proxmox server as well my proxmox server does not talk to any servers.
could you please let me know what could be the issue?
Awaiting your kind feedback.
regards
Santosh
Can you explain a little bit more what you are trying to do ?
Proxmox VE should be replacing your Hyper-V software. Proxmox Ve is the virtualization software. On the other hand, you can indeed (for test purposes) install the proxmox ve as a virtual machine and test the OpenVz functionalities. The KVM needs a CPU that support virtualization (i.e. AMD-V or Intel-VT). This CPU “feature” is not visible when running PROXMOX inside a virtual machine
I’ll try to post something about proxmox ve inside hyper-V
See ya
Hi Santosh,
I’ve made a quick test and i think I’ve find your problem. When you create your Virtual machine in Hyper-V, you have to change the type of network card you are using. You have to select the legacy Network card type.
If you can wait, I’ll post the procedure in a few days
See ya
(and Happy New Year) – Griffon
GNUAcademy sponsors the creation and regular updation of OpenVZ Templates for ProxMox VE using the standard DAB – Debian Appliance Builder. Checkout the community provided (over 20) Templates at the ProxMox Wiki:
http://pve.proxmox.com/wiki/Get_Virtual_Appliances
Latest DAB Build Files are also available at:
http://pve.proxmox.com/wiki/User:Apmuthu#Downloads_of_ProxMox_Templates_Maintained_by_Ap.Muthu
Instructions to get these community templates listed in the ProxMox Web GUI are also on that page.
thank you writer. I keep on being enthusiastic in writing. I like this article, it’s good to add knowledge that I didn’t know before. how else to complete this process especially for beginners? is there something difficult?