Hello World,
Recently, I’ve received a question/comment about the Raw format disk used with Proxmox VE. The question was really interesting so I decided to make it a post.
In this post, we were describing and explaining some of the settings that could be set when creating virtual machines and which disk fomart could be used. If you have some experience with Proxmox VE, you know that you can create virtual disk using one of the following format
- qcow2
- raw
- Vmdk
In this post, I was writing down that the raw format was “similar” to Thick disk provisioning, Well, not quite (or to be more specific – not always) ! Let me explain..
The “Strange” Case of Raw format disk size
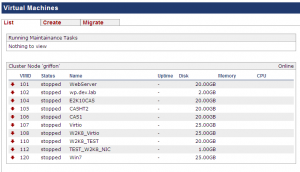
Within my Proxmox VE lab infrastructure, I have some virtual machines using the qcow2 format (the VM 101) and others are using raw format (Vm 107)
Click to enlarge
The screenshot above shows you that the VM101 has a disk of 20 GB and that the VM107 is using a disk that can have a maximum size of 25 GB.
Let’s have a look to the qcow2 format first. As described in the original post,when using qcow2 format you are basically using thing provisioning technology. This means that the disk will grow dynamically till it reaches it’s maximum allowed size.
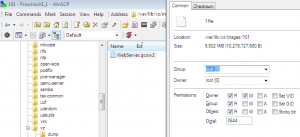
If I make a connection to my PVE host (using Winscp) and that I browse to the location where my images are stored (in my lab environment, i’m using local disk and the images files are located in /var/lib/vz/images by default with your proxmox ve installation), I can see that the “real” size of the file is indeed smaller that 20 GB. The more data I’ll be adding into my disk, the more the size for the file will grow till it reaches the maximum size of 20 GB
Click to enlarge
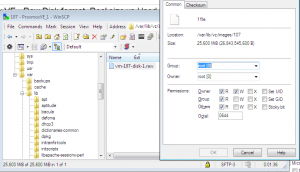
Now, let check the virtual machine using the raw format disk. In the web interface, we know that the vm107 should have a disk of maximum 25 GB. Normally, the raw format can be compared to thick disk provisioning meaning that a file of 25 GB will be created on the PVE host. So, again if i make a connection to my host and check the size of the virtual disk file, I can see indeed that a file of 25 GB has been created by the system.
Click to enlarge
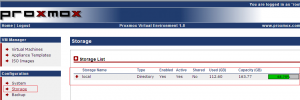
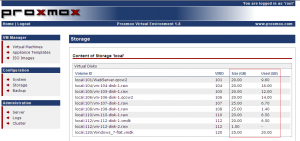
So were is the problem ? So far, we have checked indeed that qcow2 format create dynamic virtual disk and that raw format is creating fixed file disk. However, within the PVE Web Interface, if you click on the Storage Link
Click to enlarge
Then in the mid pane, you click on the storage location you have (in my case, I’m only using local disk in my lab), you will see a page similar to the following
Click to enlarge
If you have a look at the last 2 columns, for the VM101 (the one using the qcow2 format image), the information reported is correct. The used disk space should be smaller than the size. However, If you look the VM107 – the one using the raw format – there is a discrepancy between the used size and the size of the disk. The used disk space is really small and Proxmox VE will use this information to report the free available disk space. How this is possible ? We have seen that the raw file has been created in the PVE host and it’s showing 25 GB
The explanation
To explain this behavior, we have first to have a look on how the Proxmox VE has been installed and which Storage Type is effectively in used. In this scenario, I have a single PVE server that has been installed using the default settings. If you go to the storage section (within the PVE interface), you can see that the storage type is set to Directory.
Now, you have to know that the filesystem uses by the PVE software comes with a well-known feature called sparse file. To have a detailed explanation of sparse file, you can have a look at wikipedia. In simple words, sparse file efficiently save disk space by taking into account only the block that have data and will not count “zero data block” (i.e. no data written in the disk).
The combination of the storage type and the sparse file technology explains the fact that the used disk size is different than the real disk size. We are storing our virtual disk file on a filesystem that will take into account only the data effectively written.
Important Note :
This happens because we are using Directory Storage Type. If you were using LVM technology, the size of the raw disk will be reported correctly within the Proxmox VE console. (We will explain in another post LVM technology and how PVE can use it )
How to Provision Full & Fixed Disk space within Proxmox VE
So, what if you are using a default PVE installation and storage type is using defaults (i.e. local disk and directory storage type) and you want to provision “real” thick disks ? Can we do that ?
With some workarounds, yes, you could provision “real” thick disks.
To be honest, I like the fact that only the used data is taken into account by my Proxmox VE system because this allow me to create more virtual machines than the system should host. This become really handy in test labs where you have limited hardware and budget.
On the other hand, I can understand that some people might be uncomfortable with such situation. If they provision a 25 GB disk in PVE, they want to be sure that this disk space would be allocated completely for this virtual machine (especially if they are in production).
So, you wanna know you can provision thick disk ! So, please have a look to the following 2 options :
Option 1 – Using the dd command to create Virtual disk prior the virtual machine
To create “thick” virtual disk, you can use the famous linux dd command. In this option, you will have to create the virtual disk using the dd command and then attach this disk to the virtual machine that will be using it.
To simplify the process, you can create your virtual machine first through the web Interface and then when your thick disk is created, attach it within the web console to your virtual machine and get rid of the initial virtual disk.
The command is quite simple. At the PVE console or using putty, you can type the following command to create a disk of 20 GB that will be seen by the system as full
Note : to know more about dd command, have a look here or google for more specific examples
dd if=/dev/zero of=vm-disk-id.raw bs=1024k count=20000 (or 20k) (this will create a disk of 20 GB)
Note : The disk creation process will be longer (given that you want to write data on the file system)
Option 2 – Inflate Virtual disk for Windows Operating System
The other option is to try to inflate the size of the existing virtual disk. To perform this operation, you have multiple options. You can use built-in command line of the operating system or third party tools. That’s up to you
Note : This process can take some time because again you want to write “real” data on the disk
If you are running Windows Operating System, you can use the fsutil command to create a dummy file and erase the zero block. From a command prompt (within the virtual machine), you can type the following commands
fsutil volume diskfree c:
fsutil file createnew c:\Fill.txt <%Size%>
fsutil file setvaliddata c:\fill.txt <%Size%>
fsutil file setzerodata offset=1024 length=<% length%> c:\fill.txt
Let’s explain each of these commands:
the first command will provide you output the value in bytes of the empty space available within the Operating system. We will replace the <%Size> variable in the remaining commands by the value outputted by the first command. The second command will simply create a text file called fill.txt under the c drive letter. The size of the file will be equal to the available free space within the virtual disk. Because the fsutil file is also creating sparse file, we need to write data in this fake file. this is the purposes of the two remaining commands
Using this set of command does, you will simply create a big file containing data. When the file is created, you can simply delete it and if you check again in Proxmox VE web interface in the storage area, you should see that the disk size should be equal (or nearly equal) to the used disk size.
Note :Using this command line, you could automate the process of erasing zero block and inflate the size of the disk by creating a simple batch file.
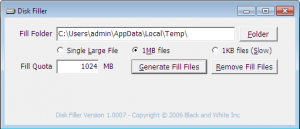
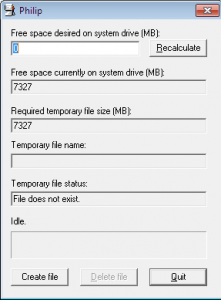
The other options is to use third-party tools (yes, they are free). You can use the following tools
Click to enlarge
Click to enlarge
The principle is exactly the same as the fsutil command line. these 2 tools will create a dummy file containing dummy data and will thus fill in the disk. Again, the size of the disk will be equal to the value of the used disk file. When the file is created within the virtual machine, do not forget to delete it or the operating system will complain that there not enough disk space.
Final Words
Proxmox VE allows you to efficiently use the disk space by only taking into account the disk space that’s really in used by the virtual machine. With this approach, you can increase the number of virtual machine your Proxmox VE can hosts. I like this and I tend not to modify this default behavior. The risk is that you can potentially run out of disk space within your Proxmox VE hosts if you do not pay attention to this. For people who want to be sure that the size of the virtual disk will be fully allocated within the Proxmox VE – and thus behaving as a real thick disk provisioning, we have seen that there are some workarounds available.
Please remember that the situation explained here happens when a standard Proxmox VE installation has been performed and the storage type is set to directory. Because the Proxmox VE filesystem can use the sparse file feature, there will be a discrepancy between the used disk size and the real disk size. If you plan to use LVM technology, you will not encounter the issue. The virtual disk will be a volume within the volume group and the volume will have the exact same size as the virtual disk.
I hope this post would be useful for some of us.
PS : There will be another post coming about LVM technology and how PVE use it. But you will need to be patient because I’m starting to have again a huge workload.
Till next time
See ya
Note : This post is based on the comments/questions of Fabien regarding this post. Thank you Fabien for your comments,test and inputs on this topic : -)

Hi,
1) Typo.
Now, you have to know that the filesystem uses by the PVE software comes with a well-known feature called spare file.
sparse should be sparse.
2) What I do to convert into non-sparse disks. First I create the disks from the UI and then I run:
cd /var/lib/vz/images/VMID
for ffile in *raw ; do \
cp –sparse=never ${ffile} \
${ffile}.SPARSE ; \
rm ${ffile} ;\
mv ${ffile}.SPARSE ${ffile}; \
done
3) I prefer non sparse files because I find that the system has a better performance for them.
Thank you for your article.
Hello Adrian15,
Thank you for noticing the typo – I have updated the spare file to sparse file. I was typing to fast : -P
Thank you for the snippet code on how to convert to non-sparse disks. Can be really useful
Till next time
See ya around