|
|
The script hereafter is outdated and has been replaced by a newer version. Please Check the Download page for latest version. |
Hello World,
Since the release of Ubuntu 18.04, we have been working mainly on the xRDP standard installation script. Ubuntu 18.04 ships with a recent xrdp package which is available through the Ubuntu repository. Using the xrdp package, installing the software has become really easy. However, some additional configuration tasks are still needed after the installation of the xRDP package in order to have a good user experience. Looking around through our blog, you could see the amount of work performed in order to ease the installation/configuration of xRDP. Hereafter, we are providing a list of posts related to Ubuntu 18.04 and xRDP.
- Ubuntu 18.04 – Install xRDP the easy way (Scripted Installation – Version 0.2)
- xRDP – The Infamous “Authentication Required to Create Managed Color Device” Explained
- xRDP – How to Fix the Infamous system crash popups in Ubuntu 18.04 (and previous versions)
- xRDP – How to Fix Theme issues in Ubuntu 18.04 remote session
- xRDP – Install xRDP the easy way (Scripted Installation – Version 0.3)
- xRDP – How to Fix different lock screen colors in Ubuntu 18.04 remote session
- xRDP – Install xRDP the easy way (Scripted Installation – Version 0.4)
- Install xRDP the easy way (Scripted Installation – Version 0.5)
Because the (recent) xrdp package is made available in Ubuntu repository, we didn’t look into custom installation script anymore. The latest version of the script was set to version 2.0 and was used to perform the installation on Ubuntu 17.10 (see here). A custom script installation of xRDP means for us that we obtain the latest xrdp binaries, compile them and perform the installation. Not a lot of people have been requesting for an update for the custom installation script but some did.
So,i n this post, we will provide an updated version of the custom installation script.
So let’s proceed…!
xRDP Custom install on Ubuntu 18.04
Assumptions
The script has been developed and updated based on the following assumptions
- Ubuntu 18.04 are supported by the script
- At time of writing, all available updates were installed on the Ubuntu machine
- No alternative Desktop will be used. Default Ubuntu Gnome desktop will be the default desktop accessible via the xrdp session
- Ubuntu machine has been installed as virtual machine using Virtualbox software with sound enabled
- Default session used is x11
- Internet connection is available so latest xrdp packages can be downloaded
The Script version 2.1
The script version 2.1 introduces a lot of changes compared to the version 2.0. All the improvements included in the Std installation script have been included in this version of the script. The following list summarizes the changes included in Version 2.1.
- drop support for Ubuntu 17.10 as this version has reached end of support status
- two parameters can be passed to configure additional settings.
- include the updated code to create the polkit file
- include the code to fix the look’n feel the first time a user logs into a remote session
- include the code to enable sound redirection as an option
- include the code to fix the gdm lock screen discrepancy color within the Remote session
- This version of the script will not restart the machine. This will allow you to review the installation steps of the script by scrolling up and down your terminal console
Important Note :
If you copy/paste the script, you might encounter some issues because font formatting might be not maintained during the copy/paste operation. Please ensure that format is accurate before launching the script. A downloadable version of the script is available at the bottom of the post
Disclaimer : As usual, use this at your own risk !!
#####################################################################################################
# Script_Name : install-xrdp-2.1.sh
# Description : Perform a custom installation of xrdp
# on ubuntu 17.10 and later
# Date : August 2018
# written by : Griffon
# Web Site :http://www.c-nergy.be - http://www.c-nergy.be/blog
# Version : 2.1
# History : 2.1 - Add logic to enable sound redirection for U18.04 and later
# - re-write code logic to include functions
# - Removed support for Ubuntu 17.10 as reached end of support
# : 2.0 - Initial Version for Ubuntu system with Gnome Desktop
# : 1.x - Script for Ubuntu 16.04.x Version
# Disclaimer : Script provided AS IS. Use it at your own risk....
####################################################################################################

#---------------------------------------------------#
# Detecting if Parameters passed to script ....
#---------------------------------------------------#

while getopts g:s: option
do
case "${option}"
in
g) fixGDM=${OPTARG};;
s) fixSound=${OPTARG};;
esac
done

#---------------------------------------------------#
# Script Version information Displayed #
#---------------------------------------------------#

echo
/bin/echo -e "\e[1;36m !-------------------------------------------------------------!\e[0m"
/bin/echo -e "\e[1;36m ! Custom XRDP Installation Script - Ver 2.1 !\e[0m"
/bin/echo -e "\e[1;36m ! Written by Griffon - August 2018 - www.c-nergy.be !\e[0m"
/bin/echo -e "\e[1;36m !-------------------------------------------------------------!\e[0m"
echo

#--------------------------------------------------------------------------#
# -----------------------Function Section - DO NOT MODIFY -----------------#
#--------------------------------------------------------------------------#

#---------------------------------------------------#
# Function 1 - Install Prereqs...
#---------------------------------------------------#

install_prereqs() {
echo
/bin/echo -e "\e[1;33m !---------------------------------------------!\e[0m"
/bin/echo -e "\e[1;33m ! Installing PreReqs packages..Proceeding. ! \e[0m"
/bin/echo -e "\e[1;33m !---------------------------------------------!\e[0m"
echo

sudo apt-get -y install libx11-dev libxfixes-dev libssl-dev libpam0g-dev libtool libjpeg-dev flex bison gettext autoconf libxml-parser-perl libfuse-dev xsltproc libxrandr-dev python-libxml2 nasm xserver-xorg-dev fuse pkg-config git intltool xserver-xorg-core

}

#---------------------------------------------------#
# Function 2 - Download XRDP Binaries...
#---------------------------------------------------#
get_binaries()
{
echo
/bin/echo -e "\e[1;33m !---------------------------------------------!\e[0m"
/bin/echo -e "\e[1;33m ! Download xRDP Binaries.......Proceeding. ! \e[0m"
/bin/echo -e "\e[1;33m !---------------------------------------------!\e[0m"
echo

cd ~/Downloads

## -- Download the xrdp latest files
echo
/bin/echo -e "\e[1;32mPreparing download xrdp package\e[0m"
/bin/echo -e "\e[1;32m-------------------------------\e[0m"
echo
git clone https://github.com/neutrinolabs/xrdp.git
/bin/echo -e "\e[1;32mPreparing download xorgxrdp package\e[0m"
/bin/echo -e "\e[1;32m-----------------------------------\e[0m"
echo
git clone https://github.com/neutrinolabs/xorgxrdp.git

}

#---------------------------------------------------#
# Function 3 - compiling xrdp and xorgxrdp...
#---------------------------------------------------#

compile_xrdp()
{
# -- Compiling xrdp package first
echo
/bin/echo -e "\e[1;33m !---------------------------------------------!\e[0m"
/bin/echo -e "\e[1;33m ! Compile xRDP packages .......Proceeding. ! \e[0m"
/bin/echo -e "\e[1;33m !---------------------------------------------!\e[0m"
echo


cd ~/Downloads/xrdp
sudo ./bootstrap
sudo ./configure --enable-fuse --enable-jpeg
sudo make

#-- check if no error during compilation

if [ $? -eq 0 ]
then
/bin/echo -e "\e[1;33m |-| Make Operation Completed successfully \e[0m"

else
echo
echo
/bin/echo -e "\e[1;31m !---------------------------------------------!\e[0m"
/bin/echo -e "\e[1;31m ! Error while Executing make !\e[0m"
/bin/echo -e "\e[1;31m ! The Script is exiting.... !\e[0m"
/bin/echo -e "\e[1;31m !---------------------------------------------!\e[0m"
exit
fi
sudo make install

}

#---------------------------------------------------#
# Function 4 - compiling xorgxrdp...
#---------------------------------------------------#

compile_xorgxrdp()
{
echo
/bin/echo -e "\e[1;33m !---------------------------------------------!\e[0m"
/bin/echo -e "\e[1;33m ! Compile xorgxrdp packages....Proceeding. ! \e[0m"
/bin/echo -e "\e[1;33m !---------------------------------------------!\e[0m"
echo

cd ~/Downloads/xorgxrdp
sudo ./bootstrap
sudo ./configure
sudo make

# check if no error during compilation
if [ $? -eq 0 ]
then
echo
/bin/echo -e "\e[1;33m |-| Make Operation Completed successfully \e[0m"
echo
else
echo
/bin/echo -e "\e[1;31m !---------------------------------------------!\e[0m"
/bin/echo -e "\e[1;31m ! Error while Executing make !\e[0m"
/bin/echo -e "\e[1;31m ! The Script is exiting.... !\e[0m"
/bin/echo -e "\e[1;31m !---------------------------------------------!\e[0m"
exit
fi
sudo make install
}


#---------------------------------------------------#
# Function 5 - create services ....
#---------------------------------------------------#

enale_service() {
echo
/bin/echo -e "\e[1;33m !---------------------------------------------!\e[0m"
/bin/echo -e "\e[1;33m ! Creating xRDP services.......Proceeding. ! \e[0m"
/bin/echo -e "\e[1;33m !---------------------------------------------!\e[0m"
echo

sudo systemctl daemon-reload
sudo systemctl enable xrdp.service
sudo systemctl enable xrdp-sesman.service
sudo systemctl start xrdp

}

#---------------------------------------------------#
# Function 6 - Install Gnome Tweak Tool....
#---------------------------------------------------#

install_tweak()
{
echo
/bin/echo -e "\e[1;33m !---------------------------------------------!\e[0m"
/bin/echo -e "\e[1;33m ! Installing Gnome Tweak...Proceeding... ! \e[0m"
/bin/echo -e "\e[1;33m !---------------------------------------------!\e[0m"
echo
sudo apt-get install gnome-tweak-tool -y
}

#--------------------------------------------------------------------#
# Function 7 - Allow console Access ....(seems optional in u18.04)
#--------------------------------------------------------------------#

allow_console()
{
echo
/bin/echo -e "\e[1;33m !---------------------------------------------!\e[0m"
/bin/echo -e "\e[1;33m ! Granting Console Access...Proceeding... ! \e[0m"
/bin/echo -e "\e[1;33m !---------------------------------------------!\e[0m"
echo
sudo sed -i 's/allowed_users=console/allowed_users=anybody/' /etc/X11/Xwrapper.config
}

#---------------------------------------------------#
# Function 8 - create policies exceptions ....
#---------------------------------------------------#

create_polkit()
{
echo
/bin/echo -e "\e[1;33m !---------------------------------------------!\e[0m"
/bin/echo -e "\e[1;33m ! Creating Polkit File...Proceeding... ! \e[0m"
/bin/echo -e "\e[1;33m !---------------------------------------------!\e[0m"
echo

sudo bash -c "cat >/etc/polkit-1/localauthority/50-local.d/45-allow.colord.pkla" <<EOF
[Allow Colord all Users]
Identity=unix-user:*
Action=org.freedesktop.color-manager.create-device;org.freedesktop.color-manager.create-profile;org.freedesktop.color-manager.delete-device;org.freedesktop.color-manager.delete-profile;org.freedesktop.color-manager.modify-device;org.freedesktop.color-manager.modify-profile
ResultAny=no
ResultInactive=no
ResultActive=yes
EOF

}

#---------------------------------------------------#
# Function 9 - Fixing Theme and Extensions ....
#---------------------------------------------------#

fix_theme()
{
echo
/bin/echo -e "\e[1;33m !---------------------------------------------!\e[0m"
/bin/echo -e "\e[1;33m ! Fix Theme and extensions...Proceeding... !\e[0m"
/bin/echo -e "\e[1;33m !---------------------------------------------!\e[0m"
echo

#Check if script has already run....
if grep -xq "#fixGDM-by-Griffon" /etc/xrdp/startwm.sh; then
echo "Skip theme fixing as script has run at least once..."
else
#Set xRDP session Theme to Ambiance and Icon to Humanity
sudo sed -i.bak "4 a #fixGDM-by-Griffon\ngnome-shell-extension-tool -e ubuntu-appindicators@ubuntu.com\ngnome-shell-extension-tool -e ubuntu-dock@ubuntu.com\n\nif [ -f ~/.xrdp-fix-theme.txt ]; then\necho 'no action required'\nelse\ngsettings set org.gnome.desktop.interface gtk-theme 'Ambiance'\ngsettings set org.gnome.desktop.interface icon-theme 'Humanity'\necho 'check file for xrdp theme fix' >~/.xrdp-fix-theme.txt\nfi\n" /etc/xrdp/startwm.sh
fi
echo
}


#---------------------------------------------------#
# Function 10 - Fixing GDM - As an Option ....
#---------------------------------------------------#
fix_gdm()
{
echo
/bin/echo -e "\e[1;33m !---------------------------------------------!\e[0m"
/bin/echo -e "\e[1;33m ! Fix for GDM Lock Screen color... !\e[0m"
/bin/echo -e "\e[1;33m !---------------------------------------------!\e[0m"
echo
# Step 1 - Install prereqs for compilation later on
sudo apt-get -y install libglib2.0-dev-bin
sudo apt-get -y install libxml2-utils

# extract gresource info (from url...)
workdir=${HOME}/shell-theme
if [ ! -d ${workdir}/theme ]; then
mkdir -p ${workdir}/theme
mkdir -p ${workdir}/theme/icons

fi
gst=/usr/share/gnome-shell/gnome-shell-theme.gresource

for r in `gresource list $gst`; do
gresource extract $gst $r >$workdir/${r#\/org\/gnome\/shell/}
done

/bin/echo -e "\e[1;33m |-| Creating XML File... \e[0m"
# create the xml file
bash -c "cat >${workdir}/theme/gnome-shell-theme.gresource.xml" <<EOF
<?xml version="1.0" encoding="UTF-8"?>
<gresources>
<gresource prefix="/org/gnome/shell/theme">
<file>calendar-arrow-left.svg</file>
<file>calendar-arrow-right.svg</file>
<file>calendar-today.svg</file>
<file>checkbox-focused.svg</file>
<file>checkbox-off-focused.svg</file>
<file>checkbox-off.svg</file>
<file>checkbox.svg</file>
<file>close-window.svg</file>
<file>close.svg</file>
<file>corner-ripple-ltr.png</file>
<file>corner-ripple-rtl.png</file>
<file>dash-placeholder.svg</file>
<file>filter-selected-ltr.svg</file>
<file>filter-selected-rtl.svg</file>
<file>gnome-shell.css</file>
<file>gnome-shell-high-contrast.css</file>
<file>logged-in-indicator.svg</file>
<file>no-events.svg</file>
<file>no-notifications.svg</file>
<file>noise-texture.png</file>
<file>page-indicator-active.svg</file>
<file>page-indicator-inactive.svg</file>
<file>page-indicator-checked.svg</file>
<file>page-indicator-hover.svg</file>
<file>process-working.svg</file>
<file>running-indicator.svg</file>
<file>source-button-border.svg</file>
<file>summary-counter.svg</file>
<file>toggle-off-us.svg</file>
<file>toggle-off-intl.svg</file>
<file>toggle-on-hc.svg</file>
<file>toggle-on-us.svg</file>
<file>toggle-on-intl.svg</file>
<file>ws-switch-arrow-up.png</file>
<file>ws-switch-arrow-down.png</file>
</gresource>
</gresources>
EOF
cd ${workdir}/theme
/bin/echo -e "\e[1;33m |-| Modify Css... \e[0m"
sed -i -e 's/background: #2e3436/background: #2c00e1/g' ~/shell-theme/theme/gnome-shell.css

##Delete the file noise-texture.png (grey one)
rm ${workdir}/theme/noise-texture.png

/bin/echo -e "\e[1;33m |-| Download Purple image file... \e[0m"
#Download the noise-texture.png with purple background
wget http://www.c-nergy.be/downloads/noise-texture.png

/bin/echo -e "\e[1;33m |-| Compile Resource File... \e[0m"
#Compile file and copy to correct location....
cd ${workdir}/theme
glib-compile-resources gnome-shell-theme.gresource.xml

/bin/echo -e "\e[1;33m |-| Copy file to target location... \e[0m"

# make a backup of the file and copy the file....
sudo cp /usr/share/gnome-shell/gnome-shell-theme.gresource /usr/share/gnome-shell/gnome-shell-theme.gresource.bak
sudo cp ${workdir}/theme/gnome-shell-theme.gresource /usr/share/gnome-shell/gnome-shell-theme.gresource
echo
}

#---------------------------------------------------#
# Function 11 - Enable Sound Redirection ....
#---------------------------------------------------#

enable_sound() {

echo
/bin/echo -e "\e[1;33m#---------------------------------------------#\e[0m"
/bin/echo -e "\e[1;33m! Enable Sound Redirection # \e[0m"
/bin/echo -e "\e[1;33m#---------------------------------------------#\e[0m"
echo

# Step 1 - Enable Source Code Repository
sudo apt-add-repository -s 'deb http://be.archive.ubuntu.com/ubuntu/ '$codename' main restricted'
sudo apt-add-repository -s 'deb http://be.archive.ubuntu.com/ubuntu/ '$codename' restricted universe main multiverse'
sudo apt-add-repository -s 'deb http://be.archive.ubuntu.com/ubuntu/ '$codename'-updates restricted universe main multiverse'
sudo apt-add-repository -s 'deb http://be.archive.ubuntu.com/ubuntu/ '$codename'-backports main restricted universe multiverse'
sudo apt-add-repository -s 'deb http://be.archive.ubuntu.com/ubuntu/ '$codename'-security main restricted universe main multiverse'

sudo apt-get update

# Step 2 - Build some packages needed for U17.10

sudo apt build-dep pulseaudio

# Step 3 - Download pulseaudio source in /tmp directory


cd /tmp
sudo apt source pulseaudio

# Step 3 - Compile
echo
echo "compile pluse....."
echo
pulsever=$(pulseaudio --version | awk '{print $2}')

echo
echo $pulsever
echo

cd /tmp/pulseaudio-$pulsever
sudo ./bootsrap
sudo ./configure

# Step 5 - Create xrdp sound modules
echo
echo "copy files to final location....."
echo
cd ~/Downloads/xrdp/sesman/chansrv/pulse
sudo make PULSE_DIR="/tmp/pulseaudio-$pulsever"


# Step 6 - copy files to correct location

sudo install -t "/var/lib/xrdp-pulseaudio-installer" -D -m 644 *.so
sudo install -t "/usr/lib/pulse-$pulsever/modules" -D -m 644 *.so
echo

}


#--------------------------------------------------------------------------#
# -----------------------END Function Section -----------------#
#--------------------------------------------------------------------------#

#--------------------------------------------------------------------------#
#------------ MAIN SCRIPT SECTION -------------------#
#--------------------------------------------------------------------------#
#---------------------------------------------------#
# Step 0 - Try to Detect Ubuntu Version....
#---------------------------------------------------#

version=$(lsb_release -sd)
codename=$(lsb_release -sc)

echo
/bin/echo -e "\e[1;33m |-| Detecting Ubuntu version \e[0m"

if [[ "$version" = *"Ubuntu 18.04"* ]];
then
/bin/echo -e "\e[1;32m |-| Ubuntu Version : $version\e[0m"
else
echo
/bin/echo -e "\e[1;31m !------------------------------------------------------------!\e[0m"
/bin/echo -e "\e[1;31m ! Your system is not running Ubuntu 18.04 Edition and later !\e[0m"
/bin/echo -e "\e[1;31m ! The script has been tested only on Ubuntu 18.04 and later !\e[0m"
/bin/echo -e "\e[1;31m ! The script is exiting... !\e[0m"
/bin/echo -e "\e[1;31m !------------------------------------------------------------!\e[0m"
echo
exit
fi

/bin/echo -e "\e[1;33m |-| Detecting Parameters \e[0m"


#Detect if argument passed
if [ "$fixSound" = "yes" ];
then
/bin/echo -e "\e[1;32m |-| Sound Redirection Option...: [YES]\e[0m"
else
/bin/echo -e "\e[1;32m |-| Sound Redirection Option...: [NO]\e[0m"
fi

if [ "$fixGDM" = "yes" ];
then
/bin/echo -e "\e[1;32m |-| gdm fix Option.............: [YES]\e[0m"
else
/bin/echo -e "\e[1;32m |-| gdm fix Option.............: [NO]\e[0m"
fi
echo

#---------------------------------------------------------#
# Step 1 - Executing the installation & config tasks .... #
#---------------------------------------------------------#

echo
/bin/echo -e "\e[1;36m !-------------------------------------------------------------!\e[0m"
/bin/echo -e "\e[1;36m ! Installation Process starting.... !\e[0m"
/bin/echo -e "\e[1;36m !-------------------------------------------------------------!\e[0m"
echo
/bin/echo -e "\e[1;33m |-| Proceed with installation..... \e[0m"
echo

install_prereqs
get_binaries
compile_xrdp
compile xorgxrdp
enable_service
install_tweak
allow_console
create_polkit
fix_theme


if [ "$fixGDM" = "yes" ];
then
fix_gdm
fi

if [ "$fixSound" = "yes" ];
then
enable_sound
fi


#---------------------------------------------------#
# Step 2 - Credits ....
#---------------------------------------------------#
echo
/bin/echo -e "\e[1;36m#-----------------------------------------------------------------------#\e[0m"
/bin/echo -e "\e[1;36m# Installation Completed #\e[0m"
/bin/echo -e "\e[1;36m# Please test your xRDP configuration.A Reboot Might be required... #\e[0m"
/bin/echo -e "\e[1;36m# Written by Griffon - August 2018 - Ver 2.1 - install-xrdp-2.1.sh #\e[0m"
/bin/echo -e "\e[1;36m#-----------------------------------------------------------------------#\e[0m"
echo
How to Use the Script
Set Execute Right on the script
Download the install-xrdp-2.1.sh script to your system. You need to mark the script as executable . To do this, perform the following action in a terminal console
chmod +x ~/Downloads/install-xrdp-2.1.sh
Note : Adjust the path where the install-xrdp-2.1.sh script to reflect your environment
Execute the script
The custom install script can be executed in two ways :
- Standard way : You do not pass any parameters and xrdp package + additional tweaks will be performed by the script
- Advanced way : You pass one or both parameters to enable additional features and the script will proceed with the installation and perform these additional config steps
Before running it, ensure that internet connection is available (so you can download the necessary packages needed for the installation)
Standard way
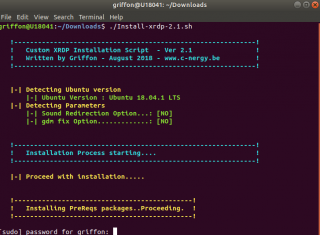
In the standard way, you simply execute the script with no parameters. In this scenario, no fix for the GDM visual issue (see here) will be implemented and no sound redirection (see here) will be implemented but the script will install xRDP and configure the basic visual theme (Dock, Theme config) on the system.
To install xRDP, simply open a Terminal console. In the Terminal console, Browse to the location where the script has been stored and then issue the following command
./install-xrdp-2.1.sh
The script will start executing and will also display some basic information about your installation. When the xrdp installation package will start, you be requested to enter your password
Click on picture for better resolution
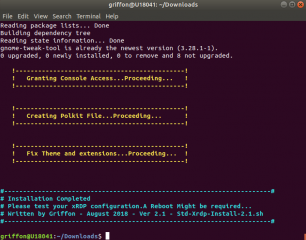
Provide the password and proceed with the installation. Wait for completion of the script. The script might ask again to enter your password one time more and then should proceed till the completion. The machine will not reboot automatically when done so you can review the actions performed by the script….
Click on picture for better resolution
At this stage, you have completed a basic installation and you will have a workable remote desktop solution. Now, let’s assume that you want to enable the additional options the script is offering. After running the script in the standard way a first time, even if not designed for, you could re-run the script and pass the parameters to enable features wanted. The script will re-run and pass the new parameters and your system should be working with the additional features enabled.
Advanced way
The custom install-xrdp script version 2.1 accepts a two parameters (so far). The script will accept one parameter or both parameters and execute the appropriate actions. Using parameters, a user can decide to enable sound redirection or to fix the lock screen color for GDM within the xrdp session or both.
To implement the lock screen fix for GDM within the xrdp session, use this syntax
./install-xrdp-2.1.sh -g yes
Click on picture for better resolution
To implement the sound redirection fix within the xrdp session, use this syntax
./install-xrdp-2.1.sh -s yes
Click on picture for better resolution
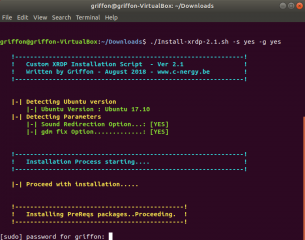
To implement both the sound redirection fix and gdm lock screen fix within the xrdp session, use this syntax
./install-xrdp-2.1.sh -s yes -g yes
Click on picture for better resolution
As you can see, whatever the option you are selecting, the script is providing a summary of the options. While the script is running you might need to provide a password. Provide it and let the script complete.
Click on picture for better resolution
When script execution is completed, the machine will not reboot. At completion, it’s recommended to reboot the machine so the changes made to the system can be applied accordingly.
Click on picture for better resolution
Note :
If you select the sound redirection option, you might need to reboot your machine at least twice to have it working. If after two reboots, no sound is there, this means that there might be a problem with the installation of this feature….
Test your configuration
To Test your configuration, you need to perform the following steps
- step 1 – Logout from the Ubuntu machine because you can only have a single connection to the machine for the same user (either local either remote)
- step 2 – Start your favorite remote desktop client and provide the ip address or hostname of your ubuntu machine
- step 3 – At this stage, you should see the xRDP login page. Provide your credentials
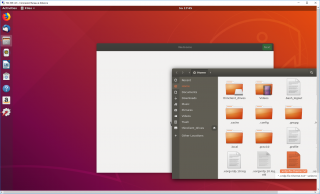
- step 4 – At this stage, you should see your standard Ubuntu Gnome Desktop with the Dock visible, the Ambiance theme displayed and the icons set are set correctly as well
Click on picture for better resolution
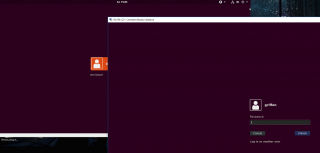
- step 5 – Lock the remote session and unlock it again. If you have executed the script with the fixGDM parameter, the background color should be purple (and not gray)…
Click on picture for better resolution
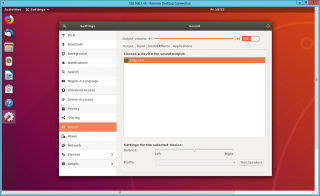
- step 6 – Check if the Sound redirection option has been enabled accordingly. If you open, in your remote session, the Sound Card settings, you should see the xrdp_sink sound card object. If you see this, there is a great chance that the sound redirection would work for your Remote Session
Click on picture for better resolution
Download the Script
Please download the script : install-xrdp-2.1.sh
Final Notes
This is it for this post ! As requested by some people, the custom xrdp installation script has been updated and support the latest version of Ubuntu 18.04. Using this version of the script, you can have the latest xrdp version installed on your system (which is at time of writing 0.9.7). The script includes features like sound redirection and a bunch of small fixes that improve the usability and user experience.
We hope you will enjoy this one, play around with it and provide some feedback
Till next time
See ya


Works like a dream … thanks very much.
I only have one problem which I hope you can help me with.
I live in Norway and use a Norwegian keyboard and run on a Mac client. This keyboard is initially detected and works almost correctly. However, I have not found a way to type the “~” key, which is quite frustrating.
Normally “~” is typed by pressing ++”¨” (that is the key to the upper-left of the return key”. Do you know how I can remap this ?
Thanks
Ian
Thank you very much for creating such a good script.
I installed ubuntu 18.04 on each of my two computers.
One was completely new on the empty hard disk and the other was upgraded from ubuntu 16.04 to 18.04.
I ran this script on the computer where ubuntu 18.04 had installed newly and found that xrdp works well.
But, I ran this script on the other computer upgraded from 16.04 and it did not work.
On computers that upgraded from 16.04 to 18.04, I ran the xrdp installation script you provided earlier for ubuntu 16.04.
I think something went wrong because of the previous xrdp installation that I ran on 16.04.
So it would be nice if you provide a complete uninstaller.
If you provide an uninstaller, I would like to use it to completely uninstall the existing xrdp and its settings, and then reinstall xrdp using this script for 18.04.
@Kyuwon Kim,
We have described the process to remove xrdp completely from a system through this post (http://c-nergy.be/blog/?p=11454)…
Give it a try and see if this can help…We never had this issue so we do not know…. Provide feedback if possible….
Hope this help
Till next time
See ya
This worked great for me. Thank you for the time you’re putting into it!
I spooled up a VPS using Ubuntu Server 18.04, ran an “apt install ubuntu-gnome-desktop”, and then ran your script. As I was just testing this for a few minutes, I did everything as root, and the only issue I ran into was that the script returns an error if /root/Downloads doesn’t exist.
@Chris;
This is a known issue. This is why we mention that the script should be run as a normal user
Thank for you visit and thanks for providing feedback
Till next time
See ya
This works nicely for a single monitor, but I typically have 3 (2 desktop monitors and my laptop display). When I try to connect with “using all monitors”, I get a brief black screen and then the session terminates. I think the following are the relevant lines from syslog:
Sep 25 14:20:48 neil-Virtual-Machine org.gnome.Shell.desktop[5639]: Window manager warning: Configuring CRTC 683 with mode 682 (1920 x 1080 @ 50.000000) at position 5120, 0 and transform 0 failed
Sep 25 14:20:48 neil-Virtual-Machine org.gnome.Shell.desktop[5639]: X Error of failed request: BadMatch (invalid parameter attributes)
Sep 25 14:20:48 neil-Virtual-Machine org.gnome.Shell.desktop[5639]: Major opcode of failed request: 140 (RANDR)
Sep 25 14:20:48 neil-Virtual-Machine org.gnome.Shell.desktop[5639]: Minor opcode of failed request: 7 (RRSetScreenSize)
Sep 25 14:20:48 neil-Virtual-Machine org.gnome.Shell.desktop[5639]: Serial number of failed request: 388
Sep 25 14:20:48 neil-Virtual-Machine org.gnome.Shell.desktop[5639]: Current serial number in output stream: 391
Sep 25 14:20:48 neil-Virtual-Machine gnome-session[5496]: gnome-session-binary[5496]: WARNING: App ‘org.gnome.Shell.desktop’ exited with code 1
Sep 25 14:20:48 neil-Virtual-Machine gnome-session-binary[5496]: WARNING: App ‘org.gnome.Shell.desktop’ exited with code 1
Sep 25 14:20:48 neil-Virtual-Machine org.gnome.Shell.desktop[5653]: Window manager warning: Configuring CRTC 683 with mode 682 (1920 x 1080 @ 50.000000) at position 5120, 0 and transform 0 failed
Sep 25 14:20:48 neil-Virtual-Machine org.gnome.Shell.desktop[5653]: X Error of failed request: BadMatch (invalid parameter attributes)
Sep 25 14:20:48 neil-Virtual-Machine org.gnome.Shell.desktop[5653]: Major opcode of failed request: 140 (RANDR)
Sep 25 14:20:48 neil-Virtual-Machine org.gnome.Shell.desktop[5653]: Minor opcode of failed request: 7 (RRSetScreenSize)
Sep 25 14:20:48 neil-Virtual-Machine org.gnome.Shell.desktop[5653]: Serial number of failed request: 388
Sep 25 14:20:48 neil-Virtual-Machine org.gnome.Shell.desktop[5653]: Current serial number in output stream: 391
Sep 25 14:20:48 neil-Virtual-Machine gnome-session[5496]: gnome-session-binary[5496]: WARNING: App ‘org.gnome.Shell.desktop’ exited with code 1
Sep 25 14:20:48 neil-Virtual-Machine gnome-session[5496]: gnome-session-binary[5496]: WARNING: App ‘org.gnome.Shell.desktop’ respawning too quickly
Sep 25 14:20:48 neil-Virtual-Machine gnome-session-binary[5496]: WARNING: App ‘org.gnome.Shell.desktop’ exited with code 1
Sep 25 14:20:48 neil-Virtual-Machine gnome-session-binary[5496]: Unrecoverable failure in required component org.gnome.Shell.desktop
Sep 25 14:20:48 neil-Virtual-Machine gnome-session[5496]: gnome-session-binary[5496]: CRITICAL: We failed, but the fail whale is dead. Sorry….
It’s possible this is just a gnome error — any ideas?
@Neil,
We never tried xrdp with Mutli monitor configuration… If I read and google for some info, there is some sort of support for multimon…If time permit, we zill try to look into this issue…
Thank you for the visit and the comments/question raised here…
Till next time
See ya
Hello.
Thanks a million for you script.
But I have problems.
If first I logged by RDP I can’t login at workstation and backward, if I logged at my workstation I can’t to login via rdp – I see a blue screen.
I use Ubuntu 18.04 and I have some mistake.
1) I login remote and check input another language the first time and it works correctly;
2)Then I close remote client(without logout) and open it from other pc;
3) Check input other language and I have a mistake: Switch to other input works, but really typing English. For example: (en – Engilsh=> switch => uk – English);
4)This situation normalizes when I do log out and log in back.
Maybe you give me some advice on how to use it without log out.
Thanks.
@Oleg,
we have seen this behavior when we are working from different machines with different keyboard layout…
We have also seen this happening if a keyboard key is pressed which is in fact triggering the change of keyboard layout as well
As you mentioned, within your remote session, you can simply use the GUI to set the proper language setting and proceed
After two or three times, this behavior does not appear anymore and xrdp is using the correct language
Hope this help
Till next time
See ya
I would like to specify, are you use this behavior?
2)Then I close remote client(without logout) and open it from other pc;
Thanks.
@Oleg,
not sure which behavior you are talking about….but
1/ yes, we have seen that time to time keyboard settings changes but this normalize with time
2/ about sound redirection, so far we were able to redirect sound from virtual machines and physical machines
For the sound issue, is your sound device recognized in ubuntu,
run something like this aplay -l and see what’s the output
what do you get when you run pulseaudio -vvv ? -> do you get an error message, connection failed ?
Hope this help
Till next time
See ya
About keyboard
#not sure which behavior you are talking about….but
#1/ yes, we have seen that time to time keyboard settings changes but this normalize with time
For my RDP session, this behavior of keyboard don’t normalize a long time.
Maybe I can something restart don’t do log out every time?
Thanks.
About sound:
When I running commands from RDP session I get:
pulseaudio -vvv
I: [pulseaudio] main.c: setrlimit(RLIMIT_NICE, (31, 31)) failed: Operation not permitted
I: [pulseaudio] main.c: setrlimit(RLIMIT_RTPRIO, (9, 9)) failed: Operation not permitted
D: [pulseaudio] core-rtclock.c: Timer slack is set to 50 us.
I: [pulseaudio] core-util.c: Failed to acquire high-priority scheduling: Permission denied
I: [pulseaudio] main.c: This is PulseAudio 11.1
D: [pulseaudio] main.c: Compilation host: x86_64-pc-linux-gnu
D: [pulseaudio] main.c: Compilation CFLAGS: -g -O2 -fdebug-prefix-map=/build/pulseaudio-EOwPuF/pulseaudio-11.1=. -fstack-protector-strong -Wformat -Werror=format-security -Wall -W -Wextra -pipe -Wno-long-long -Wno-overlength-strings -Wunsafe-loop-optimizations -Wundef -Wformat=2 -Wlogical-op -Wsign-compare -Wformat-security -Wmissing-include-dirs -Wformat-nonliteral -Wpointer-arith -Winit-self -Wdeclaration-after-statement -Wfloat-equal -Wmissing-prototypes -Wredundant-decls -Wmissing-declarations -Wmissing-noreturn -Wshadow -Wendif-labels -Wcast-align -Wstrict-aliasing -Wwrite-strings -Wno-unused-parameter -ffast-math -fno-common -fdiagnostics-show-option -fdiagnostics-color=auto
D: [pulseaudio] main.c: Running on host: Linux x86_64 4.15.0-43-generic #46-Ubuntu SMP Thu Dec 6 14:45:28 UTC 2018
D: [pulseaudio] main.c: Found 4 CPUs.
I: [pulseaudio] main.c: Page size is 4096 bytes
D: [pulseaudio] main.c: Compiled with Valgrind support: no
D: [pulseaudio] main.c: Running in valgrind mode: no
D: [pulseaudio] main.c: Running in VM: no
D: [pulseaudio] main.c: Optimized build: yes
D: [pulseaudio] main.c: FASTPATH defined, only fast path asserts disabled.
I: [pulseaudio] main.c: Machine ID is eefd91855301490dbdf780fbb9cdfbdd.
I: [pulseaudio] main.c: Session ID is c3.
I: [pulseaudio] main.c: Using runtime directory /run/user/1001/pulse.
I: [pulseaudio] main.c: Using state directory /home/dev/.config/pulse.
I: [pulseaudio] main.c: Using modules directory /usr/lib/pulse-11.1/modules.
I: [pulseaudio] main.c: Running in system mode: no
E: [pulseaudio] pid.c: Daemon already running.
E: [pulseaudio] main.c: pa_pid_file_create() failed.
aplay -l
aplay: device_list:270: no soundcards found…
When I running commands from local session I get:
pulseaudio -vvv
I: [pulseaudio] main.c: setrlimit(RLIMIT_NICE, (31, 31)) failed: Operation not permitted
I: [pulseaudio] main.c: setrlimit(RLIMIT_RTPRIO, (9, 9)) failed: Operation not permitted
D: [pulseaudio] core-rtclock.c: Timer slack is set to 50 us.
D: [pulseaudio] core-util.c: RealtimeKit worked.
I: [pulseaudio] core-util.c: Successfully gained nice level -11.
I: [pulseaudio] main.c: This is PulseAudio 11.1
D: [pulseaudio] main.c: Compilation host: x86_64-pc-linux-gnu
D: [pulseaudio] main.c: Compilation CFLAGS: -g -O2 -fdebug-prefix-map=/build/pulseaudio-EOwPuF/pulseaudio-11.1=. -fstack-protector-strong -Wformat -Werror=format-security -Wall -W -Wextra -pipe -Wno-long-long -Wno-overlength-strings -Wunsafe-loop-optimizations -Wundef -Wformat=2 -Wlogical-op -Wsign-compare -Wformat-security -Wmissing-include-dirs -Wformat-nonliteral -Wpointer-arith -Winit-self -Wdeclaration-after-statement -Wfloat-equal -Wmissing-prototypes -Wredundant-decls -Wmissing-declarations -Wmissing-noreturn -Wshadow -Wendif-labels -Wcast-align -Wstrict-aliasing -Wwrite-strings -Wno-unused-parameter -ffast-math -fno-common -fdiagnostics-show-option -fdiagnostics-color=auto
D: [pulseaudio] main.c: Running on host: Linux x86_64 4.15.0-43-generic #46-Ubuntu SMP Thu Dec 6 14:45:28 UTC 2018
D: [pulseaudio] main.c: Found 4 CPUs.
I: [pulseaudio] main.c: Page size is 4096 bytes
D: [pulseaudio] main.c: Compiled with Valgrind support: no
D: [pulseaudio] main.c: Running in valgrind mode: no
D: [pulseaudio] main.c: Running in VM: no
D: [pulseaudio] main.c: Optimized build: yes
D: [pulseaudio] main.c: FASTPATH defined, only fast path asserts disabled.
I: [pulseaudio] main.c: Machine ID is eefd91855301490dbdf780fbb9cdfbdd.
I: [pulseaudio] main.c: Session ID is 1.
I: [pulseaudio] main.c: Using runtime directory /run/user/1000/pulse.
I: [pulseaudio] main.c: Using state directory /home/oleg/.config/pulse.
I: [pulseaudio] main.c: Using modules directory /usr/lib/pulse-11.1/modules.
I: [pulseaudio] main.c: Running in system mode: no
E: [pulseaudio] pid.c: Daemon already running.
E: [pulseaudio] main.c: pa_pid_file_create() failed.
aplay -l
**** List of PLAYBACK Hardware Devices ****
card 0: PCH [HDA Intel PCH], device 0: CX20590 Analog [CX20590 Analog]
Subdevices: 1/1
Subdevice #0: subdevice #0
card 0: PCH [HDA Intel PCH], device 3: HDMI 0 [HDMI 0]
Subdevices: 1/1
Subdevice #0: subdevice #0
This is a temporary solution for a keyboard for me. Maybe it will be useful somebody.
#command:
gnome-shell –replace &
It reloads Gnome without a lost current session. And switch keyboard being correct.
Great job on the script. I wonder if you ran into this problem. Am using this script on a hardware machine and not a VM. Works great on a wireless connection. But when I try to connect using the wired NIC I find that if the user is logged off the Ubuntu machine, then you are unable to ping the Ubuntu machine from both the Windows client and another Linux machine- (host unreachable). Of course once the Ubuntu user logs back into the Ubuntu machine then you are able to ping the Ubuntu machine. But then of course you are not able to use RDP . I am trying to figure out why the wired connection is closed when a User is logged off. I’ve posted this on the Ubuntu forum and not gotten an answer. If you happen to know the solution to this I would appreciate telling me where to look. If not Cheers to what I consider the best Ubuntu-RDP source in the world.
Got it. Go to Network and click on “Make Available to Other Users”.
great article, thank you for sharing
The script is great. However I’m encountering a problem withe XRDP & Ubuntu 18.04 on a VM from an unexpected side.
When I try to log back into an XRDP session I can log in just fine, but the home directory is missing because the related “thinclient drives” partition isn’t mounted anymore. All I see is this error message:
ls: cannot access ‘/home/”myhome_directory”/thinclient_drives’: Transport endpoint is not connected
It appears that this problem isn’t entirely new and somehow hinges on the partition not getting unmounted when the XRDP session was closed.
Is there some reliable fix ?
@ThomasH,
not sure we understand the question fully. The ThinClient_drives shortcuts is used to mount your redirected drives within your remote session. So the Thinclient_drives should give you access to local disk of the computer from which you perform the remote connection. This should not impact your Linux Home Directory. the fact that the thinclient_drive through this error after reconnection is a known issue. Based on feedback of Brian Mullan,
(…)In the XRDP v0.9.5 in the Ubuntu 18.04 Repositories there was a bug that affected Device Redirection causing intermittent or even constant failures.
This particularly affected DRIVE REDIRECTION.
NeutrinoLab’s has released a Fix which is incorporated into XRDP v0.9.9 (…)
Maybe you want to use the custom install script version which will install the xrdp v0.9.9 on your ubuntu 18.04. You can also be patient a little bit and give us some time to update the scripts in order to include ubuntu 19.04 support
Hope this help
Till next time
See ya
@Neil,
Have you solved your problem concerning the multiple screen support ? I’m having the same issue !
@Adel,
Thank you for the visit and for your questions… We had no time to look into this issue….will try to tackle it in the coming weeks
Till next time
See ya