Hello World,
This week we will continue exploring the Promotion/demotion Process in Windows 2012. In my current assignment, we are performing a lot of these operations. We needed to test and document the process for other teams. This post will describe quite quickly the demotion process.
Note :
You can read the post about how to promote a Windows 2012 server into a domain controller by following the link below
Overview
In the previous post, we have seen how to use the GUI in order to perform the Promotion of a domain controller. As you have seen, the process is not too complex. In Windows 2012, Promotion process is a 2-step process:
- First, you need to install the Active Directory Domain Services role on the server
- After that, you will be able to perform the additional configuration needed to convert your server into a domain controller
In the previous post, we have also mentioned that the dcpromo command line has been deprecated and can be used only for unattended installation.
Demotion Process
The Demotion process is quite similar to the Promotion. Again, when demoting a Windows 2012 domain controller, you will not be able to use the dcpromo or dcpromo /forceremoval option because they are not available anymore.
To demote a Windows 2012 Domain Controller, you will need to perform again a 2-step process.
- You will need to demote the Domain controller and,
- then you will need to remove the Active Directory Domain Services.
When using the GUI, you cannot remove the domain controller independently of the AD server role. In other words, in order to demote your domain controller, you will need to remove the Active Directory Domain services. During the removal of the role, you will be notified that a demotion operation needs to be performed before removing the role. The Role Wizard will offer you the option to demote the server first.
Step by Step Process
Case 1 – Demoting a Domain Controller but not the last one
In the Server Manager, on the top right menu, click on Manage and then click on Remove Roles and Features
Click on picture for better resolution
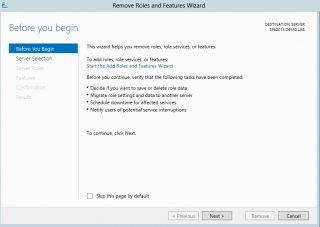
The Remove roles Wizard will start. In the begin page, Press Next
Click on picture for better resolution
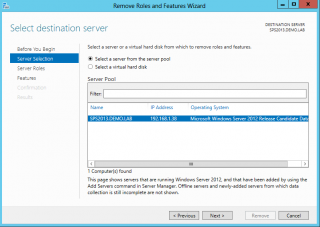
In the Select destination server page, choose the appropriate option and press Next
Click on picture for better resolution
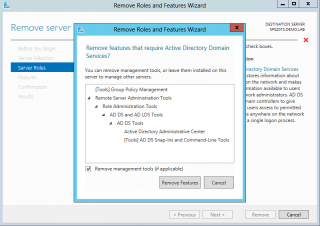
In the Remove Server Role page, when you untick the box for the Active Directory Domain Services, you will see the following dialog box displayed to you. Press Remove Features
Click on picture for better resolution
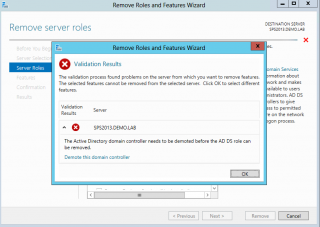
At this stage, you will see a Validation error dialog box. Do not panic ! The validation box simply notifies you that you first need to demote the domain controller before being able to remove the Active Directory Role. At the bottom, you will see the link Demote this Domain controller. Click on it.
Click on picture for better resolution
A new Wizard will start (Active Directory Domain Services Configuration Wizard).
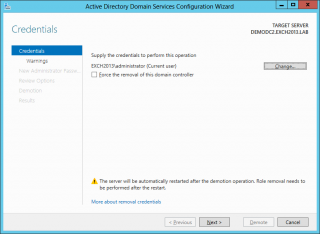
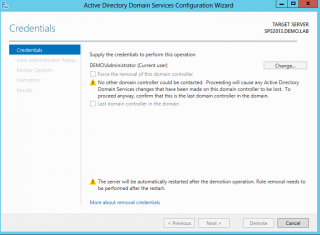
This wizard will present you the credential page. From there, you can specify which user account will perform the demotion operation. The account you specify here has to have enough rights to perform this action (i.e Domain admins or Enterprise Admins). You will also be able to specify if you need to perform a force removal process. In our scenario, we do not need to force the removal.
Finally, note the warning message at the bottom of the page. You are informed that the server will reboot automatically after the demotion process. Using the GUI, you cannot control the restart process (but you might be able to by using powershell )
Click on picture for better resolution
Note : you use the force removal when you can perform a graceful demotion. After the force removal, you will need to cleanup the metadatabase
When you have selected your options, you can press Next.
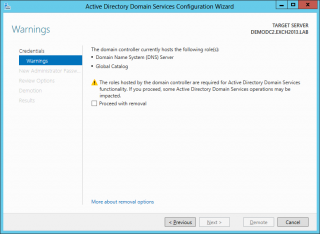
In the Warnings page, you will have to confirm the removal of the domain controller. In the page, tick the Proceed with Removal and Press Demote
Click on picture for better resolution
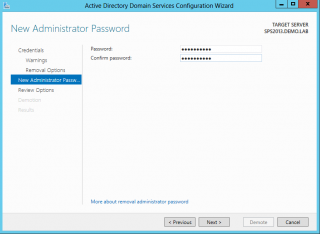
In the New Administrator Password page, you can specify the password for the local administrator account to be used after the demotion. When done, Press Next
Click on picture for better resolution
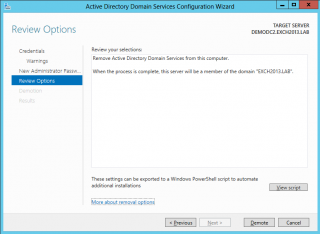
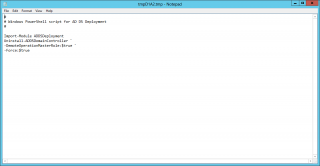
In the Review Options, check your settings and process with the demotion. Note again the View Script Button. A powershell script has been generated automatically for you that will perform the demotion. As in the promotion operation, you can use this script, customize it as needed and implement automation process for Promotion/demotion within your infrastructure.
Click on picture for better resolution
Click on picture for better resolution
When ready, Press Demote
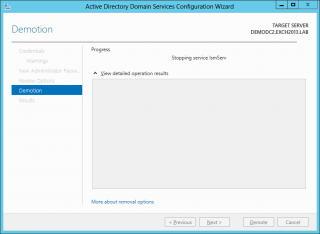
In the Demotion Page, you will see the progress of the operation. Wait for completion
Click on picture for better resolution
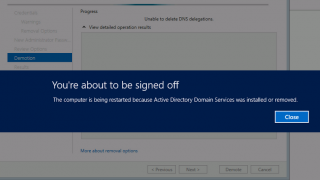
At the end of the process, you will be notified that you will be signed off because the machine is not anymore a domain controller. The server will reboot automatically and you will see something like this for a few seconds.
Click on picture for better resolution
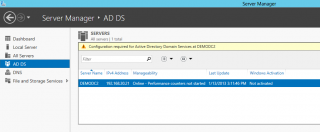
When the server reboots, it’s not anymore a domain controller. Howerver, the Active Directory Domain server role is still availabe in the Server Manager Console. In order to finalize, you will need to remove the Active Directory Domain services role as explained in the beginning of this post. Yes, you read correctly. You have to uninstall twice the Active Directory Domain services role to decommission an domain controller.
Click on picture for better resolution
Case 2 – Demoting the last Domain Controller in the domain
The process is fairly similar to the one described above. The only change is when performing the demotion process, you will see some differences in the Active Directory Wizard pages.
Click on picture for better resolution
You will see the same options as in case 1. However, because we are uninstalling the last domain controller in the domain, we will have to tick the option “Last Domain controller in the domain”
In the Warnings page, you will have to confirm the removal of the domain controller. In the page, tick the Proceed with Removal and Press Demote
Click on picture for better resolution
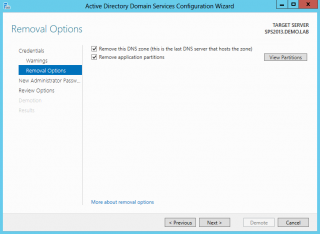
In the Removal Options page, you will see an additional page that offer you the possibility to remove dns partition and application partitions. Choose your settings and Press Next
Click on picture for better resolution
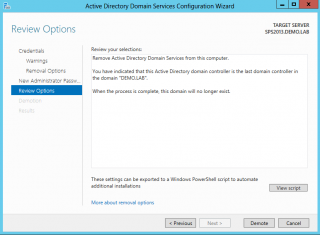
In the Review options, you will be notified that this is the last domain controller.
Click on picture for better resolution
Review your settings and when ready Press the Demote Button. Wait for completion. The server will again reboot automatically.
Final Notes
In this post, we have seen the process of demoting a domain controller via the GUI. We have described a situation where a graceful demotion could be achieved. We have also seen the small differences that the Wizard display when you remove the last domain controller or not. On this post, we have seen that when using only the GUI to decommission a domain controller, we have to remove twice the Active Directory Domain services. The first time to demote the domain controller and the second time to remove the AD DS binaries. Moreover, using the GUI, you cannot really decide when to reboot the server. It reboots automatically after the decommissioning of the domain controller.
In the coming posts, we will see how powershell can provide more flexibility and automation in the promotion/demotion process. We will also quickly explain two common erros I’ve encountered at customer location when performing such operations.
Till next Time
See ya
References
For more information about demoting Domain Controller, have a look at http://technet.microsoft.com/en-us/library/hh472163.aspx

