Hello World,
In this muti-part post, we will describe how we can configure Certificate-Based Authentication for Exchange ActiveSync and Outlook WebApp. In a standard Exchange 2010 configuration, users will authenticate by entering a user account and password However, as you probably know,Microsoft Exchange 2010 also provides other ways to authenticate users.
The idea of this post came from the fact I was recently involved in a project where the customer wanted to test iPhones/iPads capabilities when used in conjunction with Microsoft Exchange ActiveSync technology. One of the requirements of this project was to provide certificate-based authentication when connecting to the Exchange ActiveSync.
This post summarizes the steps needed in order to configure your Exchange 2010 to support Certificate-based authentication. The initial plan was to cover only Exchange ActiveSync but we were curious to see if the same configuration could be applied to Outlook WebApp as well.
You will see the process is not too difficult but there are some pitfalls ! Let’s go…
Prepare your Infrastructure to support Certificate-based authentication
In this first part, we will prepare and configure our environment in order to support certification-based authentication protocol. In order to implement certificate-based authentication, you will need to go through these steps :
-
Install a PKI Infrastructure (we will be using the Microsoft CA solution)
-
Configure the CA to issue User Certificates
-
Issues Certificates to the Users
We assume that you have Exchange 2010 already installed in your network and that you are using Windows 2008 R2…
It’s time for action. let’s describe what has to be done……
Step 1 – Install Microsoft Certificate Authority (CA)
In this post, we have described the steps needed to install and configure a Certificate Authority. You can follow these steps in order to install and configure your CA. You should install the Web Enrollment interface given that this will be used by the users to request their own certificates.
When you have completed the CA installation, you can proceed to the next step….
Step 2 – Configure your Certificate Authority to issue User Certificates
As mentioned above, we want to use the Web interface of the CA to request and issue user certificates. When requesting user certificates through the CA, SSL traffic is required. If you have performed a standard installation of the CA, you might need to perform additional configuration at the web server level in order to be able to request/issue certificates.
Note :
If your IIS Server is already configured to accept SSL connections, you can move to the next step “Issuing a User Certificate”
If your IIS Server is not already confiugred to accept SSL connections, you will need to perform the following actions in order to be able to generate User Certificate requests using the Web Interface.
- Open your Internet Information Service mmc console, and browse to your Default Web Server
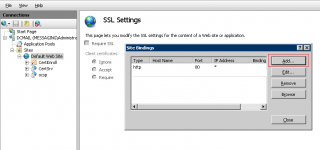
- Right-click on it and select the option Edit Bindings
- In the Bindings interface dialog box, you are missing the https binding, press on Add
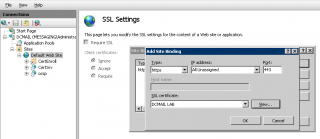
- In the Add Bindings, provide the requested information (i.e. https protocol, a certificate and an IP address)
- When ready, Press OK
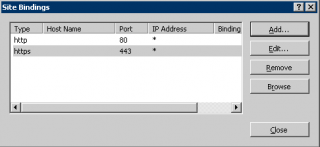
- You should see something similar in the Binding Dialog Box
- You can then move to the CertSrv virtual Directory and in the mid pane, click on SSL Settings and ensure that you have the check box ticked next to the option require SSL
You are ready to proceed to the next step which is issuing a user certificate for a user
Step 3 – Issuing a User Certificate
To request, issue and associate the certificate, we will be using the Web Interface Certificate enrollment. There are other ways (using mmc.exe certificate console) that can be used to performed exactly the same tasks. We want to keep the process as simple as possible.
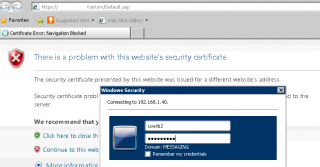
In this post, we will assume that each user will connect to the Web Enrollment interface and request their certificates. In this example, let’s assume that you are a user called UserB and you need to request and obtain your certificate. So, You will log into a computer (as userb), open your browser and type the url of the Certificate Authority web enrollment page (something like https://certificateAuthorityServer/CertSrv).
-
You might be prompted for a user account and a password. Enter your user account and password
-
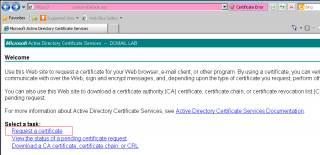
When done, you will reach the welcome page of your Certificate Authority. Click on the link Request a certifcate
-
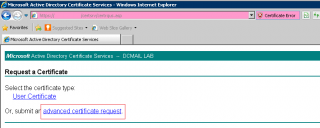
In the request certificate page, you can click on user Certificate or Advanced request certificate. We will click on the Advanced request Certificate link
-
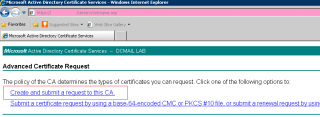
In Advanced request certificate page, you will click on the link create and submit a request to this CA
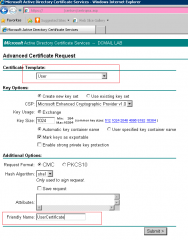
- In the Advanced Certificate Request, check that the certificate template is set to User. Fill in also the information about the Friendly name. This will help you in identifying which certificate needs to be used.
-
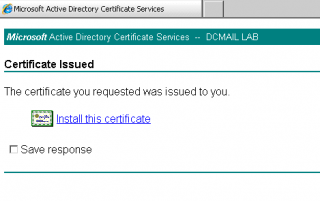
When ready, Press Submit. You might get a warning popup. Press yes to proceed. You will arrive to the page certificate issued. You will see that there is a link that invite you to Install the certificate. Click on the link in order to download and install this certificate.
-
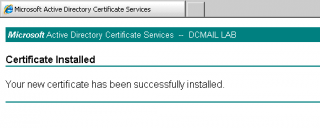
You might see a prompt. At the end of the procedure, you should get a message stating that the certificate has been successfully installed on your computer
At this stage, UserB has been issued a certificate. The certificate will be installed on the computer where the operation has been performed. It’s possible to export the certificate and install it on other computers but this is out of scope for the moment. You can check that the certificate is associated to UserB by checking your Active Directory.
Note :
In this scenario, we assume that each user will have its own certificate (one to one mapping) even if it’s possible to have many to one mapping certificate scenario (out of scope of this article).
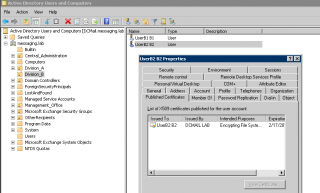
If you open your Active Directory, you can browse to the user object; right-click on it, select properties. In the properties page, you can click on the Published Certificate tab and you will see that a user certificate has been associated to the account already.
So far, we have implemented our PKI Infrastructure and we have issued certificates to our user. We have checked also that the certificate is indeed associated to the user. The next step will consist of configuring the Web Server (IIS) to support certificate based authentication as well….
So, let’s move to step 4
Step 4 – Configure IIS to Support Certificate-based authentication
On CAS server where certificate-based authentication will be provided, you will need to perform some additional configuration at the IIS level. This is a 2-step process. We will first configure the IIS service to accept Active Directory Certificate Authentication option and then we will need to tell the system to perform the mapping between a certificate and a user.
4.1. Enabling and Configuring Active Directory Certificate Authentication
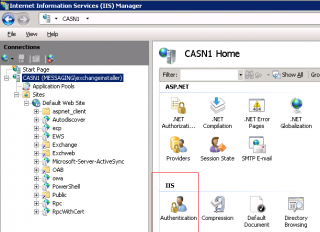
On CAS server where certificate-based authentication will be provided, you will need to enable this option.To enable this, you will need to open your Internet Information Services console, expand the node and select the Server object. In the mid pane, click on Authentication icon
In the authentication page, click on the Active Directory Certificate Authentication and on the right-pane, click on the Enable button.
4.1. Enabling ClientCertificateMappingAuthentication parameter
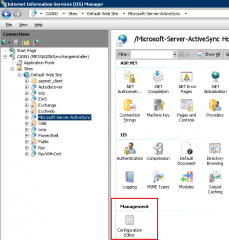
The Active Directory Certificate authentication is enabled but this is not enough. I had hard time to find this setting and a nice way to enable the configuration. In some posts, I’ve seen users going directly into the applicationhost.config file. There is a better approach. Within your Internet Information service console, click on the virtual directory where certificate authentication will be used. In the screenshot below, we will enable this authentication type for ActiveSync. In the mid pane, click on the configuration editor icon.
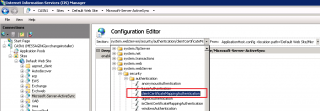
In the configuration editor page, at the top page, you have 2 drop down box. One called section and the other From. In the section drop down box level, you have to browse to the node system.webserver > security > authentication > clientCertificateMappingAuthentication. In the resulting page, you will need to ensure that the enable attribute is set to True
Note :
You will need to perform this configuration for each virtual directory that you want to be configured to use certificate-based authentication. We have performed this configuration change on the OWA/ECP virtual directory as well (see Section below -Configure Outlook WebApp for Certificate-based authentication).
When your configuration is done, you can reset the IIS server by typing in a command prompt iisreset in order to have the changes applied to your system.
Final Words
This concludes the first part of this post. Your infrastructure should be good to go. The next part will describe how to configure your Exchange Infrastructure in order to support certificate-based authentcation
Till next time
See ya
