Hello World,
This is the third part of the series related to Exchange 2010 SSL offloading through the Zen Load Balancer. In part I and Part II, we have described the Exchange infrastructure that would be used for the tests and how to configure your Exchange server to use SAN certificates. In this part, we will concentrate on the configuration that needs to be done in order to offload ssl of your Exchange 2010 through the Zen load Balancer.
Let’s start !
I.Download and Install the Zen Load Balancer
We will need to install the Zen Load Balancer first. You should download the version 2rc1 because this version is able to manage certificates and you can use the new http/https profiles to better tweak your load balancing needs.
After downloading the software, you will need to install it. I’ve created a virtual machine within my Proxmox VE infrastructure and loaded the Zen Load Balancer software on it. The installation process has not changed since versioin 1.0 so you can follow this step by step guide to help you in the initial installation of the Load balancer.
II.Configuring the Exchange 2010 infrastructure to work with Load Balancer
Now, we assume that you want to create CAS Array in order to be able to load balance Exchange traffic between multiple CAS servers. In this post, we have described the steps needed in order to configure Exchange to use static ports and how to create your Client Access Array as well.
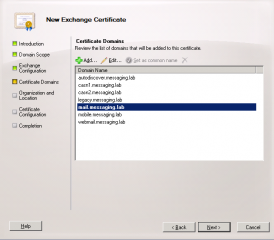
Moreover, you will need to create some additonal DNS entries in order to map the IP address of the Load balancer to the different FQDN you are about to use within your network. If you remember, in part II of this serie, we have created a certificate request and we were specifiying multiple names to be used (see screenshot below)
Click on image for better resolution
III.Configuring the Zen Load Balancer farms
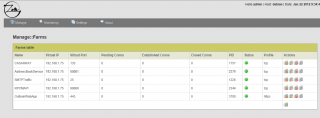
We need now to configure the Zen load balancer in order to load balance the Exchange Traffic and to Offload SSL. Because Zen load balancer support only one port per farm, we will need to create for each port we need to load balance a Zen load Balancer Farm. The following screenshot provides the configured farms to be used with Exchange 2010 SP1
Click on image for better resolution
As you can see, we will create 5 Farms within the Zen Load Balancer (one farm for each port to be load balanced). If you look with more attention, you will notice that all the farms are configured with TCP profile except the Outlook Web App which will be using the HTTPS profile.
This is a new feature of the Zen load Balancer v2Rc1 which offers more features than the previous version. You can now create farms and specify which profile type to use. We will first quickly demonstrate how to create the farms (using TCP profile) and then we will focus a little bit more on the Outlook Web App farm where https profiles have been configured.
Creating Farms using TCP profiles
To create a farm, you will need first to connect to the management console of the Zen box. This is easily done via a web browser and using the following url
http://IP_Address_LoadBalancer:444/
You will be prompted for credentials. If you have not change the defaults, you will need to use the following information.
- User : admin
- Password : admin
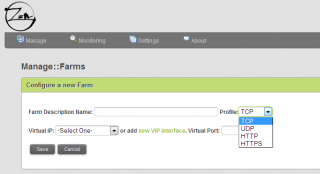
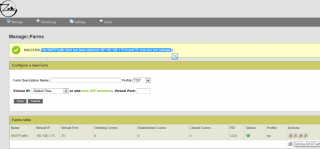
In order to create our farms, we will need to go on the Manage:: Farms page (click on the bar menu > Manage > Farms. You will be presented with a screenshot similar to the one below
Click on image for better resolution
In the Configure a new Farm section, provide the requested information
- Farm description Name (ex : SMTP Traffic)
- Profile type (TCP)
- Virtual IP (aaa.bbb.ccc.ddd)
- Port (25)
After clicking on save, you will see that a farm table is displayed just below the Configure a new Farm section. In this table, you will see the farm you’ve just created. On the right side of the table, click on the Edit icon in order to associate your farm to real servers.
Click on image for better resolution
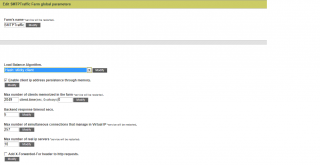
When clicked on the edit icon, you will be redirected to the Edit Farms Global Settings. There, you can tweak the behaviour of the Load balancer. For example, you can choose which load balancing algorithm to use, number of connections,… Adjust these settings as required.
Click on image for better resolution
Below this settings section, you will see a table where you can associate real servers to your Zen Farm. Click on the Add icon, enter the ip address of the server,the port, the max number of connections…..and press save.
Click on image for better resolution
Repeat the operation for each farm that needs to be configured using TCP Profile
Creating Outlook Web App farm using HTTPS Profile
For the Outlook Web App farm, we will be using the new HTTPS profile. To create our https farm, we will follow exactly the same procedure as above. The only difference is that instead of using the standard TCP profile, we will be using the https profile
In the Configure a new Farm section, provide the requested information
- Farm description Name (ex :Outlook WebApp)
- Profile type (HTTPS)
- Virtual IP (aaa.bbb.ccc.ddd)
- Port (443)
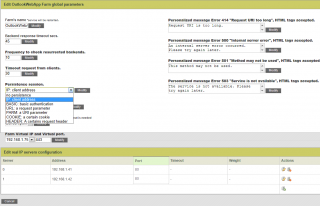
When you click on Save, you will see that the Farm has been added to the Farms table. Click on the Edit icon for the Outlook Web App farm and you will be redirected to the Manage Farm page. In this page, in the Edit Settings Section, the most interesting option to configure for Exchange is the Persistance session. You can choose from several options. For Exchange 2010, you should be using either IP address or Cookie settings.
Click on image for better resolution
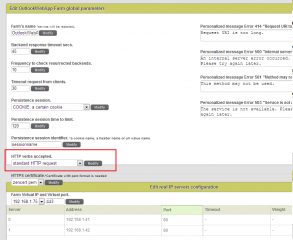
In the Settings, you will see also that you can use specific SSL certificates. For the moment, we will be using the certificate issued by the Zen Load Balancer. At a later stage, we will need to import the certificate generated in the Part II of this series into the Load balancer and configure the Outlook WebApp farm to use it.
Click on image for better resolution
As previously, you will need to associate the Outlook Web App Farm to real servers. Again, click on the Add icon and fill in the requested information. Save your settings.
Important note :
As explained in Part I, when you are configuring Ssl offloading, you will be using http (and not https) traffic between the load balancer and the Exchange servers.This means that when you create your Outlook WebApp farm, you will need to ensure that when configuring the ports used by the real servers, you will need to use port 80 (as shows in the screenshot) and not port 443.
At this stage, the configuration is not completed. In the final part of this serie, we will configure the Zen load balancer to use the certificates issued to the Exchange servers. Finally, we will configure our Exchange servers to support the SSL Offloading features.
Final Notes
In this part, we have focused on the Load Balancer part. Howerver, the configuration is not over yet. We will need to bring some final changes within our Infrastructure in order to have the SSL Offloading feature enabled accordingly.
Till Next Time
See ya
Article in this series :
- Part I : Exchange 2010 SSL Offloading using Zen Load Balancer – 1
- Part II : Exchange 2010 SSL Offloading using Zen Load Balancer – 2
- Part III : Exchange 2010 SSL Offloading using Zen load Balancer – 3
- Part IV : Exchange 2010 SSL Offloaduing using Zen load Balancer – 4

Hi, good post
One issue. Did you test the communication from zlb to backends? A screenshot shows the connection from zlb to backends (192.168.1.141 & 192.168.1.142 over 443 port) You need to know that in v2rc2 the zlb only speaks in HTTP mode with backedns, NO HTTPS mode.
Regards!
Hello Emilio,
Yes, I have tested the connection to the backend servers. This basic setup was working as expected. But you are right, the connection between Zen LB and the backend servers is done through HTTP.. This should be described in more or less details in the final part (published in a few days 🙂 )
Thank you for the comments…. I’m still in the learning process : -))
Hello Emilio,
Just for your information, we have updated the screenshots showing the correct settings for the real servers when configuring the OWA https farms. The screenshot was confusing a lot of people. So, to keep it clear, we have updated the screenshot in this post. Today/tomorrow we will be publishing the final part of the series where we will show how to configure the back end Exchange servers to use HTTP instead of HTTPS connections
Thank you for your positive comments and remarks…
Till next time
See ya
Hi,
Can someone tell me what is load balancing scheme for https profile? I mean I have setup the server farm with 2 back end servers (server0 and server1). I tried connecting from different IPs (clients) and I get to server0 and the persistence (cooking) works as well. However server1 is never accessed. So how does the load balancing work? Its clearly not round-robin. Both the servers have default weights
Hello Prasoon,
which version of Zen load balancer are you using ?
Which load balancing algorithm option are you using ? If you use Round-robin equal sharing option; you should load balance between the real servers. This option is not visible in the https profile but should be visible at the farm level
Hope this help
how about today?