Hello World,
As you have seen in our previous posts, we have updated the information about how to deploy Ubuntu 24.04 (Desktop & Server) through PXE Technology. We have also provided a really basic overview on how to perform an unattended installation of Ubuntu 24.04 through the new approach or technology provided by Canonical (i.e. Autoinstall). For more information about PXE and Ubuntu 24.04, please look at these posts
- Ubuntu 24.04 – Deploy Ubuntu 24.04 Desktop through PXE (BIOS & UEFI)
- Ubuntu 24.04 – Deploy Ubuntu 24.04 Server through PXE (BIOS & UEFI)
- Ubuntu 24.04 – Howto Autoinstall Ubuntu Desktop 24.04 through PXE Technology (Basic)
- Ubuntu 24.04 – Howto Autoinstall Ubuntu Server 24.04 through PXE Technology (Basic)
Some people have been requesting to provide an light overview on how to perform an unattended installation on Ubuntu 22.04 (Desktop edition). In this post, we will provide some guidance on how to do this.
So, let’s do this…
Overview
If you are planning to deploy Ubuntu 22.04 Desktop Edition via PXE and you would like to automate the installation, you will need to use the preseed method (and not the newly introduced technology by Ubuntu i.e. autoinstall).
So, before jumping into the technical details, you will first need to identify the Ubuntu edition you are using and identify which unattended method will be used. So, as a quick reminder, you will need to know that
- Ubuntu Server, Version 20.04 and later is using the new Autoinstall approach
- Ubuntu Desktop, Version 23.04 and later is using the new Autoinstall approach
To perform unattended installation against those releases, you will need to create an autoinstall configuration file used to perform the installation without any user interaction. Since we want to perform an unattended installation of Ubuntu Desktop 22.04, we will need to use the Debian based installation approach using preseeding methodology.
Step by Step Guide
Pre-requisites
To successfully follow this specific guide, you will need to ensure that you have implemented the necessary PXE infrastructure that is needed. We have described how to implement a PXE server within your network. This information can be found at Ubuntu 24.04 – Deploy Ubuntu 24.04 Desktop through PXE (BIOS & UEFI)
After following these instructions, it is time to tweak the setup to support Ubuntu 22.04 Desktop deployment.
Step 1 – Populate the web folder structure
Since we want to deploy Ubuntu 22.04.x Desktop edition, we will need to obtain the iso file and mount it on our newly installed and configured PXE Server. So, to mount it, issue the following command
sudo mount /dev/sr0 /media
Copy the files from the iso image into the correct directory. You can use the following syntax to perform the operation
sudo cp -rf  <%Your Path To Install Files%>/*  /var/www/html/desktop/u2204
example : sudo cp -rf /media/*  /var/www/html/desktop/u2204
The command below is copying all the contents of the source cdrom except a hidden folder which is needed to have the pxe process working as expected. So, you have to run an additional command in order to ensure that all the files you need have been copied accordingly. From a Terminal Console, issue the following command
sudo cp -rf  <%Your Path To Install Files%>/.disk  /var/www/html/desktop/2204
example : sudo cp -rf /media/cdrom_Name/.disk /var/www/html/desktop/u2204
When the copy is finished, unmount the iso/DVD image from your machine by issuing the following command
sudo umount /media
You can check that your files have been copied accordingly by browsing to /var/www/html/desktop/u2204.
Creating the preseed file
Now that we have the Ubuntu 22.04 Desktop source files, it is time to create the preseed file that will be used to automate the installation. So, in a command prompt, we will issue the following command first (in order to create the file at the correct location)
sudo touch /var/www/html/desktop/preseed-u2204.seed
When the file is created, we can open it and copy the content below
sudo nano /var/www/html/desktop/preseed-u2204.seed
The file is opening in your terminal console, copy/paste the following content
Note : You will need to update values such as ip addresses or password you want to use
#d-i live-installer/net-image string http://192.168.1.160/desktop/2204/casper/filesystem.squashfs

#Unattented Install
d-i auto-install/enable boolean true
d-i debconf/priority select critical

#Local
d-i debian-installer/locale string en_US.UTF8

#keyboard
d-i console-setup/ask_detect boolean false
d-i keyboard-configuration xkb-keymap select be
d-i keyboard-configuration/layoutcode string be
d-i keyboard-configuration/variantcode string

#network config
d-i netcfg/get-hostname string devops

#Partitions - Auto Partitioning
ubiquity partman-auto/init_automatically_partition select Guided - use entire disk
ubiquity partman-auto/disk string /dev/sda
ubiquity partman-auto/method string regular
ubiquity partman-auto/choose_recipe select All files in one partition (recommended for new users)
ubiquity partman/confirm_write_new_label boolean true
ubiquity partman/choose_partition select Finish partitioning and write changes to disk
ubiquity partman/confirm boolean true

#Install Software and update

tasksel tasksel/first multiselect
ubiquity ubiquity/use_nonfree boolean false
ubiquity ubiquity/download_updates boolean false


##user Accounts - You can set password in plain-text or pre-encrypted.
d-i passwd/root-login boolean false
d-i passwd/user-fullname string griffon
d-i passwd/username string griffon
d-i passwd/user-password password password
d-i passwd/user-password-again password password
d-i user-setup/allow-password-weak boolean true

#d-i clock-setup/utc boolean true
d-i time/zone string Europe/Brussels

#Reboot
#this shows the dialog box asking you to reboot
d-i finish-install/reboot_in_progress note

#this reboots automatically using ubiquity
#ubiquity ubiquity/reboot boolean true
Updating the PXE Server Config Files
After creating the preseed file has been created, it is time to update the pxe configuration files.
Obtain the initrd and vmlinuz file from the Ubuntu 22.04 Sources file
If you have followed the steps described in the post Ubuntu 24.04 – Deploy Ubuntu 24.04 Desktop through PXE (BIOS & UEFI), the folder
/tftp/boot/casper
would be populated with the initrd and vmlinuz file from Ubuntu 24.04 source files.
If you want to keep co-existence between Ubuntu 22.04 and Ubuntu 24.04, you would need to copy the ubuntu 22.04 file into this folder (and rename it)
So, you would issue the following command
sudo cp /var/www/html/desktop/u2204/casper/initrd  /tftp/boot/casper/initrd22
sudo cp /var/www/html/desktop/u2204/casper/vmlinuz  /tftp/boot/casper/vmlinuz22
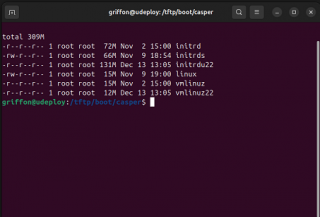
As you can see in the screenshot below, I have multiple version of initrd and vmlinuz files.
Click on Picture for better Resolution
Update the PxeLinux.cfg
You will need to update the default file (located under /tftp/bios/pxelinux.cfg/). You will add a new section (Ubuntu 22.04 Desktop – Automatic). In this section, we have specified additional parameters pointing to the preseed file….
DEFAULT menu.c32
ENU TITLE ULTIMATE PXE SERVER - By Griffon - Ver 2.0
PROMPT 0
TIMEOUT 0

MENU COLOR TABMSG  37;40  #ffffffff #00000000
MENU COLOR TITLE   37;40  #ffffffff #00000000
MENU COLOR SEL      7     #ffffffff #00000000
MENU COLOR UNSEL    37;40 #ffffffff #00000000
MENU COLOR BORDER   37;40 #ffffffff #00000000


LABEL Ubuntu Desktop 22.04 - AUTOMATIC
    kernel /boot/casper/vmlinuz22
    initrd=/boot/casper/initrd22
    append auto=true priority=critical nfsroot=192.168.1.160:/var/www/html/desktop/u2204 netboot=nfs ip=dhcp boot=casper url=http://192.168.1.160/desktop/preseed-u2204.seed debug-ubiquity automatic-ubiquity fsck.mode=skip DEBCONF_DEBUG=5 systemd.mask=tmp.mount --

LABEL UBUNTU 22.04 Desktop - INTERACTIVE
   kernel /boot/casper/vmlinuz22
   initrd=/boot/casper/initrd22
   append priority=critical nfsroot=192.168.1.160:/var/www/html/desktop/u2204 netboot=nfs ip=dhcp boot=casper fsck.mode=skip systemd.mask=tmp.mount --
Note : Update this file to reflect the ip address you would be using. In our example, the pxe server is using the ip address 192.168.1.160 but you can use any ip address on your internal network.
Update the Grub.cfg
You will need to update the grub.cfg file (located under /tftp/grub/). You will add a new section (Ubuntu Desktop 22.04 Desktop – Automatic). In this section, we have specified additional parameters pointing to the autoinstall.yaml file.
if loadfont /grub/font.pf2 ; then
set gfxmode=auto
insmod efi_gop
insmod efi_uga
insmod gfxtermterminal_output gfxterm
fi
set menu_color_normal=white/black
set menu_color_highlight=black/light-gray
set timeout=5

menuentry "Ubuntu Desktop 22.04" {
set gfxpayload=keep
linux /boot/casper/vmlinuz22 ip=dhcp nfsroot=192.168.1.160:/var/www/html/desktop/u2204/ netboot=nfs ip=dhcp boot=casper
#systemd.mask=tmp.mount --
initrd /boot/casper/initrd22
}

menuentry "Ubuntu Desktop 22.04 - Automatic" {
set gfxpayload=keep
linux /boot/casper/vmlinuz22 ip=dhcp nfsroot=192.168.1.160:/var/www/html/desktop/u2204 netboot=nfs ip=dhcp boot=casper url=http://192.168.1.160/desktop/preseed-u2204.seed debug-ubiquity automatic-ubiquity fsck.mode=skip DEBCONF_DEBUG=5 systemd.mask=tmp.mount --
initrd /boot/casper/initrd22
}
Note : Update this file to reflect the ip address you would be using. In our example, the pxe server is using the ip address 192.168.1.160 but you can use any ip address on your internal network.
Time To Test
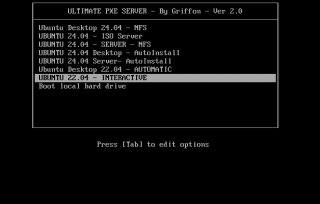
If everything is configured accordingly, you should be able to boot the target computer, boot from network card and you should see PXE menu that will allow you to select the correct option.
Click on Picture for better Resolution
After you have made your choice and after the bootin process, you will have the live installer running on your system. Since we have used preseed file, the setup wizard will start automatically and will perform the installation based on the information contained in the file…
You can grab a cup of tea and relax…:)
Final Notes
This is it for this post !
This post has described how to automate the installation of Ubuntu 22.04 Desktop Edition through the usage of the preseed file. This file is basically an answer file that is passed to the installer and will use this information to go through the setup progress. The instructions provided here are really basic and should be seen as a starting point if you are planning to deploy Ubuntu 22.04 on your network.
Remember that Canonical has introduced important changes when it comes to unattended installation. Based on the Ubuntu release & Edition (Server vs Desktop), you will need to either use the preseed approach or you will need to take advantage of the new autoinstall approach.
As you can see, we have spend some time in updating information about ubuntu and pxe technology. We went a step further this time, we have shown how to perform a really basic automated installation. I Hope you enjoyed these post(s)
Till next time
See ya


