Hello World,
Today, I’ll finish the discussion about the Virtio Drivers and how to install Windows 2003 (32-bit or 64 bit) operating system from scratch while using the virtio disk type. In part 1, we have seen that in order to perform the installation of Windows 2003 virtual machine configured to use virtio disk type, you would need to mount a floppy drive into your virtual machine and pass the drivers during the setup process. In part 1, we have basically described the walktrough to perform such operation.
The method explained in part 1 is working (no doubt). However, you will need to mount the floppy on each new virtual machine that would be using virtio Disk Type. In this post, we want to show you how you can integrate the Virtio Drivers into the windows 2003 installation files. By integrating these drivers, you will not need anymore to mount floppy and press F6 button to present the virtio drivers. Using the slipstream cd approach, you will simply need to boot from your “custom” windows 2003 cdrom and perform your installation whatever the disk type you are using.
So let’s start….
Manually create your “Custom” windows 2003 cdrom
Step 1 – Get the Drivers and TxtSetup.oem file
Note: This procedure is basically based on the information founded at http://unattended.msfn.org/unattended.xp/view/web/36/
Note 2 : To ease the process, you can use tools like nlite to integrate drivers into your cdrom. I didn’t try such tool so I do not know if that will be working but I’m assuming that this would be the case.
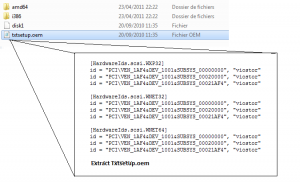
In part1 of this post, you have downloaded the virtio iso file containin the virtio drivers. Again, we will need to access the virtio-win-x-x-x-.vfd floppy image. The floppy image contains the txtsetup.oem file (containing important information) and the drivers itself.
Click to Enlarge Picture
Step 2 – Create your folder structure and copy the drivers
1 – Copy the content of your windows 2003 cdrom onto your computer. In my case, I have created a folder called w2k3_pve under c:\ (c:\w2k3_pve) and copied the content of the windows 2003 cdrom (or iso file)
2- Within the W2K3_PVE folder, I have created a $OEM$ folder and the following subfolder structure
- c:\W2K3_PVE
- |–$OEM$
- |–$1
- |– Drivers
- | –Virtio
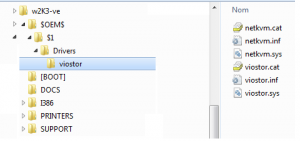
3 – In the virtio Drivers, I have copied the drivers for the Windows 2003 version I’m installing (32bit or 64-bit). At the end of the process, you should have something similar to the screenshot below. If you look the content of the folder , you will notice that I have also include the drivers for the network card (netkvm.sys). This will ensure that the virtio network drivers will also be isntalled automatically on my system.
Click to Enlarge Picture
Step 3 – Modify the TxtSetup.sif file
The txtSetup.sif file is located under the i386 folder (in my example, c:\W2K3_PVE\i386\txtSetup.sif or c:\W2K3_PVE\amd64\txtSetup.sif for 64bit version).
We will need to modify the file in order for the setup routine to know about the virtio drivers. Doing this, you will not need to press the F6 button and the virtio disk will be recognized automatically by Windows setup routine. The following modifications needs to occur :
-
in the section [SourceDisksFiles.x86], at the bottom of the section, enter the following information
viostor.sys=1,,,,,_x,4_,4,1,,,1,4
-
in the section [HardwareIdsDatabase], at the bottom of the section, enter the following information
PCI\VEN_1AF4&DEV_1001&SUBSYS_00000000=”viostor”
PCI\VEN_1AF4&DEV_1001&SUBSYS_00020000=”viostor”
PCI\VEN_1AF4&DEV_1001&SUBSYS_00021AF4=”viostor”
-
in the section [SCSI.Load], at the bottom of the section, enter the following information
viostor=viostor.sys,4 viostor=”Red Hat VirtIO SCSI Disk Device Win2003/32-bit”
- in the section [SCSI], at the bottom of the section, enter the following information
Note: At the end of the post, you can download a copy of the files I’ve used to create my own windows 2003 custom installation iso image
Step 4 – Copy the Viostor.sys in the i386 Folder
You have to copy the viostor.sys file in the root\i386 folder (or amd64 for 64-bit version). This is important. During the setup routine (text mode), Windows will need to get an access to the drivers.
Step 5 – Create the Winnt.sif File
Again, this file shoul be placed in Root\i386 folder (or root\amd64 for 64bit version) of your folder structure (in my example c:\W2K3_PVE\i386\winnt.sif). This file will automate the installation of your windows. This file should contain at minimum the following entries
[Unattended]
OemPreinstall=Yes
DriverSigningPolicy=”Ignore”
OemPnPDriversPath=”Drivers\viostor;”
This file will tell the Setup routine that additional drivers are available in the OemPnpDrivers folders. I would recommend you to take advantage of the winnt.sif file. By using this file, you could possible fully automate the installation of your windows 2003 virtual machine
Step 6 – Create your iso file
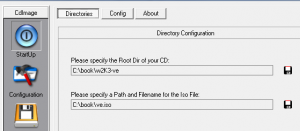
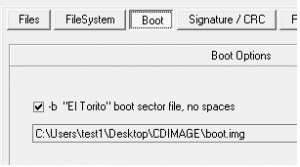
To create the iso image, I’m using the CDimageGUI utility. The utility is quite straight forward and come with a boot sector compatible with windows xp/2003
Click to Enlarge Picture
Click to Enlarge Picture
Step 7 – Upload your iso image in ProxMox VE and test it
If everything went fine, you will be able to install your windows 2003 virtual machine with no need to mount th floppy drive and press F6 Button. When the installation is completed, you can log into your virtual machine. you will notice that the virtio network has been detected and is installed and ready to be used by the operating system. Isn’t it cool ! 🙂
Final words
As you can see, you might need to have to provide an initial effort in order to prepare this customized cdrom or iso image in order to have a smooth windows 2003 installation even if you are using virtio disk type. The advantage is that you will need to perform this action only once (well depends, you might need to update the drivers time to time). As a plus, I’m attaching here a copy of the modified files I’m using. Give it a try and let me know if this is working for you !
As a final note, i would like to say that windows 2003 is becoming a legacy operating system. In the proxmox ve wiki web site, I’ve seen a lot of information about windows 2000 or windows 2003/XP. It’s time to give more focus on Windows 2008 R2 operating system family. More and More people are working with these versions. So, Proxmox ve product should start to focus also on these products
That’s it for today
Till next time see ya


Hi is it possible to download from you the whole iso image of windows 2003 32/64 installation disk built for Proxmox VE with some tracker or direct download ?
Hello Danik,
This would not be an option given that windows 2003 software is protected by copyrights… At the end of the post, you can download the files needed to create such a disk… In the zip file, you can see a readme.txt file that explain how to build up your own iso (it’s 4 steps : 1. copy content of win2003 cdrom, 2. copy $OEM$ to target folder, 3. Copy 3 files in i386 folder coming from the cd, 4. Burn it)
That’s it. The process should be super easy…. Give it a try and create your own iso image…
Till next time see ya
Hi Danik,
Your files worked perfectly for me (Windows 2003 64bits). Thanks a lot.
By the way, what about those for Windows 2008 ? It’s been quite a while since you posted the article so maybe by chance … ?
Thanks.
Ooops I meant thanks Proxmox !
Cheers.
Hello Ferdinand,
Thank you for your comments but I would like to outline some stuff
First of all, these files are mine (and not from Ferdinand). I’m working hard to provide good information so I deserve sometime recognition 🙂
For Windows 2008 and later the process is different, you do not need to have these files generated. The Setup process of windows 2008 and later allows you to inject on the fly drivers. Have a look at http://c-nergy.be/blog/?p=2666
Another option would be indeed to include the drivers into the wim image directly as well but again no need to have specific files or folder structure…You simply inject the drivers into the wim image….
I’m really overloaded with my work..I’m working on several projects and I do not have much time to blog lately
Plus, I start to feel tired……
Till next time
See ya
Oopps… You mean thank Griffon and Proxmox 🙂
Till next time
see ya
Hi Griffon,
I made a terrible mistake thinking you were working for Proxmox.
Of course, all the credits is yours. Thanks a lot !
CU
Hey Ferdinand,
Thank you for the correction…
Errors can happens…so no big deal
See you next time
Griffon