Hello World,
As you can see from my previous posts, I’ve been playing around with the Ubuntu 12.04 software. A topic that I wanted to write about since a really long time is the KVM virtualization solution. The KVM virtualization software is built-in in Linux Operating system. I was looking for possible virtualization software that could be used with Ubuntu 12.04 and the first that came into my mind was KVM. However, note that solutions such as virtualbox or vmware (server or player) can be also installed on your Ubuntu machine and have virtualization capabilities. We will investigate these other options in some coming posts.
At the moment, let focus on the KVM Solution…. So, Let’s Go
Introduction
By default, Linux Operating system provides within the kernel virtualization capabilities i.e. Kernel Virtual Machine (kvm). Before enabling the kvm feature, you will first need to ensure that you meet the hardware and software requirements.
Verifying that CPU support virtualization
Before installing any virtualization software, you might want to ensure that you have a cpu with hardware assisted virtualization. Intel-VT cpu and AMD-V are cpu type that support hardware virtualization. In this quite old post, we were already describing the way to check for virtualization support.
To check that your computer support virtualization, you can issuse one of the following commands :
- egrep -c ‘(vmx |svm’) /proc/cpuinfo
If this command returns the value 0, the cpu does not support hardware virtualization. If the command returns value 1 or greater, your cpu is capable of running virtualization software. The following screenshot shows the output of the command on my system and yes, virtualization is supported. 🙂
Another way to check would be to use the command kvm-ok.
click on picture for better resolution
I issue this command on my system as well and discovered that I was missing some packages (cpu checker). I had to install this package first in order to be able to run the kvm-ok command (see the screenshot below).
click on picture for better resolution
Note :
- If you receive a message similar to “INFO: your cpu does not support KVM extensions, KVM acceleration can not be used”, you might still be able to run virtual machines but the performance will not be really good since you will not be using KVM extensions.
- If you receive a message similar to KVM Acceleration cannot be used might means that hardwared-assisted virtualization capabilities is present on the system but not activitated in the BIOS
Checking the CPU architecture (32-bit or 64-bit)
We would recommend to run a 64-bit version of Ubuntu 12.04 simply because you will be able to host 32-bit and 64-bit virtual machines. Knowing that the new Microsoft Operating system only support 64-bit, this would make sense. To check this, you can simply try to install ubuntu 64-bit on your system, if the 64-bit architecture is not supported, you will get an error message and the installation process will be stopped.
Another way (if you have already installed Ubuntu) would be to issue the following command
- egrep -c ‘lm’ /proc/cpuinfo
If the output is O, you are not using a 64-bit CPU. If the Output is 1 or greater, you are running 64-bit CPU and can proceed with the KVM installation
click on picture for better resolution
Note: For your information, you can have kvm installed on a 32-bit system but will be then able to run only 32-bit guests
Verifying that Operating system version
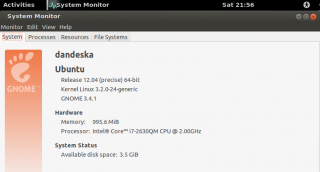
Using the system monitor interface, you can easily check that the operating system you are running is 32-bit or 64-bit. Whatever the desktop interface you are running, type in the dash/activities, system and select system monitor. In the sytem tab, you can see the version of the operating system.
click on picture for better resolution
For the geek, you can also using the command line and digit the following command line (see screenshot)
click on picture for better resolution
If the output is something like x86_x64, you are running a 64-bit
Installating KVM packages
If you reach this section, we assume that you meet the basic requirements in order to have KVM software running. It’s time to download and install the kvm packages. With Ubuntu, this is quite easy. You can use the Ubuntu software GUI based interface or you can use the command line
If you prefer to use the GUI,
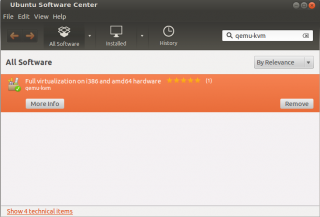
- Launch the Ubuntu Software Center, and in the search box type qemu-kvm. Click on the package.The package is highlighted and you will see two buttons : more and Install. Click on more button.
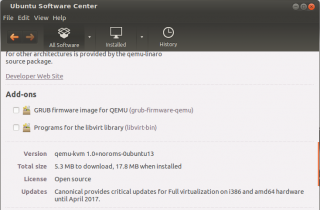
- Scroll down and select the 2 additional Add-ons
- You are ready to install the package. Press the Install button (scroll up to see it)
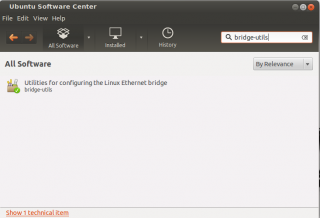
- Check that the Bridge-utils package has been installed as well. From the ubuntu Software Center, type in the search box bridge-utils and you should see it already installed. If not, install it
click on picture for better resolution
If you prefer to use the command line ( slightly faster), simply type the following command and wait for the installation to complete.
- sudo apt-get install qemu-kvm libvirt-bin bridge-utils
Installating Management Interface
There are different management tools available with KVM virtualization solution. For this post, we will simply install the ‘de facto’ standard virtual Machine Manager (VMM). To perform the installation, you can use the Ubuntu software Center. In the search box, type virt and you should see in the list the VMM package. click on it and press the install button
click on picture for Better Resolution
You can perform the same installation operation using the command line by issuing the following command
- sudo apt-get install virt-manager
After the installation complete, you can try to connect to the management interface (by typing in the Dash/activities search box virtual. the application icons will be displayed. Click on it.
Click on picture for better Resolution
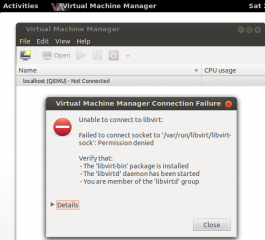
The application will start but you will get immediately an error message. (see screenshot)
Click on picture for Better resolution
Actually, you need to create a new user on your system and to add this user to a specific group (called libvirtd). This will basically grant the right to use the Virt-manager interface. With Ubuntu 12.04, it simply easier to perform the group creation from the command line. By default, Ubuntu 12.04 does not come with a utility to manage groups.
To add your user account (for example griffon) into the group libvirtd, you would type
- sudo adduser griffon libvirtd
Note : If you want, you can also install the gnome users and group interface back into Ubuntu by installing the package gnome-system-tools. When installed, you should have a Users and Groups interface that can be used from the GUI.
You will need to logoff and login again in order to have the changes applied. Try to launch the virt-manager application again, and you should be able to have it started. You are now ready to create your first virtual machine using KVM as Hypervisor.
Creating your First virtual machine
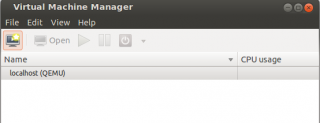
It’s time to create you first virtual machine on Ubuntu when using KVM as your preferred Hypervisor. At this stage, you have launched the Virtual Machine Manager and you should see a dialog box similar to this one
Click on picture for Better resolution
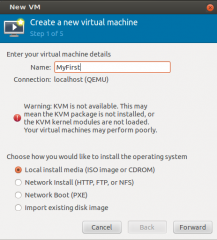
click on the highlighted computer icon and the New virtual machine wizard starts.
Click on picture for Better resolution
Provide the information and Press Forward.
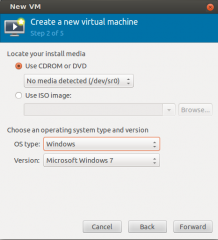
In the following screen, select the installation source and the type of virtual machine that you want to install. Press Forward
Click on picture for Better resolution
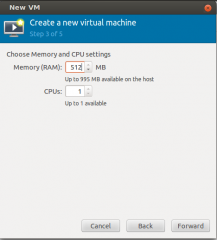
In the next screen, simply specify CPU and Memory information. Press Forward
Click on picture for Better resolution
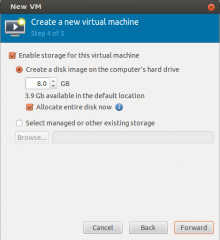
In the next screen, provide the information about the virtual disk to created and Press Forward
Click on picture for Better resolution
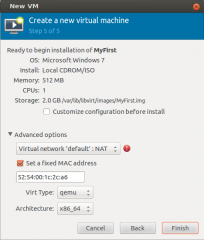
In the final screen, provide the information about the Virtual networking and Press Finish
Click on picture for Better resolution
At this stage, you will need to perform the installation of your operating system and you should be ready to go for the rest of your journey
Final Notes
And Voila. We have just installed a virtualization solution on our ubuntu computer. For me, this was the first time I was playing with KVM. Nowadays, It’s really easy to enable virtualization solution within Linux Operating system. You install a bunch of additional packages and you are ready to go. A positive point also is that the process is actually well documented. I’ve found plenty of information on internet when I was stucked with my setup.
Something we didn’t speak about is the kvm management options. You can manage your virtual machines using command line (great for automation), via the Virt-Manager or you can install other kvm mangement tools like oVirt2 to perform your day to day activities. If I have some spare time, we might want to investigate these solutions.
The only drawback (I can see ) might be the fact that KVM does not support 3D acceleration. If you have need that, you might want to go for another virtualization option (virtualbox or vmware) on top of your ubuntu operating system
Till next time
See ya
References : https://help.ubuntu.com/community/KVM/





I installed kvm and it works great, i really like the software but i keep having issues, my linux server does support visualization and on the architecture test it output a 0 although i have 8 CPUs. What do i have to do to tell kvm to read all my cpus? I created a Windows 7 server and regarles of the cpu configuration it only reads 2 cps. Under device manager it shows 4 or 6 however i allocate them but under task manager never uses more than 2cpus . Intel® Xeon(R) CPU E5420 @ 2.50GHz × 8
Would you have any idea? Thank you before hand
Hello Gabriel,
I’m not sure i understand your question but if you are asking if you can increase the number of CPUs within your virtual machine (which is a Windows 7 machine), the answer is no
Windows 7 supports a max of 2 CPUs only (whatever the number of CPUs your machine have)… This is by design. Microsoft licensing put limits in the number of cpu you can use per cpu
I hope this answer your question
Till next time
See ya