Hello World,
Finally, we will conclude this 4-part article related to the SSL offloading configuration that can be used within an Exchange infrastructure. In part III of this article, we have configured the Zen Load Balancer in such way that the Exchange Traffic to CAS servers are load balanced. The configuration is not complete. We still need to configure our Certificates accordingly on the Zen Load Balancer and we need to tweak our Exchange servers in order for them to use the SSL Offloading configuration.
I. Configuring the Certificates on the Zen Load Balancer
To perform this taks, we will need to go through 3 stetps :
-
Step 1 – Export Certificates from the Exchange Server
-
Step 2 – Convert the Certificate to .pem format
-
Step 3 – Import the certificate in the Zen Load Balancer
Step 1 – Export SSL Certificates from Exchange
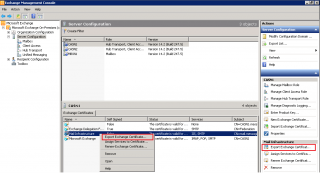
Open your Exchange Console. Expand the Server Configuration Node and Click on it. On the mid pane, you select one of you CLient Access Server. In the mid pane (bottom section), you will see the certificates used by Exchange. Identify the Certificate that have been issued to you by your Certificate Authority, and right-click on it. Then Simply select Export Certificate
Click on image for better resolution
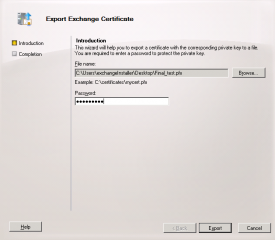
The Export certificate Wizard starts. In the Page, specify where to store the exported File and also provide a password. Press The Export Button
Click on image for better resolution
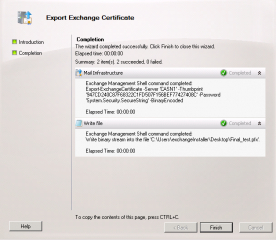
Check that you receive green ticks. If everything is OK, you can press Finish…
Click on image for better resolution
You’ve just exported your certificate
Step 2 – Convert the certificate from pfx format into pem format
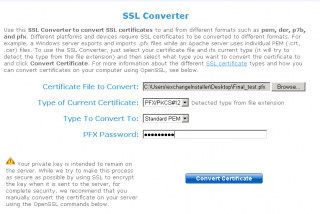
The Zen load Balancer (version 2 -release client 1) support import of certificates. However, the software accepts only .pem files. Before beign able to import the file, you will first need to convert the format. To do this, you can simply use the following web site interface (if you are running in a test environment).
Click on image for better resolution
In a production environment where you need to convert from .pfx form to .pem format, it’s highly recommended to use the OpenSSL utility on your own machine/network. This way you do not have to expose your private key. You have to download the OpenSSL utility. When done, you can open a command prompt and type the following command to convert your .pfx file int .pem file.
openssl pkcs12 -in c:\certs\exchangeCertificate.pfx -out c:\certs\ExchangeCertificate.pem –nodes
You will be prompted for a password. Enter the password you have used during the Export operation. When done, you will have a .pem certificate that can be imported into the Zen Load Balancer appliance.
Step 3 – Import the Certificate into the Zen Load Balancer Appliance
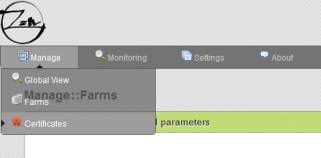
From your browser, go to the Web interface management of the Zen Load Balancer. On the menu, click on Manage and then click on certificates
Click on image for better resolution
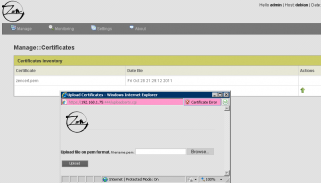
The Manage Certificate pages opens up. Click on the Green arrow to import your certificate files. You will see a popup box asking for the location of the pem file. Browse to this location and press Upload.
Click on image for better resolution
If everything went fine, you should see your new certificate.
Click on image for better resolution
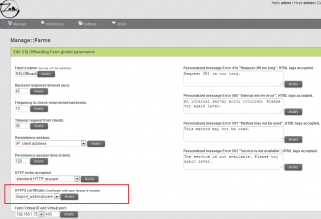
To finalize you installation, you should edit the Outlook WebApp Farm settings and ensure that your are using the newly imported certificate.
Click on image for better resolution
II. Finalizing the Exchange configuration for SSL Offloading Support
This link explains how to configure your Exchange 2010 SP1 to work in conjunction with SSL offloading feature. The link will explain the configuration to be performed for all Exchange services that you want to offload. In this post, we will simply focus on two services : Outlook WebApp and the Exchange Control Panel(ECP).
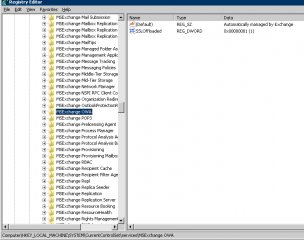
To configure SSL offloading for Outlook Web App and ECP, you will need to create a registry key on each CAS servers that are member of your CAS Array. Open your registry editor (regedit) and go to the following location
HKEY_LOCAL_MACHINE\SYSTEM\CurrentControlSet\Services\MSExchange OWA
Under this registry key, create a new REG_DWORD key named “SSLOffloaded” and set the value for this key to “1”
Click on image for better resolution
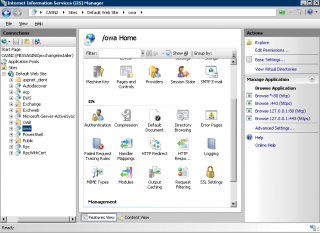
After adding this registry key, we will need to disable the SSL requirements for the OWA directory and for the ECP directory. We will simply open our IIS Manager, expand the Default Web site and locate the owa virtual Directory. In the mid pane, double-click on the SSL settings (padlock icon)
Click on image for better resolution
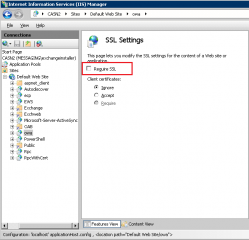
In the SSL Setting page, uncheck the box Require SSL
Click on image for better resolution
You will need to perform this operation also on the ECP virtual directory. Click on the ecp virtual directory, double-click on the SSL Settings and in the SSL settings page, ensure that the Require SSL check box is not ticked
Note:
To offload Offline Address Book, Active Sync, Autodiscover Service, Exchange Web Services, you simply need to remove the SSL requirements within the IIS Manager by locating their virtual directories
For Mailbox Replication Proxy Service, to enable SSL offloading, you will need to edit the web.config file located under C:\Program Files\Microsoft\Exchange Server\V14\ClientAccess\exchweb\ews. In the file, search for MRSProxyHttpsBinding, click Find Next twice. When arrived at this point, remove the “s” from the line <httpsTransport authenticationScheme=”Negotiate” maxReceivedMessageSize=”1048576″ />
For more information, please have a look at this detailed description about SSL offloading
Final Notes
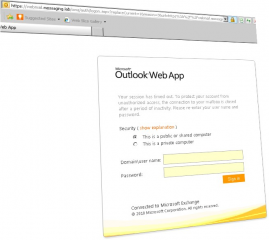
That’s it. We did it ! You have offloaded your SSL connection through your Zen Load Balancer. If you open your web browser,uisng the FQDN used by your certificates, and where the IP address of the load balancer is associated to, you will see that you can access easily (and with no certificates prompt messages) your Outlook WebApp/ecp web interface.
Click on image for better resolution
All in all, the process is really not complex and you can find a lot of information on how to ssl offload an Exchange Infrastructure. I’ll need to perform some additional tests regarding sticky clients and the Zen load balancer but so far, I haven’t encounter any issues.
I hope that you enjoyed this long but quite interesting step by step guide.
Till next Time
See Ya
Article in this series :
- Part I : Exchange 2010 SSL Offloading using Zen Load Balancer – 1
- Part II : Exchange 2010 SSL Offloading using Zen Load Balancer – 2
- Part III : Exchange 2010 SSL Offloading using Zen load Balancer – 3
- Part IV : Exchange 2010 SSL Offloaduing using Zen load Balancer – 4

Great and useful posts, it will be added in the zen web, documentation section
Congratulations!
Emilio,
Thank for the comments and positive remarks….
Appreciate….
Till next post (related to Zen load balancer°
see ya
How can you import intermediate certificate, if you have the certificate that needs intermediate from CA to be installed?
Thnx
Hello there,
Based on the zen load balancer documentation, You can see the following information “The uploaded certificate file must contain a PEM-encoded certificate, optionally a certificate chain from a known Certificate Authority to your server certificate and a PEM-encoded private key (not password protected).”
I’m assuming that you can concatenate the certificates into a single file…The best example (and explanation) I’ve found can be found at http://www.digicert.com/ssl-support/pem-ssl-creation.htm
Check the second option, you pem file should contain these sections
—–BEGIN CERTIFICATE—–
(Your Primary SSL certificate: your_domain_name.crt)
—–END CERTIFICATE—–
—–BEGIN CERTIFICATE—–
(Your Intermediate certificate: Cert_CA.crt)
—–END CERTIFICATE—–
Hope this help
Till next time
see ya
any chance for exchange 2013 documentation(just basic not ssl offload since its not supported yet only at sp1)
thanks
when using exchange 2010 or 2013 any way to kill connections to a “dead” back end cas server
so clients don’t get “hanged” when one of the back end “dies”?
thanks
Hello There,
the post is on its way… we will soon publish an update of the article for Exchange 2013….but you will have to wait a little bit…(at least a month) I’m really busy right now…. I’m running again multiple projects at the same time…not easy
Till next time
see ya
If you are using Casp array + load balancer solution, you should not need to disconnect back end cas server. To be more precise;
Exchange 2013 does not use persistence connections so no need to disconnect clients
Exchange 2010 when using in conjunction with cas array and load balancer, the load balancer (if configured correctly) will detect the dead back end server and connection will be redirected to the remaining CAS server
Hope this help
Till next time
see ya
Hi,
I’m using the stable V2 and I don’t seem to have the option for SSL offloading. Has this changed in the final release or have I missed something on the install?
Thanks
Hello, didn’t install V2 yet
Do you see options to import and manage certificates….? if Yes, you can configure ssl offloading using the instructions on the post.
I’ll try to install v2 this week and see if there major changes (but I do not think)
Hope this help
Till next time
I have been able to upload the certificate, but still no options to configure this. I have even installed another instance to see if I missed something on install, but unfortunately no options there either.
Thanks
Hello Neil,
You will not find a checkbox to configure SSL. In Zen load balancer, you import the certificates and you configure your https profile and you are done for ssl offloading configuration. Then you move to your exchange and configure it accordingly for ssl offloading
The 4 part series describes the configuration of ssl offloading…..If you read the posts and follow the instructions, you should be good to go
Hope this help
Till next time
See ya