
Hello World,
In our previous post (Ubuntu – Howto install Cockpit web console on Ubuntu 20.04 or later), we have quickly explained what is Cockpit Web console, how to install it and performed a quick tour on it. Cockpit web console can provide more features and functionalities through usage of extensions and plugins. One of these plugin will allow you to manage your KVM virtual machine infrastructure via the web browser. This feature is something that some users, friends and colleagues are asking time to time
In a previous post (How To Install Kimchi 3.0.0 on Ubuntu 19.10), we have presented the kimchi web interface that could be used to manager your KVM infrastructure from a Web Browser. The solution was working fine and providing the necessary features and functionality to manage our simple KVM infrastructure. However, it seems that there is no more updates and activities on the Kimchi project. Some problems (and workarounds) are available to make it running on Ubuntu 20.04 but the solution does not seems to have followed up with new released of Ubuntu.
Cockpit Web console could be a replacement solution to Kimchi 3.0.0 software solution. We will show you how to install it and also perform a quick tour. It will be up to you to decide if the tool can meet your needs and requirements
Let’s do this….
Overview
As mentioned in our previous post, The Cockpit Web Console is a free and open source web interface allowing to perform administrative tasks on your Linux machines from a simple browser. The tool is quite well designed, clean and quite intuitive and can be used as is out-of-the-box. However, if you want to extend functionalities, you can do by installing some additional plugins. For Ubuntu OS, there are not too many plugins available yet but one that can be interesting is the Virtual Machines Extensions.
Assumptions
In this post, we are assuming that you have followed the instructions found on the post (Ubuntu – Howto install Cockpit web console on Ubuntu 20.04 or later) and that you have already the Cockpit web console installed on your Ubuntu machine. We are also assuming that you are using Ubuntu 20.04 or later version. Also,based on the version of Cockpit you are running (Backport or from repository), some settings/features might not be exactly the same. Finally, you should have installed KVM in your Ubuntu Computer.
In our Scenario, we have installed cockpit on Ubuntu 22.04 (still in Development) and we have added the Virtual machines extensions….
Step by Step Instructions
To install the extension module that you need to manage your virtual machines, you will need to open a Terminal Console and issue the following command
sudo apt-get install cockpit-machines

Click on Picture for Better Resolution
Accept to proceed the installation and wait for it to complete. The cockpit-machines package is the additional extension that will give the possibility to manager your VMs from a web Browser
When the installation is complete, you can go access the Cockpit Web console and select the Application Node on the left menu. When done, you will noticed that indeed a new extension (called Machines) has been installed and detected by the Cockpit software.

Click on Picture for Better Resolution
If you were already logged in into the Web interface, you will need to refresh the page in order to see that a new option has been made available to you which is called Virtual Machines. From this menu, you will be able to access the admin pages that will allow you to manage your KVM Infrastructure. The screenshot below is an example of some VM already created on our KVM Lab infrastructure….

Click on Picture for Better Resolution
This is all it takes to add Virtual machines management to your Cockpit Web Console. This is rather easy, isn’t it 🙂
Quick Tour
Let’s have a quick tour and see what can be done from the Web interface. So, first login to your Cockpit Web Console by firing up your browser and issue the ip address or hostname of the cockpit server appending at the end the port 9090 (i.e. https://hostname_or_ip:9090). You will reach the login page.

Click on Picture for Better Resolution
Provide your credentials. When accessing the web interface, click on the Virtual Machines Node in the menu and you will end up with something like this. As you can see, this is a brand new Ubuntu machine with no VM created yet…

Click on Picture for Better Resolution
So, time to create one. To create a new VM, you can click on the Create VM button (on the right top corner) and the following dialog box will be presented to you. Provide all the necessary information and press Create

Click on Picture for Better Resolution
Wait for the process to complete

Click on Picture for Better Resolution
When the machine is created, click on the name of the VM and start the VM. You will see something like that. You will see the basic information about the VM and you will also see option to connect to it (via VNC or Desktop viewer). You have to scroll down the page to see all the options available

Click on Picture for Better Resolution
You can see and edit disks, networking, host devices, shared folders, snapshots…..

Click on Picture for Better Resolution
Note :
Since we have installed Cockpit on latest Ubuntu version (i.e. 22.04 still in development !!!), we have noticed that the software version we are using (version 262-x) is providing more options than the previous version. The latest Cockpit Virtual machines extensions is providing a little bit more options than previous version. These additions are really nice because it make the tool more and more fully useable.
Final Notes
Voila ! This is it for this post 🙂
We are happy to have gone through the installation of Cockpit Web Console software and discovered that the latest version of the Virtual machine plugin provides quite a good web interface that can be used to manage KVM virtual machines infrastructure. We will probably migrate from our Kimchi installation to the Cockpit version. All in all, the tool can be quite useful in some organizations or in some specific scenario. The Web interface is really easy to use and can be handed over to less experience Linux administrators who are not yet confident with command line and ssh connections.
Hope you enjoyed this post…. We will come back with a third and final post about Cockpit Web Console….
Till Next time
See ya
Hi,
I installed Cockpit on Centos8. I also installed VM ubuntu 18.04 on KVM instance. But the cockpit console seems doesn’t work with vnc. There is a .vv file, but when I click it, I only can read it as a .txt file. I really want to use VM desktop from Cockpit console.
I installed virt-viewer on VMs.
Thanks,
Amy
@Amy,
Thank you for visiting our blog and providing feedback.. From where are you trying to open this .vv file. We would assume that you are on a Windows machine, you are then prompted to download the file. is this correct ?
If this is the case; you have to install the virt-viewer for windows in order to associate the .vv file with the virtual manager viewer application and being able to open the .vv file
Have you installed the virt-manager also on your Linux box if you are working from a linux box ?
Again, here we are guessing that you want to use some sort of Viewer to access your VM… You should be able to view your vm from the browser as well…
Hope this help
Till next time
See ya
Hi Griffon,
Thank you for your apply and suggestions.
In my case, I installed:
Centos 8 with virt-manager
Ubuntu VM: virt-viewer version 6.0
I opened Cockpit from browser on Windows 10. On Console part, there are Serial console and Desktop viewer(no Graphic Console option). If I choose Desktop viewer, it shows Launch remote viewer, after click it, it downloads .vv file. Today I installed virt.viewer.msi on Windows. After I click .vv file, it shows “Unable to connet to the graphic server C:\..\..\download.vv”
@Amy,
OK. So my understanding is that you have installed the virt-manager viewer (the windows version) on your windows machine but you still have the problem.
So, my guess is that the Display Spice Server is configured to listen to localhost only….
I will try to explain how to enable the VM to listen to all the ports….
On the CentOS, you have to install the Virtual Machine Manager ( something like this sudo apt-get install virt-manager)
Step 1
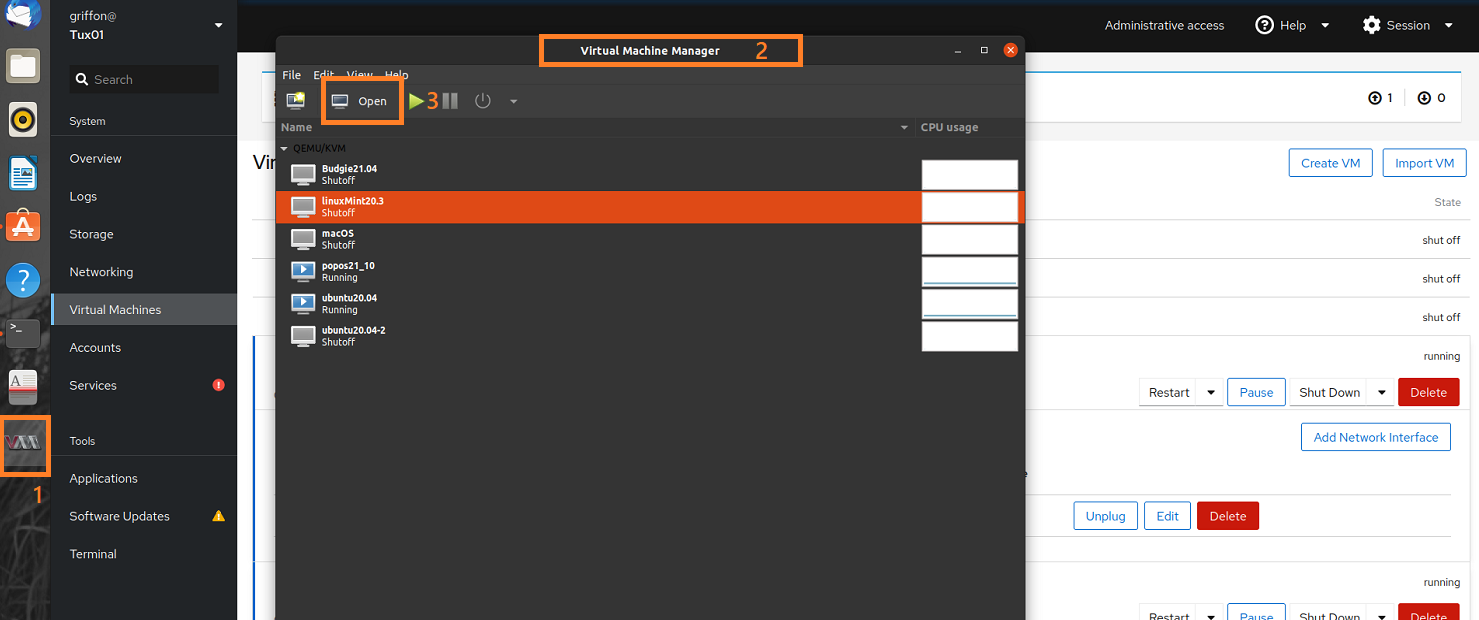
Open the Virtual machine Manager and select the VM you would like to connect via remote viewer (see image below)
Click on the Open button on the top bar menu
Step 2
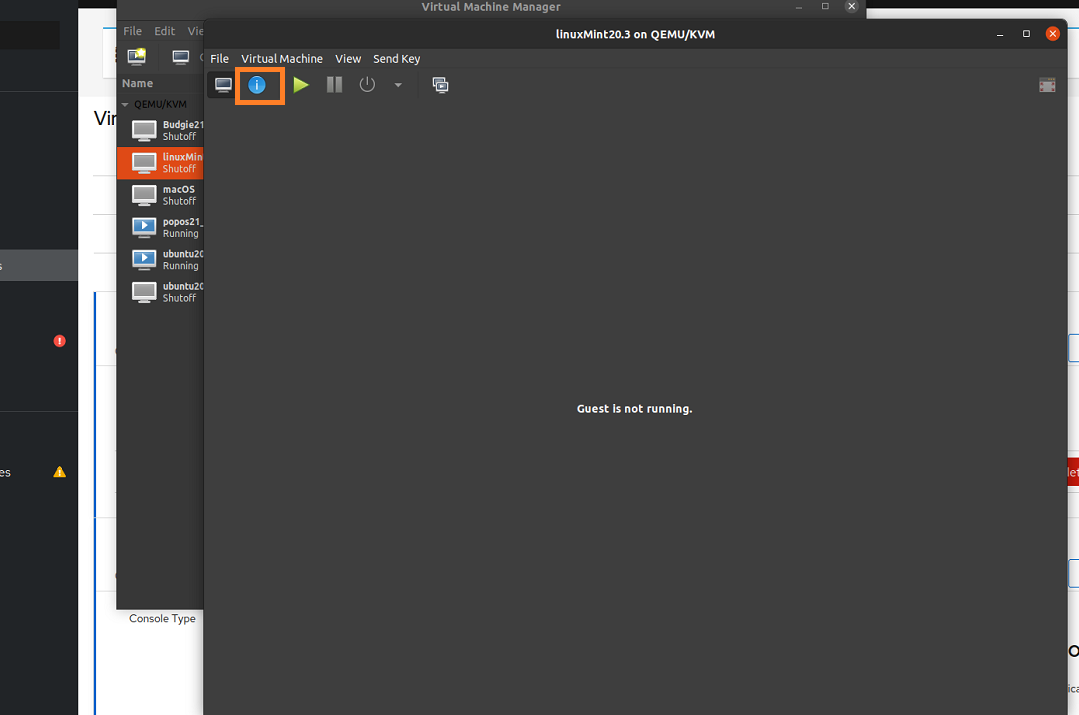
In the qemu/kvm windows that just open up, click on the info icon
step 3
Select Display Spice option on the left side,
In the right pane, ensure that the following options are set correctly
Type Server : Spice Server
Listen Type : Address
Address : All interfaces
From the web interface, when you download the file, you might need to edit the file via notepad and change the host value from 127.0.0.1 to ip_address of the CentO server
Hope this help
Till next time
See ya
Hi Griffon,
Thank you for taking time to explain in details. In my case, I only have a host and all VM installed in the local host. I found if I installed VM by cockpit, then I could have VNC VIEW from the web console. I compared the xml files of VM installed by Cockpit and by Virt-manger,then I added “vnc…” under part (before there is only “spice…”), the problem was solved.
Thank you again for answering my question. I am a newbie.
Amy
@Amy,
Thank you for providing feedback. We are happy that your problem is solved and you found the solution 🙂
We are happy to provide some help if needed…
Thank you for your visit and your positive feedback
Till next time
See ya