Hello World,
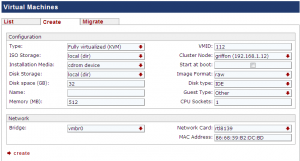
Today, I’ll blog about one of my favourite topic : Proxmox VE. I recently received a question about the possibility to modify the default settings presented to you when creating a kvm virtual machine. By default, when you are creating a kvm virtual machine, you will get the following web page.
Click to enlarge
By default, the disk type will be set to IDE and the network card will be set to rtl8139. If you deploy mainly windows virtual machines, each time you create a virtual machine, you would need to change the default settings from IDE/RTL8139 to Virtio Drivers — because you know that’s best practice to use virtio drivers (see this post) when deploying windows operating system –. This process can be “a little bit” tedious.
To “ease” the process of creating kvm virtual machines, we can either modify the default settings presented on the web interface or try to script the creation of these virtual machines.
Modifying the Web Interface
Disclaimer :
Use this procedure at your own risk !! You have to understand that you are modifying some of the proxmox ve files. If something bad happens to your system, I’ll not be responsible for any damaged caused by this tweak.
So, you wanna change the default settings presented to you ? Let’s do this ! First, we will need to locate where the web pages are located on your system and see if we can modify them.
Using winscp, you can make a connection to the Proxmox VE host and you need to locate the two following files :
- /usr/share/pve-manager/root/vmlist/create.htm
- /usr/share/perl5/PVE/QemuServer.pm
I would recommend you to make a backup of these files (in case everything goes wrong) before changing anything
Changing Default Settings for the Storage (putting Virtio as default choice)
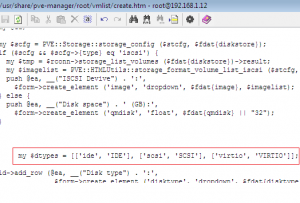
Step 1 – Edit the file /usr/share/pve-manager/root/vmlist/create.htm and you need to locate the following line (see screenshot)
Click to enlarge
Step 2 – replace the following line
my $dtypes = [[‘ide’, ‘IDE’], [‘scsi’, ‘SCSI’], [‘virtio’, ‘VIRTIO’]];
with this new one
my $dtypes = [[‘virtio’, ‘VIRTIO’], [‘scsi’, ‘SCSI’], [‘ide’, ‘IDE’]];
By making this change, the virtio disk option will be listed as default on the web page
Step 3 – Save your file
At this stage, you should already see the changes. If you open the create virtual machine web page, you will see that now, by default, the virtio disk is selected. Now, we have to perform the same change for the network card….
Changing Default Settings for network Card (putting virtio as default choice)
If you search for rtl8139 in the file /usr/share/pve-manager/root/vmlist/create.htm, you will not find any reference of it. The create.htm page will use a sub routine/function to make a call to another file and display the network card information.
As you would have guessed, the other file is /usr/share/perl5/PVE/QemuServer.pm
Step 1 – Edit the file and locate the following lins
(…)
sub nic_models {
return [ ‘rtl8139’, ‘ne2k_pci’, ‘e1000’, ‘pcnet’, ‘virtio’,
‘ne2k_isa’, ‘i82551’, ‘i82557b’, ‘i82559er’];
}
(…)
Step 2 – Simply re-order the list as needed. Because, we want to have the virtio drivers listed first, replace the code above by the following code
sub nic_models {
return [‘virtio’, ‘ne2k_pci’, ‘e1000’, ‘pcnet’, ‘rtl8139’,
‘ne2k_isa’, ‘i82551’, ‘i82557b’, ‘i82559er’];
}
Step 3 – Save your file
Step 4 – Reboot your Proxmox VE host (or restart the apache service)
If you refresh your file, you will not see any changes, you need to reboot the Proxmox VE host to see the changes applied to your system. After the reboot, the default settings presented to you when creating a kvm virtual machine will be using the Virtio option for the Disk and for the network.
You can give it a try and let me know if this is working for you : – )
Final Notes
As you can see, yes, you can tweak your Proxmox VE web interface to meet your needs. You can change also some other settings (i.e. the default operating system you want to use..). If you do not want to make changes to system files you can also use a scripted approach to create your virtual machine and define the default settings you wanna use but that’s would be for another post
Till next time
See ya


