|
|
The script hereafter is outdated and has been replaced by a newer version. Please Check the Download page for latest version. |
Hello World,
In this post, we will continue to investigate xRDP installation procedure on Ubuntu 17.10. In this post, we have seen how to perform a standard xrdp installation. The purpose of this post was to describe in a clear way the different tweaks and configuration tasks needed to have a working xRDP implementation. Then, in the following post , we have provided a simple script that can be used to automate the installation of xRDP. The script can be used to automate standard xRDP installation meaning using the default xrdp package available within Ubuntu Official repositories.
In this post, we will update the Install-xrdp.sh script to make it work with Ubuntu 17.10 and the new Ubuntu gnome desktop flavor. The standard installation is working great and it’s easy to install. So why bother to perform a custom installation from source. This is simply to get the latest improvements (and bugs) of the xRDP solution. The xrdp version available in Ubuntu repository is 0.9.1. However, the xrdp team has released a more recent version of the xrdp package which is set to 0.9.4.
Using the updated script in this post, you will be able to install the latest xrdp package from source in an automated way….. So, Let’s start….!
xRDP Custom install on Ubuntu 17.10
Assumptions
The script has been developed and updated based on the following assumptions
- The Ubuntu 17.10 final release will be used
- At time of writing, all available updates were installed on the Ubuntu machine
- No alternative Desktop will be used. Default Ubuntu Gnome desktop will be the default desktop accessible via the xrdp session
- Ubuntu machine has been installed as virtual machine using Virtualbox software
- Default session used is Wayland (it’s supported in Virtualbox)
- Internet connection is available so latest xrdp packages can be downloaded
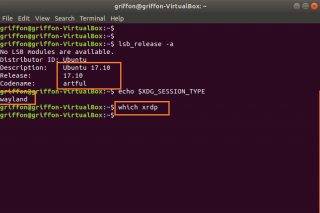
The following screenshot shows the current version of Ubuntu we are using and shows that we are indeed running a Wayland session…The screenshot also shows you that no xRDP software is installed yet.
Click on picture for better resolution
The Script version 2.0
The version of the script has been changed to 2.0. Even do, the code of this version is similar to the version 1.9.1, we needed to make clear that this is a new start for the Install-xrdp.sh script. The version 2.0 will be the base code for any new Ubuntu release using Gnome Desktop. This version of the script is really the foundation of a possible new version that would include more features. In the future, we might want to merge the Std-Xrdp-Install-0.1.sh script into this script. We might also want to add more options and features for different distributions… We will see how much free time we have….
Version 2.0 has been modified a little bit and the following changes have been made
- checking the version of your Ubuntu system. If you are running something different than Ubuntu 17.10, the script will not execute
- No check of the desktop environment. Previous version was checking for Unity Desktop. This script assume that we are using Ubuntu Gnome Desktop.
- We download the xrdp binaries first and then download and install the necessary software prerequisites.
- the fontutil.h section has been removed as the bug has been fixed in Ubuntu 17.10 (for more info see this post)
- the script then compile xrdp package first and then the xorgxrdp package. A simple error handling is in place in order for you to see fatal errors during the make process
- as in the previous versions, the script will create the polkit exception
- the script configure the Xwrapper.config file automatically so you do not have to edit it
- the script will create the necessary services for xrdp and start the xrdp service so you can test your connection without the need of a reboot
- Finally, the script install the xserver-xorg-core package to overcome possible issues with Virtual machines. This should not be necessary anymore but we keept it just in case
- This version of the script will not restart the machine. This will allow you to review the installation steps of the script by scrolling up and down your terminal console
Important Note :
If you copy/paste the script, you might encounter some issues because font formatting might be not maintained during the copy/paste operation. Please ensure that format is accurate before launching the script. A downloadable version of the script is available at the bottom of the post
Disclaimer : As usual, use this at your own risk !!
################################################################
# Script_Name : install-xrdp-2.0.sh
# Description : Perform an automted custom installation of xrdp
# on ubuntu 17.10
# Date : November 2017
# written by : Griffon
# Web Site :http://www.c-nergy.be - http://www.c-nergy.be/blog
# Version : 2.0
# Disclaimer : Script provided AS IS. Use it at your own risk....
##################################################################

#---------------------------------------------------#
# Step 0 - Try to Detect Ubuntu Version....
#---------------------------------------------------#

version=$(lsb_release -d | awk -F":" '/Description/ {print $2}')

if [ "$version" = " Ubuntu 17.10" ]
then
echo
/bin/echo -e "\e[1;32m!!!!!!!!!!!!!!!!!!!!!!!!!!!!!!!!!!!!!!!!!!!!!!!!!!!!!!!!\e[0m"
/bin/echo -e "\e[1;32mSupported version detected....proceeding\e[0m"
/bin/echo -e "\e[1;32mUbuntu Version :$version\e[0m"
/bin/echo -e "\e[1;32m!!!!!!!!!!!!!!!!!!!!!!!!!!!!!!!!!!!!!!!!!!!!!!!!!!!!!!!!\e[0m"

else
/bin/echo -e "\e[1;31m!!!!!!!!!!!!!!!!!!!!!!!!!!!!!!!!!!!!!!!!!!!!!!!!!!!!!!!!\e[0m"
/bin/echo -e "\e[1;31mYour system is not running Ubuntu 17.10 Edition.\e[0m"
/bin/echo -e "\e[1;31mThe script has been tested only on Ubuntu 17.10...\e[0m"
/bin/echo -e "\e[1;31mThe script is exiting...\e[0m"
/bin/echo -e "\e[1;31m!!!!!!!!!!!!!!!!!!!!!!!!!!!!!!!!!!!!!!!!!!!!!!!!!!!!!!!!\e[0m"
echo
exit
fi

#---------------------------------------------------#
# Step 1 - Download XRDP Binaries...
#---------------------------------------------------#

echo
/bin/echo -e "\e[1;32m!!!!!!!!!!!!!!!!!!!!!!!!!!!!!!!!!!!!!!!!!!!!!!!!!!!!!!!!\e[0m"
/bin/echo -e "\e[1;32mDownload Packages Needed....proceeding\e[0m"
/bin/echo -e "\e[1;32m!!!!!!!!!!!!!!!!!!!!!!!!!!!!!!!!!!!!!!!!!!!!!!!!!!!!!!!!\e[0m"
echo
/bin/echo -e "\e[1;32mDownloading Git package...Proceeding\e[0m"
/bin/echo -e "\e[1;32m-----------------------------------\e[0m"
echo
sudo apt-get -y install git

cd ~/Downloads

## -- Download the xrdp latest files
echo
/bin/echo -e "\e[1;32mPreparing download xrdp package\e[0m"
/bin/echo -e "\e[1;32m-------------------------------\e[0m"
echo
git clone https://github.com/neutrinolabs/xrdp.git
/bin/echo -e "\e[1;32mPreparing download xorgxrdp package\e[0m"
/bin/echo -e "\e[1;32m-----------------------------------\e[0m"
echo
git clone https://github.com/neutrinolabs/xorgxrdp.git

#---------------------------------------------------#
# Step 2 - Install Prereqs...
#---------------------------------------------------#

echo
/bin/echo -e "\e[1;32m!!!!!!!!!!!!!!!!!!!!!!!!!!!!!!!!!!!!!!!!!!!!!!!!!!!!!!!!\e[0m"
/bin/echo -e "\e[1;32mInstall Prereqs...proceeding\e[0m"
/bin/echo -e "\e[1;32m!!!!!!!!!!!!!!!!!!!!!!!!!!!!!!!!!!!!!!!!!!!!!!!!!!!!!!!!\e[0m"
echo

sudo apt-get -y install libx11-dev libxfixes-dev libssl-dev libpam0g-dev libtool libjpeg-dev flex bison gettext autoconf libxml-parser-perl libfuse-dev xsltproc libxrandr-dev python-libxml2 nasm xserver-xorg-dev fuse pkg-config

#---------------------------------------------------#
# Step 3 - compiling...
#---------------------------------------------------#
# -- Compiling xrdp package first

echo
/bin/echo -e "\e[1;32m-----------------------------------\e[0m"
/bin/echo -e "\e[1;32mXRDP Compilation about to start ! \e[0m"
/bin/echo -e "\e[1;32m-----------------------------------\e[0m"
echo

cd ~/Downloads/xrdp
sudo ./bootstrap
sudo ./configure --enable-fuse --enable-jpeg
sudo make

#-- check if no error during compilation

if [ $? -eq 0 ]
then
echo
/bin/echo -e "\e[1;32m-----------------------------------\e[0m"
/bin/echo -e "\e[1;32mMake Operation Successful ! \e[0m"
/bin/echo -e "\e[1;32m-----------------------------------\e[0m"
echo
else
echo
/bin/echo -e "\e[1;31m!!!!!!!!!!!!!!!!!!!!!!!!!!!!!!!!!!!!!!!!!!!!!!!!!!!!!!!!\e[0m"
/bin/echo -e "\e[1;31mError while executing make.\e[0m"
/bin/echo -e "\e[1;31mThe script is exiting...\e[0m"
/bin/echo -e "\e[1;31m!!!!!!!!!!!!!!!!!!!!!!!!!!!!!!!!!!!!!!!!!!!!!!!!!!!!!!!!\e[0m"
echo
exit
fi
sudo make install

# -- Compiling xorgxrdp package first

echo
/bin/echo -e "\e[1;32m-----------------------------------\e[0m"
/bin/echo -e "\e[1;32mxorgxrdp Compilation about to start ! \e[0m"
/bin/echo -e "\e[1;32m-----------------------------------\e[0m"
echo
cd ~/Downloads/xorgxrdp
sudo ./bootstrap
sudo ./configure
sudo make

# check if no error during compilation
if [ $? -eq 0 ]
then
echo
/bin/echo -e "\e[1;32m-----------------------------------\e[0m"
/bin/echo -e "\e[1;32mMake Operation Successful ! \e[0m"
/bin/echo -e "\e[1;32m-----------------------------------\e[0m"
echo
else
/bin/echo -e "\e[1;31m!!!!!!!!!!!!!!!!!!!!!!!!!!!!!!!!!!!!!!!!!!!!!!!!!!!!!!!!\e[0m"
/bin/echo -e "\e[1;31mError while executing make.\e[0m"
/bin/echo -e "\e[1;31mThe script is exiting...\e[0m"
/bin/echo -e "\e[1;31m!!!!!!!!!!!!!!!!!!!!!!!!!!!!!!!!!!!!!!!!!!!!!!!!!!!!!!!!\e[0m"
echo
exit
fi
sudo make install

#---------------------------------------------------#
# Step 4 - create services ....
#---------------------------------------------------#

echo
/bin/echo -e "\e[1;32m-----------------------------------\e[0m"
/bin/echo -e "\e[1;32mCreating xRDP Services ! \e[0m"
/bin/echo -e "\e[1;32m-----------------------------------\e[0m"
echo

sudo systemctl daemon-reload
sudo systemctl enable xrdp.service
sudo systemctl enable xrdp-sesman.service
sudo systemctl start xrdp

#---------------------------------------------------#
# Step 5 - Install Gnome Tweak Tool....
#---------------------------------------------------#
echo
/bin/echo -e "\e[1;32m!!!!!!!!!!!!!!!!!!!!!!!!!!!!!!!!!!!!!!!!!!!!!!!!!!!!!!!!\e[0m"
/bin/echo -e "\e[1;32mInstalling Gnome tweak package....proceeding\e[0m"
/bin/echo -e "\e[1;32m!!!!!!!!!!!!!!!!!!!!!!!!!!!!!!!!!!!!!!!!!!!!!!!!!!!!!!!!\e[0m"
echo
sudo apt-get install gnome-tweak-tool -y

#---------------------------------------------------#
# Step 6 - Allow console Access ....
#---------------------------------------------------#
echo
/bin/echo -e "\e[1;32m!!!!!!!!!!!!!!!!!!!!!!!!!!!!!!!!!!!!!!!!!!!!!!!!!!!!!!!!\e[0m"
/bin/echo -e "\e[1;32mGranting Console Access....proceeding\e[0m"
/bin/echo -e "\e[1;32m!!!!!!!!!!!!!!!!!!!!!!!!!!!!!!!!!!!!!!!!!!!!!!!!!!!!!!!!\e[0m"
echo
sudo sed -i 's/allowed_users=console/allowed_users=anybody/' /etc/X11/Xwrapper.config

#---------------------------------------------------#
# Step 7 - create policies exceptions ....
#---------------------------------------------------#
echo
/bin/echo -e "\e[1;32m!!!!!!!!!!!!!!!!!!!!!!!!!!!!!!!!!!!!!!!!!!!!!!!!!!!!!!!!\e[0m"
/bin/echo -e "\e[1;32mCreating Polkit file....proceeding\e[0m"
/bin/echo -e "\e[1;32m!!!!!!!!!!!!!!!!!!!!!!!!!!!!!!!!!!!!!!!!!!!!!!!!!!!!!!!!\e[0m"
echo
sudo bash -c 'cat >/etc/polkit-1/localauthority.conf.d/02-allow-colord.conf <<EOF
polkit.addRule(function(action, subject) {
if ((action.id == “org.freedesktop.color-manager.create-device” ||
action.id == “org.freedesktop.color-manager.create-profile” ||
action.id == “org.freedesktop.color-manager.delete-device” ||
action.id == “org.freedesktop.color-manager.delete-profile” ||
action.id == “org.freedesktop.color-manager.modify-device” ||
action.id == “org.freedesktop.color-manager.modify-profile”) &&
subject.isInGroup(“{group}”)) {
return polkit.Result.YES;
}
});
EOF'

#---------------------------------------------------#
# Step 8 - Enable Extensions ....
#---------------------------------------------------#
echo
/bin/echo -e "\e[1;32m!!!!!!!!!!!!!!!!!!!!!!!!!!!!!!!!!!!!!!!!!!!!!!!!!!!!!!!!\e[0m"
/bin/echo -e "\e[1;32mEnabling Extensions....proceeding\e[0m"
/bin/echo -e "\e[1;32m!!!!!!!!!!!!!!!!!!!!!!!!!!!!!!!!!!!!!!!!!!!!!!!!!!!!!!!!\e[0m"
echo
gnome-shell-extension-tool -e ubuntu-dock@ubuntu.com
gnome-shell-extension-tool -e ubuntu-appindicators@ubuntu.com

#---------------------------------------------------#
# Step 9 - install additional pacakge ....
#---------------------------------------------------#

echo
/bin/echo -e "\e[1;32m!!!!!!!!!!!!!!!!!!!!!!!!!!!!!!!!!!!!!!!!!!!!!!!!!!!!!!!!\e[0m"
/bin/echo -e "\e[1;32mInstall xserver-xorg-server (if not there)....proceeding\e[0m"
/bin/echo -e "\e[1;32m!!!!!!!!!!!!!!!!!!!!!!!!!!!!!!!!!!!!!!!!!!!!!!!!!!!!!!!!\e[0m"
echo
sudo apt-get -y install xserver-xorg-core

#---------------------------------------------------#
# Step 10 - Credits ....
#---------------------------------------------------#

/bin/echo -e "\e[1;32m----------------------------------------------------------\e[0m"
/bin/echo -e "\e[1;32mInstallation Completed\e[0m"
/bin/echo -e "\e[1;32mPlease test your xRDP configuration....\e[0m"
/bin/echo -e "\e[1;32mCheck c-nergy.be website for latest version of the script\e[0m"
/bin/echo -e "\e[1;32mwritten by Griffon - November 2017 - Version 2.0\e[0m"
/bin/echo -e "\e[1;32m----------------------------------------------------------\e[0m"
echo
How to Use the Script
Set Execute Right on the script
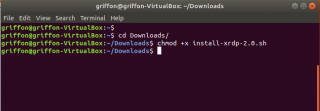
After you have downloaded the script install-xrdp-2.0.sh, you need to mark the file as executable before running it. To mark a script/file as executable, from the command line, issue the following command
chmod +x ~/Downloads/install-xrdp-2.0.sh
Note : Adjust the path where the install-xrdp-2.0.sh script to reflect your environment
Click on Picture for Better Resolution
Execute the script
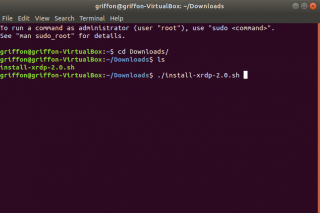
To execute the script, ensure that internet connection is available (so you can download the necessary packages needed for the installation) and simply open a Terminal console. In the Terminal console, Browse to the location where the script has been stored and then issue the following command
./install-xrdp-2.0.sh
Click on Picture for Better Resolution
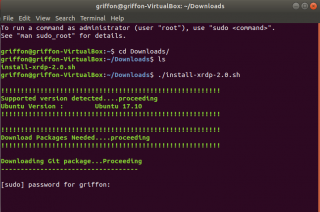
You will be prompted for a password. Provide the password and proceed with the installation.
Click on Picture for Better Resolution
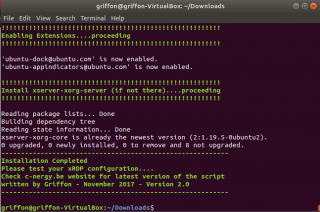
Wait for completion of the script. The machine will not reboot automatically when done so you can review the actions performed by the script….
Click on Picture for Better Resolution
Note
There is a small change in the way we execute the script compared to the previous instructions provided. The script needs to be run from Terminal console. However, we do not use the sudo command when executing the script. We perform the operation as the logged on user. When the script reach the sudo apt-get… command, a prompt for a password is displayed…
Test your configuration
To Test your configuration, you need to perform the following steps
- step 1 – Logout from the Ubuntu machine
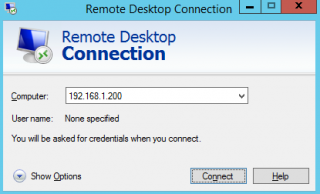
- step 2 – Start your favorite remote desktop client and provide the ip address or hostname of your ubuntu machine
Click on Picture for Better Resolution
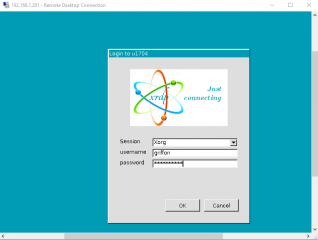
- step 3 – At this stage, you should see the xRDP login page. Provide your credentials
Click on picture for better resolution
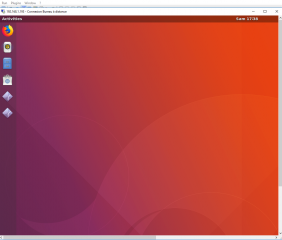
- step 4 – At this stage, you should see your standard Ubuntu Gnome Desktop with the Dock visible….
Click on picture for better resolution
Local connections, remote connections, multiple connections….
A single user can access console and remote session
This is the most annoying one. In the past, the same user could be locally logged on on the system and still perform a remote connection to the same machine. Nowadays, this does not seems to be the case anymore. If the user is connected through remote desktop session, and if the same user tries to connect to the console, the login process will loop. If the user is logged into the console, the remote session will only show a black screen. So this point is still not fixed…..
Click on picture for better resolution
Download the Script
Please download the script : install-xrdp-2.0.zip
Final Notes
Voila ! We have achieved our goal so far….The last three posts have been focusing on the installation process of xRDP on Ubuntu 17.10. Because Canonical has dropped the Unity Desktop, it sounded logical to start and see how this change would have affected the xRDP installation. We have been demonstrating how to perform a step by step installation of xRDP providing all the necessary information needed. Then we moved a step forward in the second post where a really quick and dirty script has been provided that can be used to automate the xRDP installation process. Finally, in this post, we have been checking how to perform a custom installation on Ubuntu 17.10.
All in all, no major changes have been introduced in the installation process. Some new tweaks are needed in order to make the xRDP software package working on the Ubuntu 17.10 operating system. When all the necessary configuration changes have been performed; you will be able to enjoy the remote desktop capability from any machine that can make an rdp connection. This is cool !
As mentioned in the past, so far, xRDP is still working on Ubuntu 17.10 where the Default Display server is Wayland. Wayland does not officially support yet remote desktop capabilities (even do we have seen some initial work that would offer this capability). The xRDP solution is working because the solution is using a xorg backend component. The future will tell us if xRDP will be modified to support Wayland Display server or if a new product will be developped
That’s it for today
Till next time
See ya
Great job, thanks alot!
i met this issue on 17.10, not login on local, but remote doesn’t show dock anyhow. any resolution for this matter?
thanks mate!
@ke;
If you use the script enclosed and follow the process accordingly, the dock should be visible in the remote session
To fix your issue, please read this post then, that explain how to perform needed changes manually http://c-nergy.be/blog/?p=11336
Hope this help
Till next time
See ya
I have tried almost all of your 17.10 how-to’s among some 16xx, all from scratch, to your letter, even breaking down and trying VirtualBox which has no practical use for me and probably many, if I was going to run it in a VM on my PC why would I need to RDP into it, and none of them work. I’m talking multiple attempts from blank beginnings. Are you actually doing it like you portray or are you using copies of VM images created long ago? Can you honestly follow this guide, starting from a blank drive and downloading the 17.10 ISO and following this page to the letter? And the polkit config file included in your script that actually matches “rules” syntax works? With the “{group}” placeholder that should actually be a real value? Or is it all just some copy/paste from somewhere you’ve never actually used?
Sorry to call you out like this but I can’t see how there is any way that following these instructions would end up working. Please prove me wrong. Change shoes and try it.
@thc,
It seems that our way of installing and configuring is not working for you and we feel sorry about that…..
To answer your questions/concerns,
the way you use virtualbox or hyper-v or any virtualization platform is not up to me…However, there are a lot a scenarios where you can have VM machines where you need to get access remotely and this is the point or purposes of xRDP solution….
Using Old VM images ! Seriously ? For each ubuntu release, we download and install the final iso file and install them from scratch. Then we proceed with the installation of the xrdp using different techniques (std and custom install or checkinstall recently). Based on the comments and feedback received (please review comments on the xrdp posts), we can see that this is actually working….. We even published a video for xRDP on Ubuntu 16.04.2 (see video here) and ubuntu 16.04.3 (see video here
the polkit config works as well as we do not receive the prompt for creating managed device.However, you are right, in the script we are using a placeholder called group. Anybody can change this or leave as it is because it will simply works or even delete the groups line from the file and still have the solution working…..
Final note; if you check the comments section of xRDP posts, you can actually see people confirming that the script is working as expected and that the installation is working as expected..This script has even been re-used/re-published by others because they had the positive experience with it and worked for them…
Apparently, the script install is maybe too advanced for you and you might want to stick to the standard installation approach where you are simply using the ubuntu packages which provide the same functionality
See ya
You reference comments for 16.04. I have it working in 16.04 but it’s considerable different in 17+. The 16.04 setup is based on much older components and uses Xvnc (the login window is even totally different).
I understand the assumption that leads you to assume I fit in the average “this all may be too advanced” category but I assure you that would not be an appropriate assertion.
There is a problem with the xrdp package provided through Ubuntu, a bug related to IPv6, so installing from source is the only possible option.
Would you be willing to indulge me (and likely some other readers) and list out the steps in detail so that one might see where they’ve gone wrong? In my VirtualBox attempt I no configuration changes other than the location to store the VM files and the network to be bridged instead of NAT after installing immediately after downloading. In Ubuntu I change to a static IP address and install openssh-server, otherwise just running your scripts or following the list of instructions depending on the post being followed.
1. One physical machine or two(+)?
2. Host OS for your VirtualBox?
3. Client OS using RDP into the xrdp server?
4. Linux users/groups used for each step?
5. Network configuration (IPv4/IPv6) client/server?
6. Network environment (domain/workgroup)?
7. Authentication mechanisms?
There has to be some pivotal step, piece of configuration or assumption beyond that stated above that it missing. One of those simple things that gets overlooked because it is otherwise trivial.
@thc,
Now, I do not get it. So in your first comment; you said that all the instructions failed for you from 16.xx to 17.xx. Now you are telling us that actually, you got it working for Ubuntu 16.04. Other point, we do not understand what you are looking for as additional information….. As long as you have an ubuntu 17.10 running with proper network settings (i.e. can be accessed from the network), you only need to install the xrdp packages as described in the posts. The script is self documented and provide all the info and steps needed to perform the install…. We check Ubuntu version, we download pre-reqs, we download xrdp packages, compile them and perform additional configuration specific to Ubuntu…
I do not know if these are the questions you want us to answer but anyway, let’s provide some answers here….
1. One physical machine or two(+)? -> we have multiple machines in our network (number of machines does not matter as long as network connectivity is present)
2. Host OS for your VirtualBox? -> does not matter.. We have the solution working on Windows,Linux, Virtualbox,Hyper-v,ProxmoxVE,….
3. Client OS using RDP into the xrdp server? -> usually we are using MS RDP because the aim of the posts is to show interoperability between Linux and Windows
4. Linux users/groups used for each step? -> a single user that can run sudo command
5. Network configuration (IPv4/IPv6) client/server? -> access through IPV4
6. Network environment (domain/workgroup)? -> does not matter. we have machines in standalone configuration or machine in domains that can access Ubuntu through xRDP
7. Authentication mechanisms? -> ?? local authentication mechanism used by your Ubuntu Machine
You might want to explain your problems and explain what’s failing for you ? What’s the scenario you are trying to implement ?
see ya
Ok … so weirdly, fresh install of Ubuntu 17.10 w/updates as of today (1/18/2018), everything updated (software updater, apt-get update, etc), Nvidia drivers 384.111, the remote connection just crashes after a successful login and disconnects. Any logs that might be useful to see?
@Joey,
There are known issues with nvidia drivers and xRDP…. The only advice we can give you would be to try to remove the nvidia drivers and see if xRDP works…
Hope this help
Till next time
See ya
Excellent script. It works like a charm. Thanks a lot.
@Henk Schaap,
Thank you Henk for the feedback on the post and for visiting our blog
Till next time
See ya
ok, so I like what you’ve done, but I’m wondering why you compile the xrdp package instead of using the apt-get install xrdp command. I didn’t see an explanation in your post.
@John,
Originally, the custom installation script has been created because the xrdp package in previous Ubuntu version are outdated. Ubuntu 16.04 still ships with xrdp 0.6.x…As the team behind xrdp was releasing more recent versions offering more capabilities, we decided to compile from source. The other point some other distribution might not have xrdp package or outdated package as well (Linux Mint). This was also a good way to learn how to compile from sources. enfin, plenty of reasons. And By the way; we have released a post that contains a script to perform the xrdp installation based on the apt-get update xrdp (see http://c-nergy.be/blog/?p=11399)
Till next time
See ya
Hi, I run this script flowing all steps, but when I try open connection from MS Windows 10 to Ubuntu 17.10 desktop, I am always finishing with this message in connection log window:
connection to sessman ip 127.0.0.1 port 3350
sesman connect ok
sending login to session manager, please wait…
login failed for display 0
I am using admin name and password for log in.
When I click on OK, I see again login dialog window.
How can I find out where is the problem?
@oldo;
you have to look at the logs files for xrdp (check /var/logs directory), you have also to check the xorg log files and check the ~/.xsession-errors files to see if any info are available so we could troubleshoot the issue
till next time
See ya