Hello World;
In this post, a step by step procedure has been provided in order to perform manually an successful installation of xRDP on Ubuntu 17.10 and have it working. The previous post is basically providing all the necessary steps needed to configure your remote session. This include the installation of the xRDP software, the configuration of the console access and the configuration of the Dock within the remote session.
In the past, the installation was more straight forward and we didn’t need to perform all these additional steps. a standard xrdp installation on a single or a few machine is not that time consuming. However, when you start to have a little bit more machines or if you need to repeat the process multiple times, you might want to automate this process. This post will provides a quick and dirty script that can be used to perform a standard xrdp installation. The script is basically wrapping all the manual actions described in the part I and define the equivalent command line action.
This script has helped us in setting up quickly xRDP on Ubuntu 17.10 to perform tests…Let’s share this script that can become handy in the future…..
The Standard Installation Script – Version 0.1
Overview
The version 0.1 of the script perform a standard installation of xRDP (i.e using the xRDP package available in the Official Ubuntu Repository) and perform also the additional configuration tasks needed to have a workable xRDP solution
Assumptions
Before running this script, be aware of the following assumptions
- We have tested the script on Ubuntu 17.10 (and not on any other Ubuntu Flavors!!!)
- No additional desktop interface has been installed.
- We have performed the test on a Virtual Machine running on Virtual box
Prerequisites
We assume that you have internet connection on the Ubuntu machine. The internet connection is needed to download the necessary packages that will be installed on your system.
The script version 0.1
Important Note :
If you copy/paste the script, you might encounter some issues because font formatting might be not maintained during the copy/paste operation. Please ensure that format is accurate before launching the script. A downloadable version of the script is available at the bottom of the post
Disclaimer : As usual, use this at your own risk !!
################################################################
 # Script_Name : Std-Xrdp-Install-0.1.sh
 # Description : Perform an automated standard installation of xrdp
 # on ubuntu 17.10
 # Date : November 2017
 # written by : Griffon
 # Web Site :http://www.c-nergy.be - http://www.c-nergy.be/blog
 # Version : 0.1
 # Disclaimer : Script provided AS IS. Use it at your own risk....
 ##################################################################

#---------------------------------------------------#
 # Step 0 - Try to Detect Ubuntu Version....
 #---------------------------------------------------#

version=$(lsb_release -d | awk -F":" '/Description/ {print $2}')

if [ "$version" = " Ubuntu 17.10" ]
 then
 echo
 /bin/echo -e "\e[1;32m!!!!!!!!!!!!!!!!!!!!!!!!!!!!!!!!!!!!!!!!!!!!!!!!!!!!!!!!\e[0m"
 /bin/echo -e "\e[1;32mSupported version detected....proceeding\e[0m"
 /bin/echo -e "\e[1;32mUbuntu Version :$version\e[0m"
 /bin/echo -e "\e[1;32m!!!!!!!!!!!!!!!!!!!!!!!!!!!!!!!!!!!!!!!!!!!!!!!!!!!!!!!!\e[0m"

else
 /bin/echo -e "\e[1;31m!!!!!!!!!!!!!!!!!!!!!!!!!!!!!!!!!!!!!!!!!!!!!!!!!!!!!!!!\e[0m"
 /bin/echo -e "\e[1;31mYour system is not running Ubuntu 17.10 Edition.\e[0m"
 /bin/echo -e "\e[1;31mThe script has been tested only on Ubuntu 17.10...\e[0m"
 /bin/echo -e "\e[1;31mThe script is exiting...\e[0m"
 /bin/echo -e "\e[1;31m!!!!!!!!!!!!!!!!!!!!!!!!!!!!!!!!!!!!!!!!!!!!!!!!!!!!!!!!\e[0m"
 echo
 exit
 fi

#---------------------------------------------------#
# Step 1 - Install xRDP Software....
#---------------------------------------------------#
echo
/bin/echo -e "\e[1;32m!!!!!!!!!!!!!!!!!!!!!!!!!!!!!!!!!!!!!!!!!!!!!!!!!!!!!!!!\e[0m"
/bin/echo -e "\e[1;32mInstalling xrdp package....proceeding\e[0m"
/bin/echo -e "\e[1;32m!!!!!!!!!!!!!!!!!!!!!!!!!!!!!!!!!!!!!!!!!!!!!!!!!!!!!!!!\e[0m"
echo
sudo apt-get install xrdp -y

#---------------------------------------------------#
# Step 2 - Install Gnome Tweak Tool....
#---------------------------------------------------#
echo
/bin/echo -e "\e[1;32m!!!!!!!!!!!!!!!!!!!!!!!!!!!!!!!!!!!!!!!!!!!!!!!!!!!!!!!!\e[0m"
/bin/echo -e "\e[1;32mInstalling Gnome tweak package....proceeding\e[0m"
/bin/echo -e "\e[1;32m!!!!!!!!!!!!!!!!!!!!!!!!!!!!!!!!!!!!!!!!!!!!!!!!!!!!!!!!\e[0m"
echo
sudo apt-get install gnome-tweak-tool -y

#---------------------------------------------------#
# Step 3 - Allow console Access ....
#---------------------------------------------------#
echo
/bin/echo -e "\e[1;32m!!!!!!!!!!!!!!!!!!!!!!!!!!!!!!!!!!!!!!!!!!!!!!!!!!!!!!!!\e[0m"
/bin/echo -e "\e[1;32mGranting Console Access....proceeding\e[0m"
/bin/echo -e "\e[1;32m!!!!!!!!!!!!!!!!!!!!!!!!!!!!!!!!!!!!!!!!!!!!!!!!!!!!!!!!\e[0m"
echo
sudo sed -i 's/allowed_users=console/allowed_users=anybody/' /etc/X11/Xwrapper.config

#---------------------------------------------------#
# Step 4 - create policies exceptions ....
#---------------------------------------------------#
echo
/bin/echo -e "\e[1;32m!!!!!!!!!!!!!!!!!!!!!!!!!!!!!!!!!!!!!!!!!!!!!!!!!!!!!!!!\e[0m"
/bin/echo -e "\e[1;32mCreating Polkit file....proceeding\e[0m"
/bin/echo -e "\e[1;32m!!!!!!!!!!!!!!!!!!!!!!!!!!!!!!!!!!!!!!!!!!!!!!!!!!!!!!!!\e[0m"
echo
sudo bash -c 'cat >/etc/polkit-1/localauthority.conf.d/02-allow-colord.conf <<EOF
polkit.addRule(function(action, subject) {
if ((action.id == “org.freedesktop.color-manager.create-device” ||
action.id == “org.freedesktop.color-manager.create-profile” ||
action.id == “org.freedesktop.color-manager.delete-device” ||
action.id == “org.freedesktop.color-manager.delete-profile” ||
action.id == “org.freedesktop.color-manager.modify-device” ||
action.id == “org.freedesktop.color-manager.modify-profile”) &&
subject.isInGroup(“{group}”)) {
return polkit.Result.YES;
}
});
EOF'

#---------------------------------------------------#
# Step 5 - Enable Extensions ....
#---------------------------------------------------#
echo
/bin/echo -e "\e[1;32m!!!!!!!!!!!!!!!!!!!!!!!!!!!!!!!!!!!!!!!!!!!!!!!!!!!!!!!!\e[0m"
/bin/echo -e "\e[1;32mEnabling Extensions....proceeding\e[0m"
/bin/echo -e "\e[1;32m!!!!!!!!!!!!!!!!!!!!!!!!!!!!!!!!!!!!!!!!!!!!!!!!!!!!!!!!\e[0m"
echo
gnome-shell-extension-tool -e ubuntu-dock@ubuntu.com
gnome-shell-extension-tool -e ubuntu-appindicators@ubuntu.com

#---------------------------------------------------#
# Step 6 - Credits ....
#---------------------------------------------------#

/bin/echo -e "\e[1;32m!!!!!!!!!!!!!!!!!!!!!!!!!!!!!!!!!!!!!!!!!!!!!!!!!!!!!!!!!!!\e[0m"
/bin/echo -e "\e[1;32mInstallation Completed\e[0m"
/bin/echo -e "\e[1;32mPlease test your xRDP configuration....\e[0m"
/bin/echo -e "\e[1;32mwritten by Griffon - November 2017 - Version 0.1 - Std-Xrdp-Install-0.1.sh\e[0m"
/bin/echo -e "\e[1;32m!!!!!!!!!!!!!!!!!!!!!!!!!!!!!!!!!!!!!!!!!!!!!!!!!!!!!!!!!!!\e[0m"
echo
How to Use the Script
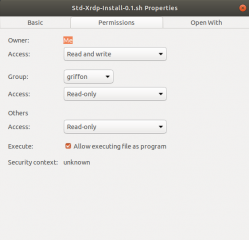
Set Execute Right on the script
Download the Std-Xrdp-install-0.1.sh script to your system. To have it running, the script has to be marked as executable. To mark a script/file as executable, the following actions needs to be performed
Right-click on the file, go to properties, then select permissions and tick the box allow executable….
Click on picture for better resolution
or from the command line, issue the following command
chmod +x ~/Downloads/Std-Xrdp-Install-0.1.sh
Note : Adjust the path where the Std-Xrdp-Install-0.1.sh script to reflect your environment
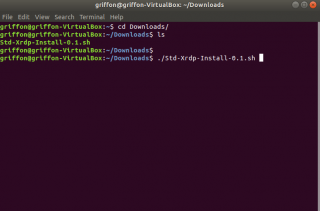
Execute the script
To execute the script, ensure that internet connection is available (so you can download the necessary packages needed for the installation) and simply open a Terminal console. In the Terminal console, Browse to the location where the script has been stored and then issue the following command
./Std-Xrdp-Install-0.1.sh
Click on picture for better resolution
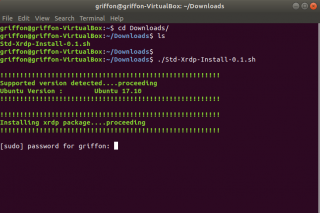
The script will start executing and when the xrdp installation package will start, you be requested to enter your password
Click on picture for better resolution
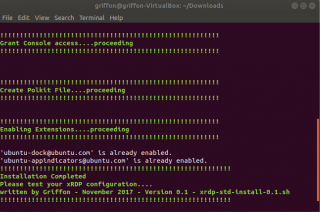
Provide the password and proceed with the installation. Wait for completion of the script. The machine will not reboot automatically when done so you can review the actions performed by the script….
Click on picture for better resolution
Test your configuration
To Test your configuration, you need to perform the following steps
- step 1 – Logout from the Ubuntu machine because you can only have a single connection to the machine for the same user (either local either remote)
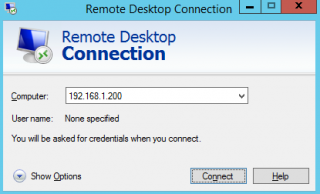
- step 2 – Start your favorite remote desktop client and provide the ip address or hostname of your ubuntu machine
Click on Picture for Better Resolution
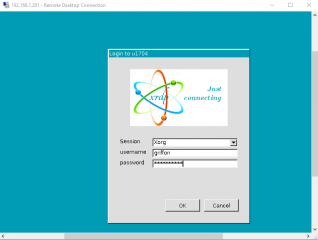
- step 3 – At this stage, you should see the xRDP login page. Provide your credentials
Click on picture for better resolution
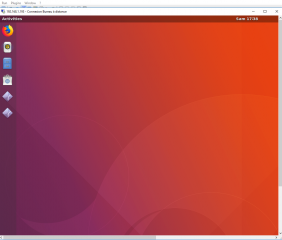
- step 4 – At this stage, you should see your standard Ubuntu Gnome Desktop with the Dock visible….
Click on picture for better resolution
Download the Script
Please download the script : Std-Xrdp-Install-0.1.zip
Final Notes
This is the end of this post. As you can see, with a little bit of ingenuity, you can automate the installation of the xRDP software solution and provide remote connections to Ubuntu machines. The solution is still not perfect but it’s still working. xRDP is currently working because it’s connect to a x11 backend component. However, Ubuntu 17.10 use Wayland server as default Display server which does not officially support yet any remote solution features. So, future will tell if we can keep using xRDP software solution or if a new solution would be available…
In the next post, we might want to have a look at a custom installation and provide an updated version of the famous install script we have provided for some time now….
Keep in touch
Till next time
See ya
Any idea why xRDP almost never works by default on Ubuntu distributions?
Thanks a whole lot for your posts!
@Saulo,
xRDP is a generic solution that should be working with different distribution..Maybe this is difficult to achieve and this is why you need some small tweaks to make it working on Ubuntu or other Linux Distributions…
Thank you for the visit and positive feedback
till next time
See ya
Hi there. Thanks for this, it’s invaluable. I’m currently running it on Ubuntu 16. I’d like to upgrade my distribution to Ubuntu 18, but am worried I’ll lose XRDP access. Any thoughts? Thanks again.